
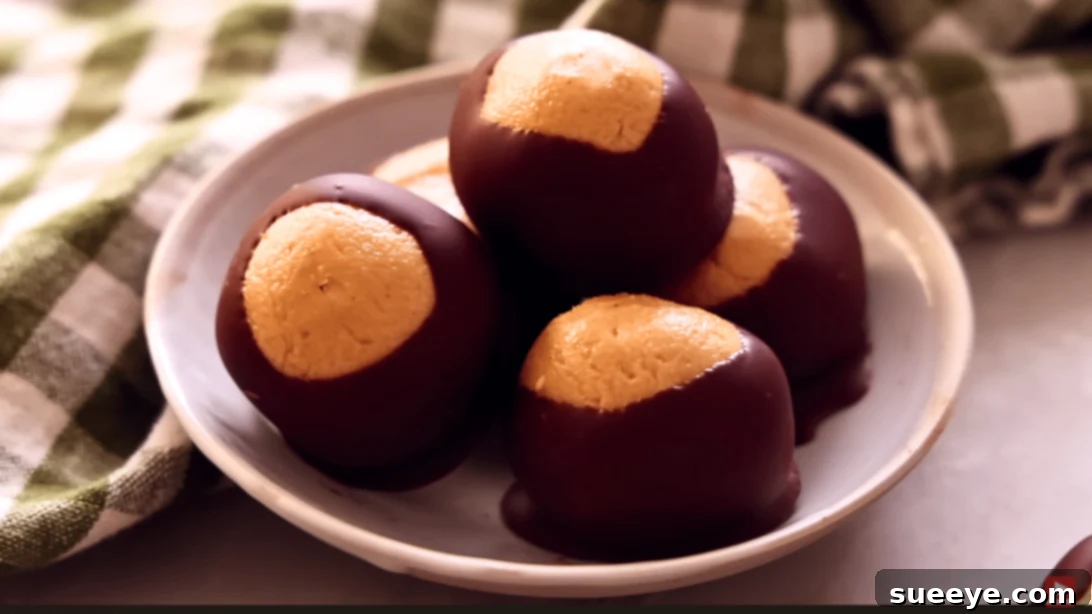
There are some desserts that instantly transport you back to childhood, conjuring memories of holiday gatherings, family celebrations, or simply a sweet afternoon treat. Among these beloved classics, the homemade Buckeyes recipe stands out as a true icon. These irresistible peanut butter and chocolate confections, named for their uncanny resemblance to the poisonous nut of the Ohio buckeye tree, are a testament to the power of simple ingredients creating extraordinary flavor. If you grew up with these delightful bites, you know the magic they hold; if you’re new to the world of Buckeyes, prepare to fall in love with their creamy, rich peanut butter centers perfectly enrobed in a smooth chocolate shell.
This comprehensive guide will walk you through crafting the perfect batch of Buckeyes from scratch, ensuring a smooth, decadent experience with every bite. Forget complicated baking – this is a no-bake wonder that promises delicious results with minimal effort. Whether you’re preparing for a festive holiday platter, a casual get-together, or simply satisfying a sweet craving, these easy homemade Buckeyes are guaranteed to be a crowd-pleaser, disappearing almost as quickly as you can make them!
RELATED: Enhance your dessert repertoire with our Easy No-Bake Oreo Buckeye Pie Recipe!
Essential Ingredients for Perfect Homemade Buckeyes:
Crafting these delectable peanut butter chocolate candies requires just a handful of common pantry staples. The quality of your ingredients plays a significant role in the final taste and texture, so choose wisely!
- 1 cup (approx. 250g) of creamy peanut butter (natural or conventional, see tips below)
- 5 tablespoons (approx. 70g) of unsalted butter, softened to room temperature
- 2 cups (approx. 240g) of powdered sugar (confectioners’ sugar), sifted if clumpy
- 1 teaspoon of pure vanilla extract
- 2 cups (approx. 340g) of high-quality semisweet chocolate chips or chopped chocolate
- 2 tablespoons of coconut oil, refined (optional, but highly recommended for smooth dipping)
Ingredient Insights:
- Peanut Butter: For the most consistent results, many prefer conventional creamy peanut butter (like Jif or Skippy) as it’s less prone to separation and has a firmer texture. If using natural peanut butter, ensure it’s well-stirred and doesn’t have too much oil separation, or your mixture might be too soft.
- Unsalted Butter: Using unsalted butter allows you to control the overall saltiness of the Buckeyes. Ensure it’s at room temperature for easy blending and a smooth peanut butter mixture.
- Powdered Sugar: Also known as confectioners’ sugar, this fine sugar is crucial for the silky-smooth texture of the peanut butter balls. Sifting it prevents lumps and ensures an even consistency.
- Vanilla Extract: A splash of pure vanilla extract enhances the overall flavor profile, adding warmth and depth to the peanut butter.
- Semisweet Chocolate: This type of chocolate offers a perfect balance, complementing the sweet peanut butter without being overly bitter or too sweet. You can experiment with milk chocolate for a sweeter profile or dark chocolate for a richer, more intense flavor.
- Coconut Oil: While optional, a small amount of refined coconut oil added to your melting chocolate will make it incredibly smooth and easy to dip, creating a beautiful, glossy finish. It also helps the chocolate set faster and prevents cracking.
Mastering Homemade Buckeyes: A Step-by-Step Guide
Follow these detailed steps to create your own batch of irresistible Buckeyes. Precision and patience are your best friends in this delicious endeavor!
Step 1: Preparing the Creamy Peanut Butter Mixture
In a large mixing bowl, combine the softened unsalted butter with the creamy peanut butter. Using an electric mixer on medium speed, beat these two ingredients together until they are light, fluffy, and thoroughly combined. This initial step creates the foundational creamy base for your Buckeyes. Once smooth, add the pure vanilla extract and continue to mix until it’s evenly incorporated, infusing the mixture with its aromatic flavor. Next, gradually add the powdered sugar, one cup at a time, mixing on low speed to prevent a sugar cloud from forming. As the mixture thickens, you might need to increase the speed slightly. Continuously scrape down the sides of the bowl with a spatula to ensure all ingredients are fully integrated. The final mixture should be firm enough to handle but still soft and pliable, resembling a thick dough. If it’s too sticky, add a little more powdered sugar; if it’s too dry, a tiny bit more melted butter or peanut butter can help.
Step 2: Shaping and Chilling the Peanut Butter Balls, then Preparing the Chocolate Coating
Once your peanut butter mixture is perfect, it’s time to transform it into the iconic Buckeye shape. Using a small cookie scoop or simply pinching off tablespoon-sized pieces, roll the mixture between your palms to form smooth, uniform balls. Aim for a consistent size to ensure even chilling and dipping. As you finish each ball, place it on a baking sheet lined with parchment paper or wax paper. This prevents sticking and makes transfer easy. Once all your peanut butter balls are formed, transfer the baking sheet to the refrigerator and chill for at least 20-30 minutes, or until they are firm to the touch. This crucial step prevents the peanut butter from melting and falling apart when dipped into the warm chocolate. While your peanut butter balls are chilling, prepare your chocolate coating. In a medium-sized microwave-safe bowl, combine the semisweet chocolate chips (or chopped chocolate) and the optional coconut oil. Microwave in short bursts (30 seconds at a time), stirring well after each interval, until the chocolate is completely melted and smooth. Be careful not to overheat the chocolate, as this can cause it to seize or burn. Alternatively, you can melt the chocolate using a double boiler method for more controlled heating.
Step 3: Dipping and Setting Your Homemade Buckeyes
Remove the chilled peanut butter balls from the refrigerator. Allow the melted chocolate mixture to cool slightly to room temperature; if it’s too hot, it will melt your peanut butter centers. Now for the signature Buckeye look! Take a skewer or a toothpick and gently insert it into the top of a peanut butter ball. Dip the ball into the melted chocolate, leaving a small circle of the peanut butter exposed at the top. This exposed peanut butter is what gives Buckeyes their characteristic appearance, mimicking the “eye” of the buckeye nut. Gently lift the ball from the chocolate, allowing any excess chocolate to drip back into the bowl. You can lightly tap the skewer against the edge of the bowl to help remove excess. Carefully slide the dipped Buckeye off the skewer onto a clean piece of parchment paper or wax paper. Repeat this process with the remaining peanut butter balls. Once all the Buckeyes are dipped, allow the chocolate to firm up and set completely. This can be done at room temperature, which will give a slightly softer set, or in the refrigerator for about 10-15 minutes for a quicker and firmer set. Once set, your delicious homemade Buckeyes are ready to be served and enjoyed!
*All these images are credited to Preppy Kitchen via YouTube. Give his channel a visit and subscribe for more delightful recipes and cooking tips!
Pro Tips for Making the Best Homemade Buckeyes:
Achieving Buckeye perfection is easy with these helpful hints:
- Room Temperature Ingredients: Ensure your butter and peanut butter are at room temperature. This makes them much easier to cream together, resulting in a smoother, lump-free mixture.
- Sift Your Powdered Sugar: To avoid any grainy texture in your peanut butter filling, sift your powdered sugar before adding it to the mix.
- Chill Thoroughly: Do not skip the chilling step for the peanut butter balls. This is critical to prevent them from falling apart or melting when dipped in warm chocolate. The firmer they are, the easier they are to dip cleanly.
- Don’t Overheat Chocolate: When melting chocolate, whether in the microwave or a double boiler, use low heat and constant stirring. Overheated chocolate can seize, become grainy, or burn, making it unusable for dipping.
- Use Coconut Oil: The optional coconut oil (or a tiny bit of shortening) truly makes a difference. It thins the chocolate slightly, making it smoother for dipping and giving the finished Buckeyes a beautiful sheen that helps prevent bloom.
- Work Quickly While Dipping: The colder the peanut butter balls, the faster the chocolate will set on them. If the chocolate starts to thicken, gently warm it again for a few seconds.
- The Buckeye “Eye”: For that signature look, remember to leave a small portion of the peanut butter exposed at the top. This is the charming imperfection that defines a Buckeye.
- Storage: Store your finished Buckeyes in an airtight container in the refrigerator for up to two weeks, or at room temperature for a few days, especially if your kitchen is cool. For longer storage, Buckeyes freeze beautifully for up to two months.
Creative Variations for Your Buckeyes:
While the classic Buckeye is a timeless treat, don’t hesitate to experiment and make them your own!
- Chocolate Choices: Instead of semisweet, try milk chocolate for a sweeter profile or dark chocolate for an intense, bittersweet contrast. White chocolate can also be used for a different aesthetic and flavor.
- Add-ins for Peanut Butter:
- Crunchy Peanut Butter: For a delightful texture contrast, use crunchy peanut butter.
- Mini Chocolate Chips: Fold in a quarter cup of mini chocolate chips into the peanut butter mixture for an extra chocolatey surprise inside.
- Spices: A pinch of cinnamon or a tiny dash of espresso powder can deepen the flavor of the peanut butter.
- Toppings & Garnishes:
- Sea Salt: Sprinkle a tiny pinch of flaky sea salt on the wet chocolate after dipping for a sophisticated sweet and salty combination.
- Sprinkles: Add festive sprinkles for holidays or special occasions.
- Chopped Nuts: Finely chopped peanuts, pecans, or almonds can be sprinkled over the chocolate.
- Drizzle: After the main chocolate has set, melt a contrasting chocolate (e.g., white chocolate on dark-dipped Buckeyes) and drizzle it artfully over the top.
- Nut-Free Buckeyes: For those with peanut allergies, sunflower seed butter (SunButter) is an excellent substitute, allowing everyone to enjoy this classic treat.
- Vegan Buckeyes: Use a plant-based butter alternative and ensure your chocolate is dairy-free. Many dark chocolate varieties are naturally vegan.
Why Buckeyes Remain a Timeless Treat
The enduring popularity of Buckeyes is no mystery. They combine two universally loved flavors – peanut butter and chocolate – in a perfectly balanced, bite-sized package. Their no-bake nature makes them incredibly accessible, even for novice cooks, and a fantastic project to do with children. They require no oven space, making them ideal for busy holiday baking schedules or when your oven is already occupied. Furthermore, their delightful appearance, mimicking the unique buckeye nut, adds a touch of charm and nostalgia that resonates deeply with many. They are not just a dessert; they are a tradition, a memory, and a simple pleasure rolled into one perfect bite.
Making homemade Buckeyes is more than just following a recipe; it’s about creating joy, sharing deliciousness, and perhaps even starting a new family tradition. The satisfaction of dipping each perfectly chilled peanut butter ball into a velvety pool of melted chocolate, then seeing it transform into a glossy, irresistible treat, is truly rewarding. So gather your ingredients, clear some space in your refrigerator, and prepare to embark on a sweet adventure that will delight your taste buds and impress your friends and family.
Easy Homemade Buckeyes Recipe: Your Next Sweet Obsession
Whether you’re reliving cherished memories or creating new ones, this easy homemade Buckeyes recipe is an absolute must-try. With its simple ingredients, straightforward steps, and utterly delicious outcome, it’s a guaranteed winner. So go ahead, whip up a batch (or two!), share them with loved ones, and savor every moment of this classic peanut butter chocolate delight. Happy making!