
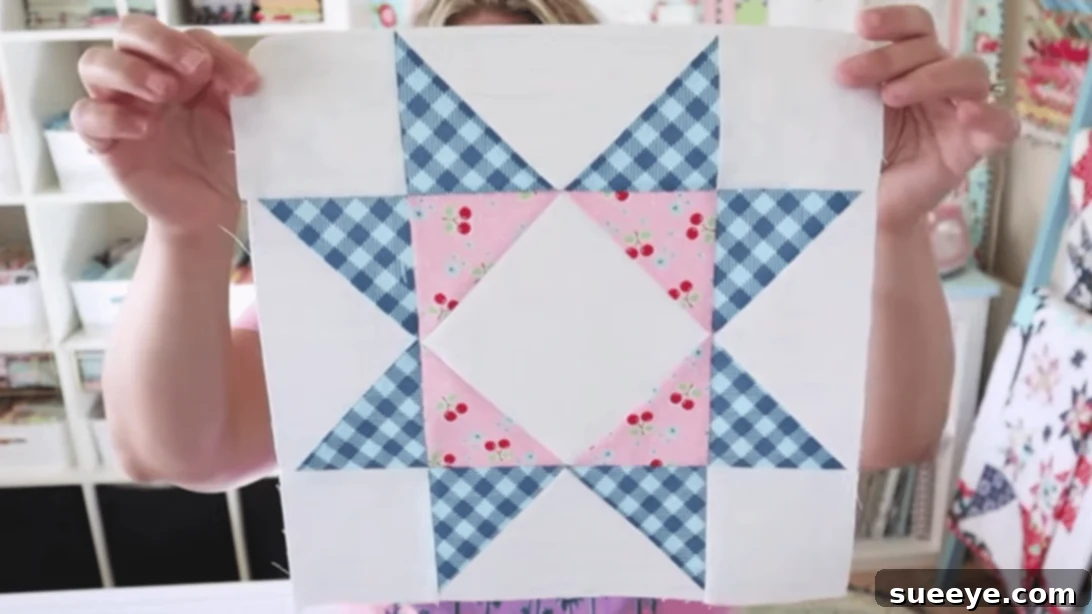
Embark on a delightful quilting journey with the Ohio Star quilt block, a timeless design that stands out for its captivating beauty and remarkable simplicity. Crafted by the talented Erica Arndt, whose insightful tutorials grace YouTube, this block is often hailed as one of the most accessible yet visually stunning creations in the quilting world. Its enduring appeal lies in its incredible versatility; whether you’re drawn to vibrant, bold prints or prefer a harmonious blend of muted tones, the Ohio Star effortlessly accommodates any fabric combination, promising a gorgeous result every time. This makes it an absolute favorite among quilters of all skill levels, from those just starting their sewing adventure to seasoned artisans seeking a quick, satisfying project.
The Ohio Star block serves as an excellent foundation for mastering fundamental quilting techniques. For beginners, it’s an ideal entry point, as it primarily involves two key components: the Flying Geese units and Snowball squares. These techniques, once understood, unlock a myriad of possibilities for future quilting endeavors. There’s no need to feel overwhelmed; with clear guidance, you’ll be confidently piecing together this classic block in no time. Dive into the comprehensive instructions below to get started, and for a visual walkthrough that clarifies every detail, be sure to watch the accompanying video tutorial by Erica Arndt. This combination of written steps and visual aid ensures a smooth, enjoyable crafting experience, guiding you from fabric selection to a perfectly finished block.
Why The Ohio Star Is A Must-Try Quilt Block
The Ohio Star quilt block isn’t just another pattern; it’s a rite of passage for many quilters and a beloved classic for good reason. Its inherent design offers a perfect blend of simplicity and intricate appearance, making it a stellar choice for a wide array of projects. For those new to the craft, this block provides a gentle introduction to essential piecing techniques without overwhelming complexity. You’ll gain valuable experience in accurate cutting, precise stitching, and effective pressing – skills that are absolutely critical for any successful quilting project. Moreover, the sense of accomplishment derived from creating such a beautiful and recognizable block is incredibly rewarding, boosting confidence for more ambitious future projects.
Beyond its educational value, the Ohio Star is celebrated for its versatility in design. Its central star motif, flanked by corner squares, allows for endless color and fabric play. You can create high-contrast stars that pop against a background, or opt for a more subtle, harmonious blend that allows textures and prints to shine. When multiple Ohio Star blocks are combined, they can form captivating secondary patterns within the overall quilt design, adding another layer of visual interest. This adaptability means the Ohio Star can effortlessly transition from traditional, heritage-style quilts to modern, minimalist masterpieces, fitting seamlessly into any aesthetic. Whether you envision a cozy throw for your living room, a decorative wall hanging, or a practical tote bag, this block provides a strong, beautiful starting point.
Materials for Crafting Your Ohio Star Quilt Block:
Gathering the right tools and materials is the first crucial step towards creating a flawless Ohio Star quilt block. Quality materials not only make the process more enjoyable but also ensure a lasting, beautiful finished product. Here’s a detailed list of what you’ll need:
- Print Fabric (Star Point): This fabric will form the dynamic points of your star. Choose a print or solid color that you want to stand out, as it will be the focal point of your block. Consider how it will contrast or complement your other fabric choices.
- Print Fabric (Snowball): This fabric is used for the corner units, often referred to as “snowball squares.” It can be a contrasting color to the star points, or a complementary tone that blends beautifully with your background.
- Background Fabric: This fabric creates the base of your block and makes the star motif truly shine. A solid, light-colored fabric is a common choice as it allows the star points to pop, but don’t hesitate to experiment with subtle prints or darker shades for a unique effect.
- Marking Pen, Pencil, or Chalk: Essential for drawing precise lines on your fabric, which will guide your cutting and stitching. Ensure your chosen tool makes clear, visible marks that can be easily removed or hidden within the seams.
- Quilting Ruler: A transparent ruler, preferably at least 6×24 inches or 8.5×24 inches, is indispensable for accurate cutting. Look for one with clear measurement markings to ensure precision.
- Scissors or Rotary Cutter and a Cutting Mat: While sharp fabric scissors work, a rotary cutter combined with a self-healing cutting mat offers unparalleled speed and accuracy, especially when cutting multiple layers of fabric. A good quality rotary cutter will make your cutting tasks much more efficient and less tiring.
- Fabric Pins or Clips: Used to hold fabric pieces together securely before stitching, preventing shifting and ensuring accurate seam alignment.
- Needle and Thread: While most of the block is machine-sewn, a hand-sewing needle can be useful for any tiny adjustments or for basting. Use good quality polyester or cotton quilting thread that matches or blends with your fabrics.
- Iron, for Pressing: A good quality iron is critical for achieving flat, precise seams. Pressing is just as important as stitching for a professional-looking quilt block. Consider a steam iron for crisp results.
- Sewing Machine: A reliable sewing machine with a quarter-inch foot attachment is highly recommended for consistent seam allowances, which are vital in quilting.
- Pattern: Make sure to download and print the specific pattern provided by Erica Arndt. This will give you the exact cutting dimensions for each fabric piece, tailored to the size of the Ohio Star block you wish to create. Clicking the link will take you directly to the download page for the pattern.
Having all these items ready before you begin will streamline your process and set you up for success. Remember, precision in cutting and pressing is key to a beautiful final block!
How to Make the Ohio Star Quilt Block: Step-by-Step
Creating the Ohio Star quilt block is a journey of precision and patience, resulting in a truly stunning piece. Follow these detailed steps to bring your block to life, ensuring accuracy and a beautiful finish.
Step 1: Precise Fabric Preparation and Initial Cuts for Flying Geese Units
Begin by carefully cutting all your fabrics to the exact dimensions specified in the downloaded pattern. Accuracy at this stage is paramount for a perfectly pieced block. Lay the print fabric square, designated for your star points, right side down on your cutting mat. Refer to the video tutorial by Erica Arndt to visualize the correct alignment for the next cut. Using your ruler and rotary cutter, meticulously cut this square in half, both horizontally and vertically, to yield four smaller, identical squares. Next, take your background fabric square and place it right side up. Position two of the small print squares (star point fabric) onto opposite corners of the background square, ensuring their right sides are facing each other. It’s crucial that the raw edges and the drawn lines (which you may have marked per the pattern for stitching guidelines) are perfectly aligned. This precision will ensure your Flying Geese units come together flawlessly.
Step 2: Constructing Your First Flying Geese Units
Once your print squares are perfectly positioned on the background square, secure them with fabric pins to prevent any shifting during stitching. Now, take your pieces to the sewing machine. Stitch precisely along the inside of the drawn lines you marked, or if the pattern suggests, a scant quarter-inch seam allowance from the marked line towards the corner. The goal is to create a stitch line that, when folded open, will align perfectly with the corner. After stitching, carefully cut the fabric along the middle of the drawn lines. This action separates your piece into two half-square triangle (HST) units, which are the basis of your Flying Geese. Press the seam allowances open or towards the darker fabric (depending on your preference and the pattern’s recommendation) to create flat, crisp units. This step forms the initial two points of your star.
Step 3: Completing the Flying Geese and Preparing Snowball Squares
With your initial Flying Geese units formed, it’s time to add the final point. Take the third small print square and place it on the remaining empty corner of one of your units, making sure its right side is facing the right side of the unit and the drawn line is vertical, aligning with the previous construction. Pin it securely. Stitch along the inside of the drawn line, just as you did before. Once stitched, cut the piece apart along the drawn line, and press the seam open. You now have two completed Flying Geese units. Trim off any excess fabric dog ears to square up your units, if necessary, and set them aside. Next, prepare your snowball squares: take your background squares and on the back, draw a diagonal line from corner to corner. Place one of your “snowball” fabric squares on opposite corners of your background square, right sides facing, aligning the drawn line on the back of the snowball fabric with the corner you are covering on the background square.
Step 4: Assembling the Snowball Squares and Final Block Construction
With the snowball fabric squares pinned in place on the background square, stitch directly along the drawn diagonal line. This line acts as your stitching guide for the snowball technique. After stitching, trim off the excess fabric layers, leaving a quarter-inch seam allowance beyond your stitched line. Carefully press the fabric open, revealing your crisp snowball corner. Repeat these steps for the remaining empty corners of your background square, creating a complete snowball unit. Now, it’s time for the exciting part: assembling your Ohio Star block! Refer to Erica Arndt’s video tutorial for a clear demonstration of the block layout. Arrange your Flying Geese units, snowball units, and any central squares (if your pattern includes one) into the classic Ohio Star formation. Once satisfied with the layout, begin stitching the pieces together in rows, typically three rows of three units each. When stitching rows to each other, remember to nest your seams where possible to ensure points meet perfectly. Give the entire block a final, thorough press with a hot iron to set all the seams flat and crisp. Congratulations, your beautiful Ohio Star quilt block is complete and ready to be incorporated into your next quilting project!
Tips for Success and Designing with Your Ohio Star Blocks
To ensure your Ohio Star blocks turn out perfectly every time, keep these valuable quilting tips in mind. Firstly, always use a scant quarter-inch seam allowance. This means your seam should be just a thread’s width less than a true quarter-inch, accounting for the fabric folded into the seam. This tiny adjustment can make a huge difference in achieving accurate block sizes. Secondly, press, don’t iron. Ironing involves pushing the iron back and forth, which can distort your fabric. Pressing means lifting the iron and setting it down, holding it in place, then lifting again. This helps keep your fabric square and prevents stretching. Thirdly, consider chain piecing when making multiple units of the same type (like Flying Geese or snowball squares). This technique involves feeding fabric pieces through your machine one after another without breaking the thread, saving time and thread.
Once you’ve mastered creating individual Ohio Star blocks, the design possibilities are endless! This versatile block can be arranged in countless ways to create stunning quilts. Consider rotating alternate blocks to form secondary patterns, or intersperse them with solid blocks or simpler four-patch blocks for visual relief. Experiment with color placement: use high-contrast fabrics for a dramatic effect, or subtle tonal variations for a sophisticated look. The Ohio Star is ideal for baby quilts, adding a touch of classic charm, or for larger bed quilts that command attention. You can also incorporate these blocks into smaller projects like throw pillows, table runners, or even a unique tote bag. Don’t be afraid to play with different fabric collections and colors; the Ohio Star’s adaptability means it almost always looks fantastic.
Remember, quilting is a journey of learning and creativity. Each block you make refines your skills and builds your confidence. The Ohio Star is a fantastic stepping stone, teaching you foundational techniques that will serve you well in all your future quilting adventures. Embrace the process, enjoy the colors and textures of your fabrics, and delight in the beautiful creations you bring to life with your own hands. Happy quilting!
*All these amazing images are thanks to Erica Arndt via YouTube. Do visit her channel to see more videos like this! She offers a wealth of knowledge and inspiration for quilters of all levels.