
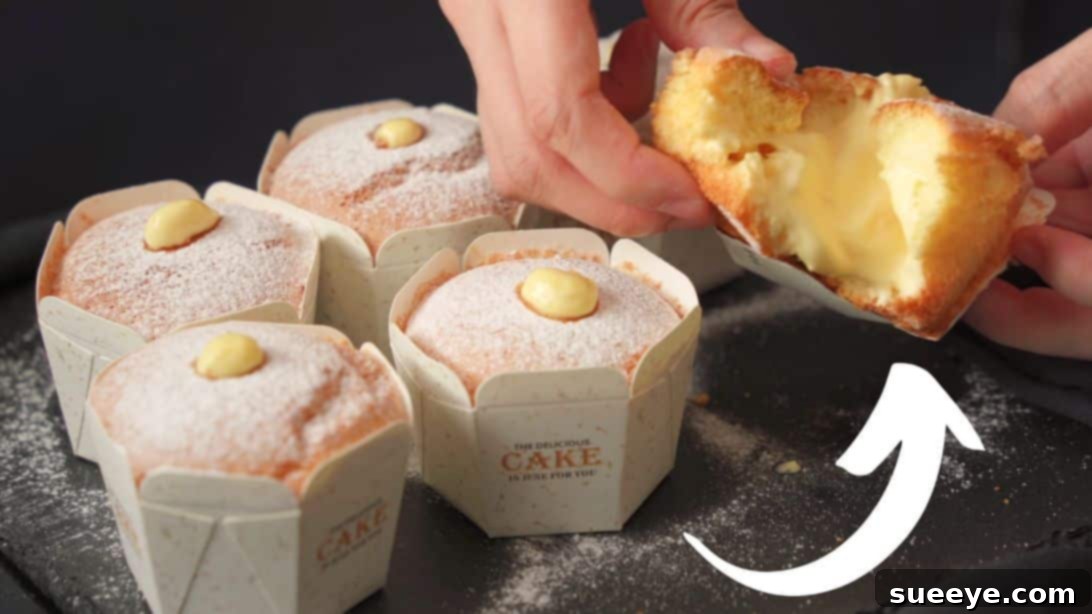
Prepare to fall in love with these delightful mini chiffon cakes, a truly exquisite dessert that perfectly marries an incredibly light, airy texture with a rich, creamy, and irresistible “lava” custard filling. Inspired by the brilliant recipe from MoLaLa Cook on YouTube, these individual treats are designed to be fun, flavorful, and profoundly satisfying. Each bite offers a cloud-like softness that practically melts in your mouth, giving way to an oozing center of sweet, velvety custard. Whether you’re hosting a grand celebration, a casual get-together, or simply treating yourself to a moment of culinary bliss, these lava mini chiffon cakes are guaranteed to impress. Their perfect portion size makes them ideal for serving with your favorite coffee, tea, or any refreshing beverage, transforming an ordinary day into something special.
Creating these beautiful cakes might seem daunting, but this comprehensive guide breaks down every step, ensuring a smooth and enjoyable baking experience. We’ll walk you through crafting the delicate chiffon cake batter, achieving those signature stiff peaks, and folding the ingredients to maintain maximum airiness. Simultaneously, you’ll learn the secrets to a perfectly smooth, lump-free custard that forms the irresistible “lava” core. Get ready to bake a dessert that not only looks professionally made but tastes even better – a true testament to homemade goodness, ideal for anyone looking to master the art of chiffon baking.
Essential Ingredients for Your Heavenly Lava Mini Chiffon Cakes
Crafting these heavenly mini chiffon cakes requires a selection of fresh, high-quality ingredients. Pay attention to the precise measurements to ensure the perfect texture and flavor for both the cake and the creamy custard filling. Each component plays a vital role in achieving the desired lightness and richness.
For the Light and Fluffy Chiffon Cake Base:
- 40ml (approximately 3 tbsp) of fresh full-fat milk: Contributes to moisture and tenderness in the cake.
- 30ml (approximately 2 tbsp) of corn oil (or other neutral-flavored vegetable oil): Essential for the chiffon cake’s moistness and delicate texture.
- 55g (½ cup) of cake flour, sifted: Sifting is crucial for aeration and preventing lumps, leading to a finer, softer crumb.
- 3 large egg yolks, carefully separated from the whites: Provides richness and color to the cake batter.
- 3 large egg whites, meticulously separated from the yolks: The foundation for the cake’s airy structure when whipped into a meringue.
- A small pinch of fine salt: Balances the sweetness and enhances overall flavor.
- 1g (¼ tsp) of fresh lemon juice (or cream of tartar): Helps stabilize the egg whites, allowing them to whip to greater volume and hold their shape.
- 45g (3½ tbsp) of granulated sugar: Sweetens the cake and contributes to the meringue’s stability and glossy appearance.
For the Rich and Oozing Custard Filling:
- 2 large egg yolks: Forms the creamy base of the custard, adding richness and a beautiful yellow hue.
- 25g (2 tbsp) of granulated sugar: Sweetens the custard to perfection.
- 6g (2½ tsp) of cornstarch: A primary thickening agent for a smooth, stable custard.
- 5g (1¾ tsp) of cake flour: Works with cornstarch to create a velvety texture, preventing the custard from being too gummy.
- 170ml (approximately 1 cup) of fresh full-fat milk: Provides the liquid base for the custard and contributes to its creamy consistency.
- 10g (2 tsp) of unsalted butter, softened: Adds luxurious richness and a silky mouthfeel to the finished custard.
- 70ml (approximately 5 tbsp) of cold whipping cream (at least 35% fat): To be whipped and folded into the cooled custard for a lighter, more ethereal “lava” filling.
Step-by-Step Guide to Baking Your Delicious Lava Mini Chiffon Cakes
Follow these detailed instructions carefully to achieve beautifully baked cakes with a delightful, creamy filling. Precision in each step is key to unlocking the full potential of this wonderful recipe and ensuring your mini chiffon cakes are a resounding success.
Step 1: Preparing the Chiffon Cake Batter and Baking
Begin by preparing your chiffon cake batter, focusing on incorporating air and achieving the right consistency. This first stage is crucial for the cake’s signature light and airy texture, demanding careful attention to technique.
- Combine Wet Ingredients for Yolk Batter: In a generously sized mixing bowl, pour in the measured 40ml of milk and 30ml of corn oil. Using a whisk, beat these two ingredients together vigorously until the mixture becomes pale, cloudy, and frothy. This emulsification step is important for a smooth batter, ensuring fats and liquids are well integrated.
- Incorporate Dry Ingredients and Egg Yolks: Sift the 55g of cake flour directly into the frothy milk and oil mixture. Sifting ensures there are no lumps and helps aerate the flour, contributing to a finer crumb. Add the three egg yolks, then continue whisking gently until all the ingredients are thoroughly combined and the batter appears perfectly smooth, glossy, and free of any flour lumps. Do not overmix at this stage; just mix until combined.
- Double Sift for Ultimate Smoothness: For an exceptionally fine and smooth batter, which is characteristic of a superior chiffon cake, pass the entire yolk mixture through a fine-mesh sieve. This extra step guarantees an incredibly tender crumb. Set this smooth, refined batter aside.
- Whip Egg Whites to Stiff Peaks: In a separate, impeccably clean mixing bowl (preferably metal or glass to prevent grease residue, which can severely hinder whipping), add the three egg whites. Ensure there is absolutely no trace of egg yolk, as any fat prevents the whites from whipping properly. Add the 1g of lemon juice and a pinch of salt. Begin beating the egg whites on medium speed. Once they become foamy, gradually incorporate the 45g of granulated sugar, adding it slowly in 2-3 additions. Continue beating on medium-high speed until the egg whites transform into glossy, firm, and stable stiff peaks. When you lift the whisk, the peaks should stand upright without drooping, indicating perfect aeration.
- Gently Fold the Batter: This is a critical step for maintaining the chiffon cake’s airiness. Carefully and gradually fold about one-third of the whipped egg white meringue into the egg yolk batter. Use a flexible spatula and a gentle folding technique (cutting through the center and sweeping up the sides of the bowl) to lighten the yolk mixture without deflating the egg whites. Once partially combined, add the remaining egg whites in two more additions, continuing to fold gently until the batter is uniformly combined, homogenous, and visibly airy. Avoid overmixing at all costs, as this can deflate the precious air you’ve incorporated, leading to a dense cake.
- Prepare Molds and Pipe Batter: Carefully transfer the delicate chiffon cake batter into a piping bag for easier handling and neatness. Prepare your mini cake molds; if using paper liners, place them in a muffin tin or specific mini chiffon cake molds. There’s no need to grease chiffon molds, as the cake needs to cling to the sides to rise. Pipe the batter into each mold, filling them to about two-thirds full, leaving sufficient headspace for the cakes to rise beautifully during baking.
- Bake to Perfection in Two Stages: Preheat your oven to 130°C (266°F). Place the filled molds into the preheated oven and bake for approximately 50 minutes at this lower temperature. This gentle heat allows the cakes to rise slowly and evenly, preventing cracks and ensuring a delicate crumb. After 50 minutes, increase the oven temperature to 150°C (302°F) and continue baking for another 15 minutes to fully set the cakes, develop a light golden brown exterior, and ensure they are cooked through. While your cakes are baking, use this time efficiently to prepare the luscious custard filling.
Step 2: Crafting the Creamy Custard Filling and Assembling the Cakes
With your chiffon cakes gently cooling, it’s time to create the star of the show: the rich, flowing custard filling that gives these cakes their “lava” quality. The combination of a perfectly smooth custard and light whipped cream will elevate these treats to an unforgettable dessert experience.
- Prepare the Custard Base: In a medium-sized saucepan, combine the two egg yolks, 25g of granulated sugar, 6g of cornstarch, and 5g of cake flour. Whisk these dry and wet ingredients together thoroughly until you have a smooth, lump-free paste. This crucial initial mixing step prevents lumps from forming when the milk is added and ensures a silky final custard.
- Cook the Custard to Perfection: Gradually pour in the measured 170ml of milk, whisking continuously to ensure a perfectly smooth consistency. Place the saucepan over low to medium-low heat and cook, stirring constantly with a whisk or rubber spatula. Continue to stir, scraping the bottom and sides of the pot, until the mixture thickens significantly, reaching a pudding-like consistency. It’s crucial not to stop stirring to prevent scorching the bottom or forming lumps. The custard should coat the back of a spoon.
- Enrich and Chill the Custard: Once the custard has thickened, remove it from the heat and stir in the 10g of softened unsalted butter until it is fully melted and incorporated. The butter adds a beautiful sheen, richness, and smoothness. Immediately transfer the hot custard into a clean mixing bowl. Cover the surface of the custard directly with plastic wrap (ensure the wrap touches the custard’s surface) to prevent a skin from forming as it cools. Refrigerate for at least an hour, or until it is thoroughly chilled and firm.
- Cool, Unmold, and Prepare Cakes for Filling: By now, your chiffon cakes should be baked to perfection. Remove them from the oven and let them cool completely on a wire rack before attempting to unmold them. Warm cakes are fragile and prone to tearing. Once cool, gently unmold each mini cake. Using a small round piping nozzle, a chopstick, or a similar small tool, carefully poke a hole in the center of each cake. This cavity will be filled with the delicious, oozing custard.
- Whip the Cream to Soft Peaks: In another clean, chilled mixing bowl, add the cold whipping cream. Beat the cream with an electric mixer on medium-high speed until it forms soft to medium peaks. Be careful not to overbeat, as it can turn grainy. The cream should be airy but still pliable.
- Combine Custard and Whipped Cream for “Lava” Filling: Retrieve the thoroughly chilled custard from the refrigerator. Give it a light whisk to loosen it slightly and make it smooth again, breaking up any firmness from chilling. Gently fold the lightened custard into the whipped cream using a spatula. Continue folding until the two components are well combined, creating a lighter, airier, yet still rich and incredibly creamy filling that will flow beautifully.
- Fill and Serve Your Delights: Transfer the combined custard filling into a piping bag fitted with a suitable nozzle (a round tip works well for filling the cavity). Carefully insert the nozzle into the hole you poked in each mini chiffon cake and pipe the luscious custard until the cake is generously filled and a small “lava” peak emerges, or just enough to fill the cavity to your preference. Serve your delightful lava mini chiffon cakes immediately and savor every soft, creamy bite! Enjoy the fruits of your labor and watch as they disappear!
These captivating images are beautifully presented by MoLaLa Cook via YouTube, showcasing the irresistible charm and elegant presentation of these mini chiffon cakes. We encourage you to visit her channel for an inspiring visual guide and subscribe for an abundance of delightful baking content, tips, and tricks that will enhance your culinary skills!
Expert Tips for Achieving the Perfect Lava Mini Chiffon Cakes
To ensure your baking adventure is a resounding success and your mini chiffon cakes are nothing short of phenomenal, consider these expert tips. They address common challenges and highlight crucial techniques for achieving that signature airy cake and silky custard.
- Ingredient Temperature Matters Immensely: For the chiffon cake, always ensure your eggs are at room temperature. This is vital for achieving maximum volume when whipping egg whites and better emulsification with the yolks, resulting in a lighter batter. For the custard, cold milk is generally fine, but for whipping cream, ensure it’s straight from the fridge and your mixing bowl and whisk attachments are thoroughly chilled – this promotes quicker, more stable peaks.
- No Grease for Egg Whites: This tip cannot be stressed enough! Even the tiniest speck of fat (from residual egg yolk, an oily mixing bowl, or even your fingers) can completely prevent egg whites from whipping to stiff peaks. Use impeccably clean, dry bowls and beaters. Wiping with a little lemon juice or vinegar can help ensure a fat-free surface.
- Gentle Folding is Key: The chiffon cake’s signature airiness and cloud-like texture come directly from the carefully incorporated whipped egg whites. Always fold the meringue into the yolk batter gently, using a cut-and-fold motion with a spatula. This technique maintains the air bubbles. Overmixing is the enemy here; it will deflate the batter and result in a dense, chewy cake rather than a light, springy one.
- Accurate Oven Temperature is Critical: Chiffon cakes are notoriously sensitive to temperature fluctuations. A reliable oven thermometer is your best friend to ensure your oven is truly at the set temperature. The two-stage baking process (initial lower temperature then higher) is crucial: the initial lower temperature allows the cake to rise slowly and set its delicate structure without bursting, while the subsequent higher temperature ensures it bakes through, develops a light golden crust, and doesn’t collapse upon cooling.
- Cooling the Cakes Properly: Always allow chiffon cakes to cool completely on a wire rack before attempting to unmold them and fill them. Warm cakes are incredibly fragile and prone to tearing, especially when removed from molds or handled. Proper cooling helps the cake set its structure and prevents shrinkage.
- Achieving Lump-Free Custard: Whisking the egg yolks, sugar, and flours thoroughly into a smooth paste before adding milk is a vital first step. Once the milk is in, continuous stirring over low to medium-low heat during cooking will prevent lumps from forming and prevent scorching the bottom of the pan, resulting in a perfectly smooth, velvety, and luxurious custard.
- Preventing Custard Skin: To avoid an unappealing thick skin from forming on top of your custard as it cools, cover the surface of your hot custard directly with plastic wrap immediately after cooking and transferring to a bowl. The plastic wrap should be touching the entire surface of the custard.
- Don’t Overbeat Whipping Cream: Beat whipping cream just until soft to medium peaks form. Overbeating will make it grainy, lumpy, and difficult to fold into the custard smoothly, affecting the final texture of your “lava” filling.
- Piping Bag for Easy Filling: A piping bag makes filling the cakes neat, efficient, and ensures even distribution. It allows you to control the amount of “lava” custard in each mini cake, creating that satisfying ooze when cut or bitten into.
Creative Variations and Customizations for Your Mini Chiffon Cakes
While delicious as is, this mini chiffon cake recipe is incredibly versatile! Feel free to experiment with these ideas to create your unique twist and cater to different tastes, making these delightful treats even more special.
- Flavor Infusions: Elevate the taste profile by adding a teaspoon of pure vanilla extract, a hint of almond extract, or the bright zest of lemon, orange, or lime to either the cake batter or the custard for an extra layer of aromatic flavor. For a delicate twist, matcha powder can be sifted with the cake flour for a beautiful green tea chiffon base.
- Chocolate Lover’s Delight: For chocolate enthusiasts, incorporate a tablespoon of unsweetened cocoa powder into the cake flour for a rich chocolate chiffon base. For the custard, melt in a few squares of good quality dark or milk chocolate to create an irresistible chocolate lava filling.
- Fresh Fruit Accents: Serve your mini chiffon cakes with a side of fresh berries (such as juicy strawberries, tart raspberries, or sweet blueberries) or a light, homemade fruit compote. The fresh fruit provides a wonderful counterpoint to the creamy custard.
- Different Molds and Shapes: While mini molds are undeniably charming and perfect for individual servings, you can adapt this recipe for small cupcakes or even a single small chiffon cake if you adjust baking times and temperatures accordingly. Remember that traditional chiffon cake molds are often ungreased to allow the cake to cling and rise high.
- Coffee Kick: For a delightful coffee-flavored treat, dissolve a small amount of instant coffee powder (or espresso powder) in the warm milk when preparing the custard. This creates a sophisticated mocha-flavored filling that pairs beautifully with the light chiffon cake.
Serving and Storage Suggestions for Maximum Enjoyment
These mini chiffon cakes are a delight on their own, but here are some ways to enhance your enjoyment and keep them fresh for longer:
- Elegant Serving: Present them beautifully on a platter for a dessert bar at parties, or arrange them individually on small plates for a more refined presentation. A light dusting of powdered sugar just before serving adds an elegant finishing touch. They pair wonderfully with a hot cup of tea, a rich coffee, a glass of chilled milk, or even a sparkling wine for a celebration.
- Optimal Storage: Store any leftover cakes in an airtight container in the refrigerator for up to 2-3 days. While the custard will remain creamy, the chiffon cake itself can become a bit drier over time, as is common with very airy cakes. For the best taste and texture, it’s highly recommended to fill the cakes closer to serving time if possible, to maintain the freshest texture of the delicate chiffon.
Indulge in Homemade Perfection: Your Guide to Easy Lava Mini Chiffon Cakes
There you have it – a comprehensive guide to creating truly spectacular lava mini chiffon cakes. This recipe, inspired by the talented MoLaLa Cook, is a testament to the joy of homemade desserts, offering a perfect balance of light texture and rich, flowing flavor. Each step has been carefully detailed and expanded upon to ensure that even novice bakers can achieve professional-looking and tasting results, making these an accessible yet impressive treat.
Imagine the delightful experience of biting into a soft, airy cake, immediately greeted by that luscious, oozing custard – it’s an experience that speaks volumes of comfort, indulgence, and exquisite craftsmanship. These mini chiffon cakes are not just desserts; they are little pockets of happiness, ready to brighten any occasion or simply make your ordinary day extraordinary. They offer a unique blend of delicate baking and rich flavor that is hard to resist. So, gather your ingredients, follow these instructions with passion and precision, and prepare to delight yourself and your loved ones with these unforgettable treats. Happy baking, and enjoy every single delightful bite!