
The Ultimate Guide to Crafting Perfect Homemade Meringue Cookies
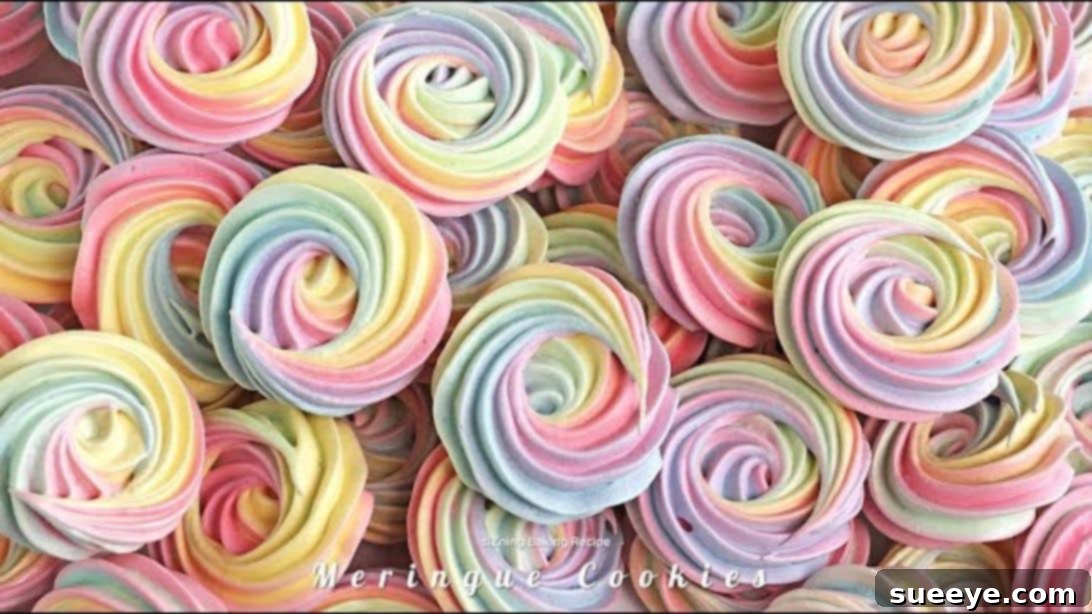
Have you ever dreamed of creating those ethereal, melt-in-your-mouth meringue cookies right in your own kitchen? It turns out, achieving these delightful, airy confections is far simpler than you might imagine! Many home bakers believe that making classic meringues is a complex endeavor, but with the right technique and a straightforward approach, anyone can master them. This comprehensive guide, inspired by the easy-to-follow method from siZning, will walk you through every step to produce beautiful, pastel-colored meringue cookies that are as irresistible as they are elegant. Imagine pairing these light, perfectly sweet treats with your morning coffee or afternoon tea – a truly exquisite indulgence!
The charm of meringue cookies lies not only in their delicate texture and exquisite sweetness but also in their vibrant, customizable appearance. Growing up, these cookies were a favorite, often appearing in bright, bold colors. While those were certainly fun, there’s something uniquely sophisticated about the subtle beauty of pastel meringues. Their ability to dissolve effortlessly on the tongue, leaving behind a lingering sweetness, makes them incredibly addictive. It’s hard to stop at just one, and before you know it, the entire batch might mysteriously disappear!
Beyond their delightful taste and texture, meringue cookies offer a fantastic baking experience. They require minimal ingredients, making them an accessible project for bakers of all skill levels. They also provide a wonderful opportunity for creativity, whether through experimenting with colors, flavors, or decorative techniques. This guide is designed to empower you with all the knowledge needed to confidently bake a batch of stunning meringues that will impress both your family and friends.
RELATED: Easy No-Fail Mint Chocolate Cookies Recipe
Why Bake Meringue Cookies at Home?
Baking meringue cookies from scratch is a rewarding experience that offers several advantages over store-bought alternatives. Firstly, the freshness of homemade meringues is unparalleled – their crispness and delicate flavor are best enjoyed soon after baking. Secondly, you have complete control over the ingredients, allowing you to choose high-quality components and avoid artificial additives if you wish. This recipe, in particular, utilizes the Swiss meringue method, which involves gently heating egg whites and sugar together. This technique not only ensures the sugar fully dissolves, resulting in a wonderfully smooth and stable meringue, but it also lightly pasteurizes the egg whites, adding a layer of safety and peace of mind.
Moreover, homemade meringue cookies are incredibly versatile. They can be flavored with various extracts, colored to match any occasion, or even piped into intricate shapes. They make fantastic gifts, beautiful additions to dessert platters, or simply a delightful treat to enjoy on a quiet afternoon. Their relatively low-fat content (compared to many other cookies) also makes them a lighter indulgence, perfect for satisfying a sweet craving without feeling overly heavy. Embark on this baking journey, and discover the pure joy of creating these delightful confections yourself!
Understanding the Art of Meringue
At its heart, meringue is a simple concoction made primarily from egg whites and sugar, whipped until it transforms into a light, fluffy, and stable foam. However, this seemingly basic combination offers a world of culinary possibilities. There are three main types of meringue, each distinguished by its preparation method and resulting texture:
- French Meringue: The simplest form, made by whipping raw egg whites until frothy, then gradually adding sugar. It’s the least stable and often used for baking immediately or incorporating into other desserts.
- Italian Meringue: Made by drizzling hot sugar syrup into already whipped egg whites. This method cooks the egg whites, resulting in a very stable, glossy meringue perfect for frosting cakes or torching.
- Swiss Meringue: The method we’ll be using today. Egg whites and sugar are gently heated over a double boiler until the sugar fully dissolves and the mixture is warm to the touch. This mixture is then whipped until stiff, creating a dense, stable, and incredibly smooth meringue that holds its shape beautifully and bakes up wonderfully crisp.
The Swiss method is particularly favored for meringue cookies because of its stability and the beautiful sheen it imparts. The gentle heating helps to dissolve the sugar crystals, preventing a grainy texture, and slightly cooking the egg whites, which contributes to a more robust structure. This makes it ideal for piping intricate designs that hold their form during baking, yielding those perfectly crisp, light, and airy cookies we all adore.
Meringue Cookies Ingredients
- 4 oz egg white (approximately 3-4 large egg whites)
- 3/4 cups of granulated sugar
- 1/4 teaspoon of vanilla extract
Food coloring:
- 1 drop red (or preferred pastel color)
- 1 drop golden yellow (or preferred pastel color)
- 1 drop mint green (or preferred pastel color)
- 1 drop navy blue (or preferred pastel color)
A Closer Look at Your Ingredients
While the ingredient list for meringue cookies is surprisingly short, the quality and preparation of each component play a crucial role in your success.
- Egg Whites: Use fresh, large eggs. Separate the whites carefully, ensuring absolutely no trace of yolk gets into the whites, as fat can prevent them from whipping properly. Room temperature egg whites are often recommended for achieving maximum volume, though with the Swiss method, the initial heating step negates the need for them to be at room temperature beforehand.
- Granulated Sugar: Standard granulated sugar works well here, as the heating process ensures it dissolves. Superfine sugar (caster sugar) can also be used for an even smoother meringue. Sugar is not just for sweetness; it plays a vital role in stabilizing the whipped egg whites, preventing them from collapsing, and contributing to the crisp texture of the finished cookies.
- Vanilla Extract: A classic flavor pairing for meringue, vanilla extract adds a warm, inviting aroma and taste. You can experiment with other extracts like almond, peppermint, lemon, or even a touch of coffee extract for different flavor profiles.
- Food Coloring: Gel food colorings are highly recommended over liquid ones. Liquid food colorings can add too much moisture to the meringue, potentially destabilizing it. Gel colors are concentrated, allowing you to achieve vibrant hues with just a tiny drop, without compromising the meringue’s consistency. For pastel colors, start with a single drop and mix thoroughly, adding more sparingly until you reach your desired shade.
Essential Tools for Meringue Success
Having the right tools at hand will make the meringue-making process much smoother and more enjoyable. Here’s what you’ll need:
- Stand Mixer or Hand Mixer: While possible to whisk by hand, an electric mixer is essential for achieving the necessary volume and stiffness in the meringue. A stand mixer with a whisk attachment is ideal, freeing up your hands, but a good hand mixer will also do the job.
- Heat-Proof Bowl: A large glass or stainless steel bowl that can withstand heat and fit snugly over a saucepan for the double boiler method. Ensure it’s impeccably clean and free of any grease.
- Saucepan: For creating the double boiler. Choose one that your heat-proof bowl can sit on without touching the boiling water.
- Whisk: For the initial whisking of egg whites and sugar over heat.
- Thermometer: A candy thermometer or instant-read thermometer is crucial for accurately reaching the 113°F (45°C) temperature, ensuring the sugar dissolves and the egg whites are gently cooked.
- Piping Bags: Disposable or reusable piping bags are needed to shape the cookies.
- Piping Tips: A star tip (like an Ateco 826 or Wilton 1M) is commonly used for classic meringue shapes, but you can experiment with other decorative tips.
- Parchment Paper: Absolutely essential for lining baking sheets, preventing the meringues from sticking, and ensuring easy release.
- Baking Sheets: Sturdy baking sheets to support the parchment paper and meringues in the oven.
- Circular Cutter or Template: (Optional but recommended) For marking even circles on your parchment paper to guide your piping and ensure uniformly sized cookies. A small glass or even a sugar powder-dusted cutter can work.
How to Make Meringue Cookies
Step 1: Prepare the Meringue Base
Begin by combining the egg whites, granulated sugar, and vanilla extract in your chosen heat-proof bowl. Using a clean whisk, gently but thoroughly whisk these ingredients together until they are well combined. At this stage, you’re not trying to whip them, just mix them enough to start dissolving the sugar and incorporate the flavors evenly. This initial mixing is crucial for ensuring a smooth, lump-free meringue once it’s heated.
Step 2: Heat Over a Double Boiler
Place the bowl containing your egg white mixture over a pot of simmering (not aggressively boiling) water, creating a double boiler. Ensure the bottom of the bowl does not touch the water. Continuously whisk the mixture as it heats. The goal here is to gently warm the egg whites and fully dissolve the sugar crystals. This process also lightly pasteurizes the egg whites, making them safer to consume. Keep whisking until the mixture reaches a temperature of 113°F (45°C) on your thermometer. Once the target temperature is reached, immediately remove the bowl from the pot of water.
Step 3: Whip to Stiff, Glossy Peaks
Transfer the warm egg white mixture to the bowl of your stand mixer (or use a hand mixer). Begin whipping the mixture at a medium-low speed for a minute or two, gradually increasing to high speed. Continue whipping until the meringue becomes incredibly thick, glossy, and forms stiff peaks. You’ll know it’s ready when you lift the whisk, and the peak of meringue stands upright with only a slight bend at the very tip (often referred to as a “firm peak”). If it’s still too soft, continue whipping. If it looks slightly bent, you can reduce the speed to medium-low and let it whip for another 1 to 2 minutes to stabilize further, ensuring a strong, resilient meringue that holds its shape beautifully for piping.
Step 4: Divide and Color the Meringue
Once your meringue is perfectly whipped, gently divide it into four separate bowls. Now it’s time to add your vibrant pastel food colorings. Add just one drop of your chosen gel food coloring into each bowl – one color per bowl. Using a spatula, carefully fold the color into the meringue. Be gentle and use a folding motion rather than stirring vigorously, as you want to preserve as much of the whipped-in air as possible. Mix until the color is evenly distributed and you have four distinct, beautiful pastel shades.
Step 5: Prepare for Piping
Prepare your piping bag by fitting it with your preferred piping tip (a star tip works wonderfully for classic meringue cookies). To achieve a beautiful swirled, multi-colored effect, carefully spoon equal parts of each colored meringue into the piping bag. Try to layer them side-by-side inside the bag rather than mixing them too much. Line a baking sheet with parchment paper. To ensure uniformly sized and spaced cookies, you can lightly dust the parchment paper with a little powdered sugar and use a circular cutter or a small glass to mark out even circles as a guide. Then, holding the piping bag perpendicular to the baking sheet, apply steady, even pressure to squeeze out the meringue into your desired cookie shapes, following your marked guides. Lift the bag cleanly to create a peak.
Step 6: Bake and Cool to Perfection
Preheat your oven to a very low temperature, specifically between 185°F to 194°F (approximately 85°C to 90°C). This low-temperature baking is crucial for meringues, as it allows them to dry out slowly rather than bake in the traditional sense, preventing browning and cracking. Place the baking sheets with your piped meringues into the preheated oven and bake for a significant period – typically around 2 hours. The exact time may vary depending on your oven and the size of your cookies, so keep an eye on them. They are done when they are completely dry, crisp to the touch, and easily lift off the parchment paper. Once baked, turn off the oven and allow the meringue cookies to cool completely inside the oven with the door slightly ajar. This gradual cooling in a dry environment is essential to prevent them from becoming chewy or sticky due to sudden temperature changes or humidity. Once fully cooled, they will be perfectly crisp and ready to enjoy.
Tips for Meringue Cookie Success
- Ensure Cleanliness: Any trace of grease or fat in your bowl, whisk, or even on your hands can prevent egg whites from whipping properly. Use clean, dry, non-plastic bowls and utensils.
- Room Temperature Eggs: While the Swiss method involves heating the egg whites, using them at room temperature can still help them whip faster and achieve better volume initially.
- Patience with Whipping: Don’t rush the whipping process. Slowly increase speed and allow the meringue to develop fully until it forms stiff, glossy peaks.
- Low and Slow Baking: Meringues are dried, not baked. Keep your oven temperature very low (below 200°F / 93°C) to prevent browning and cracking.
- Cooling is Key: Always cool meringues completely in the oven with the door ajar, or in a very dry environment. Humidity is the enemy of crisp meringues.
- Avoid Humidity: Meringues are highly sensitive to humidity. Avoid making them on rainy or humid days if possible, and store them in airtight containers once cooled.
Flavor Variations and Customization
While vanilla is a classic choice, don’t hesitate to get creative with your meringue cookies!
- Extracts: Substitute vanilla with almond, peppermint, lemon, orange, or even coffee extract for different flavor profiles.
- Zest: Finely grated lemon or orange zest folded into the meringue can add a bright, fresh flavor.
- Cocoa Powder: Sift a tablespoon of unsweetened cocoa powder into a portion of the meringue for a chocolate swirl.
- Spices: A pinch of cinnamon or cardamom can add a warm, inviting note.
- Decorations: Before baking, sprinkle with colored sugar, sprinkles, or edible glitter. After baking, you can dip the cooled meringues in melted chocolate or drizzle them with a glaze.
- Shapes: Experiment with different piping tips to create roses, swirls, kisses, or even small sticks.
Serving Suggestions
These beautiful meringue cookies are perfect for a variety of occasions:
- Coffee or Tea Companion: As mentioned, their lightness makes them an ideal partner for a warm beverage.
- Dessert Platter: Their delicate appearance and variety of colors make them a stunning addition to any dessert spread, especially for parties or holidays.
- Cake Decoration: Use smaller meringues as elegant garnishes for cakes, cupcakes, or tarts.
- Fruit & Cream: Crush them over fresh berries with whipped cream for a simple yet sophisticated dessert.
- Ice Cream Topping: Crumble them over your favorite ice cream for added texture and sweetness.
Storage for Optimal Freshness
To keep your meringue cookies crisp and delicious, proper storage is paramount. Once completely cooled, store them in an airtight container at room temperature. Avoid refrigerating meringues, as the humidity inside a refrigerator can cause them to become soft and chewy. If stored correctly, meringue cookies can remain fresh and crisp for up to two weeks, though they are often best enjoyed within a few days of baking. For longer storage, you can freeze baked meringues in an airtight container for up to a month; simply thaw at room temperature when ready to serve.
Troubleshooting Common Meringue Problems
Even with the best instructions, baking can sometimes present challenges. Here are solutions to common meringue issues:
- Meringues are sticky or chewy: This is almost always due to humidity, either during baking, cooling, or storage. Ensure your oven temperature is low enough to dry them out, cool them slowly in a dry environment, and store them in an airtight container. Undercooking can also lead to chewiness.
- Meringues are weeping (leaking syrup): This usually happens when the sugar hasn’t fully dissolved or if the meringue is underbaked. The Swiss method helps prevent this by heating the sugar. Make sure to whisk thoroughly over the double boiler until no sugar crystals remain.
- Meringues cracked during baking: This can be caused by the oven temperature being too high, or a sudden change in temperature. Ensure your oven is accurately calibrated and maintain a consistently low temperature.
- Meringues are flat and didn’t hold their shape: This indicates the meringue wasn’t whipped to stiff enough peaks, or it was overmixed and lost its air. Ensure your bowl and tools are grease-free, and whip until the meringue is firm and glossy.
- Meringues turned yellow: Too high an oven temperature or baking for too long can cause meringues to brown or yellow. Stick to the low temperature range to keep them pristine white (or your chosen pastel color).
Your Easy Meringue Cookies Recipe Journey
Making meringue cookies at home is a delightful culinary adventure that promises impressive results with surprisingly little effort. From the moment you whip the egg whites into a cloud of glossy perfection to the satisfying crunch of the first bite, you’ll discover the simple magic of these elegant treats. With this comprehensive guide, you now have all the tools, tips, and techniques to create your own batch of beautiful, light, and perfectly sweet meringue cookies. Don’t shy away from experimenting with colors and flavors to make them truly your own. So, gather your ingredients, preheat your oven, and prepare to enchant your taste buds with these irresistible homemade delights!
For more cookie recipes and baking inspiration, be sure to check out these fantastic ideas:
- Carrot Cake Cookie Sandwiches
- Easy 3-Minute Edible Cookie Dough Recipe
- Betty Crocker Chocolate Cookie Cups Recipe