
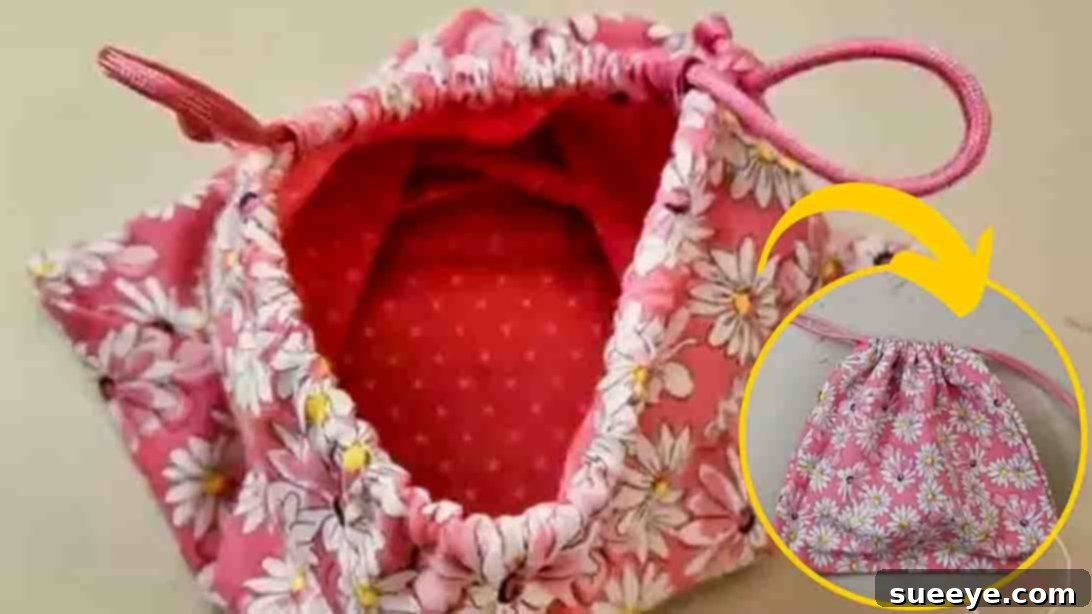
Master the Art of Sewing: Create Your Own Easy Lined Drawstring Bag
Are you looking for a fulfilling and achievable sewing project that combines practicality with personal style? Look no further! The simple DIY lined drawstring bag is an absolute gem for anyone venturing into the world of fabric crafts, or even for seasoned sewers seeking a quick and gratifying make. This project, inspired by the fantastic guidance from Stars Crafts Designs on YouTube, offers a delightful experience, yielding a beautiful and versatile bag that’s perfect for a myriad of uses.
Whether you’re aiming to craft unique, heartfelt gifts for loved ones, produce charming handmade items to sell at your local craft fair, or simply want to create stylish storage solutions for your home, this tutorial will guide you every step of the way. It’s designed to be incredibly beginner-friendly, ensuring a smooth and enjoyable process from start to finish. You’ll gain valuable sewing skills while creating a durable, aesthetically pleasing bag complete with a neat, professional-looking lining.
Say goodbye to flimsy, uninspired bags and embrace the joy of crafting something truly special with your own hands. This project is not just about sewing; it’s about unleashing your creativity, learning a new skill, and enjoying the immense satisfaction that comes with completing a handmade item. So, gather your materials, set up your sewing machine, and prepare to embark on a fun-filled crafting journey. For a visual demonstration of each step, be sure to watch the comprehensive video tutorial by Stars Crafts Designs on YouTube.
Why Sew Your Own Lined Drawstring Bag?
The allure of a handmade drawstring bag extends far beyond its functional appeal. Crafting your own offers a unique blend of benefits that mass-produced items simply cannot match. Firstly, personalization is key. You get to select fabrics that truly reflect your personality, match your decor, or perfectly suit the recipient’s taste. Imagine a bag adorned with a whimsical print for a child’s toys, a sophisticated floral design for your craft supplies, or a vibrant geometric pattern for a reusable shopping tote.
Secondly, these bags are incredibly versatile. From organizing small items like jewelry, cosmetics, or travel essentials to serving as charming gift packaging, reusable produce bags, or even dedicated project bags for knitting or embroidery, their uses are virtually endless. The lining adds an extra layer of durability and gives the bag a much cleaner, more finished interior, enhancing both its look and longevity. This makes them significantly more robust than unlined alternatives, capable of withstanding regular use and washing.
Furthermore, this sewing project is a fantastic confidence booster for beginners. It introduces fundamental sewing techniques such as cutting fabric accurately, sewing straight seams, creating a lining, and forming a casing – all within a manageable timeframe. The simplicity of the design means fewer complex steps, reducing the chances of frustration and increasing the likelihood of a successful outcome. Plus, making something yourself is a sustainable choice, reducing waste and encouraging mindful consumption. It’s an eco-friendly craft that brings joy and utility into your life.
Essential Materials for Your Drawstring Bag Project
Before diving into the sewing process, ensure you have all your materials ready. Having everything at hand will make your crafting experience much smoother and more enjoyable. Here’s a detailed look at what you’ll need:
- Two Pieces of Different Fabric Designs: Choosing two coordinating or contrasting cotton fabrics (quilting cottons are excellent for beginners due to their stable weave) will give your bag a professional and stylish appearance. One piece will serve as the outer bag, and the other as the lining. This combination adds visual interest and structure.
- Sharp Fabric Scissors: Essential for precise fabric cuts. Invest in a good pair that is used *only* for fabric to keep them sharp.
- Sewing Machine: A basic sewing machine with a straight stitch function is all you need. Ensure it’s threaded and in good working order.
- Iron and Ironing Pad/Board: Pressing seams and folds at various stages is crucial for crisp, professional-looking results. It helps to set stitches and create clean lines.
- Drawstring (or Drawstring Threader): This is what allows your bag to open and close. You can use a pre-made cord, ribbon, or even create your own fabric strip. A drawstring threader or a safety pin will help you feed the drawstring through the casing.
- Ruler and Tape Measure: For accurate measuring and marking of your fabric. Precision here will lead to a better-finished product.
- Fabric Marking Pen (or Chalk): To mark cutting lines, stitch lines, or folding points directly onto your fabric without leaving permanent marks.
- Pins (or Fabric Clips): These hold fabric layers together securely before and during sewing, preventing shifting and ensuring accurate seams. Fabric clips are a great alternative for thicker fabrics or if you prefer not to use pins.
- Matching Thread: Choose a good quality polyester thread that matches the dominant color of your outer fabric for an invisible finish.
Step-by-Step Guide: Crafting Your Lined Drawstring Bag
Follow these detailed instructions carefully to construct your beautiful lined drawstring bag. Remember, patience and precision are your best tools!
Preparation is Key: Setting Up Your Workspace
Before you begin sewing, it’s wise to pre-wash and press your chosen fabrics. This prevents future shrinkage and makes them easier to cut and sew. Lay out your materials on a clean, flat surface. Ensure your sewing machine is threaded and ready, and your iron is heated. A well-organized workspace minimizes errors and maximizes enjoyment.
Step 1: Cutting and Assembling the Bag Layers
Begin by measuring and cutting each of your two fabric pieces to 20 inches in length by 11 inches in width. These dimensions are ideal for a versatile medium-sized bag, but feel free to adjust them to your preferred size for a larger or smaller pouch. Just ensure both the outer fabric and the lining fabric are cut to identical dimensions for a perfect fit.
Next, take each piece of fabric and fold it in half, aligning the 20-inch edges. Crucially, make sure the “right sides” (the side with the print or pattern you want to show) are facing each other. This is known as “right sides together” and is a standard practice in sewing to enclose seams neatly. After folding, measure down 1 1/2 inches from the top raw edge of each folded fabric piece. Mark this point with your fabric pen. This 1 1/2-inch section at the top will eventually form the casing for your drawstring.
Now, carefully pin the two side edges of each folded fabric piece, starting from the marked 1 1/2-inch point down to the bottom. Do not pin the top 1 1/2-inch section or the bottom fold. Using your sewing machine, stitch along the pinned side edges of both the outer bag fabric and the lining fabric, using a 3/8 to 1/2-inch seam allowance (the distance from the raw edge to your stitch line). Remember to backstitch at both the beginning and end of each seam. Backstitching involves sewing a few stitches forward, then a few backward, then forward again, which locks the stitches in place and prevents them from unraveling.
Once the side seams are sewn for both the outer bag and the lining, gently open the seams with your fingers and press them flat with your iron. Pressing the seams open helps to reduce bulk and gives a smoother finish. Next, to create a more defined bottom for your bag (often called boxed corners), flatten each sewn bag (outer and lining) so that the side seam aligns with the bottom fold. At each bottom corner, you’ll see a small triangle. Measure from the corner point inward and mark a line about 1 1/2 to 2 inches across (adjust based on desired bag depth). Stitch along this marked line, effectively forming a “V” shape or a small triangle at each corner. Trim the excess fabric from these corners to about 1/4 inch from your stitching line. This technique adds depth to your bag, allowing it to stand upright more easily.
With both the outer bag and the lining sewn, turn the outer bag right side out. Keep the lining bag with its wrong side out. Insert the lining bag inside the outer bag, aligning the side seams perfectly and ensuring the wrong sides of both fabrics are facing each other. The goal is to have the right side of the outer bag facing out, and the right side of the lining bag also facing out on the inside. Carefully line up the top raw edges of both bags and pin them together. Sew along the very top edge of the bag, using a small seam allowance (about 1/4 inch), to attach the lining to the outer bag. This creates a secure, neat top edge.
Step 2: Creating the Drawstring Casing and Finishing Your Bag
Now that your lining and outer bag are joined at the top, it’s time to create the crucial casing for your drawstring. This step requires careful pressing and stitching to ensure a clean channel. First, turn the top edge of the bag inward once, just past the stitch line you made to attach the lining. Press this fold firmly with your iron. This initial fold should be approximately 1/2 inch to 3/4 inch. The purpose of this fold is to enclose the raw edge, creating a clean finish. Pressing at this stage is essential for creating a crisp, professional edge.
Next, turn the top edge under again, this time turning it down further to form the full casing. The depth of this second fold should be wide enough to accommodate your chosen drawstring (usually around 1 to 1 1/4 inches). Ensure this fold extends just past the bottom of the open seams you left unstitched in Step 1. Pin this fold all the way around the top of the bag. Press this second fold firmly as well. This creates a neat channel for your drawstring cord. The precise folds, reinforced by pressing, will make your stitching much easier and the final casing much neater.
With the casing neatly folded and pressed, it’s time to stitch it down. Using your sewing machine, stitch all the way around the bag, close to the bottom folded edge of the casing. Remember to backstitch at the beginning and end of your seam to secure it. Make sure your stitching is consistent and straight for a polished look. This line of stitching creates the enclosed tunnel through which your drawstring will pass. Be careful not to stitch over the openings you left at the side seams of the outer fabric, as these are where the drawstring will enter and exit.
Finally, it’s time to insert your drawstring. If you’re using a regular cord or ribbon, attach a safety pin to one end. This will act as a temporary threader. Feed the safety pin, leading the drawstring, through one of the openings in the casing (the unstitched sections at the top of your original side seams). Guide it all the way around the casing until it emerges from the other opening. Pull both ends of the drawstring until they are even. Tie a simple knot at each end of the drawstring to secure it and prevent it from pulling back into the casing. Test your drawstring by pulling it to close the bag, then loosening it to open. Trim any excess thread, and voilà! Your easy lined drawstring bag is complete!
Tips for Sewing Success
For those just starting their sewing journey, a few extra tips can make a world of difference in achieving a professional finish and building confidence:
- Press, Press, Press: This cannot be emphasized enough. Ironing your fabric before cutting, pressing seams open, and pressing folds for the casing will dramatically improve the appearance and quality of your finished bag. It creates crisp edges and helps your stitches lie flat.
- Use Good Quality Thread: A strong, good-quality polyester thread will prevent breakage and ensure durable seams that withstand use and washing.
- Start with a Fresh Needle: A sharp sewing machine needle prevents skipped stitches and snags, especially when working with different fabric thicknesses. Change your needle every few projects or if it feels dull.
- Test Your Stitch: Always test your sewing machine’s stitch settings on a scrap piece of your project fabric before sewing on the actual bag. This allows you to check tension, stitch length, and ensure everything is working correctly.
- Go Slow: Especially when you’re a beginner or sewing intricate parts, reduce your sewing machine speed. This gives you more control and helps you sew straighter lines. Accuracy trumps speed every time.
- Don’t Be Afraid of Your Seam Ripper: Mistakes happen! A seam ripper is every sewer’s best friend. Don’t hesitate to unpick stitches if you’re not happy with them. It’s better to fix an error than to leave a flaw you’ll always notice.
- Trim Your Threads: Always trim loose threads neatly after each sewing step. This prevents tangles and gives your finished product a clean, polished look.
Unleash Your Creativity: Customizing Your Drawstring Bag
While the basic tutorial provides a fantastic foundation, the beauty of DIY lies in customization. Here are some ideas to make your drawstring bag uniquely yours:
- Fabric Choices: Experiment with different fabric combinations! Mix solids with patterns, create themed bags for holidays, or use novelty prints for children. Consider fabrics like canvas or denim for a more structured, heavy-duty bag, or rayon for a softer, flowier feel.
- Size Variations: This tutorial provides a great starting size, but don’t limit yourself. Scale the dimensions up or down to create tiny jewelry pouches, medium-sized project bags, or large laundry bags. Remember to adjust the drawstring length accordingly.
- Drawstring Options: Beyond a simple cord, consider using satin ribbons for a luxurious touch, braided fabric strips made from coordinating scraps, or even thin leather cords for a rustic look.
- Embellishments: Add decorative elements to truly personalize your bag. Iron-on patches, fabric paint, embroidery, appliqués, or even small tassels attached to the drawstring ends can add charm and character.
- Add Pockets: For extra functionality, consider sewing a small patch pocket to the inside of the lining before assembling, perfect for holding tiny essentials.
- Two-Tone Casing: Instead of turning the casing from the bag’s main fabric, you could sew on a separate strip of contrasting fabric to create a visible two-tone casing for added visual appeal.
Beyond the Basics: Wonderful Uses for Your Handmade Drawstring Bags
Once you’ve mastered the art of making these versatile bags, you’ll find countless ways to incorporate them into your daily life and gift-giving:
- Gift Packaging: Ditch the wasteful wrapping paper! Use these bags as beautiful, reusable gift bags that become part of the present itself. Fill them with homemade cookies, small toys, or craft supplies.
- Travel Organizer: Keep your suitcase tidy by using drawstring bags to separate shoes, laundry, toiletries, or delicates. They make packing and unpacking a breeze.
- Home Organization: Perfect for tidying up small items around the house. Store craft supplies, LEGO bricks, hair accessories, charging cables, or even snacks in a stylish and accessible way.
- Reusable Shopping Bags: Create larger versions for produce at the grocery store or for small purchases, helping you reduce plastic waste.
- Lunch or Snack Bag: A lined bag is perfect for carrying a lunch or snacks, keeping your food contained and making it easy to carry.
- Project Bags: For knitters, crocheters, or embroiderers, these bags are ideal for holding ongoing projects, yarn, and tools, keeping everything together and portable.
- Party Favors: Sew a batch of smaller bags to use as unique and charming party favor bags for birthdays, weddings, or baby showers.
Conclusion: Your Next Favorite Handmade Project Awaits!
Congratulations! You’ve just discovered how straightforward and rewarding it can be to create your very own lined drawstring bag. This project is a testament to the fact that even beginners can achieve impressive results with clear instructions and a little practice. The satisfaction of seeing your chosen fabrics transform into a functional and beautiful item is truly unparalleled.
Don’t hesitate to experiment with different fabrics, sizes, and embellishments to make each bag unique. Whether you’re gifting them, selling them, or using them to bring order and style to your own life, these handmade drawstring bags are sure to be a cherished creation. So, fire up your sewing machine, embrace your inner crafter, and get ready to enjoy the countless possibilities that this simple yet elegant project offers. Happy sewing, and don’t forget to share your amazing creations!