
Transforming a living space into a vibrant, welcoming sanctuary often involves incorporating elements of nature. For many, including myself, decorating with plants and flowers is a delightful way to inject life and freshness into any room. The verdant hues and intricate forms of foliage have a unique ability to uplift spirits and create a sense of calm. While real plants offer undeniable beauty and air-purifying benefits, they also come with specific requirements for light, water, and ongoing care, which can be a challenge for busy individuals or those without a green thumb. Additionally, sourcing unique or exotic real plants can sometimes be quite costly, depending on their rarity and the establishment from which they’re purchased. This dilemma often leads enthusiasts to consider artificial or decorative alternatives.
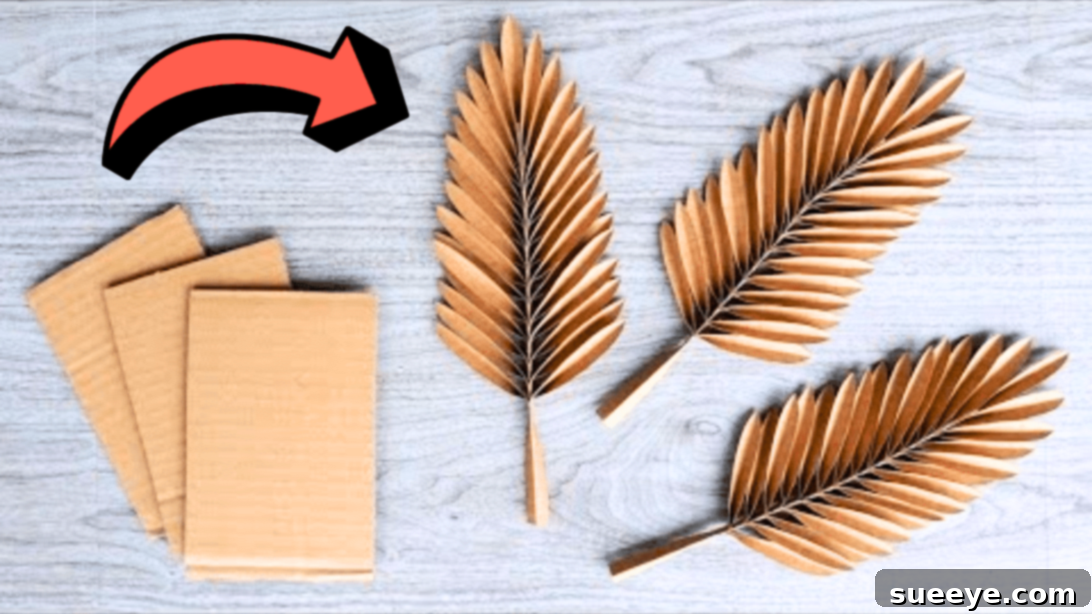
Fortunately, the world of decorative plants has evolved significantly, offering incredibly realistic and aesthetically pleasing options that require no maintenance. However, pre-made artificial plants, especially high-quality ones, can still carry a considerable price tag. This is where the magic of DIY comes in! For those who cherish creative projects and sustainable living, crafting your own decorative leaves and flowers presents a fantastic, budget-friendly solution. Imagine turning readily available household items like cardboard into stunning botanical accents. Not only does this approach save money, but it also allows for complete customization, ensuring your decorative pieces perfectly complement your home’s aesthetic. This guide will walk you through the process of creating surprisingly realistic decorative leaves from simple cardboard, a brilliant technique shared by Tatzkreen Art on YouTube. Get ready to unleash your creativity and bring a touch of handmade nature into your home!
RELATED: How to Make DIY Flowers Using Corn Husks
The Undeniable Benefits of Crafting Your Own Cardboard Leaves
Diving into a DIY project like creating decorative cardboard leaves offers a multitude of advantages beyond just beautifying your space. It’s an excellent way to embrace sustainability, personalize your decor, and even engage in a relaxing, fulfilling activity. Here are some compelling reasons why you should consider making these realistic decorative leaves:
- Unbeatable Cost-Effectiveness: One of the primary draws of this project is its incredibly low cost. Instead of purchasing expensive real or artificial plants, you’re utilizing materials you likely already have lying around – old cardboard boxes, packaging, or even cereal boxes. This makes it an ideal craft for budget-conscious decorators.
- Eco-Friendly Upcycling: By repurposing cardboard, you’re actively contributing to waste reduction and promoting environmental sustainability. You’re giving new life to materials that would otherwise end up in landfills, transforming them into beautiful, functional decor items. It’s a small step that makes a big difference.
- Complete Customization: Unlike store-bought options, DIY allows you to dictate every aspect of your decorative leaves. You can choose the size, shape, color, and even the “species” of leaf you want to create. Want a vibrant monstera? Or perhaps a delicate fern? The possibilities are endless. You can paint them to match your existing color scheme or experiment with unique finishes.
- Zero Maintenance: These cardboard leaves offer all the aesthetic benefits of real plants without any of the hassle. There’s no need for watering, sunlight, pruning, or worrying about pests. They’ll look fresh and vibrant year-round, regardless of your gardening skills.
- Durable and Long-Lasting: Once crafted and properly glued, these cardboard leaves are surprisingly robust. They won’t wilt, fade, or decompose, ensuring your handmade decor remains a cherished part of your home for a long time. They’re perfect for areas where real plants wouldn’t thrive due to lack of light or extreme temperatures.
- A Fun and Rewarding Creative Outlet: Engaging in craft projects is not only productive but also incredibly therapeutic. The process of cutting, folding, and assembling can be a relaxing way to unwind and express your creativity. The satisfaction of displaying something you made with your own hands is truly rewarding.
- Unique Personal Touch: Handmade decor adds character and warmth that mass-produced items simply cannot replicate. Your cardboard leaves will tell a story and reflect your personal style, making your home feel more unique and inviting. They can be conversation starters and a testament to your resourcefulness.
Embracing this DIY project means more than just creating a decorative item; it’s about making a conscious choice for sustainability, expressing your artistic flair, and enjoying the simple pleasure of crafting. So, gather your materials and prepare to be amazed by what you can create with a little cardboard and a lot of imagination!
Essential Materials for Crafting Realistic Cardboard Leaves:
Before you begin your creative journey, ensure you have all the necessary tools and materials at hand. Most of these items are readily available around your home or can be purchased affordably at any craft or stationery store. The beauty of this project lies in its simplicity and accessibility.
- Cardboard: The star of our project! Look for medium-weight corrugated cardboard from old delivery boxes, cereal boxes, or even poster boards. The key is to find cardboard that’s sturdy enough to hold its shape but flexible enough to cut and fold. Using a variety of thicknesses can also add character to your finished leaves.
- Scissors: A good pair of sharp scissors is crucial for clean, precise cuts. If you’re working with thicker cardboard, you might consider using a utility knife for straight lines (always use a cutting mat and exercise caution).
- Marking Pen or Pencil: Essential for drawing outlines, making measurements, and marking fold lines. A pencil is great for initial sketches as it can be erased, while a pen might be useful for clearer, permanent marks before cutting.
- Ruler: Accuracy in measurement is key for achieving a realistic and well-proportioned leaf structure. A standard ruler will suffice for measuring and ensuring straight cuts.
- Glue: A strong adhesive is vital for securing the cardboard pieces. White school glue, craft glue, or even a hot glue gun (with adult supervision if necessary) can work effectively. Choose a glue that dries clear and provides a firm bond.
- Optional (but Recommended) Additions:
- Paint and Brushes: Acrylic paints in various shades of green, brown, and even yellow can dramatically enhance the realism of your leaves. Consider adding subtle veins with a fine brush or sponges for texture.
- Sealant: A clear matte or gloss sealant spray can protect your painted leaves and give them a more finished look.
- Cutting Mat: If using a utility knife, a self-healing cutting mat protects your work surface.
Step-by-Step Guide: Crafting Realistic Decorative Cardboard Leaves
Follow these detailed instructions to transform ordinary cardboard into stunning, lifelike decorative leaves. Precision and patience are your best friends in this creative endeavor.
Step 1: Preparing Your Cardboard Pieces with Precision
The foundation of realistic leaves begins with careful preparation of your cardboard. If you’re working with corrugated cardboard, which often has a wavy inner layer between two flat sheets, the first critical step is to separate these components. Gently peel away one of the flat outer layers to expose the corrugated interior. For this project, we will primarily be using the smooth, flat side, as it provides a cleaner surface for our leaf shapes. Once you have your flat cardboard sheet, measure and cut it into specific dimensions using your ruler and marking pen or pencil. You’ll need one long strip measuring approximately 21 x 1.8 cm (or roughly 8.2 x 0.7 inches). This strip will form the central stem of your leaf branch. Additionally, prepare fifteen smaller rectangular pieces, each measuring 7 x 3.5 cm (or about 2.7 x 1.3 inches). These will be transformed into the individual leaf blades. Accuracy in these initial cuts is paramount, as it ensures uniformity and a professional finish for your final product. Set all these meticulously cut pieces aside, making sure they are neat and ready for the subsequent steps.
Step 2: Crafting the Central Stem for a Sturdy Foundation
Now, let’s focus on creating the robust and realistic stem that will support your leaves. Take the long cardboard strip you prepared in Step 1 (the 21 x 1.8 cm piece). Carefully fold this strip in half lengthwise. This folding action will increase its thickness and rigidity, making it more durable and giving it a more lifelike appearance. Once folded, and while it’s still folded, use your ruler and marking pen to make small marks along the folded edge. These marks should be spaced approximately 1 cm (or 0.4 inches) apart, and you’ll need to make fifteen such marks. These markings will serve as guides for where you’ll attach your individual leaves later. After marking, unfold the strip. You will now see your guide marks on the inside surface. On one half of the unfolded strip, apply a thin, even layer of glue along its entire length. Crucially, leave a small section at one short end (where your last mark is) unglued. This unglued section will allow for a clean finish or a potential slight curve at the tip of your branch. The glue applied now will create a strong, consolidated stem when sealed.
Step 3: Assembling the Stem and Initial Leaf Shaping
With the glue applied to the stem strip, it’s time to seal it. Carefully close the strip along the original fold line, pressing the two halves firmly together to ensure the glue creates a strong, lasting bond. Run your fingers along the entire length to eliminate any air bubbles and ensure maximum adhesion. Once pressed, set this stem aside to allow the glue to dry completely. A fully dried stem will be much sturdier and easier to work with. While the stem is drying, turn your attention to the rectangular leaf pieces. Grab one of the 7 x 3.5 cm cardboard rectangles. Fold this piece lengthwise, creating a central crease that will mimic the natural midrib of a leaf. Next, take one of the long edges of this folded rectangle and fold it back in half towards the central crease. This creates a slightly raised edge, adding dimension. Repeat this exact folding technique for the opposite long edge of the same rectangular piece. These precise folds are essential for giving your cardboard leaves a three-dimensional, natural contour, moving beyond a simple flat cut-out.
Step 4: Sculpting Individual Leaf Shapes for Realism
With your folded rectangular pieces ready, it’s time to transform them into individual leaf blades. Take one of the pieces you folded in Step 3. Keep it folded, and using your scissors, carefully cut the top edge of this folded piece in a gentle, outward curve. This curved cut will give your leaf a rounded, organic tip, avoiding a blunt, unnatural appearance. Perform this curved cut on half of your prepared leaf rectangles. For the remaining half of your leaf rectangles, you will also cut them in half lengthwise along the original fold, resulting in two separate, smaller leaf blanks from each initial rectangle. This technique provides variety in your leaf sizes, contributing to a more natural and less uniform branch. For these individual halves, you will also apply the same curved cutting technique to their tips. The key is to keep the pieces paired up, as you will glue their bases together as shown in the video tutorial by Tatzkreen Art. This step requires a keen eye for organic shapes to ensure each leaf looks as authentic as possible, even before painting.
Step 5: Final Assembly and Achieving a Natural Arrangement
Now comes the exciting part: assembling your leaves onto the dried stem. Retrieve your fully dried, sturdy cardboard stem. Begin by taking one of your single, smaller leaf pieces (the ones you cut individually in Step 4) and carefully glue it to the very tip of the stem. This will form the topmost leaf of your branch. Next, take the rest of your prepared leaf pieces, which should be in pairs with their bases glued together, and begin attaching them along the length of the stem, working your way down from the tip. Refer closely to the video tutorial by Tatzkreen Art for precise guidance on the proper adhering technique and positioning of each leaf. The video demonstrates how to slightly offset the leaves and angle them alternately on either side of the stem, mimicking the natural growth pattern of real foliage. Pay attention to spacing and ensure there’s a slight overlap or natural arrangement rather than rigid, evenly spaced placement. Once all the leaves are glued in place, gently adjust them if needed to achieve a harmonious and realistic appearance. Allow the entire assembled branch to dry completely, ensuring all glue bonds are strong and firm before handling extensively. Once dry, your realistic decorative leaves are ready to display!
Elevating Realism: Tips for Making Your Cardboard Leaves Truly Lifelike
While the basic steps will yield beautiful results, a few extra touches can transform your cardboard leaves from “crafty” to “captivatingly realistic.”
- Embrace Color and Texture: This is perhaps the most impactful step. Use acrylic paints to replicate the natural variations found in real leaves. Don’t stick to a single shade of green; incorporate lighter greens for new growth, darker greens for mature leaves, and hints of yellow or brown for subtle imperfections. Use a fine brush to paint delicate veins, or a sponge to dab on subtle textural differences.
- Vary Sizes and Shapes: Nature rarely produces perfectly uniform leaves. When cutting your initial rectangles, consider making some slightly larger or smaller, or varying the curve of the tips. This natural irregularity adds immense realism to your finished arrangement.
- Create Different Leaf Types: Once you’ve mastered the basic technique, experiment with cutting different leaf shapes. Think about the distinctive outlines of Monstera, fern fronds, or oak leaves. Each new shape will add a unique botanical touch to your collection.
- Add a Flexible Element: For an advanced touch, you could insert a thin floral wire along the center of your stem before gluing it, allowing you to gently bend and shape your finished branch for even more dynamic arrangements.
- Consider a Protective Finish: Once painted and completely dry, a spray-on matte or satin sealant can protect your leaves from dust and moisture, while also giving them a subtle sheen that mimics natural leaf surfaces.
Creative Display Ideas for Your Handmade Cardboard Leaves
Once your realistic cardboard leaves are complete, the possibilities for showcasing them are endless! Here are some inspiring ideas to integrate them into your home decor:
- Elegant Vases and Bouquets: Arrange your branches in a tall vase, either on their own for a minimalist statement or combined with other artificial or dried flowers for a fuller bouquet.
- Stunning Wall Decor: Create a botanical gallery wall by mounting individual leaves or branches directly onto a wall. You can arrange them in a cascading pattern or a symmetrical design.
- Chic Table Centerpieces: Lay a few branches flat along the center of your dining table or coffee table for a natural, understated centerpiece. Add candles or other small decorative elements for a layered look.
- Festive Garlands and Wreaths: String multiple leaves or small branches together to create a unique garland for mantels, doorways, or stair railings. They can also be incorporated into DIY wreaths for seasonal or everyday decor.
- Gift Wrapping Embellishments: Add a handmade touch to your gifts by tying a small cardboard leaf branch to the ribbon. It’s a thoughtful and eco-friendly alternative to traditional bows.
- Terrarium or Shadow Box Fillers: Place a few leaves inside a decorative terrarium (without live plants) or a shadow box for a protected and artistic display.
The beauty of these DIY leaves lies in their versatility. Let your imagination guide you in finding the perfect spot and arrangement for your unique, handmade creations.
*All these images are credited to Tatzkreen Art via YouTube. Give his channel a visit and subscribe for more inspiring DIY projects and art tutorials!
Conclusion: Embrace the Beauty of Handmade Botanical Decor
As we’ve explored, creating realistic decorative leaves from cardboard is an incredibly rewarding and accessible DIY project that offers a perfect blend of creativity, sustainability, and aesthetic appeal. From transforming humble cardboard into lifelike botanical elements to customizing every detail to suit your personal style, this craft provides a unique opportunity to infuse your home with warmth and character. You’ve learned how to meticulously prepare your materials, craft a sturdy stem, sculpt individual leaf shapes, and assemble them into a cohesive, natural-looking branch. With the added tips for enhancing realism through painting and varying forms, your handmade leaves are poised to become eye-catching accents in any room.
Beyond the immediate beauty they bring, these cardboard leaves represent a mindful approach to home decor. They are a testament to the power of upcycling, proving that stunning decoration doesn’t have to come with a hefty environmental or financial cost. So, whether you’re looking to add a touch of greenery to a dimly lit corner, create a unique centerpiece, or simply enjoy the therapeutic process of crafting, this project is an excellent choice. We encourage you to gather your materials, follow Tatzkreen Art’s excellent tutorial, and embark on this delightful journey. The satisfaction of displaying your own handcrafted, realistic decorative leaves will undoubtedly bring a smile to your face and a breath of fresh, creative air into your living space. Happy crafting!