
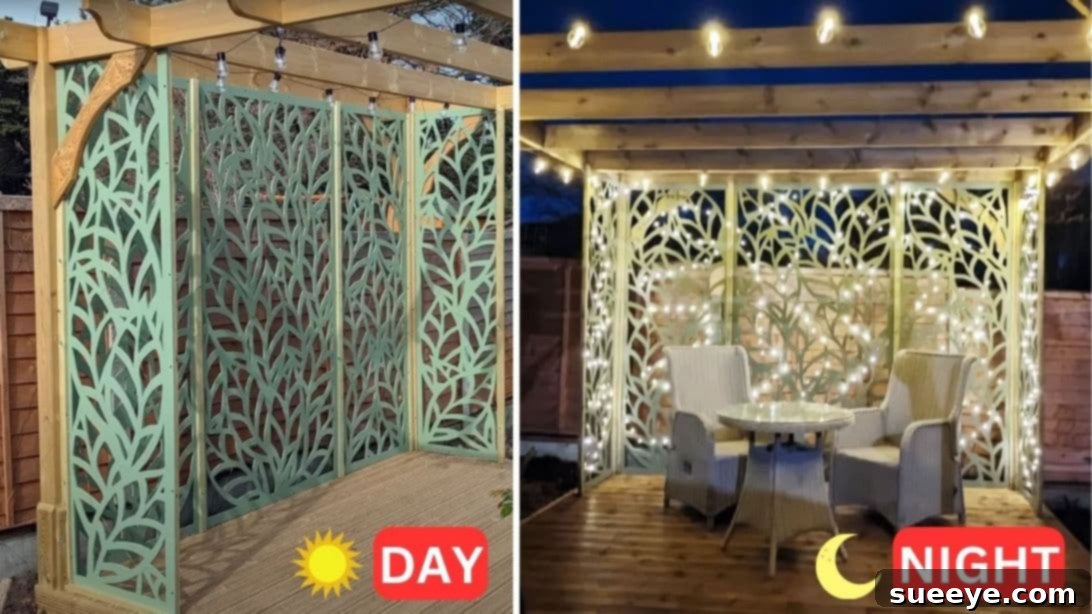
Transform Your Outdoor Space: Easy DIY Leaf Garden Screens
Are you looking to add a unique, whimsical, and practical touch to your garden or outdoor living area? Imagine beautiful, intricately designed screens that provide privacy, define spaces, and elevate your backyard aesthetic. This incredible project, inspired by the talented Crouch Vale Woodcraft on YouTube, offers an accessible and rewarding way to craft stunning DIY leaf garden screens using only plywood. Surprisingly easy to make, this woodworking endeavor is perfect for both seasoned DIY enthusiasts and beginners eager to tackle a creative outdoor project.
These versatile screens can serve multiple purposes: install them as elegant walls in your pergola to create a shaded, intimate retreat, use them as decorative accents anywhere in your garden to add a touch of whimsy, or deploy them as privacy barriers in strategic locations. The beauty of this project lies in its profound customizability. While the leaf pattern offers a natural, organic charm, feel free to unleash your creativity! You can easily adapt the design to flower patterns, geometric shapes, abstract motifs, or any other pattern that complements your garden’s style. Furthermore, these screens are a blank canvas for color; paint them with whatever hue best suits your outdoor palette, whether a vibrant pop of color or a serene, natural stain.
Embark on this delightful crafting journey by following our comprehensive, step-by-step instructions below. For visual learners, we highly recommend watching the accompanying video tutorial provided by Crouch Vale Woodcraft, which perfectly illustrates each stage of the process. Prepare to be amazed by how easily you can bring this charming garden enhancement to life, adding a bespoke element that will undoubtedly impress your guests and enhance your personal enjoyment of your outdoor sanctuary. I am confident you will cherish this craft project idea as much as I do.
Why DIY Garden Screens? Benefits That Enhance Your Outdoor Living
Investing time in creating your own garden screens offers a multitude of benefits beyond mere aesthetics. These custom-made additions can fundamentally transform how you experience and utilize your outdoor space:
- Enhanced Aesthetics: Custom screens instantly elevate the visual appeal of your garden. The intricate leaf patterns, or whatever design you choose, create a focal point, adding texture and artistic flair that store-bought decor often lacks.
- Privacy Solutions: Strategically placed screens can offer much-needed privacy from neighbors or unwanted views, turning your garden, patio, or pergola into a secluded haven where you can relax undisturbed.
- Defined Outdoor Spaces: Just like walls indoors, garden screens can help define distinct “rooms” within your outdoor area. Create a cozy seating nook, separate a dining area from a play zone, or visually segment different planting areas.
- Sun and Wind Protection: Depending on their density and placement, these screens can provide partial shade during hot summer days or act as a gentle windbreak, making your outdoor spaces more comfortable and usable.
- Cost-Effectiveness: Building your own screens from plywood is significantly more economical than purchasing pre-made privacy panels or hiring professionals for custom installations. You save money while gaining a unique, handmade item.
- Personalization and Satisfaction: There’s immense satisfaction in creating something beautiful and functional with your own hands. This project allows for complete personalization, ensuring your garden screens perfectly reflect your style and meet your specific needs.
Essential Materials for Your Leaf Garden Screens
Gathering the right materials and tools before you begin is crucial for a smooth and successful project. Here’s what you’ll need:
- Plywood: The primary material for your screens. Opt for exterior-grade plywood (such as marine-grade or treated exterior plywood) for maximum durability and resistance to weather. A thickness of at least 1/2 inch (12mm) is recommended for stability, but adjust based on your desired panel size and robustness.
- Jigsaw: Your essential cutting tool for intricate designs. A variable-speed jigsaw with different blade types (for wood, fine cuts) will offer the best control and precision.
- Pencil: For marking measurements, drawing your template, and tracing designs onto the plywood.
- Ruler or Measuring Tape: For accurate measurements when cutting your plywood panels to size and ensuring straight lines.
- Sanding Paper: A range of grits (e.g., 80-grit for initial smoothing, 120-grit for general sanding, and 220-grit for a fine finish) will be needed to smooth rough edges and prepare the surface for painting. A sanding block or an orbital sander can significantly speed up this process.
- Exterior Paint or Wood Stain: Choose a high-quality exterior paint or wood stain that can withstand the elements. Consider a primer designed for outdoor wood for better paint adhesion and longevity.
- Protective Sealant (Optional but Recommended): An outdoor wood sealant or varnish will add an extra layer of protection against moisture, UV rays, and general wear and tear, extending the life of your screens.
- Safety Gear: Always include safety glasses, work gloves, and potentially ear protection when using power tools.
Step-by-Step Guide: Crafting Your DIY Leaf Garden Screens
Follow these detailed instructions to create stunning, durable leaf garden screens that will be the envy of your neighborhood:
Step 1: Planning and Plywood Preparation
Begin by determining the desired dimensions for your garden screens. Consider where they will be installed – whether as a wall for a pergola, a standalone privacy screen, or decorative panels. Once you have your measurements, align your sheets of plywood together to ensure consistent cuts if you’re making multiple panels of the same size. Using a ruler and pencil, carefully mark your cutting lines. With precision and a suitable saw (a circular saw or table saw is ideal for straight cuts), cut your plywood into the desired panel sizes. Always double-check your measurements before making any cuts to prevent waste. Safety is paramount; wear safety glasses and ensure your work area is clear.
Step 2: Crafting Your Design Template
This is where your chosen design truly begins to take shape. Grab a small, sturdy piece of scrap wood or thick cardboard – this will become your template. With your pencil, carefully draw your desired leaf design onto this material. Focus on creating clear, distinct lines and smooth curves. If you’re opting for a different pattern like flowers or geometric shapes, ensure the design is well-defined and repeatable. Once satisfied with your drawing, use your jigsaw to meticulously cut out the design. Take your time to achieve clean edges, as this template will guide all subsequent cuts. This finished piece will now serve as your master stencil.
Step 3: Tracing Your Design onto the Plywood Panels
Now, bring your design to life on the main plywood panels. Place your newly created template onto the plywood sheet. Using your pencil, carefully trace around the template. You can arrange the leaf patterns randomly across the panel for an organic look, as demonstrated in the video, or create a more uniform, repeating pattern. Experiment with overlapping leaves, varying their orientation, or leaving open spaces to create visual interest. Ensure there’s enough space between designs for your jigsaw blade to maneuver without damaging adjacent shapes. Secure the template with painter’s tape if needed to prevent slipping during tracing, guaranteeing clean and accurate outlines.
Step 4: Precision Cutting with Your Jigsaw
With all your leaf designs traced, it’s time for the most intricate step. Using your jigsaw, carefully cut along the marked lines. This requires a steady hand and patience. For internal cuts (like the inside of a leaf or a pattern that doesn’t extend to the edge), you’ll need to drill a pilot hole large enough to insert your jigsaw blade. Move slowly and deliberately, guiding the jigsaw along the pencil lines. Pay close attention to curves and sharp corners, adjusting your speed as needed. Always wear safety glasses, keep your hands clear of the blade, and ensure the plywood is securely clamped to your workbench to prevent movement during cutting. This precision cutting is key to the aesthetic appeal of your finished screens.
Step 5: Sanding for Smoothness and Safety
After all the cutting is complete, your plywood panels will likely have rough, splintered edges – a natural result of sawing. This step is crucial for both the aesthetic finish and the safety of your screens. Begin with a coarser grit sanding paper (e.g., 80 or 100-grit) to remove any major burrs and rough spots. Work your way up to finer grits (120-grit, then 220-grit) to achieve a super smooth surface on all cut edges and the panel faces. Pay particular attention to the intricate curves of your leaf designs. Hand sanding with a sanding block works well for curves, while an orbital sander can quickly smooth the flat surfaces. This step prepares the wood perfectly for painting, ensuring a professional and splinter-free finish.
Step 6: Painting and Finishing for Longevity
Now for the color! Before painting, clean the entire surface of the plywood panels to remove any sawdust or debris. A tack cloth or damp rag works well. If using paint, apply a high-quality exterior wood primer first. This will help the paint adhere better, provide a more uniform finish, and offer additional protection against moisture. Once the primer is dry, begin painting your panels with your chosen exterior color. Apply thin, even coats, allowing each coat to dry completely according to the manufacturer’s instructions before applying the next. Use brushes for intricate areas and rollers for larger flat surfaces. If you prefer a natural wood look, apply an outdoor-grade wood stain followed by a marine-grade varnish or exterior sealant for maximum weather protection. Ensure all sides and edges are fully coated to protect the plywood from the elements.
Step 7: Installation and Placement
With your beautifully finished screens dry and ready, it’s time for installation. The method of installation will depend on where you intend to place them. For pergola walls, you can securely attach them to existing posts using strong exterior-grade screws or L-brackets. If creating freestanding privacy screens, you’ll need to anchor sturdy wooden or metal posts into the ground and then attach the plywood panels to these posts. Ensure the screens are level, plumb, and robustly secured to withstand wind and other environmental factors. Consider the optimal placement for aesthetic impact, privacy, and sun/wind protection. Once installed, step back and admire your handiwork – your garden has been beautifully enhanced!
Unleash Your Creativity: Customization Ideas for Your Garden Screens
While the leaf design is charming, don’t limit yourself! Here are more ways to personalize your screens:
- Diverse Motifs: Experiment with other nature-inspired designs like birds, butterflies, geometric patterns, or even abstract shapes.
- Color Play: Instead of a single color, try painting individual leaves or sections in contrasting or complementary shades for a multi-dimensional effect.
- Lighting Integration: Attach string lights or solar-powered LED strips along the back of the screens to create a magical, illuminated ambiance in the evening, highlighting the cut-out patterns.
- Climbing Plants: Train delicate climbing plants like clematis or jasmine to grow through some of the cut-outs, creating a living, evolving piece of art that blends with nature.
- Mixed Materials: For added texture, consider backing some of the cut-outs with colored acrylic sheets or even translucent fabric to create stained-glass like effects.
Maintaining Your DIY Garden Screens for Lasting Beauty
To ensure your beautiful screens endure for years to come, a little maintenance goes a long way:
- Regular Cleaning: Periodically wipe down your screens with a damp cloth to remove dust, pollen, and cobwebs. For stubborn grime, a mild soap solution can be used.
- Inspect for Wear: Annually, check your screens for any signs of wear, such as chipping paint, splintering wood, or loosening fasteners.
- Re-seal or Re-paint: Depending on your local climate and the type of finish used, you may need to re-apply a fresh coat of sealant or paint every 2-3 years to maintain protection against moisture and UV damage.
- Winter Protection: In areas with harsh winters, consider covering your screens or bringing smaller panels indoors to extend their lifespan.
Safety First: Essential Precautions for Your Project
Working with power tools and wood requires attention to safety. Please always prioritize these precautions:
- Eye Protection: Always wear safety glasses or goggles when cutting, sanding, or drilling to protect your eyes from debris.
- Ear Protection: When operating noisy power tools like jigsaws, consider wearing earplugs or earmuffs.
- Gloves: Wear work gloves to protect your hands from splinters and when handling paint or chemicals.
- Ventilation: If painting or sealing indoors, ensure adequate ventilation to avoid inhaling fumes. Work outdoors if possible.
- Secure Workpiece: Always clamp your plywood securely to a stable workbench before cutting or drilling to prevent movement and ensure precision.
- Read Manuals: Familiarize yourself with the operating instructions and safety warnings for all power tools you use.
- Clean Workspace: Keep your work area tidy and free of clutter to prevent trips and falls.
Create Your Own Garden Oasis Today!
Crafting these DIY leaf garden screens is more than just a woodworking project; it’s an opportunity to infuse your outdoor space with personal style and functional beauty. From the initial cuts of plywood to the final stroke of paint, each step brings you closer to creating a truly unique and captivating feature for your garden. The satisfaction of seeing your vision come to life and enjoying the enhanced privacy and aesthetics these screens provide is truly unparalleled.
Whether you install them around a cozy seating area, as a charming backdrop for your flowerbeds, or as a decorative boundary for your entire garden, these screens promise to be a conversation starter and a source of continuous enjoyment. We encourage you to embrace the creative process, experiment with designs and colors, and make these screens truly your own. Get ready to transform your backyard into an even more inviting and enchanting sanctuary!
*A heartfelt thank you to Crouch Vale Woodcraft via YouTube for inspiring this fantastic project and for providing the excellent images used here. If you enjoyed this craft, we highly recommend visiting his channel and subscribing for more brilliant woodworking ideas!