
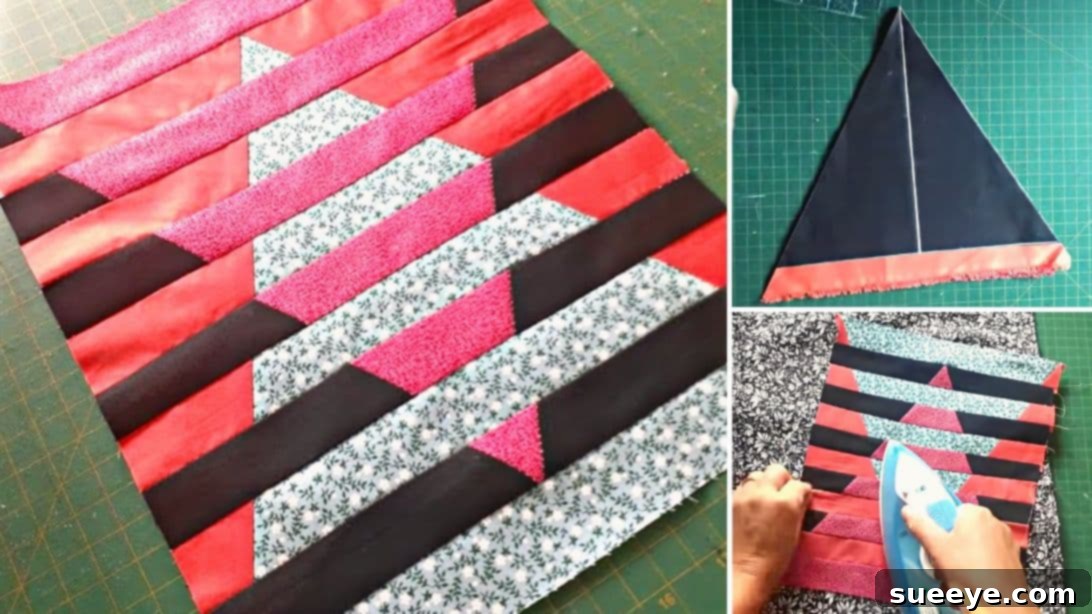
Unlock Your Quilting Potential: Easy Intersection Quilt Block Tutorial for Beginners
Embark on a rewarding journey into the world of quilting with a project that promises both challenge and immense satisfaction. If you’re eager to elevate your quilting skills or simply searching for a visually striking yet achievable endeavor, this Intersection Quilt Block tutorial, inspired by the talented Patchwork Fácil on YouTube, is your perfect starting point. Many beginners might initially perceive this intricate-looking design as daunting, assuming it involves complex steps and advanced techniques. However, you’ll be pleasantly surprised to discover just how straightforward and enjoyable it is to construct this beautiful quilt block.
The Intersection Quilt Block is renowned for its dynamic, crisscrossing lines and geometric appeal, making it a fantastic addition to any quilt, pillow, or wall hanging. It’s an ideal project for practicing foundational quilting skills such as precise cutting, consistent seam allowances, and effective pressing – all crucial elements for achieving a professional finish. By breaking down the process into clear, manageable steps, this guide ensures that even those new to quilting can confidently create a stunning block that looks far more complex than it truly is. Get ready to transform ordinary fabric into a piece of art that reflects your creativity and dedication.
Essential Materials for Your Intersection Quilt Block
Before diving into the creative process, gathering all your necessary supplies is key to a smooth and enjoyable quilting experience. Having the right tools at hand not only makes the process easier but also contributes significantly to the accuracy and overall quality of your finished quilt block. Here’s a detailed list of what you’ll need:
- Four Distinct Fabric Colors: Opt for high-quality cotton quilting fabric. Cotton is ideal due to its ease of handling, minimal stretch, and durability. Choosing four contrasting or harmonizing colors will enhance the visual impact of your intersection design. Consider how your chosen colors will interact to create depth and movement within the block. Pre-wash your fabrics if you’re concerned about shrinkage or color bleeding, especially if combining light and dark colors.
- Fabric Marking Tool: A marking pencil, tailor’s chalk, or a fine-tipped fabric marker is essential for transferring measurements and lines onto your fabric accurately. Ensure your chosen tool creates a clear line that can be easily removed or will disappear after use, without staining your fabric.
- Quilting Ruler: A clear acrylic quilting ruler is indispensable for precise measurements and straight cuts. A ruler that is at least 12-15 inches long and marked with clear grid lines will be highly beneficial for this project, especially when cutting larger triangles and strips.
- Sharp Scissors or Rotary Cutter and Self-Healing Mat: While sharp fabric scissors can be used, a rotary cutter paired with a self-healing cutting mat is highly recommended for quilting. A rotary cutter allows for quick, precise, and consistent cuts, which are critical for accurate piecing. Always use a rotary cutter with a firm hand and keep your fingers away from the blade. The cutting mat protects your work surface and prolongs the life of your blade.
- Hand Sewing Needle and Thread: While much of this project will be done by machine, a hand sewing needle might be useful for securing loose threads or making small adjustments. For machine sewing, a good quality polyester or cotton thread in a neutral color (or one that matches your dominant fabric) is recommended.
- Iron and Ironing Board (for pressing): An iron is a quilter’s best friend. Pressing seams correctly is as important as sewing them accurately. It helps your block lie flat, reduces bulk, and ensures precise alignment. Don’t “iron” by sliding the iron; instead, “press” by lifting and placing it firmly on your fabric.
- Sewing Machine: A standard sewing machine capable of sewing a straight stitch is all you need. Ensure it’s in good working order, threaded correctly, and equipped with a fresh needle appropriate for quilting (e.g., a universal or quilting needle). A ¼-inch quilting foot can be a huge asset for achieving consistent seam allowances.
Step-by-Step Guide to Crafting Your Intersection Quilt Block
With your materials ready, let’s dive into creating this captivating quilt block. Remember, precision in each step will lead to a beautifully finished piece.
Step 1: Fabric Preparation and Precise Cutting
Accuracy begins with your very first cut. Take your time with this step, as well-cut fabric pieces are the foundation for a successful quilt block.
- Create Your Template Triangle: Begin by selecting one of your chosen fabrics. Fold this fabric in half, aligning the selvage edges or ensuring a perfectly straight fold. Using your marking tool and ruler, measure and mark a vertical line 11 inches long along the folded edge, starting from one end. This will form the central height of your triangle. At the bottom end of this 11-inch line, measure outwards 5½ inches to the left and 5½ inches to the right along the raw edge. This creates a total base width of 11 inches. Connect the top point of your 11-inch vertical line to both ends of the 11-inch horizontal base. You should now have an isosceles triangle shape marked, with an 11-inch height and an 11-inch base. Carefully cut out this marked triangle. This piece will serve as your master template.
- Cut Multiple Triangles: Stack the remaining three different colored fabrics neatly, ensuring they are perfectly aligned and smooth. Place your newly cut template triangle on top of the stacked fabrics. Using your rotary cutter and ruler, meticulously cut around the template, creating multiple identical 11×11 inch triangles from each of your chosen fabrics. The number of triangles you cut will depend on how many quilt blocks you intend to make for your final project. For a single block, you will need at least two whole triangles and an additional triangle that will be split.
- Prepare Half-Triangles: Now, from the identical triangles you just cut, select an appropriate number to become your “half-triangles” for each block (you’ll need two half-triangles per block you plan to make, created from one whole triangle). Take one of these 11×11 inch triangles and carefully cut it precisely in half along its vertical line (from the apex down to the exact midpoint of its 11-inch base). This will yield two smaller, identical right-angled triangles. Repeat this step for as many “half-triangles” as your project requires. Set aside your whole triangles and these newly created half-triangles, keeping them organized by color and shape.
Step 2: Assembling the Quilt Block and Creating the Intersection Effect
This is where your block starts to take shape and the captivating “intersection” design emerges. Pay close attention to your seam allowances and pressing techniques.
- Assemble the Initial Square Units: Take one of your whole 11×11 inch isosceles triangles. This will form the central element of your square unit. Now, take two of your half-triangles (the right-angled ones). Arrange these pieces on your work surface to form a larger square: position the whole triangle in the center, with its apex pointing either left or right. Place one half-triangle on each of the two longer sides of the whole triangle, aligning their raw edges. The arrangement should now visually form a complete square. Carefully pin these pieces together, ensuring the edges are perfectly matched.
- Sew the Triangles into Squares: Using your sewing machine, stitch the half-triangles to the central whole triangle with a precise ¼-inch seam allowance. This consistent seam allowance is critical for your block to come out the correct size and lay flat. Sew slowly and carefully, guiding the fabric without stretching it. Once sewn, repeat this process to create as many square units as needed for your project, making sure to vary the fabric colors for visual interest.
- Pressing for Flatness: After sewing each square unit, take it to your ironing board. Press the seams open or to one side, whichever method results in the flattest finish for your fabric combination. Pressing is not ironing; gently lift and place the iron onto the seams, avoiding stretching the fabric. Flat seams are essential for accurate subsequent cuts and a professional-looking quilt block.
- Cut into Strips: Once your sewn square units are pressed flat, it’s time to create the “intersection” effect. Place one assembled square unit on your cutting mat. Using your quilting ruler and rotary cutter, carefully cut this square into multiple 1½-inch wide strips. Ensure your cuts are perfectly straight and parallel across the entire block. An 11-inch square will typically yield about 7 strips (with a small edge trim). The exact number isn’t as important as the consistency of the 1½-inch width.
- Reassemble and Stitch the Intersection: This is the most exciting part! Take the strips you just cut from one square unit. Now, rearrange them. The magic of the Intersection Quilt Block lies in slightly shifting or rotating certain strips to create the illusion of lines crisscrossing. You’ll notice how the original triangle pieces now form a new, dynamic pattern when the strips are moved. Experiment with different arrangements until you achieve the desired “intersection” look, often by rotating alternating strips 180 degrees. Once you are satisfied with the visual pattern, carefully pin the strips back together in their new order.
- Final Sewing and Finishing: Stitch the rearranged 1½-inch strips together, again using a precise ¼-inch seam allowance. As you sew, ensure the fabric edges align perfectly to maintain the geometric pattern. Once all strips are sewn, take your completed quilt block to the cutting mat. Square up the block by trimming any uneven edges, making sure it forms a perfect square (e.g., 9×9 inches or 10×10 inches, depending on your final desired block size and seam allowances). Give your finished block one final, thorough press to set all the seams and ensure it lies perfectly flat.
Tips for Quilting Success:
- Maintain a Consistent Seam Allowance: This is arguably the most important tip for quilting accuracy. A ¼-inch seam allowance is standard, and even a slight deviation can throw off the entire block. Practice on scrap fabric to ensure your machine’s ¼-inch foot is calibrated correctly.
- Press, Don’t Iron: As mentioned, pressing is crucial. It helps fabric lie flat and keeps your block from distorting. Pressing seams open can reduce bulk, while pressing to one side can help nest seams for perfect points.
- Use Good Lighting: A well-lit workspace helps prevent eye strain and ensures you can see your lines and seams clearly.
- Sharp Tools are Key: Always use a sharp rotary blade and sewing machine needle. Dull tools can fray fabric, cause skipped stitches, or lead to inaccurate cuts.
- Patience is a Virtue: Quilting is a meditative craft. Don’t rush! Take breaks, enjoy the process, and celebrate each small success.
And there you have it! A beautifully constructed Intersection Quilt Block, ready to be incorporated into a larger quilt project, a decorative pillow, a tote bag, or even framed as a piece of textile art. This project not only allows you to practice essential quilting techniques but also results in a stunning, modern design that is sure to impress. Don’t be afraid to experiment with different color combinations and fabric textures to make each block uniquely yours.
Quilting is a journey of continuous learning and creativity. This beginner-friendly Intersection Quilt Block tutorial is a fantastic stepping stone, proving that even complex-looking designs can be achieved with clear instructions and a little patience. We encourage you to try this rewarding project and experience the joy of creating something beautiful with your own hands. Remember, every stitch tells a story!
*These amazing images are all credited to Patchwork Fácil via YouTube. Check her other content and follow for more inspiring quilting tutorials!