
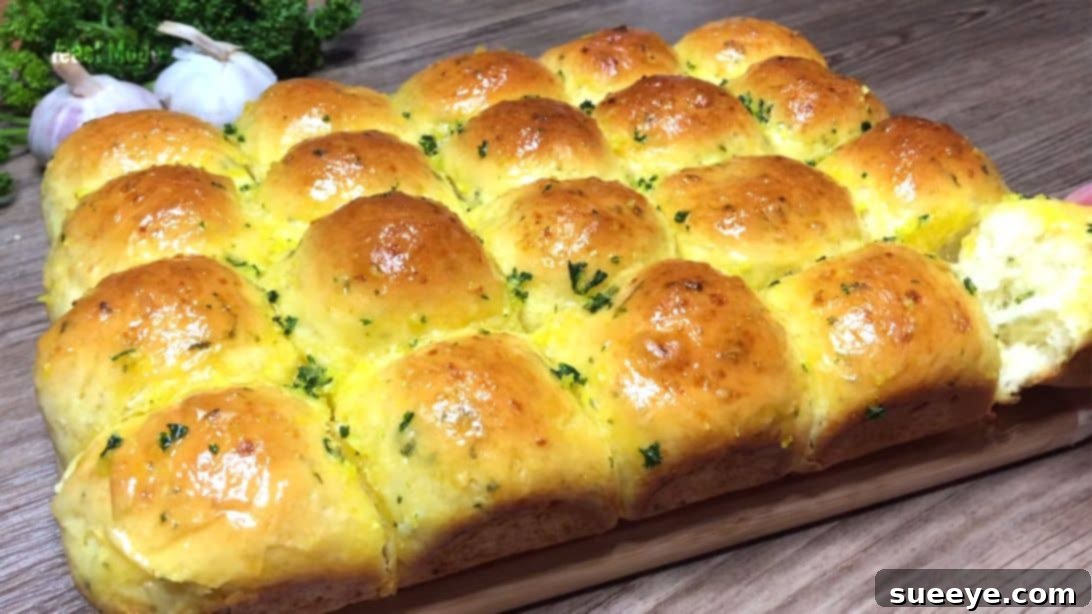
Effortless & Delicious: The Ultimate No-Knead Garlic Butter Bread Rolls Recipe
Imagine sinking your teeth into a warm, unbelievably soft, and aromatic bread roll, infused with savory garlic butter. What if we told you that achieving this culinary delight doesn’t require hours of strenuous kneading or advanced baking skills? Introducing the incredibly easy and utterly delicious no-knead garlic butter bread rolls, inspired by the fantastic recipe from Yeast Mode. These rolls are a game-changer for anyone who loves fresh bread but shies away from complex baking.
Perfect for breakfast, lunch, dinner, or as a delightful snack any time of the day, these garlic butter bread rolls are surprisingly moist and boast an irresistible texture. They pair wonderfully with a wide array of meals, from hearty stews and comforting pasta dishes to grilled meats and fresh salads. Whether you’re a seasoned baker or just starting your journey in the kitchen, this recipe promises impressive results with minimal effort. Get ready to fill your home with the inviting aroma of freshly baked bread and enjoy a truly satisfying treat. Let’s dive into the full recipe and discover how simple it is to create these amazing rolls.
Ingredients You’ll Need
Crafting these delectable rolls begins with a selection of common kitchen staples. The beauty of this recipe lies in its simplicity, using readily available ingredients that come together to create something truly extraordinary. Ensuring your ingredients are fresh and at the right temperature is key to achieving that perfect soft and fluffy texture.
For the Soft & Fluffy Bread:
- 1 cup of fresh milk (lukewarm): Milk adds richness and tenderness to the dough. Lukewarm milk (around 105-115°F or 40-46°C) is crucial for activating the instant yeast. If it’s too hot, it can kill the yeast; too cold, and the yeast won’t activate properly.
- 1 whole large egg: An egg contributes to the structure, color, and moisture of the bread, making the rolls richer and more palatable.
- 3 tablespoons of sugar: Sugar serves as food for the yeast, helping it activate and produce carbon dioxide, which makes the bread rise. It also adds a subtle sweetness that balances the savory garlic.
- 2 teaspoons of instant yeast: Instant yeast is convenient as it can be mixed directly with dry ingredients and doesn’t require proofing beforehand. Ensure your yeast is fresh for optimal rising power.
- 3 cups of all-purpose flour: The foundation of our rolls, all-purpose flour provides the necessary structure. While not requiring kneading, the gluten in the flour will still develop sufficiently during the long proofing period.
- 1/3 cup of softened unsalted butter: Butter enriches the dough, contributing to its tender crumb and delightful flavor. Ensure it’s softened to room temperature for easier incorporation into the dough.
- 1/2 teaspoon of salt: Salt is vital for enhancing the flavor of the bread and also helps to control yeast activity, preventing the dough from rising too quickly.
- 1 tablespoon of minced garlic: Freshly minced garlic infuses the dough with an aromatic, savory essence. For best flavor, use fresh garlic rather than powdered.
- 1 tablespoon of chopped fresh parsley: Parsley adds a fresh, herbaceous note and a lovely speckle of green to the rolls, complementing the garlic beautifully.
For the Irresistible Garlic Butter Spread:
This final touch is what truly elevates these rolls, adding a glossy finish and an extra burst of garlic flavor right out of the oven.
- 1 egg wash (beaten egg) or milk (for brushing before baking): Brushing the rolls with egg wash gives them a beautiful golden-brown, shiny crust. Milk can also be used for a softer crust with a less pronounced sheen.
- 1 teaspoon of minced garlic: More fresh garlic for an intense flavor boost on the surface.
- 1 teaspoon of chopped fresh parsley: Fresh parsley for visual appeal and a fresh aroma.
- 1 teaspoon of sugar: A small amount of sugar in the topping helps with caramelization and balances the strong garlic flavor.
- 2 tablespoons of melted butter: The base of our glorious topping, carrying all the wonderful flavors.
Step-by-Step Guide to Baking Your Rolls
Follow these detailed instructions to create perfectly soft, moist, and flavorful no-knead garlic butter bread rolls. Precision in these steps, especially regarding temperature and proofing, will lead to the best results.
Step 1: Activate the Yeast & Combine Wet Ingredients
Begin by gathering a large mixing bowl. Into this bowl, pour 1 cup of lukewarm milk. It’s crucial that the milk is not too hot or too cold; ideally, it should feel warm to the touch, similar to a baby’s bathwater (around 105-115°F or 40-46°C). Next, crack in 1 whole large egg, add 3 tablespoons of sugar, and sprinkle in 2 teaspoons of instant yeast. Using a spatula or a whisk, mix all these ingredients thoroughly until the sugar completely dissolves and the mixture is well combined. This initial mixing helps activate the yeast and evenly distributes the sugar, which will feed the yeast.
Step 2: Incorporate Dry Ingredients and Flavorings
To the wet mixture in the bowl, add 3 cups of all-purpose flour and 1/2 teaspoon of salt. Start mixing with your spatula until a shaggy dough begins to form. At this stage, it won’t look smooth, and that’s perfectly normal for a no-knead dough. Next, add 1/3 cup of softened butter. Continue to mix until the butter is fully incorporated into the dough. The dough will become softer and slightly sticky. Finally, add 1 tablespoon of minced garlic and 1 tablespoon of chopped parsley. Gently fold these into the dough until they are evenly distributed, ensuring not to overmix at this stage.
Step 3: The First Proofing (Bulk Fermentation)
Once your dough is mixed, cover the bowl tightly with plastic wrap or a clean kitchen towel. This prevents the dough from drying out and creates a warm, humid environment ideal for rising. Allow the dough to proof (rise) in a warm, draft-free place for approximately 90 to 120 minutes, or until it has noticeably doubled in size. The exact timing can vary depending on the temperature of your kitchen. A good test is to gently poke the dough with a floured finger; if the indentation remains, it’s ready.
Step 4: Shaping the Rolls
Gently remove the proofed dough from the bowl and place it onto a lightly floured surface. Although it’s a “no-knead” recipe, a few gentle “slap and fold” motions can help develop a little more structure and release excess gas. To do this, simply pick up a section of the dough, slap it onto the surface, and fold it over itself. Repeat a few times. Next, form the dough into a loose ball, then gently flatten it into a thick disc. From this disc, form a hollow circle (like a donut). Using a bench scraper or a knife, cut the dough circle into two long strips. Then, cut each long strip into smaller, even pieces. Aim for approximately 12-16 pieces, depending on your desired roll size. Finally, gently shape each small piece into a smooth, tight ball. This careful shaping will result in beautiful, uniform rolls.
Step 5: The Second Proofing (Final Rise)
Prepare your baking pan by lining it with parchment paper and lightly greasing the sides. This prevents sticking and ensures easy removal. Arrange the shaped dough balls in the baking pan, leaving a little space between each roll for expansion. They will grow considerably during this second rise. Once all the balls are placed, cover the pan loosely with plastic wrap. Allow the rolls to rise for another 60 to 90 minutes in a warm place. The rolls should look puffy and almost doubled in size, filling out the pan. This second proof is essential for light and airy rolls.
Step 6: Baking and Finishing Touches
While your rolls are undergoing their final rise, preheat your oven to 356 degrees F (180 degrees C). Once the rolls have finished their second proof, gently brush the tops with either an egg wash (a beaten egg mixed with a tablespoon of water) or milk. This step helps create that lovely golden-brown crust. Place the baking pan in the preheated oven and bake for about 20 to 25 minutes, or until the tops are beautifully golden brown and the rolls sound hollow when tapped. While the rolls are baking, prepare the irresistible garlic butter mixture. In a small bowl, combine 1 teaspoon of minced garlic, 1 teaspoon of chopped parsley, 1 teaspoon of sugar, and 2 tablespoons of melted butter. Mix these ingredients well. As soon as the rolls are out of the oven, while they are still hot, generously brush the entire surface with the prepared garlic butter mixture. The warmth of the rolls will allow the butter to seep in, infusing every bite with incredible flavor.
Why Choose No-Knead Bread Rolls? The Advantages Explained
The “no-knead” method has revolutionized home baking, making fresh bread accessible to everyone, regardless of their experience level. Here’s why these garlic butter bread rolls are an excellent choice:
- Effortless Preparation: The primary benefit is the elimination of strenuous kneading. This saves significant time and physical effort, making it ideal for busy individuals or those new to baking.
- Superior Texture: Despite the lack of traditional kneading, the long fermentation period allows the gluten to develop naturally. This results in an incredibly soft, moist, and airy crumb that’s often compared to professionally baked bread.
- Rich Flavor Development: The extended proofing time not only develops gluten but also enhances the flavor profile of the bread. The yeast has more time to work, creating deeper, more complex notes in the dough itself, which perfectly complements the garlic butter.
- Beginner-Friendly: With minimal active work, this recipe is incredibly forgiving and almost guarantees success, boosting confidence for new bakers.
- Delicious Aroma: There’s nothing quite like the smell of freshly baked bread filling your home, and these garlic butter rolls take that experience to another level with their aromatic ingredients.
Expert Tips for Your Best Bread Rolls
While this recipe is designed to be straightforward, a few expert tips can ensure your no-knead garlic butter bread rolls turn out absolutely perfect every time:
- Check Your Yeast: Ensure your instant yeast is fresh and active. Old yeast is often the culprit behind bread that doesn’t rise. You can test it by mixing a small amount with warm water and a pinch of sugar; it should get bubbly within 5-10 minutes.
- Maintain Proper Milk Temperature: As mentioned, lukewarm milk is crucial. Use a kitchen thermometer to ensure it’s between 105-115°F (40-46°C).
- Soften Butter Adequately: Room temperature, softened butter incorporates smoothly into the dough, leading to a more uniform texture. If your butter is too cold, it will leave lumps; too melted, it can make the dough greasy.
- Don’t Overmix: After adding the flour and particularly the garlic and parsley, mix just until combined. Overmixing can develop too much gluten too quickly, leading to a tougher roll.
- Ideal Proofing Environment: A warm, draft-free spot is best for proofing. If your kitchen is cold, try placing the bowl in a slightly warm (but turned off) oven, or near a heating vent. You can also place the bowl in a larger bowl of warm water.
- Uniform Roll Size: When shaping the dough balls, try to make them as uniform in size as possible. This ensures even baking, so all your rolls are perfectly done at the same time.
- Preheat Oven Thoroughly: Always ensure your oven is fully preheated to the correct temperature before placing the rolls inside. This helps create a good oven spring and a consistent bake.
- Generous Garlic Butter Topping: Don’t be shy with the garlic butter! Brushing it on hot rolls allows for maximum absorption and imparts that irresistible flavor and shine.
Variations and Serving Suggestions
While these garlic butter rolls are perfect as is, they also serve as a fantastic base for creativity:
- Cheesy Garlic Rolls: Add 1/2 cup of shredded cheese (like cheddar, mozzarella, or Parmesan) to the dough along with the garlic and parsley for an extra savory kick. You can also sprinkle cheese on top before the final bake.
- Herbaceous Twist: Experiment with other fresh herbs like finely chopped rosemary, thyme, or oregano to complement the garlic.
- Spicy Kick: Incorporate a pinch of red pepper flakes into the dough or the butter topping for those who enjoy a little heat.
- Sweet Rolls: For a completely different but equally delightful treat, omit the garlic and parsley from the dough. Instead, after baking, brush with melted butter mixed with cinnamon and sugar.
- Serving Ideas: These rolls are incredibly versatile. Serve them alongside a hearty lasagna, a steaming bowl of tomato soup, a rich beef stew, or grilled chicken or fish. They also make excellent mini sliders or a delicious addition to a breakfast spread with eggs.
Storage and Reheating
To keep your no-knead garlic butter bread rolls fresh, store them in an airtight container at room temperature for up to 2-3 days. For longer storage, they freeze exceptionally well. Once completely cooled, place them in a freezer-safe bag or container for up to 2 months.
To reheat, you can warm them in a microwave for a few seconds until soft, or for a crispier exterior, wrap them in foil and reheat in a preheated oven at 350°F (175°C) for 5-10 minutes. If reheating from frozen, thaw them first or add a few extra minutes to the oven reheating time.
Nutritional Information Disclaimer
Please note that the nutritional information for this recipe is an estimate. It may vary significantly depending on ingredient brands, precise measurements, and preparation methods. If you have specific dietary concerns or requirements, we recommend calculating the nutritional values based on the exact ingredients and quantities you use.
Your New Go-To Bread Recipe Awaits!
You now have all the tools and knowledge to bake the most incredible no-knead garlic butter bread rolls right in your own kitchen. This recipe simplifies the art of bread making, proving that you don’t need to be a professional baker to create truly extraordinary results. The combination of an incredibly soft texture, rich garlic butter flavor, and the sheer ease of preparation makes these rolls an instant favorite.
Whether you’re serving them as a side dish, an appetizer, or simply enjoying them on their own, these rolls are guaranteed to impress. Say goodbye to store-bought bread and hello to the delightful aroma and taste of homemade goodness. Don’t hesitate – gather your ingredients, follow these simple steps, and embark on a delicious baking adventure today. Your taste buds will thank you!