
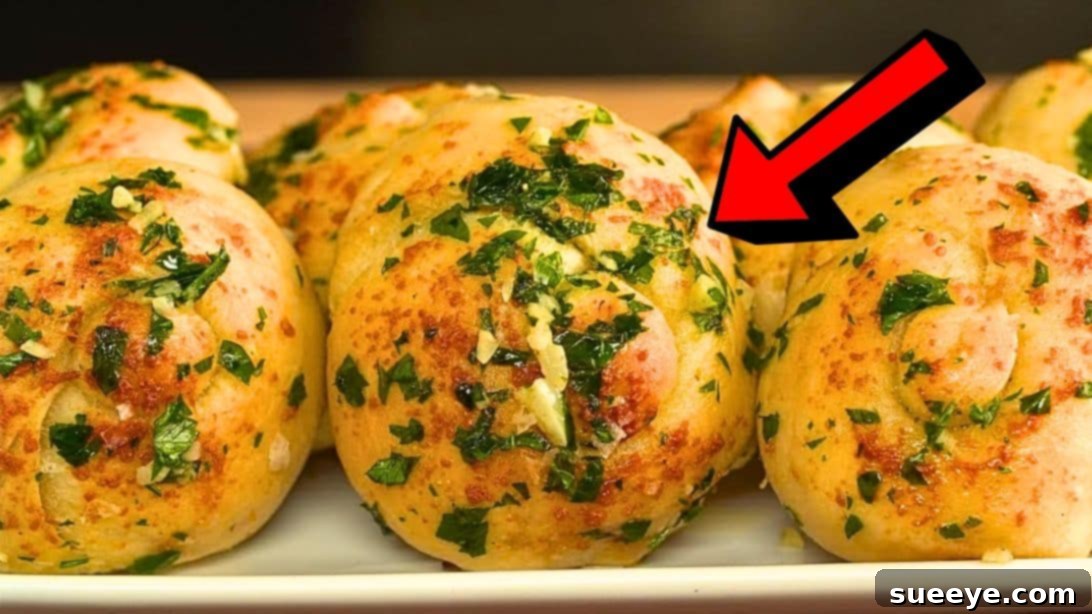
There’s an undeniable magic to warm, freshly baked bread, especially when it’s generously filled with cheese and drenched in savory garlic butter. These aren’t just any bread knots; they are a culinary delight, guaranteed to become a new favorite in your household. Inspired by the brilliant creators at Tastemade, this recipe for Garlic Butter Mozzarella Knots takes simple ingredients and transforms them into an extraordinary treat. Imagine soft, fluffy pizza dough encasing a molten core of delicious mozzarella, baked to golden perfection, then glazed with a fragrant, luscious garlic butter sauce infused with fresh parsley. Whether you’re looking for an impressive appetizer for your next gathering, a delightful side for your pasta night, or simply a comforting snack, these homemade cheese knots are surprisingly easy to make and utterly irresistible. Prepare to dazzle your taste buds and impress your family and friends with this foolproof recipe that promises delicious results every single time.
Irresistible Garlic Butter Cheese Knots: An Easy Homemade Recipe
Embark on a culinary journey to create the most divine garlic butter cheese knots right in your own kitchen. This detailed guide ensures a smooth and enjoyable baking experience, culminating in a batch of warm, cheesy, and garlicky goodness that will have everyone asking for more.
Essential Ingredients for Homemade Garlic Butter Cheese Knots
Crafting perfect garlic butter cheese knots begins with selecting quality ingredients. Each component plays a vital role in achieving that sought-after texture and flavor.
For the Cheesy Knots:
- 1 pound (approx. 450g) of prepared pizza dough: Using store-bought pizza dough is a fantastic shortcut, making this recipe incredibly quick and accessible. You can often find fresh dough in the refrigerated section of your grocery store. For an even richer flavor, consider a quality artisanal dough.
- Flour, for dusting: All-purpose flour is ideal for dusting your work surface and rolling pin. This prevents the dough from sticking and ensures a smooth shaping process. Don’t be shy about using it as needed, especially if your dough is a bit sticky.
- 8 ounces (approx. 225g) of low-moisture, part-skim mozzarella cheese: This type of mozzarella is crucial for its excellent melting properties and less water content, which prevents your knots from becoming soggy. Cubing it into small ¼-inch pieces ensures even distribution and melty pockets in every bite.
- ¼ cup (approx. 60ml) of melted unsalted butter: Unsalted butter allows you to control the overall saltiness of your dish. It’s used both to brush the knots before baking, promoting a beautiful golden crust, and as the base for our garlic butter glaze.
- ¼ cup (approx. 25g) of grated Asiago cheese: Asiago adds a wonderful nutty, sharp, and slightly salty complexity that complements the mild mozzarella. It provides an extra layer of flavor and a beautiful crust when sprinkled on top.
- ½ teaspoon of flaky sea salt: Flaky sea salt offers a pleasant textural crunch and bursts of pure saltiness that enhance all the other flavors. Sprinkle it generously over the knots before baking for an artisanal finish.
For the Aromatic Garlic Butter Glaze:
- 4 cloves of fresh garlic, smashed: Smashed garlic cloves release their pungent, aromatic oils more effectively than finely minced garlic when infused into butter, creating a deeply flavored glaze. You can also mince them if preferred for a stronger garlic presence.
- ¼ cup (approx. 15g) of fresh parsley, finely chopped: Fresh parsley brightens the garlic butter with its herbaceous, slightly peppery notes and vibrant green color, adding a professional touch and a refreshing contrast to the richness of the cheese and butter.
Step-by-Step Guide to Crafting Perfect Garlic Butter Cheese Knots
Follow these detailed steps carefully to achieve perfectly golden, cheesy, and utterly delicious garlic butter knots that will disappear in minutes!
Step 1: Prepare Your Workspace and Dough
Begin by preheating your oven to a robust 425°F (220°C). This high temperature is key to achieving a beautifully puffed and golden crust quickly. While the oven heats, prepare a large baking sheet by lining it with parchment paper. Parchment paper is essential to prevent sticking and ensures easy cleanup. If you don’t have parchment, a nonstick baking sheet can work, but parchment is highly recommended for best results. Set your prepared baking sheet aside. Next, take your low-moisture mozzarella and cut it into small, uniform ¼-inch cubes. This size is perfect for melting evenly inside the dough without creating large, empty pockets. Now, lightly flour a clean counter surface. Place your pizza dough on the floured counter, giving it a quick turn to ensure both sides are lightly coated. Sprinkle a little more flour on top, then divide the dough in half. Take each dough half and cut it into 5 even pieces, resulting in 10 dough portions in total. Generously sprinkle more flour on your counter, then one at a time, roll out each dough piece. Aim for a rectangular shape, roughly 8 inches long by 3 inches wide, ensuring the dough is thin and flat for easy rolling and filling.
Step 2: Fill, Roll, and Knot the Dough
Working with one rolled-out dough piece at a time, gently hand-pull and stretch it slightly to achieve the desired 8×3 inch dimension. Use a rolling pin if needed, and add more flour if the dough becomes sticky, ensuring it remains workable and pliable. Once your dough rectangle is ready, spread about 3 tablespoons of the cubed mozzarella evenly along the center of the dough, leaving a small border on the edges. Carefully roll the dough over itself, starting from one of the longer sides, to form a tight log. This snug roll ensures the cheese stays securely inside. Pinch the seams along the length of the log and at the ends firmly to seal the mozzarella completely. This step is critical to prevent cheese leakage during baking. Lightly dust the rolled log with a bit more flour, then gently tie it into a loose knot. The goal is to create a knot shape without compressing the dough too much. Repeat this process for the remaining dough pieces, filling and shaping each one. As you finish each knot, carefully transfer it to your prepared baking sheet, leaving about 1-2 inches of space between each knot to allow for expansion. Once all knots are on the sheet, brush the tops of each one generously with a portion of the melted unsalted butter. Finally, sprinkle them with the grated Asiago cheese and flaky sea salt, which will create a delicious, savory crust.
Step 3: Bake to Perfection and Glaze with Garlic Butter
Carefully place the baking sheet with your prepared knots into the preheated 425°F (220°C) oven. Allow them to bake for approximately 8 to 10 minutes, or until they are beautifully puffed, golden brown, and the cheese inside is visibly melted and gooey. Keep a close eye on them, as oven temperatures can vary. While the knots are baking, prepare your aromatic garlic butter glaze. In a small saucepan, combine the remaining melted unsalted butter with the smashed garlic cloves and a pinch of salt. Place the saucepan over medium heat on your stovetop. Stir continuously for 1-2 minutes, allowing the garlic to gently infuse the butter without browning. You want to extract the flavor, not cook the garlic until crisp. Remove the saucepan from the heat and stir in the finely chopped fresh parsley. Continue to stir until the parsley is well incorporated, and the flavors have melded together. As soon as the cheese knots emerge from the oven, hot and fragrant, immediately brush them generously with the warm garlic butter sauce. Ensure every nook and cranny is coated to infuse maximum flavor. The hot knots will absorb the butter beautifully. Serve your irresistible garlic butter cheese knots warm, allowing their cheesy, garlicky aroma to entice everyone at the table. Enjoy them fresh out of the oven for the ultimate experience!
Why You’ll Adore These Garlic Butter Cheese Knots
This recipe isn’t just about making food; it’s about creating an experience. Here’s why these garlic butter cheese knots will become a staple in your kitchen:
- Effortlessly Delicious: Utilizing store-bought pizza dough dramatically cuts down on preparation time, making this an ideal recipe for busy weeknights or impromptu gatherings. The simplicity belies the incredible flavor.
- Crowd-Pleaser Guaranteed: Who can resist warm, cheesy bread? These knots are universally loved by adults and children alike, making them perfect for parties, family dinners, or potlucks.
- Versatile & Customizable: While mozzarella and Asiago are fantastic, this recipe serves as a brilliant base for experimentation. Feel free to swap cheeses, add different herbs, or incorporate a touch of spice to match your preferences.
- Perfect Texture: The combination of soft, pillowy dough, gooey melted mozzarella, and a slight chewiness from the baked Asiago crust creates a texture sensation that is truly satisfying.
- Aromatic Delight: The moment the garlic butter hits the warm knots, your kitchen will be filled with an intoxicating aroma that’s impossible to ignore. It’s a sensory experience from start to finish.
Expert Tips for Crafting the Best Cheese Knots
Achieve bakery-quality results every time with these helpful hints:
- Dough Temperature is Key: Ensure your pizza dough is at room temperature before you begin working with it. Cold dough is stiff and harder to roll and shape. Let it sit on the counter for 30-60 minutes before use.
- Don’t Overcrowd the Pan: Give your knots enough space on the baking sheet to expand. Overcrowding can lead to uneven baking and prevent them from browning properly.
- Seal Those Seams Tightly: The most common issue with cheesy breads is cheese leakage. Take an extra moment to firmly pinch the seams of your dough logs to keep all that delicious mozzarella locked inside.
- Mind the Garlic: When making the garlic butter, keep the heat on medium and stir frequently. You want to infuse the butter with garlic flavor, not burn the garlic, which can turn bitter.
- Brush Generously: Don’t be shy with the garlic butter glaze! A liberal coating ensures maximum flavor and moisture, transforming your knots into an aromatic masterpiece.
- Serve Immediately: These knots are at their absolute best when served warm, straight out of the oven. The cheese is perfectly gooey, and the butter glaze is fragrant.
Creative Variations and Customizations
While the classic recipe is outstanding, don’t hesitate to put your own spin on these cheese knots:
- Cheese Swaps: Experiment with different cheeses! Provolone, Monterey Jack, sharp cheddar, or a blend of Italian cheeses would all be delicious. For a spicy kick, add some pepper jack.
- Herb Additions: Beyond parsley, consider mixing in finely chopped fresh basil, oregano, chives, or a pinch of dried Italian seasoning into your garlic butter glaze for added depth.
- Spice It Up: For those who love a bit of heat, sprinkle a pinch of red pepper flakes inside the dough with the mozzarella, or add them to the garlic butter.
- Nutritional Yeast Boost: For a deeper, umami-rich, cheesy flavor without adding more dairy, stir a tablespoon of nutritional yeast into your melted butter before brushing.
- Sweet Garlic Knots (Savory Twist): While traditionally savory, you could experiment with a touch of honey or maple syrup in the butter glaze for a complex sweet-savory profile, perfect with bacon.
Serving Suggestions for Your Cheese Knots
These garlic butter cheese knots are incredibly versatile and can elevate any meal or snack occasion:
- Classic Appetizer: Serve them as a standalone appetizer with a side of warm marinara sauce for dipping.
- Pasta Companion: They make an exquisite side dish for any Italian meal, perfectly complementing spaghetti and meatballs, lasagna, or chicken alfredo.
- Soup & Salad Partner: Pair them with a hearty soup or a fresh green salad for a complete and satisfying light meal.
- Game Day Snack: An ideal snack for game nights, movie marathons, or casual get-togethers.
- Brunch Item: Serve them as a savory bread option alongside eggs, bacon, and fruit for a delectable brunch spread.
Storage and Reheating Tips
While best enjoyed fresh, you can store and reheat leftover garlic butter cheese knots:
- Storage: Allow the knots to cool completely. Store them in an airtight container at room temperature for up to 2 days, or in the refrigerator for up to 4 days.
- Reheating in the Oven: For best results, preheat your oven to 350°F (175°C). Place the knots on a baking sheet and heat for 5-8 minutes, or until warmed through and the cheese is gooey again. This method helps restore their crispy exterior.
- Reheating in Air Fryer: An air fryer can quickly crisp up the knots. Heat at 300°F (150°C) for 3-5 minutes.
- Reheating in Microwave: The microwave is quick but can make the knots soft and less appealing. Heat for 20-30 seconds per knot, but be mindful it won’t retain the original texture.
- Freezing: You can freeze unbaked knots for future use. Prepare them through Step 2 (before baking), then flash freeze them on a baking sheet until solid. Transfer to a freezer-safe bag or container for up to 1 month. Bake directly from frozen, adding a few extra minutes to the baking time, or thaw overnight in the fridge before baking as directed.
Frequently Asked Questions (FAQs)
Here are answers to some common questions about making garlic butter cheese knots:
- Can I use homemade pizza dough for this recipe? Absolutely! If you have a favorite homemade pizza dough recipe, it will work wonderfully. Just ensure it’s at room temperature and pliable before you start shaping.
- What if my dough is too sticky? Don’t hesitate to use more flour for dusting your work surface and hands. A well-floured surface is key to preventing the dough from sticking and making it easier to handle.
- Can I use other types of cheese besides mozzarella and Asiago? Yes, feel free to experiment! Provolone, mild cheddar, or a blend of Italian cheeses would also be delicious. Just ensure they are good melting cheeses.
- How can I prevent the cheese from leaking out during baking? The key is to pinch the seams of your dough logs very tightly after rolling and before tying the knot. A secure seal is vital for keeping the cheese inside.
- Can I prepare the garlic butter ahead of time? You can prepare the melted butter with smashed garlic ahead of time and store it in the fridge. Reheat it gently on the stove or in the microwave before stirring in the fresh parsley and brushing onto the baked knots.
- My knots didn’t get golden brown. What happened? This could be due to several factors: your oven temperature might not be accurate (consider an oven thermometer), or your knots might have been too close together on the baking sheet, preventing even browning. Ensure your oven is fully preheated and give them space.
*All image credit belongs to Tastemade via YouTube. Follow and subscribe to their channel for more inspiring recipes!