
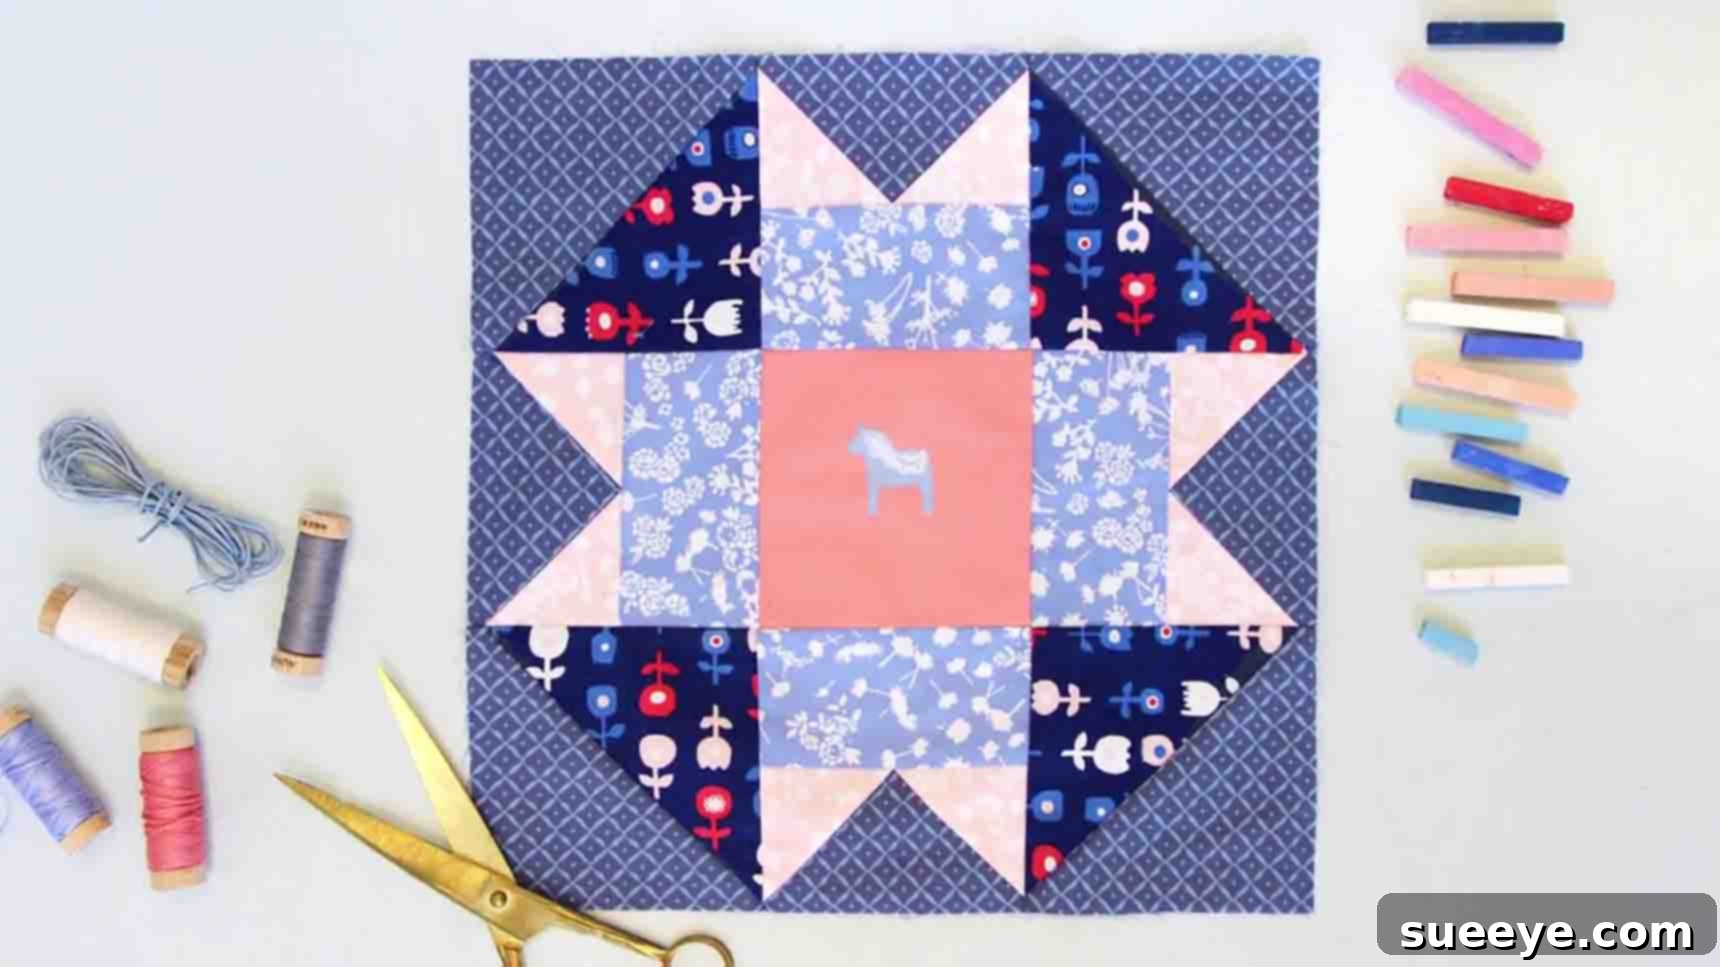
Master the Folded Corners Quilt Block: A No-Waste Method for Stunning Quilts
Embark on your next quilting adventure with a truly remarkable design: the Folded Corners Quilt Block. Celebrated by Art Gallery Fabrics and quilters worldwide, this super-efficient block utilizes the innovative “no-waste method” for creating foundational units, making it a favorite for both its ingenious construction and its striking visual impact. If you’ve ever yearned for professional-looking quilt blocks that are surprisingly beginner-friendly, this comprehensive tutorial is designed just for you. We’ll guide you through every precise cut, every careful stitch, and every pressing technique to ensure your finished block is nothing short of perfection. Discover how to create intricate designs with ease, minimize fabric scraps, and add a touch of sophisticated charm to your quilting projects. Let’s start crafting your beautiful Folded Corners Quilt Block today!
Why the Folded Corners Block is a Must-Try for Every Quilter
The Folded Corners Quilt Block offers a unique blend of efficiency, elegance, and educational value that makes it an essential addition to any quilter’s repertoire. Its distinctive design allows for dynamic interplay between different fabrics, resulting in a finished piece that draws the eye and sparks conversation. One of its most significant advantages is the incorporation of the “no-waste method” for creating Flying Geese units. This technique is a game-changer for reducing fabric waste, transforming what would typically be discarded scraps into usable pieces for other projects or even the current one. This not only makes your quilting more sustainable but also more cost-effective. Furthermore, while the block boasts a complex, professional appearance, its construction is broken down into manageable, straightforward steps, making it an excellent learning opportunity for beginners to master accurate piecing and precise measurements. For seasoned quilters, it offers a refreshing and quick method to produce stunning blocks with minimal effort. Whether you’re making a full quilt, a charming wall hanging, or a set of decorative pillows, the Folded Corners Block delivers consistently beautiful results.
Materials for Your Folded Corners Quilt Block
Successful quilting begins with proper preparation. Before diving into the sewing machine, ensure you have all your fabrics meticulously cut and your tools organized. This Folded Corners Quilt Block requires a thoughtful selection of four distinct quilting cottons, each playing a crucial role in the block’s final aesthetic. High-quality quilting cotton is recommended for its stability and ease of handling, ensuring crisp points and accurate seams. Refer to the free pattern provided by Art Gallery Fabrics to double-check your measurements and cuts. Precision at this stage is foundational for a beautifully finished block.
- 4 distinct patterns of high-quality quilting fabric: (Click here for the free pattern by Art Gallery Fabrics to guide your cutting.)
- Fabric A: (1) 6 & 3/4″ square (often for Half-Square Triangles)
- Fabric B: (4) 2 & 1/2″ x 4 & 1/2″ strips (for connecting units)
- Fabric C: (1) 5 & 1/4″ square, (1) 6 & 3/4″ square (for Flying Geese and Half-Square Triangles)
- Fabric D: (4) 2 & 7/8″ squares (for the “sky” portions of Flying Geese)
- Fabric E: (1) 4 & 1/2″ square (often used as a central element in many quilt block variations, though not explicitly detailed in the original steps for this specific block’s assembly)
Essential Quilting Tools:
Beyond your gorgeous fabrics, having the right tools on hand makes a significant difference in the ease and enjoyment of your quilting process. Make sure your workspace is ready with these fundamental items:
- Rotary Cutter: Ensure it has a new, sharp blade for clean, precise cuts.
- Self-healing Cutting Mat: Protects your work surface and extends blade life.
- Quilting Rulers: A variety of sizes, including a square-up ruler, will be invaluable.
- Sewing Machine: Equipped with a fresh needle and a 1/4″ presser foot for consistent seam allowances.
- High-Quality Thread: A neutral color or one that blends with your fabrics.
- Iron and Ironing Board: Crucial for pressing seams flat and accurately.
- Fabric Scissors: For clipping threads and smaller cuts.
- Seam Ripper: Every quilter’s essential “undo” tool.
- Fabric Marking Tool: A pencil or disappearing ink pen for drawing lines on fabric.
- Straight Pins or Fabric Clips: To secure fabric layers before sewing.
Directions: Step-by-Step Guide to Crafting Your Folded Corners Block
Creating the Folded Corners Quilt Block is a deeply satisfying process, especially when you see the different units come together. Precision in cutting and sewing is paramount, so take your time and enjoy each stage. These detailed instructions will guide you, but remember to refer to the visual aids and the original video tutorial if you’re a visual learner.
Step 1: Mastering No-Waste Flying Geese Units
The Flying Geese unit is a fundamental building block in quilting, symbolizing movement and direction. The “no-waste method” is a highly efficient technique that allows you to create four perfectly sized Flying Geese units simultaneously, eliminating excess triangular scraps. This approach not only saves fabric but also ensures uniformity across all your units, which is crucial for a cohesive quilt.
1.1 Prepare and Select Your Fabric Squares:
Begin by carefully selecting your main “goose” fabric: one 5 & 1/4″ square from Fabric C. Next, retrieve your “sky” fabrics: four 2 & 7/8″ squares from Fabric D. Before you start, ensure all your cuts are precisely square and accurate. A slight deviation in these initial cuts can affect the final dimensions of your Flying Geese, so measure twice, cut once! Give all your fabric pieces a light press with a dry iron to remove any creases, providing a flat and stable surface for marking.
1.2 Mark Your “Sky” Squares for Sewing:
Take each of your four 2 & 7/8″ squares from Fabric D. On the wrong side of the fabric, use a fabric marking tool (such as a mechanical pencil or a disappearing ink pen) to draw a single diagonal line from one corner to the opposite corner. These lines are your sewing guides, not your cutting lines, so accuracy here is very important. Repeat this marking process for all four Fabric D squares. Ensure the lines are clear but not overly dark to avoid bleeding through the fabric.
1.3 Position and Sew the First Set of “Sky” Corners:
Lay your 5 & 1/4″ square (Fabric C) right side up on your work surface. Now, take two of your marked 2 & 7/8″ squares (Fabric D). Place one Fabric D square on one corner of the Fabric C square, right sides together, carefully aligning the raw edges. The diagonal line on the Fabric D square should run from the corner closest to the center of Fabric C to the outer edge. Repeat this with the second Fabric D square, placing it on the diagonally opposite corner of the Fabric C square. When positioned correctly, the two diagonal lines you’ve drawn should form one continuous straight line across the larger Fabric C square. Pin these smaller squares securely in place, typically at the corners, to prevent any shifting during the sewing process.
With your pieces pinned, proceed to your sewing machine. Stitch a scant 1/4″ seam allowance on *both* sides of the marked diagonal line. This means you will sew two parallel lines, one on each side of your drawn line. Maintaining a consistent scant 1/4″ seam is absolutely critical for the success of this method. After completing your stitching, use your rotary cutter and ruler to carefully cut along the original marked diagonal line. This action will divide your stitched piece into two separate units. Press the seams open or, for reduced bulk, press towards the darker Fabric D triangles. This initial press helps to set the stitches and creates a flatter unit.
1.4 Attach the Second Set of “Sky” Corners:
Now you have two partially completed Flying Geese units. Take one of your remaining marked 2 & 7/8″ squares (Fabric D). Place it right sides together onto the remaining un-sewn corner of one of your partially completed units. The diagonal line on this new Fabric D square should align with the remaining raw edge and corner of the Fabric C center. Pin it firmly.
Just as before, sew a scant 1/4″ seam allowance on *both* sides of this newly marked diagonal line. Repeat this entire process for the second partially completed unit using your very last 2 & 7/8″ square from Fabric D. Ensure your stitches are even and your seam allowances are accurate.
1.5 Final Cut and Press for Flying Geese Units:
Once both additional Fabric D squares are sewn, you’ll once again cut along the marked diagonal line on each unit. This final cut will reveal four perfectly formed individual Flying Geese units. Carefully press all seams open or towards Fabric D, ensuring that each unit is beautifully flat and crisp. The final, and arguably most crucial, step for this stage is to square up each Flying Geese unit to the precise dimension of 2 & 1/2″ x 4 & 1/2″. Use a dedicated square-up ruler for this task. Trimming any excess fabric now ensures all your units will fit together seamlessly in the final block assembly.
Step 2: Creating Half-Square Triangles and Final Block Assembly
With your meticulously crafted Flying Geese units complete, the next phase involves creating Half-Square Triangles (HSTs) and then methodically assembling all the components to reveal the stunning Folded Corners Quilt Block. The “four-at-a-time” HST method is another fantastic technique for achieving efficiency and consistency, mirroring the advantages of the no-waste Flying Geese method.
2.1 Prepare for Four-at-a-Time Half-Square Triangles (HSTs):
Gather your 6 & 3/4″ square from Fabric A and your 6 & 3/4″ square from Fabric C. These two squares, when combined, will yield four perfect Half-Square Triangles. Place these two squares right sides together, taking great care to align all the raw edges precisely. Use pins generously around the perimeter of the squares to prevent any shifting of the fabric layers during the sewing process. A slight misalignment here can lead to uneven HSTs, so ensure everything is perfectly square.
2.2 Sew and Cut Your HSTs:
At your sewing machine, sew a scant 1/4″ seam allowance all the way around the entire perimeter of your layered squares. Imagine you’re drawing a square just inside the outer edges with your stitching line. Once this outer square is sewn, use your fabric marking tool and a quilting ruler to draw two diagonal lines across the larger square, from corner to opposite corner, creating a distinct “X” shape. With a sharp rotary cutter and a steady hand, carefully cut along both of these marked diagonal lines. This action will effectively divide your large square into four smaller, individual triangular units.
2.3 Press and Square Up HSTs for Accuracy:
Take each of the four triangular units you just cut and gently open them up. You will now have four Half-Square Triangle blocks. Move to your ironing board and press the seams open or, for a flatter finish, press towards the darker fabric (Fabric C in this pairing). This crucial pressing step helps to set the stitches and prevents bulk, ensuring your block lies flat. Following this, use your square-up ruler to carefully trim each HST to measure a precise 4 & 1/2″ square. Squaring up is absolutely vital for the overall accuracy and professional appearance of your finished quilt block; don’t skip this step, even if it feels repetitive.
2.4 Attach Fabric B Strips to Flying Geese Units:
Retrieve your four 2 & 1/2″ x 4 & 1/2″ strips from Fabric B. These strips will function as the “bases” or extensions for your Flying Geese units, adding to their overall length and integrating them smoothly into the block design. Take one Fabric B strip and sew it to the *top* (the wider, open edge, not the pointed end) of one of your four squared-up Flying Geese units. Maintain a consistent scant 1/4″ seam allowance. After sewing, press the seam towards the Fabric B strip. Repeat this process for all four Flying Geese units. You should now have four elongated Flying Geese units, perfectly prepared for final assembly.
2.5 Thoughtful Arrangement of Your Quilt Block Components:
This is where your vision truly comes to life! Carefully arrange all your meticulously constructed units – the squared-up Half-Square Triangles and the elongated Flying Geese units – to form the iconic Folded Corners Quilt Block. Refer closely to the pattern diagram (or the instructional image provided) to guide your placement. The typical arrangement involves creating three distinct rows. Pay close attention to the orientation of your Flying Geese (which way the “geese” are flying) and the direction of your HST points. A small rotation can drastically change the final appearance, so double-check your layout before proceeding. If your original pattern included Fabric E (a 4 & 1/2″ square), it would typically be placed in the very center of the block, surrounded by the other units.
2.6 Precise Sewing of Rows Together:
Once you are completely satisfied with your block arrangement, begin sewing the individual units within each row together. As always, use a consistent scant 1/4″ seam allowance. To ensure your seams match up perfectly when joining rows, it’s highly recommended to “nest” your seams. This means pressing the seam allowance of one unit in a row in one direction (e.g., to the left) and the seam allowance of the adjacent unit in the opposite direction (e.g., to the right). This reduces bulk at intersections and helps your points align beautifully. Pin generously at all seam intersections to secure them.
2.7 Final Assembly: Joining the Rows to Complete Your Block:
With your three rows meticulously constructed, it’s time to bring them together. Carefully join Row 1 to Row 2, ensuring all seam intersections align perfectly. Pin extensively, especially at these crucial matching points, to prevent shifting. Use your scant 1/4″ seam allowance. Once joined, press this seam. Then, attach Row 3 to the newly formed Row 1-2 unit, again paying close attention to seam alignment and using plenty of pins. Press your final seams. You can choose to press the row seams open to reduce bulk or press them all in one direction, depending on what creates the flattest finished block. Congratulations! Your beautiful and efficient Folded Corners Quilt Block is now complete, a testament to your patience and precision.
Tips for a Perfectly Pieced Quilt Block
Achieving a professional finish in quilting often comes down to attention to detail. Here are some invaluable tips to help you create flawless quilt blocks, not just for this project but for all your future quilting endeavors:
- Maintain a Scant 1/4″ Seam: This is the golden rule of quilting! A “scant” 1/4 inch is just a thread’s width less than a true 1/4 inch. Test your machine’s 1/4″ foot with scrap fabric and a ruler to ensure accuracy. Consistency is more important than exactness, but aim for scant.
- Press, Don’t Iron: When quilting, we “press” seams, rather than “ironing” them. Ironing involves sliding the iron, which can stretch and distort your fabric. Instead, lift and place your iron gently, allowing the heat to flatten the seams. Press seams consistently (either open or to one side) for a flat, even block.
- Square Up Every Unit: After creating each component (Flying Geese, HSTs), take the extra minute to square them up to the specified dimensions using a quilting ruler. This critical step ensures all your pieces will fit together perfectly, preventing wavy borders or misaligned points.
- Keep Your Tools Sharp: A dull rotary cutter blade can fray fabric and lead to inaccurate cuts. Replace your blade regularly. Similarly, a sharp, appropriate-sized needle in your sewing machine prevents skipped stitches and fabric damage.
- Pre-wash Your Fabrics: While not always necessary, pre-washing your fabrics can prevent future shrinkage and color bleeding, especially if you’re mixing different fabric types or very dark and light colors.
- Pin, Pin, Pin! Don’t underestimate the power of pins. Use them generously to align seams, especially at intersections where points need to meet. Pinning prevents fabric layers from shifting, leading to more accurate results.
- Watch the Video Tutorial: If you’re a visual learner or encounter a tricky step, the original Art Gallery Fabrics tutorial on YouTube is an excellent complementary resource. Seeing the steps in action can clarify any ambiguities.
Troubleshooting Common Quilting Challenges
Even experienced quilters encounter challenges. Don’t get discouraged if your block isn’t perfect on the first try! Here are some common issues and how to address them:
- Points Don’t Match Up: This is perhaps the most common frustration. First, check your scant 1/4″ seam allowance for consistency. When joining rows or sections where points meet, try “nesting” your seams (pressing them in opposite directions) to reduce bulk. Pin directly through the seam intersection before sewing to ensure alignment.
- Blocks Are Wavy or Warped: This often indicates that the fabric was stretched during sewing or that seam allowances were inconsistent. Use a light starch on your fabric before cutting and handle pieced units gently. Remember to press, not iron, to avoid stretching.
- Fabric Edges Are Frayed or Chewed: A dull rotary blade or a blunt/wrong-sized sewing machine needle can cause this. Replace your blade and use a fresh needle appropriate for quilting cotton (usually a 75/11 or 80/12 universal or microtex needle).
- Skipped Stitches: This can be due to an old or bent needle, incorrect needle size, or improper thread tension. Replace the needle, ensure it’s inserted correctly, and check your machine’s tension settings (refer to your manual if unsure).
- Uneven Seam Allowances: Practice makes perfect! Use a 1/4″ foot on your sewing machine. If your machine doesn’t have one, consider marking a guide line on your machine bed with painter’s tape. Sew slowly and deliberately.
Conclusion: Your Quilting Masterpiece Awaits!
Congratulations, accomplished quilter! You’ve successfully navigated the intricacies of the Folded Corners Quilt Block, mastering both the efficient no-waste method for Flying Geese and the clever four-at-a-time technique for Half-Square Triangles. This project, while delivering an intricate and sophisticated look, has hopefully proven to be an accessible and profoundly rewarding experience, solidifying your foundational quilting skills. The beauty and versatility of this block make it an excellent choice for a myriad of quilting projects. Whether you’re envisioning a grand bed quilt, a charming set of placemats, or a series of decorative pillow covers, the Folded Corners Block will undoubtedly become a cherished staple in your creative repertoire.
Don’t stop here! The world of quilting is vibrant and limitless. Experiment with different fabric combinations, play with high-contrast prints, or explore subtle tonal variations to see how each choice dramatically transforms the block’s personality. Continue to hone your precision, revel in the rhythmic process of sewing, and most importantly, find immense joy in the satisfaction of bringing beautiful fabric creations to life with your own hands. We encourage you to share your finished blocks and projects – inspire others with your artistry! Happy quilting, and may your next project be as fulfilling as this one.