
Mastering the Art of Gift Wrapping: Genius Hacks for Every Present and Occasion
The festive season, birthdays, anniversaries, and countless other special occasions bring with them the joy of giving. Yet, for many, this joy can sometimes be overshadowed by the daunting task of gift wrapping. Whether you’re grappling with an oddly shaped item, find yourself short on wrapping paper, or simply desire a more polished presentation, the dilemma is real. But what if we told you that elegant, stress-free gift wrapping is not just possible, but surprisingly easy?
Forget the frustration of crumpled corners and ill-fitting paper. This comprehensive guide, inspired by the creative insights of But First, Coffee on YouTube, will equip you with a collection of ingenious hacks to transform your gift-wrapping game. We’ll explore techniques that save paper, tackle challenging shapes, and add charming DIY embellishments, ensuring every gift you give is a beautifully presented token of your thoughtfulness. Get ready to embrace the art of hassle-free gift wrapping!
Essential Tools for Flawless Gift Wrapping
Before diving into the techniques, let’s gather the fundamental supplies that will make your wrapping experience smoother and more enjoyable. Having these on hand will ensure you’re prepared for any wrapping challenge.
- Wrapping Paper: Choose a design that suits the occasion and recipient. Consider different patterns and textures.
- Pringles Tube (or similar cardboard tube): An unexpected hero for unique packaging solutions.
- Tape: Standard clear adhesive tape is crucial for securing folds.
- Double-sided Tape: Ideal for creating seamless, professional-looking edges and closures.
- Scissors: A sharp pair of scissors is non-negotiable for clean, precise cuts.
Unlocking Gift Wrapping Secrets: Step-by-Step Hacks
The Savvy Saver: Mastering Diagonal Wrapping for Limited Paper
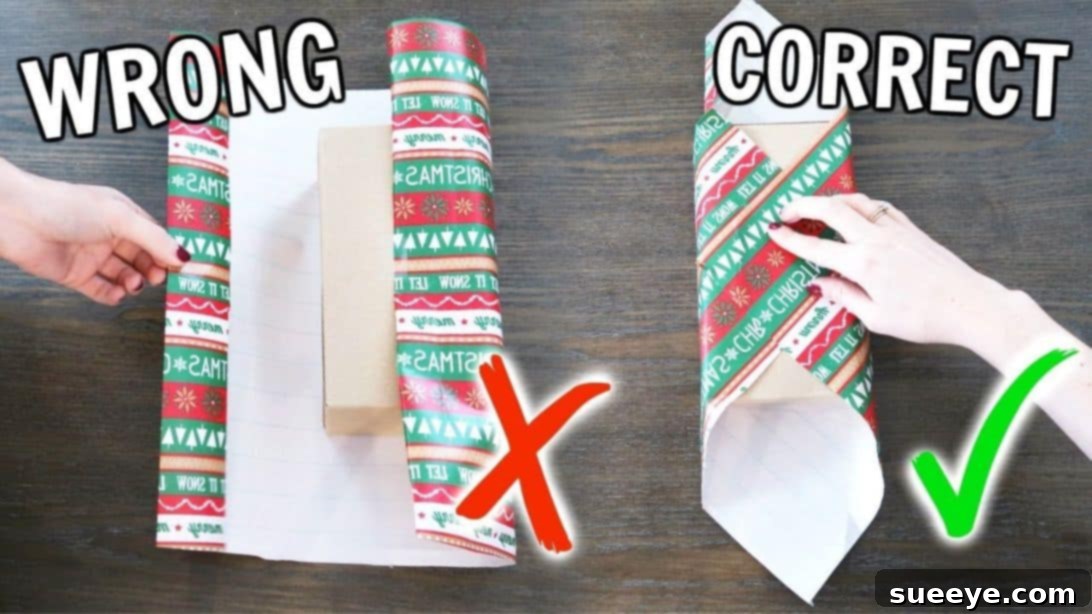
Running out of wrapping paper when you have just one more gift to wrap is a common holiday season predicament. Instead of rushing to the store for another roll, or worse, leaving a gift unwrapped, try this clever diagonal wrapping technique. It’s an ingenious method that maximizes every inch of your paper, making it appear as if you had plenty all along. This hack is not just about saving paper; it’s about smart utilization and creating a unique, neat finish that often looks more sophisticated than traditional wrapping.
Here’s how to perfect this paper-saving trick:
- Begin by laying your wrapping paper flat with the wrong side facing up. Crucially, position the paper so one of its points is facing directly towards you, forming a diamond shape rather than a square.
- Carefully place your gift box directly in the center of the wrapping paper. Ensure it’s aligned symmetrically to allow for even folds.
- Take the point of the paper nearest to you and fold it up and over the side of the box, extending it towards the center. The goal is to cover one face of the box snugly.
- Secure this initial fold firmly in place with a piece of tape, making sure the paper is taut and smooth against the box.
- Now, gently press down on the sides of the paper adjacent to the secured flap. You’ll notice new pointed corners forming.
- Take one of these pointed corners and fold it inward towards the center of the box, creating a crisp, diagonal line. Tape this down securely.
- Repeat the same folding and taping process for the remaining pointed corner on the opposite side.
- Continue this pattern, rotating the box as needed, until all sides are neatly covered and secured. The diagonal folds create a stylish, interlocking pattern that’s both efficient and aesthetically pleasing.
This technique is a lifesaver when your paper supply is low and also offers a fresh, modern look to your wrapped gifts. It truly proves that with the right method, you can achieve beautiful results even with limitations.
Embracing the Unconventional: DIY Gift Bags for Awkwardly Shaped Presents
Some gifts simply defy traditional wrapping. Bottles, stuffed animals, odd-shaped toys, or soft items can turn a simple wrapping task into a wrestling match. This is where the magic of a custom DIY gift bag comes into play. Creating your own gift bag allows you to tailor the size and shape perfectly, ensuring a neat and attractive presentation for even the most challenging items. Plus, it’s a fantastic way to utilize larger scraps of wrapping paper that might otherwise go to waste.
Follow these steps to craft your own perfectly fitted gift bag:
- Start by cutting a rectangular piece of wrapping paper. It needs to be large enough to comfortably wrap around your present with ample room at the top and bottom. Remember, it’s better to have too much paper than too little at this stage.
- Fold the paper in half lengthwise, bringing the two longer edges together. This will form the main body of your bag.
- Next, fold in both short ends of the paper towards the center. Overlap them slightly to create a strong seam. Use double-sided tape along the overlapping edge to secure them firmly, creating a continuous loop of paper. This will be the back seam of your bag.
- Now, focus on the bottom of your bag. Fold one short side of the paper upwards, about a quarter of the way up the bag’s length. This fold will determine the depth of your bag’s base.
- Open up this fold, laying it flat so that the paper forms a diamond or triangle shape on each side of the fold line. Press down firmly to create sharp creases.
- Take the point of each triangle and fold it inwards towards the center line you just created. Ensure these folds meet or slightly overlap in the middle. Tape them securely in place using double-sided tape for a clean finish. This forms the sturdy base of your gift bag.
- Stand the newly formed bag upright and gently open it. Press down on the bottom to flatten the base, ensuring it can stand independently.
- Carefully insert your awkwardly shaped present into the bag.
- Finally, fold the top of the bag over to close it. You can secure this with more tape for a crisp seal, or for an extra touch of elegance, punch holes and thread a beautiful ribbon through them, tying it into a bow.
This custom gift bag solution not only makes wrapping awkward items a breeze but also adds a personalized, handmade touch that recipients are sure to appreciate.
The Personal Touch: Crafting Elegant Bows from Leftover Wrapping Paper
A beautifully wrapped gift isn’t truly complete without a bow. While store-bought bows are convenient, there’s something incredibly charming and satisfying about adding a handmade embellishment. Crafting your own bow from leftover wrapping paper is not only an eco-friendly way to use up scraps, but it also ensures your bow perfectly matches your wrapping paper, creating a cohesive and polished look. This simple DIY project adds significant elegance and a personal touch to any present.
Here’s how to create a stunning wrapping paper bow:
- Select a piece of wrapping paper – ideally a scrap that complements your wrapped gift. Cut a rectangle of paper; the size will depend on how large you want your bow to be. A good starting point is around 8-10 inches wide and 12-15 inches long for a medium-sized bow.
- Fold this rectangular piece in half lengthwise, ensuring the pattern is on the outside. Then, fold it in half lengthwise again, creating a long, narrow strip with multiple layers.
- Now, fold this strip in half widthwise to create a smaller, multi-layered square or rectangle.
- With the paper still folded, make several parallel cuts along one of the folded edges, stopping about an inch or so before reaching the opposite folded edge. These cuts will form the individual loops of your bow. Experiment with the number and spacing of cuts to achieve different bow textures.
- Carefully unfold the paper. You should now have a piece with several strips that are still connected along one side.
- Using the edge of your scissors, gently curl each individual strip, similar to how you would curl a ribbon. Run the scissor blade along the strip firmly but carefully to create a beautiful, spiraling curl.
- Once all the strips are curled, gather the uncut, connected edge of the paper. Fold the curled strips over on top of themselves, arranging them to form a full, fluffy bow shape.
- Hold the base of the bow firmly in place and secure it with a piece of tape. You can use standard tape or a small piece of double-sided tape for an invisible hold.
- Finally, attach your beautiful DIY bow to the top of your present using a strong adhesive or double-sided tape.
This handmade bow not only elevates your gift’s presentation but also showcases your creativity and attention to detail. It’s a small effort that makes a big impact.
Sustainable Surprises: Transforming Toilet Paper Tubes into Charming Gift Boxes
For those tiny treasures, gift cards, or small party favors, finding appropriate packaging can be surprisingly tricky. This hack offers an incredibly creative, eco-friendly, and cost-effective solution: repurposing empty toilet paper tubes into charming miniature gift boxes. It’s a wonderful way to give new life to an item that would otherwise be discarded, adding a touch of rustic charm and sustainability to your gift-giving.
Here’s how to craft these adorable little gift boxes:
- Grab an empty toilet paper tube. Make sure it’s clean and dry.
- To create the curved closures, you’ll need to score the sides. A simple way to do this is to gently press the edges inward using a curved object, like the blunt side of your scissors or even your thumb. You’ll essentially be creating two opposing curved indentations on each end of the tube. This makes the next step much easier.
- Now, carefully fold the edges over following the scored lines, as demonstrated in the tutorial video. You’ll be folding the top and bottom edges of the tube inward, creating a neat, pillow-like closure. Repeat this on both ends of the tube.
- While the folded ends should hold somewhat, for added security and a cleaner finish, you can secure the folds with a small piece of tape or a dab of glue on the inside.
- Once the basic box is formed, it’s time to decorate! Take a piece of wrapping paper that’s wide enough to cover the center of the tube and long enough to wrap around it completely. Wrap this piece snugly around the middle section of the tube and secure it with tape or glue.
- For an extra flourish, wrap a festive ribbon around the decorated center. Tie it in a small bow or a simple knot to add a pop of color and texture.
These adorable DIY gift boxes are perfect for jewelry, small candies, tiny trinkets, or even rolled-up gift certificates. They offer a unique and memorable way to present small gifts while also championing sustainability.
General Tips for a Polished Gift Presentation
Beyond these specific hacks, a few general principles can elevate all your gift-wrapping efforts:
- Sharp Scissors are Your Best Friend: Invest in a good pair of sharp scissors. Clean cuts make a huge difference in the final look.
- Measure Twice, Cut Once: Always measure your paper carefully before cutting. It saves frustration and prevents waste.
- Double-Sided Tape for a Seamless Finish: Use double-sided tape for securing seams and folds. It hides the adhesive, giving a much cleaner, more professional appearance.
- Crease with Precision: Run your finger or a ruler along folds to create crisp, defined edges.
- Add a Gift Tag: A handwritten gift tag adds a personal touch and ensures your recipient knows who the thoughtful gift is from.
- Consider the Ribbon: Ribbons and bows aren’t just decorative; they can help secure wrapping paper and add structure to your presentation.
- Smooth Out Bubbles: As you wrap, gently smooth out any air bubbles or creases to ensure a taut, flawless surface.
Why Presentation Matters: The Joy of a Beautifully Wrapped Gift
While it’s true that “it’s the thought that counts,” the way a gift is presented significantly enhances the recipient’s experience. A beautifully wrapped present signals care, effort, and anticipation. It transforms the act of giving into an art form, adding an extra layer of excitement before the gift is even revealed. It shows that you’ve put thought not just into the gift itself, but into the entire gesture of giving. A well-wrapped gift is, in essence, an extension of your affection and thoughtfulness.
Conclusion: Wrap with Confidence and Creativity
Gift wrapping doesn’t have to be a source of stress or a race against the clock. With these clever hacks and a little creativity, you can transform it into an enjoyable part of the gift-giving process. From saving precious wrapping paper with the diagonal technique to crafting custom bags for those tricky shapes, and even fashioning charming bows and mini-boxes from everyday items, you now have a toolkit to tackle any wrapping challenge.
These life-changing tips, inspired by the innovative spirit of But First, Coffee, will not only make your gifts look incredible but also minimize waste and maximize your festive cheer. So, go forth and wrap with confidence, knowing that every present you give will be a testament to your thoughtfulness and newfound wrapping prowess. Happy wrapping!
*All image credit belongs to But First, Coffee via YouTube. Follow and subscribe to her channel for more ingenious DIYs and helpful tips!