
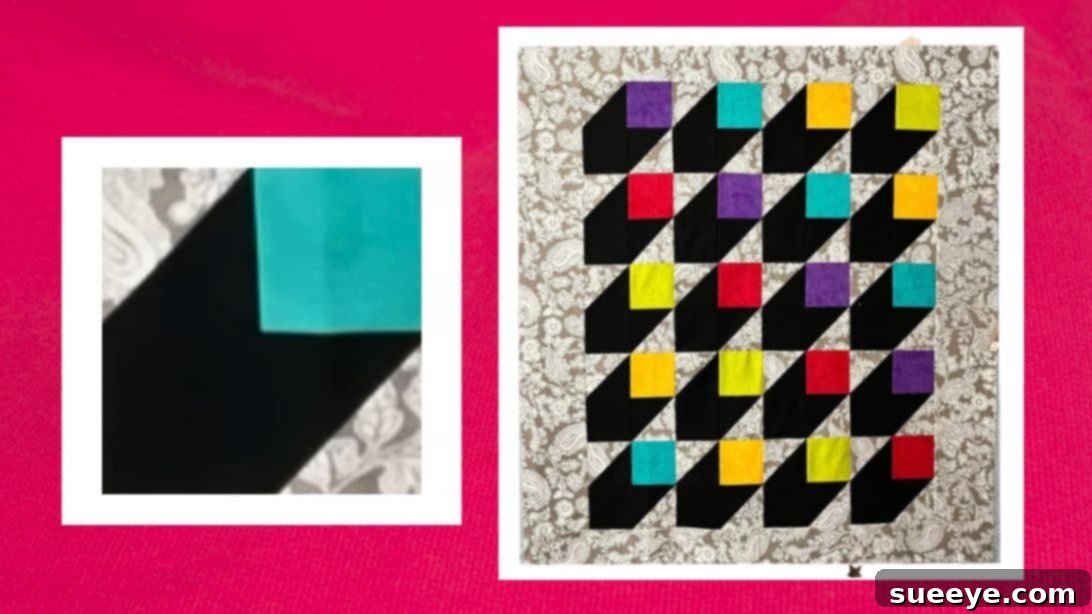
Are you searching for a quilt pattern that offers a captivating, modern look without the complicated techniques? Look no further! The 3D Blockhead Quilt Block is an ingenious design that will add stunning visual depth to your next project, creating the illusion of three-dimensional blocks floating across your quilt. Despite its impressive appearance, this block is surprisingly simple to construct, making it an ideal choice for both seasoned quilters and those just starting their creative journey.
This fantastic design, inspired by the talented Revelation Quilts, utilizes cleverly placed half-square triangles (HSTs) to form realistic shadows, giving each block its signature “blockhead” dimension. Many quilters are initially intimidated by 3D patterns, but I assure you, the steps are straightforward and incredibly rewarding. My quilting circle was absolutely captivated when they saw my finished quilt, and I’m confident you’ll feel the same sense of accomplishment. Get ready to dive into this delightful project – you might just discover your new favorite quilt block!
In this comprehensive guide, we’ll walk you through every step, from selecting your fabrics to assembling your striking 3D Blockhead Quilt. We’ll cover the essential materials, provide detailed instructions for crafting perfect half-square triangles, and guide you on arranging your blocks to maximize the stunning optical effect. Let’s get started on creating a quilt that truly stands out!
Materials Needed for Your 3D Blockhead Quilt
Before we begin sewing, gathering all your supplies is crucial for a smooth and enjoyable quilting experience. The beauty of the 3D Blockhead Quilt Block lies in its simplicity, requiring just a few key fabric pieces to create its captivating effect. For a single block, you will need the following:
- One piece of 4 1/2″ colored square (this will be the main “face” of your 3D block)
- One piece of 5″ black square (this forms part of the “shadow” and depth)
- One piece of 4 1/2″ black square (another component of the shadow)
- One piece of 5″ background square (this bright fabric contrasts to define the block’s edges)
Pro Tip for a Full Quilt: To create a dynamic and visually rich quilt top, you will need to repeat this block multiple times. For a truly varied and engaging quilt, aim to use at least five different colors for your “colored squares.” This variation will allow for stunning diagonal color progressions across your finished piece, enhancing the overall 3D illusion and adding a personalized touch to your design.
Beyond the fabric, ensure you have your standard quilting toolkit ready:
- Sewing Machine: In good working order, with a fresh needle.
- Rotary Cutter, Mat, and Rulers: For precise and accurate fabric cuts.
- Iron and Ironing Board: Essential for pressing seams flat and accurately.
- Thread: A good quality 100% cotton thread that matches or blends with your fabrics.
- Pins or Fabric Clips: To hold fabric pieces together securely.
- Fabric Marker or Pencil: For drawing guide lines on your fabric.
Step-by-Step Instructions: Crafting Your 3D Blockhead Quilt Block
Now that you have all your materials, let’s dive into the creation process. Precision is key in quilting, especially when aiming for a sharp, three-dimensional effect. Take your time with each step, and remember that careful pressing makes a world of difference.
Step 1: Creating the Half-Square Triangles (HSTs)
Half-Square Triangles are the magic behind the 3D illusion in this block, as they form the crucial “shadow” effect. Accuracy here is paramount for crisp results.
- Take your 5″ black square and your 5″ background square. Place them right sides together, ensuring all edges are perfectly aligned.
- Using a fabric marker or pencil, draw a diagonal line from one corner to the opposite corner on the wrong side of the lighter (background) fabric. This line will serve as your cutting guide.
- Next, using your sewing machine, sew a scant quarter-inch seam (just a thread’s width less than a quarter-inch) away from this drawn line on both sides. You will have two parallel stitch lines running along either side of your diagonal mark.
- Carefully cut directly on your drawn diagonal line. This will yield two individual triangular units.
- Open each unit and press the seam allowance towards the darker fabric (the black side). Pressing towards the dark fabric helps to prevent the seam allowance from showing through lighter fabrics and reduces bulk.
- Now, using your rotary cutter and ruler, trim these two new half-square triangle blocks down to exactly 4 1/2″ squares. This trimming step is critical for ensuring your blocks fit together perfectly in the next stage. You now have two perfectly sized half-square triangles, ready for assembly.
Step 2: Assembling the Four-Patch Block for 3D Effect
This step brings together your newly made HSTs with the solid colored and black squares to form the core “blockhead” unit. The arrangement is key to creating the distinct 3D shadow.
- Take your two 4 1/2″ half-square triangles, your 4 1/2″ colored square, and your 4 1/2″ black square. These four pieces will form one complete 3D Blockhead Quilt Block.
- Arrange these four blocks into a four-patch layout, as depicted in the accompanying photo below. Pay close attention to the orientation of your half-square triangles; rotating one of them correctly is essential for the shadow effect to emerge. Typically, the colored square forms one corner, the black square the opposite, and the two HSTs fill the remaining spots, creating the diagonal shadow.
- Once you are satisfied with your arrangement, begin sewing them together in rows. Sew the two blocks in the top row together with a precise quarter-inch seam allowance. Repeat this for the two blocks in the bottom row.
- After sewing each row, press the seams. For the top row, press the seam allowance towards the solid fabric piece (the colored or black square) if possible, or towards the darker fabric to reduce bulk. For the bottom row, press the seam in the opposite direction. This technique, known as “nesting seams,” will allow the seams of your two rows to lock together perfectly when you join them, resulting in a flat, accurate block.
- Finally, with right sides together, carefully align the two sewn rows, ensuring your nested seams meet perfectly. Pin them securely. Sew the two rows together with another quarter-inch seam allowance.
- Press this final seam open or to one side, whichever results in a flatter block. You have now completed one stunning 3D Blockhead Quilt Block!
Step 3: Assembling Your Full 3D Blockhead Quilt Top
Once you’ve created multiple individual 3D Blockhead blocks, the real magic happens when you arrange them into a cohesive quilt top. The layout suggested here maximizes the visual impact and enhances the three-dimensional illusion.
- For a striking and manageable quilt, plan your layout to be four blocks across and five blocks down. This 4×5 grid will create a beautifully proportioned throw quilt. You can, of course, adjust these dimensions to suit your desired quilt size.
- When arranging your blocks, the key is to create diagonal rows of the same color. Start by placing one of each different colored block down one side of your layout. Then, continue to build the rows and columns, ensuring that blocks of the same color form a pleasing diagonal line across the quilt. This strategic placement enhances the flow and depth of the overall design.
- Consider using a design wall or even laying your blocks out on a clean floor to audition your arrangement before you sew. This allows you to step back and visualize the overall effect, making any necessary adjustments to color placement or block orientation.
- Once you are satisfied with your layout, carefully sew the blocks together in rows, using a consistent quarter-inch seam allowance. Press seams alternatingly from row to row to allow for nesting when you join the rows.
- Finally, sew your completed rows together to form the main quilt top. Press these final seams neatly to ensure a flat and smooth surface.
- Adding Borders: To further enhance the “floating” effect of the 3D blocks, consider using the same background fabric you used for your HSTs for the quilt borders. This creates a seamless transition and makes the vibrant blocks truly pop against the neutral frame. Measure your quilt top accurately through the center to determine the length needed for your border strips, then cut and attach them using a consistent quarter-inch seam.
Congratulations! You’ve now created a breathtaking 3D Blockhead Quilt top. From here, you’ll proceed with basting, quilting, and binding to complete your stunning project. These final steps will secure your layers, add texture, and provide a professional finish.
Expert Tips for a Perfect 3D Blockhead Quilt
Achieving a professional-looking quilt often comes down to attention to detail and utilizing a few tried-and-true quilting techniques. Here are some tips to help you master your 3D Blockhead Quilt Block:
- Precision is Paramount: Accurate cutting is the foundation of any successful quilt. Invest in a good quality rotary cutter, ruler, and mat, and always double-check your measurements before cutting. A quarter-inch off on one block can compound into a significant issue across an entire quilt.
- Consistent Seam Allowance: Maintaining a consistent quarter-inch seam allowance throughout your project is crucial. Use a quarter-inch foot on your sewing machine or mark the quarter-inch line on your machine bed with painter’s tape to guide you.
- Pressing Matters: Don’t underestimate the power of a good press. Pressing your seams flat and in the correct direction (often towards the darker fabric or open to reduce bulk) will help your blocks lie flat and match up perfectly. Pressing is not ironing; avoid pushing the iron back and forth, which can stretch your fabric. Instead, lift and place.
- Chain Piecing: To save time and thread, especially when making many HSTs, use chain piecing. Sew one unit, then feed the next unit directly under the needle without cutting the thread between them. This creates a chain of sewn units that you can then cut apart.
- Design Wall Advantage: A design wall (even a flannel sheet tacked to a wall) is invaluable for auditioning your block arrangements. It allows you to step back and view your quilt layout from a distance, making it easier to spot potential issues or make creative adjustments to your color placement.
- Fabric Choice and Contrast: The 3D effect relies heavily on contrast. Ensure your “black” or shadow fabric provides a strong contrast to your background fabric and a good visual difference from your colored squares. Varying the tones of your colored squares will also add more interest.
- Patience and Breaks: Quilting should be an enjoyable process. If you find yourself getting frustrated, take a break! Step away, stretch, and come back with fresh eyes. This often helps to resolve tricky situations.
Final Thoughts on Your 3D Blockhead Quilting Journey
The 3D Blockhead Quilt Block is a testament to how simple techniques can combine to create something truly spectacular. The optical illusion of depth it provides is captivating, making it a fantastic showpiece for any home or a cherished gift for a loved one. By following these instructions and applying the helpful tips, you’ll not only create a beautiful quilt but also build confidence in your quilting skills.
We extend our sincere gratitude to Revelation Quilts on YouTube for sharing this inspiring and approachable pattern. Her channel is a treasure trove of creative and unique quilt designs, offering endless inspiration for your next project.
Now that you have all the knowledge and guidance, it’s time to gather your fabrics, fire up your sewing machine, and embark on this incredibly rewarding quilting adventure. We can’t wait to see your stunning 3D Blockhead Quilt come to life!