
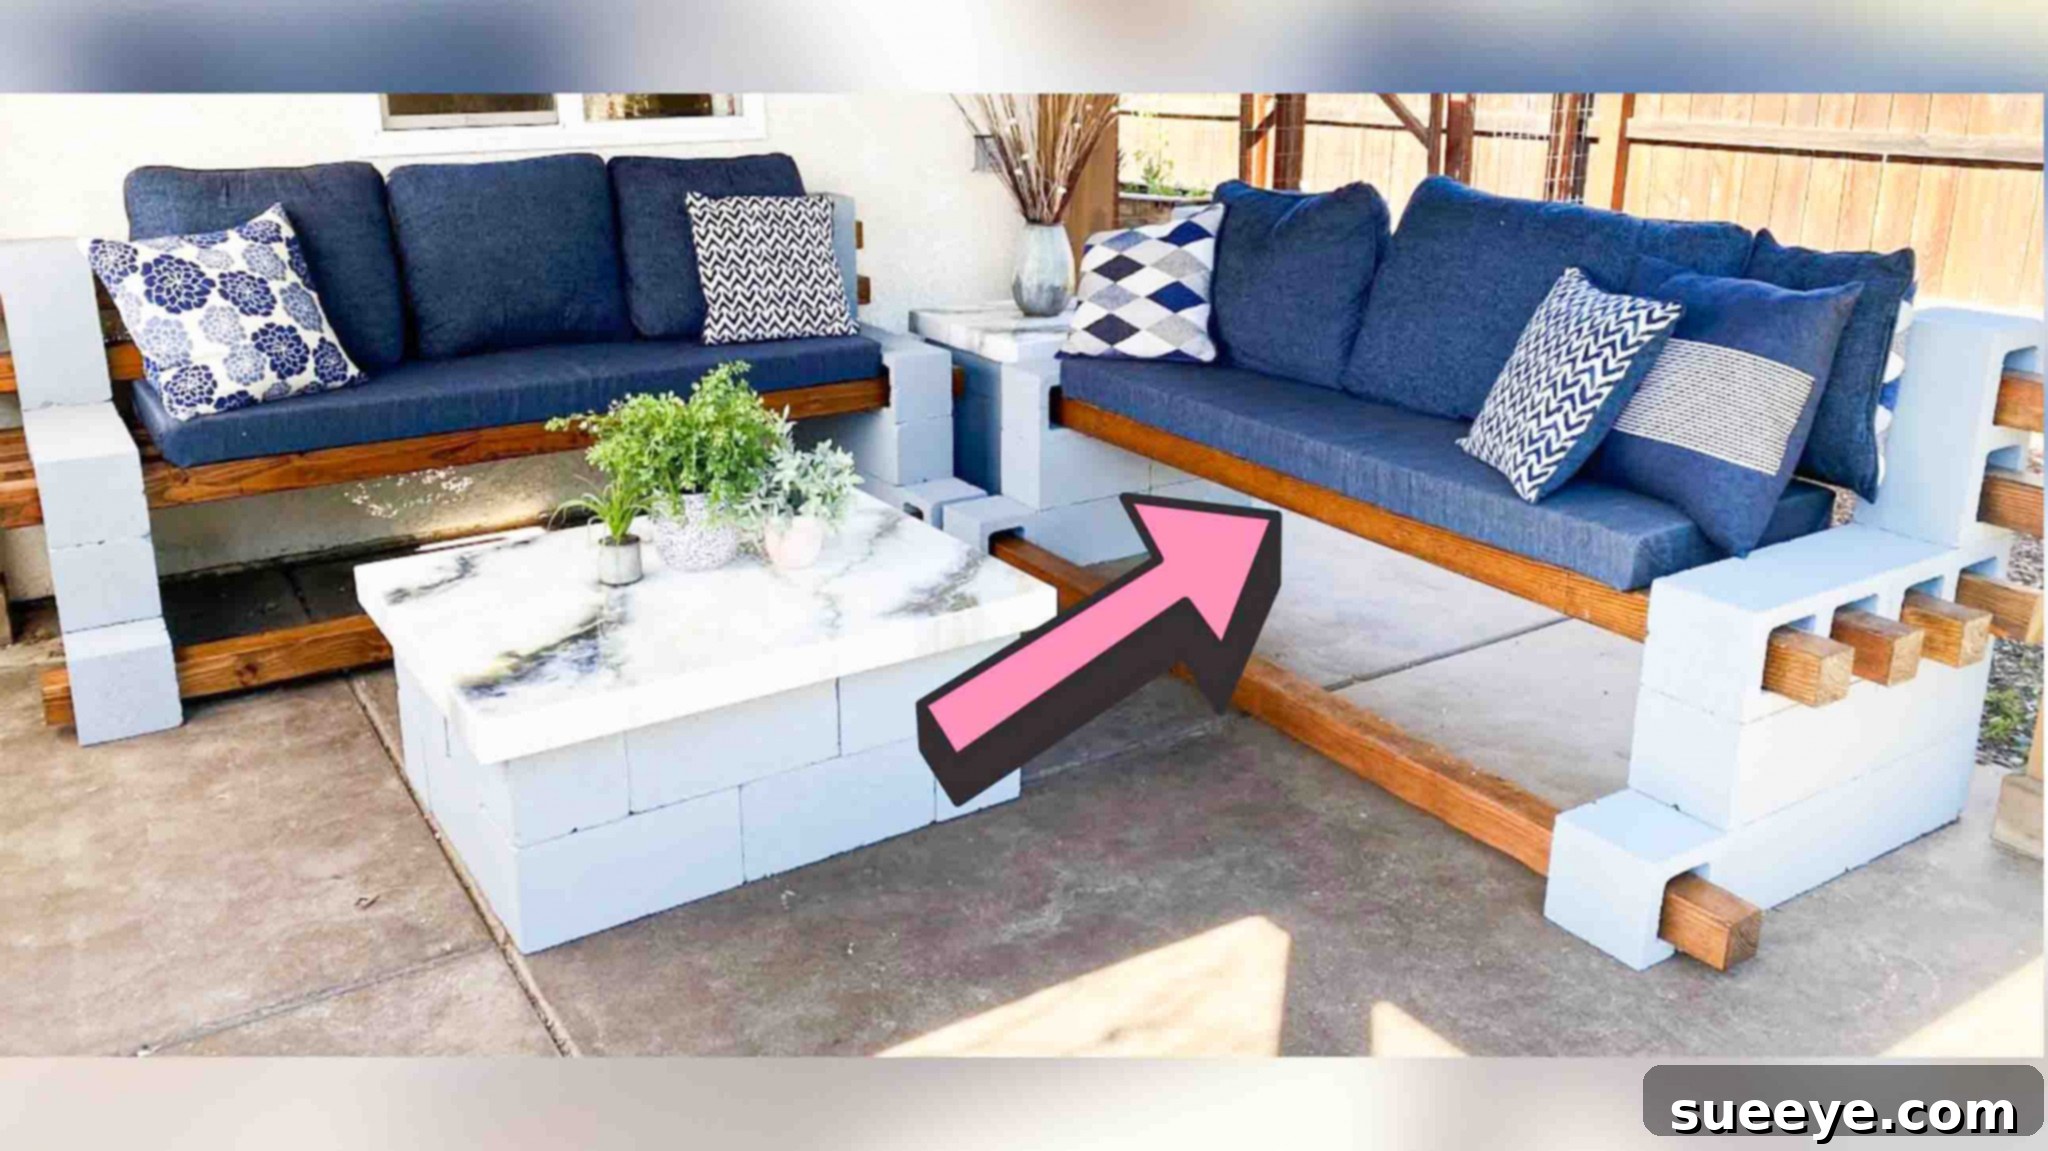
Transform Your Patio: Easy & Affordable DIY Cinder Block Bench Tutorial
Are you dreaming of a stylish and comfortable outdoor living space, but find yourself wincing at the high price tags of patio furniture? You’re not alone! Many homeowners long for elegant seating solutions to enhance their gardens, decks, or balconies without breaking the bank. The good news is, you don’t have to compromise on style or budget. We’re here to show you how to create a stunning, durable, and incredibly affordable patio bench using simple materials: cinder blocks and wood. This ingenious DIY project, inspired by the creative minds at BM Sculptures on YouTube, is perfect for beginners and seasoned DIY enthusiasts alike. Best of all, it requires no power tools, making it accessible to virtually anyone. With just a quick trip to your local hardware store and a few hours of enjoyable work, you can craft a custom piece that looks far more expensive than it is. Get ready to transform your outdoor area into an inviting oasis – let’s dive into the comprehensive tutorial below!
Gather Your Essentials: What You’ll Need for Your DIY Cinder Block Bench
Before embarking on any DIY project, gathering all your materials is key to a smooth and efficient build. For this versatile and robust cinder block bench, you’ll need the following items. We’ve broken down the list for the main bench structure and the optional, but highly recommended, comfortable upholstery to make your outdoor seating truly luxurious.
For the Bench Structure (per one bench unit):
- 14 Cinder Blocks (8″x8″x16″): These standard-sized concrete blocks will form the foundational support for your bench. They are inexpensive, readily available, and incredibly sturdy. When purchasing, inspect them for any major cracks or damage.
- 6 pieces of 8′ 4×4’s (Untreated Lumber): These wooden beams will serve as the seating surface. Untreated lumber is often more affordable, but you could opt for treated wood for enhanced weather resistance. Ensure the pieces are straight and free from significant warping for a smooth bench top.
- Construction Adhesive (Exterior Grade): A high-strength, weather-resistant adhesive is crucial for securely bonding the cinder blocks together, ensuring your bench remains stable and safe for years to come. Look for products designed for masonry and outdoor use.
- Exterior Paint (e.g., Valspar Storm Coat Exterior): Choose a paint specifically formulated for outdoor application. This will protect your cinder blocks from the elements and allow you to customize the bench’s color to match your outdoor decor. Consider a color that complements your existing patio scheme or creates a vibrant focal point.
- Paint Roller and Tray: Essential tools for efficient and even application of paint to the porous surfaces of the cinder blocks.
- Caulking Gun: This tool is necessary for precisely applying the construction adhesive, allowing for controlled and mess-free application.
- Wood Stain (e.g., Walnut Color): To bring out the natural beauty of your wood beams and provide an initial layer of protection. You can choose from various stain colors to achieve your desired aesthetic, from light natural tones to deep, rich hues.
- Wood Sealer (Polyurethane Coating): A vital step to protect the stained wood from moisture, UV rays, and general wear and tear, significantly extending its lifespan and maintaining its appearance. An exterior-grade polyurethane is highly recommended.
- Sandpaper Sponge (Medium Grit): Useful for smoothing rough edges on the wood and preparing surfaces for optimal stain and paint adhesion.
- Clean Rags: For wiping off excess stain, cleaning surfaces, and general tidying during the project.
For the Optional Upholstery (per one bench unit):
Adding custom cushions will transform your functional cinder block bench into a comfortable and inviting seating area, perfect for lounging.
- 4″ Foam Cushioning: Provides plush comfort for your seating. Measure the length and width of your bench’s seating area to determine the correct dimensions for your foam. High-density foam is ideal for outdoor use due to its durability and ability to retain shape.
- Durable Outdoor Fabric: Select a weather-resistant fabric that can withstand sun exposure, rain, and resist mildew. There’s a vast array of colors, patterns, and textures available to perfectly match your personal style and outdoor theme.
- T-50 Staple Gun: A manual staple gun is an efficient tool for securely attaching the fabric to the fiberboard cushion base.
- 1/4″ Staples: Ensure these staples are compatible with your staple gun and are long enough to provide a secure hold without penetrating through the fiberboard.
- 1/8″ x 4’x8′ piece of Fiberboard (or Plywood): This sheet will serve as the rigid base for your cushion, providing a firm surface to which the foam and fabric are attached.
- Handsaw: A basic handsaw is perfect for cutting the fiberboard to the precise dimensions required for your cushions.
Step-by-Step Guide: Building Your Cinder Block Bench
Now that you have all your materials meticulously gathered, it’s time to transform them into a stunning and functional piece of outdoor furniture. Follow these detailed instructions to construct your beautiful and resilient DIY cinder block bench.
Step 1: Preparing the Wood and Constructing the Cinder Block Base
This initial stage focuses on treating your wooden beams for longevity and assembling the robust foundation of your bench. Careful preparation ensures a durable and aesthetically pleasing final product.
- Smooth, Stain, and Seal the Wood:
- Sanding: Begin by taking each of your 4×4 wooden beams and thoroughly smoothing all four sides and edges using your sandpaper sponge. This process not only eliminates splinters and rough patches but also prepares the wood surface for optimal stain adhesion, resulting in a more professional finish. Once sanded, use a clean rag to wipe off any residual sawdust.
- Staining: Now, apply your chosen wood stain evenly across all surfaces of the wood. Work with the grain of the wood for the best results, using a brush or rag. Allow the stain to penetrate the wood for approximately 15 minutes. This soaking period is crucial for the pigment to absorb deeply, ensuring a rich, consistent color. After 15 minutes, use a clean, dry rag to wipe off any excess stain. This prevents a tacky finish and allows the wood’s natural grain to shine through.
- Sealing: To provide robust protection against moisture, UV rays, and general outdoor wear, apply a polyurethane coating or a suitable exterior wood sealer. Follow the manufacturer’s specific instructions regarding application and drying times, which often recommend multiple thin coats for superior protection. This step is vital for ensuring the longevity and beauty of your wooden seating surface.
- Plan and Position Your Cinder Block Layout: Before applying any adhesive, carefully arrange your cinder blocks in the desired configuration for your bench. A common and sturdy layout involves creating two stacks of blocks for each end of the bench, allowing for open channels where the wooden beams will sit. It is absolutely essential to assemble the bench in its final intended location on your patio or garden. Once the adhesive cures, the bench will be extremely heavy and virtually impossible to move without damaging the structure. Ensure the ground beneath is level and stable for optimal stability.
- Secure the Cinder Blocks with Adhesive: Once you are fully satisfied with the test fit and precise placement of your cinder blocks, it’s time to permanently bond them. Load your caulking gun with the construction adhesive. Apply a generous, continuous bead of adhesive to the top surface of each cinder block before placing the next block on top. Press firmly to ensure excellent contact between the layers. Pay close attention to all contact points where the blocks meet to maximize stability. Allow the adhesive to dry and cure completely, typically overnight (or according to the product’s instructions), to achieve maximum strength and a rock-solid foundation.
- Paint the Cinder Blocks for Protection and Aesthetics: After the construction adhesive has fully cured and the structure is stable, it’s time to add color and an extra layer of protection. Using your paint roller, apply your chosen exterior paint (like Valspar Storm Coat Exterior) to all exposed surfaces of the cinder blocks. Aim for at least two coats to achieve full coverage and enhance durability, allowing adequate drying time between each coat. This step not only dramatically improves the bench’s aesthetic appeal but also seals the porous cinder blocks, making them highly resistant to rain, sun, and frost damage.
Step 2: Assembling the Seat and Crafting Your Comfortable Upholstery
This final stage focuses on completing the seating surface by inserting the prepared wood and then adding the luxurious touch of custom-made, upholstered cushions, bringing comfort and style to your outdoor bench.
- Insert the Wooden Beams: Once the paint on the cinder blocks is completely dry to the touch, carefully slide the prepared and treated wooden 4×4 beams into the open holes of the top-layer cinder blocks. Ensure they fit snugly and are evenly spaced across the length of your bench. The inherent weight of the wood, combined with the snug fit within the block cavities, will generally hold them securely in place. For added peace of mind and enhanced stability, you may opt to apply a small dab of construction adhesive at the points where the wood meets the cinder blocks.
- Prepare the Fiberboard Base for Cushions: Take your 1/8″ x 4’x8′ piece of fiberboard (or plywood). Carefully measure the exact length and width of the area where your cushion will rest on the wooden beams. Using your handsaw, precisely cut the fiberboard to these dimensions. Once cut, use your sandpaper sponge to thoroughly smooth any sharp edges or rough areas, ensuring a safe and clean base for your cushion that won’t snag your fabric.
- Assemble the Upholstered Cushion:
- Layering: Begin by laying your chosen durable outdoor fabric face down on a clean, flat work surface. Position your 4-inch foam cushioning squarely and centered on top of the fabric. Finally, place the cut fiberboard piece on top of the foam. This creates a sandwich of fabric, foam, and a solid base.
- Wrapping and Stapling Sides: Starting with one of the longer sides, pull the fabric tightly up and over the foam, wrapping it around the fiberboard base. Using your T-50 staple gun, securely staple the fabric to the underside of the fiberboard. Work from the center outwards, maintaining consistent tension to ensure the fabric is taut and wrinkle-free. Repeat this precise process for the opposite long side, continuously checking that the fabric remains evenly stretched.
- Stapling Ends and Corners: Next, address the shorter ends of the cushion, pulling the fabric taut and stapling it securely. For the corners, carefully fold the fabric neatly and tightly, much like wrapping a present, to create crisp, clean edges. Staple these folds down firmly to prevent fraying and ensure a professional finish.
- Extra Security: After all staples are in place around the perimeter, use a hammer to gently tap them down further. This ensures that the staples are fully flush with the fiberboard, providing an extra layer of security and preventing the fabric from detaching over time.
- Final Placement of Cushions: With your beautifully upholstered cushions complete and ready, simply place them onto the wooden beams of your cinder block bench. For added stability and to prevent the cushions from sliding, you can optionally attach non-slip gripper pads or small strips of Velcro to the underside of the cushions and the top of the wooden beams.
Why Choose a DIY Cinder Block Bench? Benefits and Advantages
Beyond the immense satisfaction of building something with your own hands, this cinder block bench offers a wealth of practical and aesthetic benefits that make it an exceptional choice for any outdoor space:
- Unbeatable Affordability: This project significantly reduces the cost of outdoor seating. Cinder blocks and lumber are very economical, allowing you to create stylish furniture for a fraction of the price of store-bought alternatives.
- Exceptional Durability: Cinder blocks are inherently strong, robust, and weather-resistant, providing a remarkably sturdy and long-lasting base that can withstand various outdoor conditions, from harsh sun to heavy rain.
- Limitless Customization: From the paint color of the blocks to the stain or finish of the wood and the pattern/texture of the fabric, you have complete creative control. This allows you to perfectly match your existing decor or create a bold new statement piece that reflects your personal style.
- Effortless Construction (No Power Tools!): This project is incredibly beginner-friendly. The absence of complex cuts or the need for specialized power tools removes common barriers, making it a safe, enjoyable, and accessible build for everyone, regardless of their DIY experience level.
- Quick to Assemble: While drying times for adhesive and paint are necessary, the actual physical assembly steps are straightforward and can be completed in a single afternoon. This means you can enjoy your new, custom-built bench almost immediately.
- Versatility in Design: The modular nature of cinder blocks allows for incredible design flexibility. Easily scale this design to create longer benches, L-shaped seating arrangements, or even integrate open block cavities as clever planters for succulents or herbs, adding greenery to your seating.
- Eco-Friendly Potential: By choosing durable materials and engaging in DIY, you contribute to a more sustainable lifestyle by reducing reliance on mass-produced, often less durable, furniture. Cinder blocks themselves can sometimes be sourced from reclaimed materials, further enhancing the eco-friendly aspect.
Tips for Customization and Enhancing Your Cinder Block Bench
One of the greatest joys of DIY is the ability to personalize your creation to perfectly suit your taste and space. Here are some innovative ideas to make your cinder block bench uniquely yours and elevate its appeal:
- Creative Color Play: Don’t limit yourself to solid colors for the cinder blocks. Consider painting patterns, geometric designs, or even trying a distressed or ombre look. You could also paint the wood beams instead of staining them for a different aesthetic, perhaps matching an accent color from your fabric.
- Experiment with Wood Variations: Explore different types of wood for the beams. Cedar, for instance, offers natural rot resistance and a pleasant aroma, while pressure-treated pine provides enhanced durability for outdoor use. Reclaimed wood can also add a rustic, unique character.
- Fabric Flair and Texture: Outdoor fabrics come in an incredible array of colors, patterns, and textures. Choose vibrant hues for a cheerful pop of color, subtle neutrals for a sophisticated and calming look, or fun, eclectic prints to truly reflect your personality and style.
- Thoughtful Accessories: Enhance both comfort and style by adding weather-resistant throw pillows in coordinating colors and patterns, soft outdoor blankets for cooler evenings, or even a small side table crafted from a single painted cinder block and a piece of leftover wood for holding drinks and books.
- Integrated Planters: Utilize some of the open cavities within the cinder blocks as charming mini planters for succulents, small herbs, or vibrant annual flowers. Just remember to ensure adequate drainage for healthy plant growth by adding a layer of gravel at the bottom.
- Atmospheric Lighting: String solar-powered fairy lights or place small LED lanterns around or within the cinder block cavities of your bench. This creates a magical and inviting ambiance for evening gatherings or quiet relaxation.
Maintenance and Care for Lasting Enjoyment
To ensure your DIY cinder block bench remains a beautiful, comfortable, and functional addition to your outdoor space for many years to come, incorporating a few simple maintenance tips into your routine will make a significant difference:
- Cushion Care and Protection: To prolong the life of your upholstered cushions, it’s highly recommended to bring them indoors during inclement weather (heavy rain, snow) or when they are not in use for extended periods. Alternatively, invest in high-quality, waterproof furniture covers to protect the entire bench. Regularly clean outdoor fabric cushions according to the manufacturer’s instructions to prevent mildew, dirt buildup, and premature fading from sun exposure.
- Wood Protection and Re-sealing: Periodically inspect the wooden beams for any signs of wear, fading, or water damage. Depending on your local climate and sun exposure, plan to reapply wood sealer or polyurethane every 1-2 years, or as needed, to maintain their protective barrier against moisture, UV rays, and insect damage. This simple step can significantly extend the lifespan of your wooden seat.
- Cinder Block Cleaning: The painted cinder blocks are relatively low maintenance. Simply wipe them down with a damp cloth to remove surface dirt, dust, and pollen. For more stubborn stains or grime, a mild soap solution (like dish soap and water) can be used, followed by a rinse with clean water. Avoid using harsh chemical cleaners that might strip or damage the exterior paint finish.
- Winter Storage Considerations: In regions that experience harsh winters with freezing temperatures, heavy snow, or prolonged periods of rain, consider covering the entire bench with a heavy-duty furniture cover. For maximum protection, disassembling the wooden parts and cushions for indoor storage during the coldest months will significantly prolong their lifespan and preserve their appearance.
- Check for Stability: From time to time, perform a quick check of the cinder block structure to ensure all blocks are still securely adhered and stable. If you notice any joints showing signs of weakening or separation, promptly reapply construction adhesive to reinforce them, ensuring the bench remains safe and sturdy.
Conclusion: Your Dream Patio, Realized!
Congratulations! By meticulously following this comprehensive DIY cinder block bench tutorial, you have not only created a functional, incredibly stylish, and remarkably affordable piece of outdoor furniture but also gained valuable hands-on DIY experience. This project stands as a testament to the idea that achieving a beautiful and comfortable patio or garden space doesn’t require a hefty budget, complex tools, or specialized skills. With its robust, durable construction, endless customization possibilities, and straightforward assembly process, your new cinder block bench will undoubtedly become a cherished spot for relaxation, entertaining guests, and simply enjoying the tranquility of your outdoor environment. So, grab a refreshing drink, settle into your handmade masterpiece, and bask in the profound satisfaction of a job exceptionally well done. Enjoy your beautifully transformed and inviting outdoor living space!