
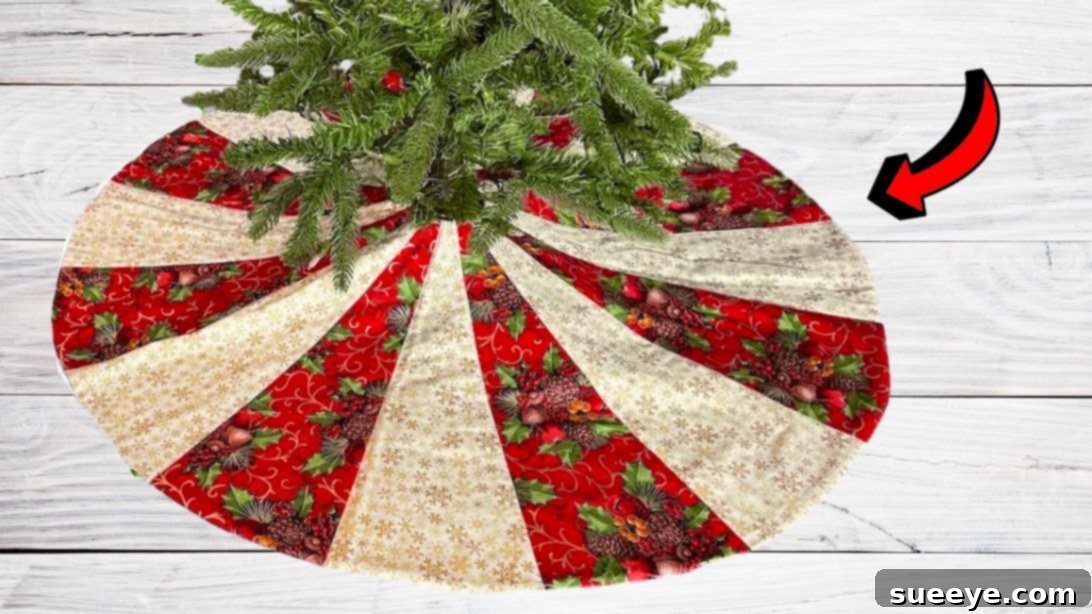
As the holiday season draws near, the desire to infuse our homes with warmth and festive cheer becomes paramount. While store-bought decorations offer convenience, there’s an undeniable magic in creating something truly special and personalized. This year, why not elevate your Christmas tree’s presentation with a stunning, handmade tree skirt? Ditch the generic options and embark on a rewarding DIY journey that promises a unique centerpiece for your holiday celebrations. We’ll guide you through crafting a beautiful two-toned Christmas tree skirt, a project that not only adds elegance but also allows for endless customization. Imagine the cozy ambiance created by this handcrafted piece, perfectly complementing your tree and gifts. You can further enhance its charm with elegant embellishments like delicate ribbons, shimmering beads, or even a touch of festive embroidery, transforming it into a cherished family heirloom.
RELATED: Quilted Dresden Pattern Christmas Tree Skirt
Craft Your Own Elegant Two-Toned Christmas Tree Skirt
The beauty of this project lies not just in its exquisite result, but also in its accessibility. Even if you’re a novice in the world of sewing, this guide is designed to walk you through each step, making the process enjoyable and stress-free. A key aspect of this project is the creation of your very own pattern, which might sound daunting, but trust us, it’s incredibly straightforward. With clear, step-by-step instructions, you’ll master pattern making in no time. While a single fabric color can create a classic look, opting for two contrasting or complementary fabrics will truly make your tree skirt pop, adding a vibrant and festive dimension to your holiday decor. This clever pattern isn’t just for Christmas; its versatile design can also be adapted to create elegant tablecloths for various seasons and occasions, making it a valuable addition to your crafting repertoire.
Why Choose a Handmade Christmas Tree Skirt?
Opting to sew your own Christmas tree skirt offers a multitude of benefits beyond just saving a trip to the store. A handmade skirt allows for unparalleled personalization, enabling you to select fabrics that perfectly match your home’s decor and your personal style. It’s a wonderful opportunity to incorporate specific colors, patterns, or even textures that resonate with your holiday theme. Furthermore, the act of crafting itself is a therapeutic and enjoyable experience, especially during the festive season. It can become a cherished annual tradition, creating memories as you prepare your home for the holidays. Unlike mass-produced alternatives, your DIY tree skirt will boast a unique character and a touch of heartfelt craftsmanship that money simply can’t buy. It’s not just a decoration; it’s a statement piece, imbued with your creativity and holiday spirit.
Choosing Your Fabrics: Creating a Festive Aesthetic
The choice of fabrics is crucial for achieving that stunning two-toned effect and overall aesthetic of your Christmas tree skirt. Fabric A and Fabric B are your primary design elements, offering an opportunity to play with color, pattern, and texture. Consider using traditional holiday colors like deep reds and forest greens, or perhaps more contemporary metallics and icy blues for a modern feel. You could even opt for one solid fabric and one patterned fabric (like plaids, stripes, or subtle holiday motifs) to create visual interest without overwhelming the design. When selecting your materials, think about durability and ease of care. High-quality quilting cottons are an excellent choice due to their wide array of designs, vibrant colors, and ease of sewing. Flannel can add a cozy, rustic touch, while velvet or satin can bring a luxurious sheen. The backing fabric and cotton batting are equally important for giving your skirt structure, softness, and a professional finish. Ensure your chosen fabrics are pre-washed and ironed to prevent any shrinkage or warping after assembly, especially if mixing different types of fibers.
DIY Christmas Tree Skirt Materials
To embark on this delightful sewing adventure, gather the following high-quality materials. The finished size of your elegant tree skirt will be approximately 41 inches in diameter, perfect for most standard Christmas trees. Remember, selecting your fabrics is half the fun!
- 7/8 yard of Fabric A: Choose a beautiful fabric for one of your main contrasting colors or patterns.
- 7/8 yard of Fabric B: Select another gorgeous fabric to complement or contrast with Fabric A, creating the distinct two-toned design.
- 1 1/4 yard of Backing Fabric: This fabric will form the underside of your tree skirt, so consider a coordinating solid color or a subtle pattern that complements your main fabrics.
- 1 1/4 yards of Cotton Batting: Essential for giving your tree skirt a plush, quilted feel and helping it lay smoothly around the tree base.
- 19″ – 20″ long piece of Sturdy Paper: This will be used to draft your initial pattern. Butcher paper, craft paper, or even several sheets of newspaper taped together will work.
- Additional Essential Sewing Supplies:
- Fabric scissors or rotary cutter with a mat
- Sewing machine
- Thread (matching your fabrics)
- Pins or fabric clips
- Iron and ironing board
- Ruler or measuring tape
- Fabric marker or chalk
- Large piece of cardboard (for tracing and creating a durable template)
Note: The finished size is 41″ in diameter, providing ample coverage for your tree stand while adding a decorative touch.
How to Make a Christmas Tree Skirt: A Step-by-Step Guide
Follow these detailed instructions to create a gorgeous and durable Christmas tree skirt that will be a cherished part of your holiday decorations for years to come.
Step 1: Crafting Your Reusable Pattern Template
The foundation of this beautiful tree skirt is a precise pattern. Begin by taking your large piece of paper (approximately 19-20 inches long). Fold this paper in half lengthwise, creating a crisp crease down the middle. Along the top folded edge, measure 1 inch down from the top and make a small mark. From this mark, draw a short, horizontal line, approximately 1/2 inch long. This small line will form part of the inner circle of your tree skirt. Next, from the end of that 1/2-inch line, measure straight down 18.5 inches along the folded edge and place another mark. This defines the overall length of one segment of your skirt. Now, from the mark on the *bottom* folded edge, measure 4 1/4 inches horizontally away from the folded edge and make a third mark. Connect the first mark (from the top, 1 inch down) to this third mark (4 1/4 inches from the bottom folded edge) with a straight diagonal line. Finally, from the mark on the bottom folded edge (18.5 inches down), go down about 1/2 inch and draw a gentle curve that connects to the 4 1/4-inch mark. This curve helps create a smooth, rounded outer edge for your skirt segment. Carefully cut out this paper pattern along your drawn lines. To ensure your pattern is durable and reusable, trace this paper pattern onto a sturdy piece of cardboard and meticulously cut out the cardboard template. You will need two identical cardboard templates. On your finished cardboard pattern piece, clearly label it: “Tree Skirt Segment, 40″ Diameter. Cut 16 pieces. Use 1/4″ Seam Allowance.” This label serves as a handy reminder for future projects. This design will yield a total of 16 segments that, when sewn together, will form a perfect 40-inch diameter circle with a central opening for the tree trunk.
Step 2: Precise Fabric Cutting
Now that you have your durable pattern templates, it’s time to cut your fabrics. Take your Fabric A and fold it in half, then fold it in half again, ensuring all edges are aligned. This will allow you to cut multiple pieces simultaneously, saving time and ensuring consistency. Carefully place two of your cardboard pattern templates on top of the folded Fabric A, arranging them in opposite directions to maximize fabric usage and minimize waste. Pin the templates securely to the fabric to prevent any shifting during cutting. Using a sharp pair of fabric scissors or, for even greater precision, a rotary cutter and cutting mat, carefully cut around the edges of the templates. The sharpness of your cutting tool is crucial for clean, professional-looking edges. Repeat this entire process for Fabric B. You should aim to cut 8 pieces from Fabric A and 8 pieces from Fabric B, totaling 16 segments. Double-check that all your pieces are accurately cut and uniform in size.
Step 3: Assembling the Skirt Top
With all 16 fabric segments cut, it’s time to bring your tree skirt to life. Take one segment from Fabric A and one segment from Fabric B. Align them along one of their long, straight edges, ensuring the right sides of the fabric are facing each other. Pin them together carefully. Using your sewing machine, sew these two pieces together with a precise 1/4-inch seam allowance. This consistent seam allowance is vital for the final circular shape. Continue adding the remaining segments, alternating between Fabric A and Fabric B, until you have sewn all 16 pieces together to form a complete circle. After each seam is sewn, press the seam allowance in one consistent direction (e.g., all seams pressed towards Fabric A or all towards Fabric B). This helps to reduce bulk, creates a flatter, more professional finish, and makes the subsequent quilting steps easier. Your top layer, with its striking two-toned pattern, is now complete!
Step 4: Layering and Trimming for the Perfect Fit
Prepare your layers for quilting and finishing. Lay your backing fabric flat on a clean, large surface, with the right side facing up. Smooth out any wrinkles. Next, carefully place the cotton batting directly on top of the backing fabric. Ensure both layers are perfectly aligned and completely smooth. Finally, position your assembled tree skirt top (the 16-segment circle) on top of the batting, with the right side facing down. This means the wrong side of your skirt top is facing you. Pin all three layers together securely around the entire perimeter, and along the central opening, paying extra attention to curves to prevent shifting. Gently smooth out any air bubbles or puckers between the layers. Once everything is perfectly aligned and pinned, carefully trim any excess cotton batting and backing fabric, using the top skirt as your guide. This ensures that all layers are the exact same size. Next, use a sharp blade or scissors to cut through all layers where the ends of the tree skirt meet (creating the opening for the tree stand) and carefully cut out the small circular opening in the very center of the skirt, aligning it with the center of your sewn top layer.
Step 5: Sewing the Edges and Preparing for Turning
With your three layers neatly stacked and trimmed, it’s time to sew them together. Starting from one edge of the tree skirt opening, sew all the way around the outer perimeter, the inner circle, and the other side of the opening, leaving a generous unstitched opening (at least 5-6 inches) along one of the straight edges of the tree skirt’s main opening. This unstitched section is crucial for turning your tree skirt right side out later. Use a 1/4-inch seam allowance for these stitches. Once you’ve sewn all the way around, carefully make small snips or “slits” into the seam allowance of the curved edges, just up to but not through the stitch line. These small cuts, known as “notching” or “clipping,” are essential for allowing the fabric to lay smoothly when turned right side out, especially around the inner and outer curved edges, preventing puckering and giving your skirt a beautifully rounded shape.
Step 6: The Grand Reveal and Finishing Touches
Now for the satisfying moment! Carefully reach through the opening you left unstitched in Step 5 and gently pull the entire tree skirt right side out. Take your time with this step, ensuring all edges are pushed out completely and smoothly. Use a point turner or a dull pencil to gently push out the seams and curves for a crisp finish. Once turned, thoroughly flatten the entire tree skirt, pressing it with a warm iron to remove any wrinkles and create neat, defined edges. Next, you need to close the opening. Fold in the raw edges of the opening, aligning them with the sewn seam, and press them flat. You can then hand-sew this opening closed using an invisible stitch (like a ladder stitch) for a seamless finish, or you can topstitch very close to the edge with your machine for a more durable, albeit visible, closure. Finally, to give your tree skirt a professional, finished look and to hold all the layers securely in place, topstitch along all the sewn seams on the surface of the skirt. This not only adds a decorative touch but also prevents the batting from shifting and gives your skirt a beautifully weighted and structured feel. You can also quilt along the alternating fabric lines or add decorative quilting stitches if desired. Your magnificent handmade Christmas tree skirt is now complete and ready to grace your holiday display!
Enhancing Your Handmade Tree Skirt
While your two-toned tree skirt is already a showstopper, there are countless ways to add extra sparkle and charm. Consider sewing decorative ribbons around the outer edge or the central opening. You could attach small jingle bells or festive beads along the hem for a subtle sparkle and sound. For a truly unique touch, embroider a family monogram or the year onto one of the fabric segments. Appliquéd shapes, like snowflakes, stars, or even tiny Christmas trees, can also be added for extra visual interest. If you’re feeling adventurous, add a ruffled border using a coordinating fabric, or incorporate elegant piping around the edges. These embellishments not only personalize your tree skirt further but also allow you to match it perfectly with your existing holiday decor, making it a truly bespoke piece.
Care and Maintenance for Longevity
To ensure your beautiful handmade Christmas tree skirt remains a cherished part of your holiday traditions for many years, proper care is essential. When it’s time to clean your skirt, generally a gentle spot cleaning is recommended for minor spills. For a more thorough cleaning, if your fabrics are cotton, a delicate cycle wash in cold water with a mild detergent is usually safe. Always air dry flat or tumble dry on very low heat to prevent shrinkage or damage to the batting. Iron on a medium setting if needed, avoiding excessive heat, especially if you’ve added any delicate embellishments. When the holiday season concludes, store your tree skirt carefully folded in a breathable fabric bag or a plastic container in a cool, dry place to protect it from dust and moisture, ensuring it looks fresh and festive year after year.
Easy Christmas Tree Skirt With Free Pattern
Creating this easy Christmas tree skirt with its unique, self-drafted pattern is a rewarding project that allows you to infuse your home with personalized holiday cheer. The blend of two different fabrics creates a dynamic and captivating pattern that will undoubtedly become a focal point of your Christmas decorations. This project, taught by The Sewing Room Channel, offers not just a guide but an invitation to embrace the joy of crafting. Imagine the compliments you’ll receive on this stunning piece, crafted with your own hands. So, gather your materials, fire up your sewing machine, and get ready to create a beautiful, custom tree skirt that will truly elevate your festive decor. Happy sewing, and happy holidays!