
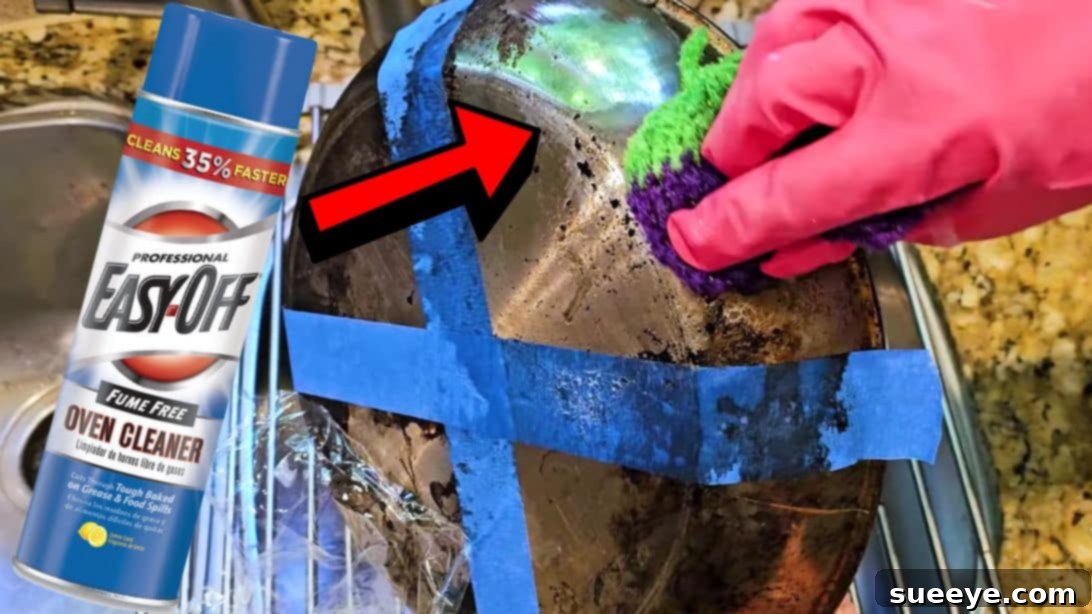
Mastering Burnt Pan Cleanup: Effective Hacks for Every Kitchen Challenge
Few kitchen woes are as frustrating as a stubborn burnt pan. The sight of caked-on, carbonized food residue can feel like a declaration of war on your cookware, often leading to wasted effort and even discarded pans. However, the good news is that even the most severely scorched surfaces can be brought back to life with the right techniques and a bit of patience. This comprehensive guide explores a variety of proven methods, offering solutions for every type of burn and cleaning preference, from potent chemical interventions to gentle, natural remedies.
Inspired by insightful cleaning experiments shared by Clean Freak & Germaphobe on YouTube, we’ve compiled a detailed breakdown of effective pan cleaning hacks. These methods vary in their intensity, required effort, and safety considerations. Some promise astonishingly quick results with minimal scrubbing, often relying on stronger chemical agents. Others champion a more eco-friendly approach, utilizing common household ingredients that might require a little more elbow grease but offer a safer alternative. By understanding the advantages and disadvantages of each, you can confidently choose the ideal strategy to restore your burnt pans, ensuring they’re spotless and ready for your next culinary adventure.
Essential Materials for Burnt Pan Restoration
Before embarking on your pan rescue mission, it’s crucial to gather all necessary supplies. Having everything readily accessible will streamline the cleaning process and enhance efficiency. Remember, safety should always be your top priority, particularly when handling powerful cleaning agents.
- Tape (e.g., painter’s tape or masking tape, useful for precise application areas)
- Easy-Off Oven Cleaner (a heavy-duty formula is recommended for severe burns)
- Ammonia (standard household ammonia; ensure excellent ventilation)
- Baking soda (a versatile, mild abrasive and deodorizer)
- Dawn dish soap (or any high-quality, grease-cutting dish detergent)
- White vinegar (can be used as a rinse or in conjunction with baking soda for certain applications)
- Paper towels or clean, absorbent cloths
- Plastic wrap (essential for trapping moisture and fumes, allowing solutions to work effectively)
- Scrubbing pad (select a non-scratch type for delicate surfaces like non-stick, and a more abrasive one for stainless steel or cast iron)
- Cleaning gloves (absolutely non-negotiable for protecting your skin)
- Safety glasses (highly recommended when working with strong chemical cleaners)
Detailed Cleaning Methods for Scorched Cookware
Each method offers a unique approach to tackling burnt-on residue. Follow these directions carefully, paying close attention to safety precautions and recommended dwell times for optimal results.
Method 1: The Power of Easy-Off Oven Cleaner
For those seemingly insurmountable, deeply embedded burns, a commercial oven cleaner like Easy-Off can be an incredibly effective solution. These cleaners contain strong caustic agents designed to break down hardened grease and carbon deposits with remarkable efficiency.
Directions:
- Prepare Your Workspace: Lay your burnt pan on a protective surface, such as several layers of newspaper or a plastic sheet. This entire step should be performed in a very well-ventilated area—ideally outdoors, in a garage with open doors, or near wide-open windows, as the fumes can be strong.
- Isolate the Burned Area: If only a specific section of your pan is affected, you can use painter’s tape to create a clear boundary around the burnt area. This ensures the cleaner is applied precisely where needed.
- Apply the Cleaner: Wearing your cleaning gloves and safety glasses, spray a generous, even layer of Easy-Off oven cleaner directly onto the burnt residue. Ensure the entire affected surface is thoroughly saturated.
- Seal and Allow to Penetrate: Immediately cover the treated area tightly with plastic wrap. This crucial step prevents the cleaner from drying out prematurely, allowing the powerful chemicals ample time to penetrate and dissolve the burnt material. For best results on stubborn stains, let the solution sit on the pan overnight, typically 8 to 12 hours.
- Effortless Wipe-Off: After the designated waiting period, put your gloves back on. Carefully remove the plastic wrap. You’ll often find that the stubborn, burnt bits have softened significantly and can be easily wiped away with paper towels or a soft cloth, requiring astonishingly little scrubbing.
- Thorough Rinse and Wash: Once the burnt residue is removed, rinse the pan thoroughly under hot running water to wash away all chemical traces. Follow up with a comprehensive wash using dish soap and water, ensuring the pan is completely clean and safe for its next use.
Pros: Exceptionally effective on severe, deeply caked-on burns; often requires minimal physical scrubbing.
Cons: Highly toxic with strong, potentially harmful fumes; absolutely demands excellent ventilation and robust protective gear; may not be suitable for all pan materials (always check manufacturer’s guidelines, especially for aluminum, cast iron with seasoning, or non-stick coatings). Ensure proper disposal of chemical residue.
Method 2: Ammonia for Stubborn Residue
Household ammonia is another powerful cleaning agent renowned for its ability to cut through baked-on grease and carbon deposits. Its efficacy comes with a strong caution: its fumes are potent and require meticulous handling and ventilation.
Directions:
- Critical Safety Precautions: This method must be performed in an extremely well-ventilated environment, such as outdoors or in a garage with wide-open doors and windows. Always wear heavy-duty cleaning gloves and safety glasses. Never, under any circumstances, mix ammonia with bleach or any other cleaning products, as this can create dangerous gases.
- Prepare the Pan: Place the burnt pan on a protective surface in your chosen well-ventilated area.
- Apply Ammonia: Lay a piece of paper towel or a small, absorbent cloth directly over the burnt spot, ensuring it covers the entire area. Carefully and slowly pour household ammonia over the paper towel until it is thoroughly saturated.
- Seal and Dwell: Immediately and tightly cover the ammonia-soaked paper towel and the entire burnt area with plastic wrap. This action traps the ammonia fumes, allowing them to work effectively on the carbonized residue without quickly evaporating. Let the solution sit for several hours, or preferably overnight, for deeply embedded stains.
- Scrub and Rinse: With your gloves and safety glasses firmly on, carefully remove the plastic wrap and the ammonia-soaked paper towel. The burnt residue should now be significantly softened and loosened. Use a scrubbing pad to vigorously clean the entire spot. You will likely find the grime much easier to dislodge than before.
- Final Wash: Rinse the pan thoroughly with water. Follow with a complete wash using dish soap and water to eliminate any lingering ammonia odor or residue, ensuring the pan is pristine and ready for use.
Pros: Highly effective on tough, greasy, and carbonized burns; helps to loosen stubborn grime, reducing the need for harsh scraping.
Cons: Emits extremely strong, potentially hazardous fumes, necessitating superior ventilation; dangerous if fumes are inhaled or if mixed with other chemicals; can be corrosive to certain metals if allowed to remain for excessive periods.
Method 3: The Natural Approach – Baking Soda and Dish Soap
For those who prefer to avoid harsh chemicals or are dealing with moderately burnt pans, a combination of baking soda and dish soap provides an effective, non-toxic, and environmentally friendlier alternative. Baking soda acts as a gentle abrasive and a natural deodorizer, while the dish soap efficiently cuts through grease.
Directions:
- Prepare the Pan: Ensure the pan is empty. For optimal results, a slightly warm pan (not hot) can help the mixture activate more effectively.
- Apply Baking Soda: Sprinkle a generous and thick layer of baking soda directly over the entire burnt area. Don’t be conservative; aim for full, opaque coverage.
- Add Dish Soap: Drizzle a significant amount of strong, grease-cutting dish soap (such as Dawn) over the layer of baking soda. The goal is to create a thick, spreadable paste when these two ingredients are combined.
- Moisten and Cover: Place a piece of slightly damp paper towel directly on top of the baking soda and dish soap mixture. This helps maintain moisture and prevents the solution from drying out prematurely.
- Seal and Dwell: Tightly cover the entire area with plastic wrap. This creates a humid environment, allowing the baking soda and soap to thoroughly penetrate and soften the burnt-on food. Allow it to sit for several hours, or for best results, overnight (8-12 hours).
- Vigorous Scrubbing: After the waiting period, remove the plastic wrap and paper towel. Using a suitable scrubbing pad (non-abrasive for non-stick, tougher for stainless steel or cast iron), scrub the burnt area with considerable effort. The residue should be significantly softened and easier to dislodge.
- Final Clean: Rinse the pan thoroughly with water and then wash with dish soap. For particularly stubborn spots, you may need to repeat the process or use a plastic scraper to gently lift off any remaining bits.
Pros: Non-toxic, safe for most cookware types, environmentally friendly, and effective for moderate burns.
Cons: Typically requires more manual scrubbing effort compared to chemical methods; may not be as effective on extremely severe or deeply carbonized burns; results can vary depending on the burn’s severity and pan material.
Method 4: The Viral Hack – Toothpaste
This method gained considerable traction on social media as a seemingly simple solution for burnt pans. Toothpaste, particularly the plain white variety, contains mild abrasives and detergents that can theoretically assist in breaking down light stains. However, its efficacy on severe, deeply embedded burnt-on residue is often overestimated.
Directions:
- Apply Toothpaste: Squeeze a generous amount of plain white toothpaste (avoid gel toothpaste, as it generally lacks the necessary abrasives) directly onto the burnt area of the pan.
- Spread and Cover: Using a spoon or your finger (with a glove), spread the toothpaste evenly over the entire burnt spot. Then, cover the area with plastic wrap to prevent the toothpaste from drying out.
- Allow to Sit: Let the toothpaste sit on the pan overnight (approximately 8-12 hours) to allow its mild abrasive and cleaning agents to work on the residue.
- Scrub and Evaluate: After the dwell time, remove the plastic wrap. Using a scrubbing pad, vigorously scrub the area.
- Rinse: Rinse the pan thoroughly with water and inspect the results.
Pros: Easily accessible, non-toxic, and extremely simple to attempt with items you likely already have.
Cons: Generally ineffective for heavy or deeply caked-on burns; requires significant scrubbing for often minimal results; more suited for polishing minor scuffs or very light discoloration rather than severe burnt food; results are often disappointing for serious grime.
Choosing the Right Method and General Cleaning Tips
Selecting the optimal cleaning method for your burnt pan involves considering several critical factors:
- Severity of the Burn: For extremely stubborn, thick layers of carbonized food that feel fused to the pan, aggressive chemical solutions like Easy-Off or Ammonia are typically the most effective, often requiring minimal physical scrubbing. For moderate burns or general discoloration and minor scorches, the baking soda and dish soap method can work wonders, though it may demand a bit more manual effort.
- Pan Material: Always factor in the material of your pan. Durable materials such as stainless steel, cast iron (unseasoned or re-seasonable), and pure copper can generally withstand stronger chemical treatments and more vigorous scrubbing. However, delicate non-stick coatings require a gentler approach; harsh chemicals or abrasive scrubbers can permanently damage them. For non-stick surfaces, always prioritize the mildest methods first, like baking soda, and strictly avoid metal scrubbers.
- Safety and Environmental Preference: If your priority is safety, minimal chemical exposure, and eco-friendliness, natural methods such as baking soda and dish soap are the preferred choice. If you are comfortable using chemical cleaners for faster, more potent results, ensure you meticulously follow all safety guidelines, including excellent ventilation and protective gear.
General Tips for Effective Burnt Pan Cleaning and Prevention:
- Act Swiftly: The moment you notice a burnt residue, the sooner you address it, the easier it will be to clean. Fresh burns are far less challenging than deeply set, old ones.
- Scrape Loose Bits First: Before applying any cleaning solution, use a plastic spatula, wooden spoon, or a non-abrasive tool to gently scrape off any loose, burnt food particles. This allows your chosen cleaning agent to directly attack the stubborn, adherent residue.
- Patience is Paramount: Most truly effective cleaning methods, especially for severe burns, require a significant soaking or dwell time. Resist the urge to scrub prematurely. Allow the cleaning solutions ample time to work their magic and soften the grime.
- Prioritize Ventilation: When utilizing strong chemical cleaners like Easy-Off or Ammonia, always ensure your workspace is exceptionally well-ventilated. Open all windows, turn on extractor fans, and if possible, consider moving the cleaning process outdoors.
- Essential Protective Gear: Always wear robust cleaning gloves to shield your hands from harsh chemicals and abrasive scrubbing. Safety glasses are also highly recommended to protect your eyes from splashes or fumes.
- Test in an Inconspicuous Area: If you are unsure how a particular cleaner will react with your specific pan material, it’s always wise to test a small amount in a hidden or less visible spot first.
- Repeat if Necessary: For truly monumental, multi-layered burns, a single application of any method might not be sufficient. Don’t hesitate to repeat the entire process if significant residue remains.
- Avoid Metal Scrubbers on Non-Stick: Metal sponges, steel wool, or highly abrasive scourers can irreversibly damage the delicate surface of non-stick pans. Always stick to soft sponges, nylon scrubbers, or plastic scrapers for these types of cookware.
Conclusion: Restoring Your Cookware with Confidence
The ordeal of a burnt pan no longer needs to be a source of dread or lead to discarding otherwise good cookware. As these detailed experiments and expert tips demonstrate, a perfectly clean pan is entirely within your reach. Whether you’re facing the toughest, most carbonized grime that demands the powerful, almost no-scrub effectiveness of Easy-Off and Ammonia, or you prefer the gentler, more labor-intensive but safer approach of baking soda and dish soap, there is a proven solution for every kitchen cleaning challenge.
The key to success lies in understanding the unique strengths and potential drawbacks of each method, allowing you to choose the one that best suits your pan’s condition, its material, and your personal safety preferences. While accidents happen, and burnt pans are an inevitable part of cooking, equipping yourself with these comprehensive cleaning hacks means you can confidently tackle any mess. Happy cooking, and may your pans remain sparkling clean!
All image credit belongs to Clean Freak & Germaphobe via YouTube. Follow and subscribe to her channel for more insightful cleaning tips!