
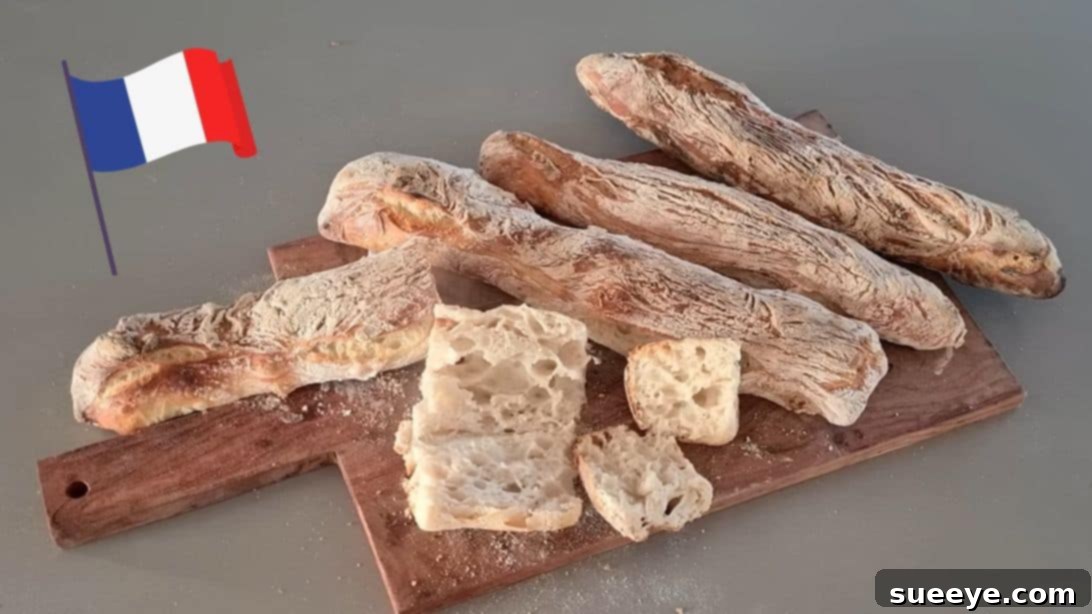
Imagine the aroma of freshly baked French bread filling your kitchen – a golden, crusty baguette with a soft, airy interior. Sounds like a dream, right? Many believe that crafting such a masterpiece at home is a complex affair, reserved for seasoned bakers. But what if we told you it’s incredibly simple, requiring only five minutes of actual hands-on work? Yes, it’s true! Forget intricate kneading techniques and complicated processes; this revolutionary no-knead baguette recipe is a game-changer for beginners and seasoned bakers alike.
I once shared the common misconception that homemade baguettes were beyond my skill level, envisioning countless failed attempts before achieving perfection. That was until I stumbled upon this brilliant no-knead method, inspired by the likes of Voila – Voila!. The simplicity of the steps will genuinely surprise you, transforming your bread-baking experience from daunting to delightful. Get ready to bake irresistible baguettes with unparalleled ease!
RELATED: Master the Art of 4-Ingredient Dutch Oven Bread
Effortless No-Knead Baguette Recipe: Your Guide to Perfect Homemade French Bread
This remarkable recipe simplifies the art of baguette making, requiring just four fundamental ingredients: bread flour, salt, yeast, and water. The magic lies in its “no-knead” nature, eliminating the most labor-intensive step of traditional bread making. Seriously, the initial mixing takes a mere two minutes! If the thought of waking up to the irresistible scent and taste of fresh bread excites you, this recipe is your golden ticket. It’s perfect for a lazy Sunday morning or a busy weekday, effortlessly fitting into your schedule. Enjoy your homemade baguette with a steaming bowl of soup, a rich cup of hot chocolate, an assortment of cheeses, or your favorite spreads. It also serves as an excellent base for delightful appetizers, transforms into the best garlic bread, or elevates your breakfast sandwiches to gourmet status.
Why Choose No-Knead Baguettes? The Secret to Artisan Bread at Home
The no-knead method isn’t just a shortcut; it’s a culinary revelation that harnesses the power of time to develop flavor and texture. Unlike traditional bread recipes that rely on vigorous kneading to build gluten structure, this technique allows the gluten to develop naturally over an extended fermentation period. This slow process results in a deeper, more complex flavor profile and an incredibly airy, open crumb reminiscent of artisan bakeries.
Here’s why no-knead baguettes are a game-changer:
- Minimal Effort: With only minutes of active preparation, it’s perfect for busy schedules.
- Beginner-Friendly: No complicated techniques, just simple mixing and shaping.
- Superior Flavor: The long, slow rise allows yeast to work its magic, creating nuanced flavors.
- Crispy Crust, Tender Crumb: Achieve that desirable contrast without specialized equipment.
- Accessibility: Enjoy bakery-quality French bread using standard kitchen tools.
Homemade Baguette Ingredients: Understanding the Essentials
The beauty of this recipe lies in its simplicity, utilizing basic pantry staples. Each ingredient plays a crucial role in achieving that perfect baguette.
- 33.5 oz Baker’s Flour or Bread Flour: This is the backbone of your baguette. Bread flour, with its higher protein content, is ideal as it develops strong gluten networks essential for the chewy texture and structure of French bread. While all-purpose flour can be used, expect a slightly less chewy result. Using a kitchen scale for precise measurement is highly recommended for consistent results.
- 2 teaspoons of Salt: More than just a flavor enhancer, salt regulates yeast activity, preventing the dough from rising too quickly. It also strengthens the gluten structure and adds depth to the overall taste of your bread. Ensure it’s evenly distributed for optimal performance.
- ¾ teaspoon of Yeast: Instant dry yeast is typically preferred for no-knead recipes as it can be mixed directly with the dry ingredients without prior activation. This small amount, combined with a long fermentation, allows for slow, steady gas production, contributing to the airy texture and complex flavor.
- 25.07 oz of Water (Room Temperature): Water is critical for hydrating the flour and activating the yeast. Using room temperature water ensures a steady and predictable rise. The hydration level in this recipe is quite high, which is characteristic of artisan bread and contributes to its open, irregular crumb and crispy crust. Again, a kitchen scale is invaluable for accurate water measurement.
How to Make Baguette: Your Easy Guide to French Bread Perfection
Follow these straightforward steps to create magnificent no-knead baguettes right in your own kitchen.
Step 1: Combine All Ingredients for Your Dough
In a large mixing bowl, add all the dry ingredients first (flour, salt, yeast), then pour in the room temperature water. Using the handle of a sturdy wooden spoon or a spatula, mix the ingredients together for approximately 2 minutes. Your goal is to combine everything until no dry patches of flour remain at the bottom of the bowl. The mixture will be quite shaggy and sticky – this is exactly what you want. Avoid the urge to overmix; just ensure all ingredients are incorporated and form a cohesive, albeit loose, ball of dough.
Step 2: The Essential First Rise (Bulk Fermentation)
Cover the bowl tightly with plastic wrap or a damp kitchen towel to prevent the dough from drying out. Let it rest and rise at room temperature for an extended period, typically 8 to 10 hours. This long, slow fermentation is where the magic of the no-knead method truly happens. During this time, the yeast slowly works to develop the gluten structure and create those desirable air bubbles, while also building incredible flavor. Look for the dough to significantly increase in volume, often doubling or even tripling, with visible bubbles on the surface. If your kitchen is particularly cool, the rise might take a bit longer; conversely, in a warmer environment, it might be ready sooner.
Step 3: Gently Transfer and Flour the Dough
Once your dough has completed its first rise, generously sprinkle a work surface, pizza peel, or large plate with flour – preferably rice flour, as it’s less likely to be absorbed by the dough and helps prevent sticking. Using a plastic dough scraper (to avoid deflating the dough too much), gently scrape the dough out of the bowl and transfer it onto the floured surface. The key here is to handle the dough as lightly as possible; avoid pressing or kneading it to preserve all the precious air bubbles that have developed during fermentation. Sprinkle more flour lightly over the top of the dough to ensure it doesn’t stick to your hands during the next step.
Step 4: Form and Divide the Dough into Baguettes
Still working gently, use your hands to coax the dough into a rough elongated shape. Then, using your dough scraper or a sharp knife, carefully cut the dough into four equal pieces. Again, resist the urge to press down or flatten the dough. The goal is to maintain its airy structure as much as possible. These pieces will become your individual baguettes.
Step 5: Shape Your Baguettes and Prepare Baking Tray
Line a baking tray or large baking sheet with parchment paper. Take one piece of the dough and very gently stretch and shape it into a classic baguette form – long and slender. The dough will be quite pliable. Place the shaped baguette onto the prepared baking tray. Repeat this process with the remaining three pieces of dough, ensuring they are spaced adequately apart on the tray to allow for expansion during baking. You can also use a baguette pan if you have one, which helps maintain the shape.
Step 6: Bake to Golden Perfection
Preheat your oven to a high temperature of 480°F (250°C). A high initial temperature is crucial for achieving an excellent “oven spring” – the rapid expansion of the dough in the first few minutes of baking, which contributes to a light, airy interior. For an even crisper crust, you can create steam in your oven by placing a shallow pan of hot water on the bottom rack during preheating, or by spraying water onto the oven walls right before you place the baguettes inside. Carefully place the baking tray with your shaped baguettes into the preheated oven and bake for approximately 25 minutes, or until they turn a beautiful golden-brown color and sound hollow when tapped on the bottom. The crust should be wonderfully crisp and crackly.
Tips for Success with Your Homemade Baguettes
While this recipe is incredibly forgiving, a few pointers can elevate your baking game:
- Accurate Measurements: For bread baking, precision is key. A digital kitchen scale is highly recommended for measuring flour and water by weight for consistent results.
- Don’t Overwork the Dough: The essence of “no-knead” is minimal handling. Be gentle during shaping to preserve the gas bubbles.
- Embrace the Stickiness: High hydration doughs are sticky. Flour your hands and surfaces well, but don’t add excessive flour to the dough itself, as this can alter the texture.
- Monitor Your Rise: Room temperature varies. If your kitchen is cold, the dough might need an extra hour or two to rise. If it’s warm, check it earlier.
- Create Steam for a Better Crust: Steam in the oven during the initial baking phase helps keep the crust pliable, allowing the bread to expand fully, and then results in a beautifully crispy, thin crust.
- Cool Completely: Always let your baguettes cool on a wire rack before slicing. This allows the internal structure to set and prevents a gummy texture.
Serving Suggestions and Pairing Ideas
Once your golden, aromatic baguettes emerge from the oven, a world of culinary possibilities opens up. Here are some delightful ways to enjoy your homemade French bread:
- Classic with Butter: A simple spread of good quality butter allows the baguette’s flavor to shine.
- Dipping Oils: Serve with a flavorful olive oil, perhaps infused with herbs, garlic, or balsamic vinegar.
- Soups and Stews: The crusty exterior is perfect for soaking up rich broths and sauces.
- Cheese and Charcuterie Boards: An essential component of any elegant platter, pairing beautifully with various cheeses, cured meats, and pâtés.
- Sandwiches and Panini: Slice lengthwise to create gourmet sandwiches with your favorite fillings.
- Bruschetta: Toast slices, rub with garlic, top with fresh tomatoes, basil, and olive oil.
- Garlic Bread: Slice, spread with garlic butter, and bake until golden for a crowd-pleasing side.
- Breakfast Bliss: Enjoy with jam, honey, Nutella, or use it to make delicious French toast.
- With Coffee or Hot Chocolate: A simple, comforting treat for a morning or afternoon break.
Storage: Keeping Your Baguettes Fresh
Baguettes are best enjoyed on the day they are baked. However, if you have leftovers, here’s how to store them:
- Room Temperature (Short-term): Wrap leftover baguette tightly in a linen towel or paper bag (avoid plastic, which makes the crust soft) and consume within 12-24 hours.
- Freezing (Long-term): For longer storage, slice the cooled baguette, wrap pieces individually in plastic wrap, and then place them in an airtight freezer bag. Freeze for up to 1-2 months. To reheat, thaw at room temperature, then refresh in a preheated oven (350°F/175°C) for a few minutes until crusty again.
No-Knead Baguette Video Recipe: Visual Guide
For those who prefer a visual learning experience, the original inspiration for this incredibly easy recipe comes from Voila – Voila!’s YouTube channel. Watching the simple mixing and shaping techniques can provide additional confidence and clarity as you embark on your baguette-making journey. A visual guide often helps demystify the process, showing you exactly how the dough should look and feel at each stage, making it even easier to achieve perfect results on your first try.
Making your own baguettes at home no longer needs to be an intimidating endeavor. With this no-knead method, you can achieve professional-quality French bread with minimal effort and maximum reward. The satisfaction of pulling a warm, crusty baguette from your own oven is truly unmatched. So, gather your simple ingredients, dedicate a few minutes to mixing, and let time work its magic. You’re just a few steps away from enjoying authentic, delicious homemade baguettes. Happy baking!