
Effortless No-Knead Flatbread: Your Ultimate Guide to Quick & Delicious Homemade Bread
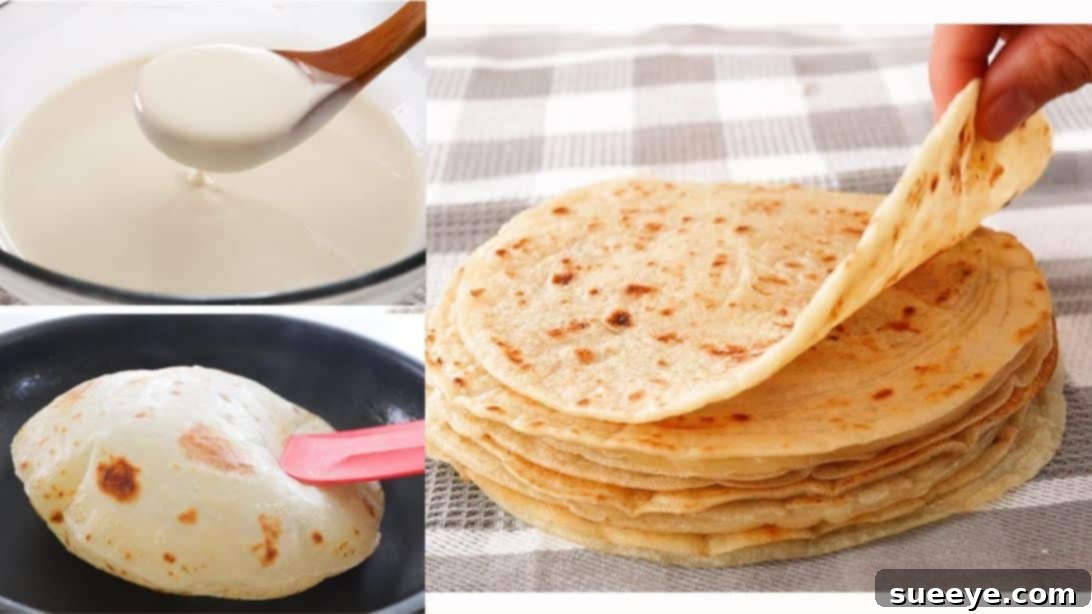
Imagine serving warm, fresh bread straight from your kitchen, without the fuss of kneading, long proofing times, or complex baking techniques. This dream becomes a delicious reality with our incredibly simple, no-knead flatbread recipe! Inspired by the brilliant culinary creations of Qiong Cooking, this recipe is a game-changer for anyone craving homemade goodness on a busy schedule. You’ll be amazed at how quickly five basic ingredients transform into soft, pliable, and utterly delicious flatbreads, ready to be topped with virtually anything your heart desires. Whether you’re a seasoned chef or a kitchen novice, this recipe guarantees success and satisfaction.
Forget the myth that making bread from scratch is a labor-intensive task. Our easy flatbread method uses a pourable batter, eliminating the need for any kneading whatsoever. This means less mess, less effort, and more time to enjoy your culinary creations. Within minutes, you’ll have a stack of warm flatbreads perfect for breakfast, lunch, dinner, or a simple snack. The versatility is truly endless – think savory wraps, quick pizzas, sweet desserts, or a simple accompaniment to your favorite dips and curries. Get ready to unlock a world of flavor and convenience with this straightforward, yet incredibly rewarding, recipe.
Why This No-Knead Flatbread Recipe Will Become Your New Favorite
- Unbelievably Easy: No complex techniques, no sticky kneading – just a simple whisked batter. Perfect for beginners!
- Super Quick: From mixing bowl to hot pan in under 10 minutes, with each flatbread cooking in about 2-3 minutes.
- Minimal Ingredients: You only need 5 common pantry staples, making it an accessible and budget-friendly option.
- Incredibly Versatile: These flatbreads are a blank canvas, ideal for an extensive range of sweet or savory toppings and meals.
- Consistently Delicious: Yields soft, pliable, and perfectly cooked flatbreads every single time.
- Healthier Homemade Option: Control your ingredients and avoid preservatives found in store-bought alternatives.
Essential Ingredients for Your Perfect Homemade Flatbread
The beauty of this recipe lies in its elegant simplicity. You won’t need to hunt for exotic ingredients; everything required is likely already in your kitchen, making it incredibly convenient to whip up fresh flatbreads whenever the craving strikes.
- 2 cups of All-Purpose Flour: This is the foundational ingredient, providing the necessary structure and body to your flatbreads. While all-purpose flour works exceptionally well, you can experiment by substituting a small portion (e.g., 1/4 cup) with whole wheat flour for a slightly nuttier flavor and added fiber, though it might result in a slightly denser texture. Ensure your flour is fresh for the best results.
- 1 teaspoon of Salt: A crucial flavor enhancer. Salt doesn’t just make the flatbread taste better; it also balances the subtle sweetness from the sugar and brings out the natural flavors of the flour. Don’t be tempted to omit it, as the flatbreads would taste bland without it.
- 1 teaspoon of Sugar: A small amount of granulated sugar plays a vital role in browning the flatbreads beautifully on the pan, giving them an appealing golden hue. It also contributes a very subtle sweetness that complements a wide array of toppings, without making the flatbread overtly sweet.
- 2 cups of Water (1 cup cold and 1 cup warm): The precise temperature of the water is key to achieving the perfect batter consistency. Starting with cold water for initial hydration, followed by warm water, helps the flour absorb liquid evenly and prevents the formation of stubborn lumps, leading to a smooth, pourable batter that cooks consistently. Ensure the warm water is not hot, as excessively hot water can partially cook the flour and affect the final texture.
- 1 tablespoon of Cooking Oil: Incorporating a neutral-flavored cooking oil (such as vegetable, canola, sunflower, or light olive oil) into the batter serves multiple purposes. It adds richness, contributes to a tender and pliable texture, and helps the flatbreads achieve that desirable golden-brown crust during cooking. It also prevents the flatbreads from drying out, ensuring they remain soft even after cooling.
Kitchen Tools You’ll Need
Gathering your tools before you start will make the flatbread-making process even smoother and more enjoyable:
- Large Mixing Bowl: Essential for combining your dry and wet ingredients without making a mess.
- Whisk: Your primary tool for thoroughly mixing the batter, ensuring there are no dry pockets of flour or lumps.
- Measuring Cups and Spoons: Accurate measurements are critical for achieving the correct batter consistency and a successful outcome.
- Non-Stick Frying Pan or Griddle: A good quality non-stick pan is paramount for easy cooking and flipping of the flatbreads, preventing them from sticking.
- Spatula: Crucial for gently flipping the flatbreads and pressing down on the edges to encourage even cooking and puffing.
- Kitchen Paper or Pastry Brush: For lightly and evenly oiling your pan between batches of flatbreads.
- Clean Kitchen Cloth: To cover your cooked flatbreads, trapping steam and keeping them warm, soft, and moist.
Step-by-Step Instructions: Mastering Your No-Knead Flatbread Journey
Follow these detailed steps closely to create perfectly cooked, delightfully fluffy, and incredibly soft flatbreads every single time. Paying attention to the consistency of your batter and the heat of your pan will ensure the best results.
Step 1: Preparing Your Dry Ingredients for the Batter
In a spacious mixing bowl, begin by adding 2 cups of all-purpose flour. Follow this with 1 teaspoon of salt and 1 teaspoon of sugar. Take your whisk and thoroughly combine these dry ingredients. This step is more important than it might seem; ensuring that the salt and sugar are evenly distributed throughout the flour guarantees a consistent flavor profile in every bite of your flatbread. Whisk for approximately 30 seconds to a minute, making certain there are no visible clumps of salt or sugar remaining, and the flour is uniformly aerated.
Step 2: Hydrating the Flour to Achieve a Smooth Batter
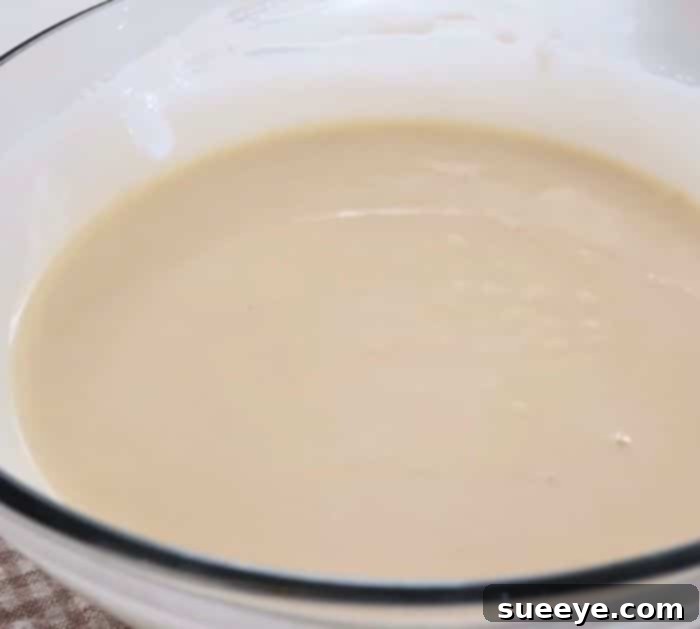
Now, it’s time to introduce the water to your dry mixture. First, pour in 1 cup of cold water. Begin to whisk vigorously for 2 to 3 minutes. This initial amount of cold water allows the flour to start absorbing liquid gradually, which is key to preventing the formation of stubborn lumps. You’ll observe the mixture starting to form a thick, somewhat lumpy paste. Once this initial hydration has occurred, add the second cup of water, which should be warm (ensure it’s not hot enough to cook the flour, just comfortably warm). Continue whisking with determination until the batter becomes perfectly smooth, resembling a thin, pourable pancake batter. Scrape down the sides of the bowl to ensure no dry pockets of flour are left behind. A lump-free, smooth batter is absolutely critical for flatbreads that cook evenly and possess a desirable, tender texture.
Step 3: Enhancing the Batter with Cooking Oil for Pliability
To further improve the texture, pliability, and richness of your flatbreads, add 1 tablespoon of your chosen cooking oil (such as vegetable, canola, or sunflower oil) to the smooth batter. Stir thoroughly with your whisk or a large spoon until the oil is fully integrated into the batter. This means there should be no visible streaks of oil or separation; the batter should look homogenous. The oil plays a vital role in making the flatbreads incredibly tender, preventing them from drying out, and contributing to a beautiful golden crust as they cook, ensuring they remain soft even after cooling.
Step 4: Preparing Your Cooking Surface for Optimal Results
Place your non-stick frying pan or griddle on the stove burner. Turn the heat to medium-low, ensuring it’s just below a true medium setting. It’s crucial to allow the pan to heat gradually and evenly across its surface. Once the pan is sufficiently warmed (you can test by flicking a tiny drop of water – it should sizzle and evaporate immediately), add a very small amount of cooking oil, approximately half a teaspoon. Using a piece of clean kitchen paper, carefully and evenly wipe this oil across the entire cooking surface of the pan. This creates a thin, uniform non-stick layer that is essential for preventing the flatbread from sticking and contributes to achieving a desirable golden-brown crust without excess greasiness. Ensure the pan is not smoking hot, as this indicates too high a heat and will burn your flatbreads; a gentle, consistent medium-low heat is ideal for thorough cooking without scorching.
Step 5: Cooking Your Flatbreads to Golden Perfection
With your pan perfectly heated and lightly oiled, it’s time for the magic to happen! Pour approximately two full tablespoons of the flatbread batter into the precise center of the pan. Immediately and slowly, use the back of your spoon to gently spread the batter outwards in a circular motion, aiming to form a thin, even disc. The ideal thickness is similar to a crêpe or a very thin pancake. Cook the flatbread on this first side until you visibly notice the top surface beginning to set, losing its wet sheen, and small, delicate bubbles start to appear across the surface. This typically takes about 1-2 minutes, depending on your pan and heat.
Once the top batter has set, carefully slide your spatula underneath the flatbread and flip it over to cook the second side. Continue cooking. As it cooks on the second side, gently press down on the edges with your spatula. This strategic pressing helps to ensure even heat distribution across the entire flatbread and actively encourages it to puff up beautifully with air inside. You’ll observe more bubbles forming and the flatbread beginning to expand. If you prefer larger, more significantly puffed-up flatbreads, you can cautiously increase the heat slightly to medium at this stage, but maintain vigilance to prevent any burning. The flatbread is perfectly ready when it’s fully expanded, a lovely golden brown on both sides, thoroughly cooked through, and feels wonderfully soft and pliable to the touch. This usually requires another 1-2 minutes per side.
As each flatbread is cooked to perfection, immediately transfer it to a clean kitchen cloth-lined basket or plate and cover it. This crucial step traps the steam, which is essential for keeping the flatbreads warm, incredibly soft, and moist while you proceed with cooking the remaining batter. Repeat the entire cooking process, lightly re-oiling the pan with kitchen paper between each flatbread if needed, until all of your delicious batter has been transformed into a stack of warm, homemade flatbreads. This recipe typically yields several satisfying flatbreads.
Endless Culinary Adventures: Topping Possibilities for Your Homemade Flatbread
The true brilliance of these easy no-knead flatbreads lies in their incredible versatility. They serve as a deliciously neutral and sturdy canvas, eagerly awaiting a vast array of toppings to suit any meal, mood, or culinary inspiration. Let your creativity soar and customize them to your heart’s content!
Savory Flatbread Creations:
- The Ultimate Breakfast Wrap: Start your day right with fluffy scrambled eggs, crispy bacon or savory sausage, a sprinkle of shredded cheddar or Monterey Jack cheese, and a dollop of your favorite hot sauce or a swirl of salsa.
- Mediterranean Masterpiece: Spread a generous layer of creamy hummus, topped with thinly sliced cucumbers, ripe cherry tomatoes, briny Kalamata olives, crumbled feta cheese, and a fresh sprinkle of chopped parsley or oregano.
- Lightning-Fast Personal Pizzas: Use your flatbread as a quick base! Spread a thin layer of marinara sauce, generously sprinkle with mozzarella cheese, and add your favorite pizza toppings like pepperoni, sautéed mushrooms, bell peppers, or onions. Pop it under the broiler or in a hot oven until the cheese is bubbly and golden.
- Grilled Chicken & Veggie Wraps: Fill with tender sliced grilled chicken, a vibrant mix of fresh greens, halved cherry tomatoes, and a light drizzle of vinaigrette, Caesar dressing, or creamy ranch.
- Gourmet Steak & Onion Flatbread: Layer with thinly sliced, perfectly seared steak, sweet caramelized onions, a delicate sprinkle of crumbled blue cheese, and a rich drizzle of balsamic glaze for an elevated meal.
- Spinach & Mushroom Delight: Sauté fresh spinach and sliced mushrooms with aromatic garlic, mix with creamy ricotta cheese, and season with a touch of nutmeg for a sophisticated vegetarian option.
- Spicy Asian-Inspired Wrap: Shredded cooked chicken or tofu, a crunchy mix of shredded cabbage and carrots, a drizzle of savory peanut sauce or a fiery sriracha mayo, garnished with toasted sesame seeds and fresh cilantro.
- Falafel Flatbread Pockets: Crumble crispy falafel, add a generous amount of tangy tahini sauce, pickled turnips, and a fresh salad mix for a vibrant Middle Eastern-inspired meal.
- Smoked Salmon & Cream Cheese: A sophisticated brunch option with a spread of cream cheese, smoked salmon, capers, and fresh dill.
Sweet Flatbread Sensations:
- Decadent Nutella & Banana: Spread generously with rich Nutella, topped with slices of ripe banana, and a sprinkle of chopped toasted hazelnuts or pecans.
- Fresh Fruit & Yogurt Indulgence: A healthy and refreshing option with Greek yogurt, a colorful medley of mixed berries (strawberries, blueberries, raspberries), a drizzle of golden honey, and a sprinkle of crunchy granola.
- Classic Cinnamon Sugar Treat: Brush your warm flatbread with melted butter, then generously sprinkle with a mixture of cinnamon and sugar for a simple yet satisfying sweet snack reminiscent of churros.
- Mini Apple Pie Flatbread: Sauté thinly sliced apples with cinnamon and a hint of brown sugar until soft. Spoon onto a flatbread, perhaps with a scoop of vanilla ice cream for a warm, comforting dessert.
Expert Tips for Flatbread Success and Troubleshooting Common Issues
Achieving consistently perfect flatbreads is easy once you master a few key techniques. Keep these tips in mind for the best results:
- Ideal Batter Consistency: The batter should always be smooth and pourable, much like a thin pancake batter. If your batter appears too thick (clumpy or difficult to spread), add water one tablespoon at a time, whisking well after each addition, until the desired consistency is reached. Conversely, if it seems too thin (watery and spreads too quickly), add a teaspoon of flour at a time until it thickens slightly.
- Mastering Pan Temperature: This is arguably the most crucial factor. A consistent medium-low to medium heat is essential. If the heat is too low, your flatbreads will cook slowly, become dry and tough, and won’t brown properly. If the heat is too high, they will burn quickly on the outside before cooking through, resulting in a raw interior. Always perform a small test with a tiny amount of batter to gauge the pan’s temperature before cooking full-sized flatbreads.
- Avoid Overcrowding the Pan: For optimal cooking and ease of flipping, always cook one flatbread at a time. Trying to cook multiple simultaneously often leads to uneven cooking and can make them difficult to manage.
- Keep Them Covered: As soon as each flatbread is cooked, transfer it immediately to a clean, cloth-lined basket or plate and cover it. This action traps the steam, which is vital for keeping the flatbreads incredibly soft, pliable, and warm as you continue cooking the rest of the batch.
- Even Spreading Technique: When pouring the batter, work quickly but gently. Use the back of your spoon to swiftly spread the batter outwards into an even circle. Practice makes perfect – don’t worry if your first few aren’t perfectly round!
- Experiment with Thickness: For a crisper flatbread that’s great for dipping, spread the batter thinner. For a chewier, more substantial flatbread ideal for wraps, aim for a slightly thicker disc.
- Don’t Rush the Flip: Wait until the top surface has visibly set and bubbles have appeared before attempting to flip. Flipping too early can cause the flatbread to tear.
Storing and Reheating Your Delicious Flatbreads
While these homemade flatbreads are undoubtedly at their best enjoyed fresh off the pan, they also store remarkably well, allowing you to enjoy them for days to come. Proper storage ensures they retain their wonderful texture.
To Store:
Allow the flatbreads to cool completely to room temperature before storing. Stack them with a piece of parchment paper or wax paper in between each flatbread to prevent them from sticking together. Place the stack in an airtight container or a large zip-top bag. They can be stored at room temperature for up to 2 days, or in the refrigerator for up to 5 days. For longer-term storage, these flatbreads freeze beautifully for up to 2-3 months. Just ensure they are well-wrapped to prevent freezer burn.
To Reheat:
You have several convenient options for reheating your flatbreads, each preserving their texture differently:
- Microwave (Quickest): For individual flatbreads, microwave for 15-30 seconds on high until warmed through and soft again. Be careful not to overcook, as they can become tough.
- Frying Pan (Best Texture): This method often yields the best results. Heat a dry non-stick pan over medium heat. Place a flatbread in the pan and heat for 30 seconds to 1 minute per side, gently pressing with a spatula, until it’s warm, pliable, and slightly refreshed.
- Oven/Toaster Oven (For Multiple Flatbreads): Wrap a stack of several flatbreads loosely in aluminum foil. Place them in a preheated oven at 300°F (150°C) for 5-10 minutes, or until they are soft and warmed through. The foil helps to retain moisture.
Conclusion: Your New Favorite Quick Meal Solution Awaits!
This effortless no-knead flatbread recipe truly revolutionizes convenience in the kitchen. In just a few simple steps, using only five basic ingredients, you can create a versatile, utterly delicious bread that easily surpasses its store-bought counterparts. It’s proof that fresh, wholesome, and incredibly satisfying food doesn’t have to be complicated, expensive, or time-consuming.
Whether you’re seeking a speedy breakfast, a customizable lunch, a creative dinner base, or a delightful accompaniment to your favorite dips and stews, these homemade flatbreads are an absolute winner. They invite endless culinary exploration and are guaranteed to impress anyone lucky enough to try them. So, stop dreaming of homemade bread and start making it! Grab your whisk, follow these easy steps, and prepare to savor the satisfying taste of warm, tender, homemade flatbread today. We encourage you to get creative with your toppings and share your favorite combinations with us!