
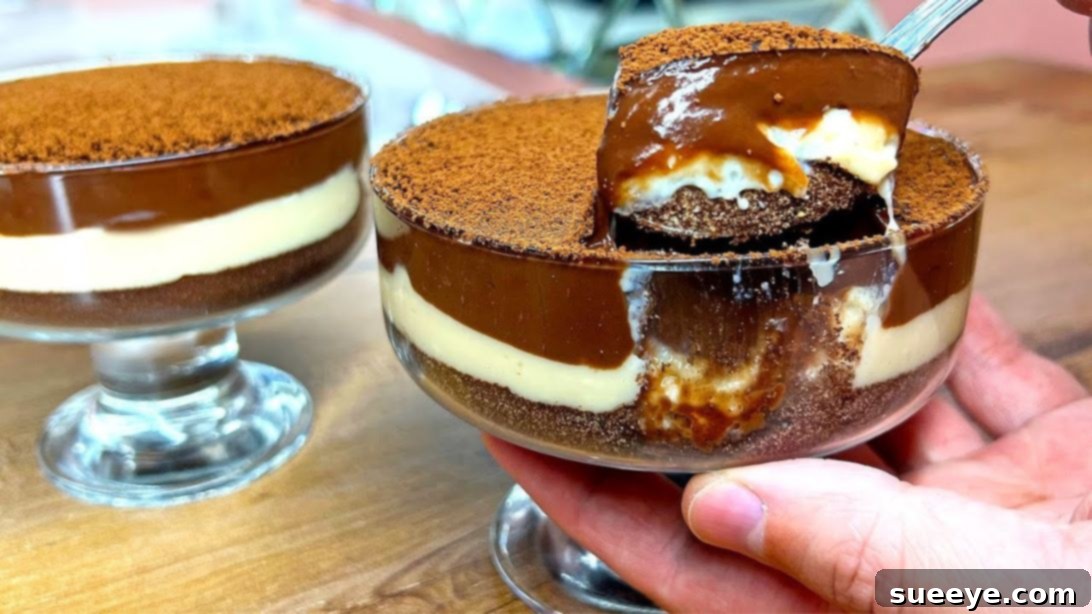
Delightful 5-Ingredient No-Bake Chocolate Pudding: Your Go-To Quick Dessert
Craving a rich, chocolatey dessert but short on time? Look no further! This incredibly easy and luscious 5-ingredient no-bake chocolate pudding is the ultimate solution for those last-minute sweet cravings. Inspired by the brilliant simplicity of Schnell Kochen, this recipe proves that you don’t need a pantry full of exotic ingredients or hours in the kitchen to create something truly spectacular. With just a handful of common staples and a few simple steps, you’ll have a decadent, multi-layered chocolate dessert that’s sure to impress your family and friends.
What makes this no-bake chocolate pudding so exceptional? Its convenience, for starters. You’ll likely find all the necessary ingredients already in your kitchen, making spontaneous dessert-making a breeze. The straightforward process means even novice cooks can achieve perfect results every time. Say goodbye to complicated baking techniques and hello to a fuss-free treat that delivers maximum flavor with minimal effort. Prepare to fall in love with your new favorite dessert!
Essential Ingredients for Your No-Bake Chocolate Pudding
Creating this irresistible chocolate pudding requires a minimal list of readily available ingredients, strategically divided into three delicious layers. Opting for quality ingredients will significantly elevate the final taste and texture of your dessert.
For the Crispy Bottom Layer:
- 4.6 oz (approx. 130g) of your favorite cookies: Digestive biscuits, graham crackers, or even chocolate wafer cookies work wonderfully here. Choose a cookie that crumbles easily and provides a good base texture. The slight crunch of this layer provides a delightful contrast to the creamy puddings above.
For the Smooth Second Layer:
- 1 tablespoon of cocoa powder: For a deep chocolate flavor. Dutch-processed cocoa powder will give a darker color and milder taste, while natural cocoa powder offers a more intense, slightly bitter chocolate note.
- 2 cups plus 5 teaspoons (approx. 500ml) of milk: Whole milk is recommended for a creamier texture, but 2% milk can also be used. This forms the base of your silky pudding.
- 2 tablespoons of cornstarch: This is your key thickening agent, giving the pudding its characteristic smooth and firm consistency without the need for eggs or gelatin.
- A pinch of vanilla extract: A small amount goes a long way to enhance the chocolate flavors and add a subtle aromatic depth to the pudding.
- 1/2 cup (approx. 100g) of sugar: Granulated sugar is perfect for sweetening this layer. This layer will also incorporate caramelized sugar for an extra dimension of flavor.
For the Velvety Third Layer:
- 2 cups plus 5 teaspoons (approx. 500ml) of milk: Similar to the second layer, fresh milk is crucial for a smooth and rich final layer.
- 1/4 cup (approx. 50g) of sugar: Adjust this amount to your preference, but this provides the right balance of sweetness for the top chocolate layer.
- 2 tablespoons of cornstarch: Again, cornstarch ensures this final layer is thick, creamy, and holds its shape beautifully once chilled.
- 2 tablespoons of cocoa powder: Used for the rich chocolate flavor and dark color of the top layer.
Step-by-Step Guide to Crafting Your No-Bake Chocolate Pudding
Follow these simple instructions to create a stunning, multi-layered chocolate dessert that’s as pleasing to the eye as it is to the palate. Precision and patience are key, especially during the cooking and chilling phases.
Step 1: Prepare the Cookie Base
Begin by creating the foundation for your pudding. Take your chosen cookies and place them into a food processor. Process the cookies until they resemble fine crumbs, similar to sand. Ensure there are no large chunks remaining, as this will affect the base’s consistency. Once finely ground, add 1 tablespoon of cocoa powder to the cookie crumbs. Continue to pulse or mix thoroughly until the cocoa powder is evenly distributed and well incorporated with the biscuit crumbs. This chocolate-infused base adds an extra layer of flavor and a beautiful darker color, complementing the pudding layers to come.
Step 2: Assemble the First Layer in Dessert Cups
Prepare your individual dessert cups or a larger serving dish. Take a spoonful of the fine chocolate cookie mixture and add it to the bottom of each cup. Use the back of a spoon or a small tamper to gently flatten and press the mixture down firmly. The goal is to create a compact, even layer that will hold its shape once the puddings are added. This firm base is crucial for structural integrity and a pleasant texture contrast. Once all cups have their bases, set them aside. These prepared bases are now ready to receive the creamy pudding layers.
Step 3: Prepare the Second Pudding Layer
For the first creamy pudding layer, combine 2 cups plus 5 teaspoons of milk, a pinch of vanilla extract, and 2 tablespoons of cornstarch in a small pot. It’s essential to whisk all these ingredients together thoroughly while the pot is still cold to ensure the cornstarch dissolves completely and prevents lumps from forming. Once well mixed, place the pot over low to medium heat. Continuously stir the mixture with a whisk, especially around the bottom and sides of the pot, to prevent sticking and ensure even cooking. Continue cooking and stirring until the mixture thickens significantly, reaching a consistency similar to a creamy custard or thick gravy. This usually takes several minutes. As soon as it reaches this thick consistency, remove it from the heat immediately to prevent overcooking.
Step 4: Create the Caramelized Second Layer
Now, prepare the unique caramelized element for this layer. In a separate pan, add 1/2 cup of sugar. Place this pan over medium heat. Allow the sugar to melt slowly without stirring too much. Watch it carefully as it melts and transforms into a beautiful, golden-amber syrup. Once all the sugar has completely melted and reached a light caramel color (be careful not to burn it, as it can turn bitter quickly), carefully and slowly pour the warm milk mixture (from Step 3) into the caramelized sugar. This step requires caution as the mixture will bubble vigorously. Continue stirring constantly with a whisk until the caramel has fully dissolved into the milk mixture and everything is well incorporated, forming a smooth, golden-hued pudding. Turn off the heat and let this mixture cool down slightly for a few minutes before proceeding. Carefully pour this warm caramel pudding mixture over the cookie bases in your dessert cups, spreading it evenly with a spoon to create a smooth second layer. Allow it to set slightly while you prepare the final layer.
Step 5: Prepare and Add the Third Pudding Layer, Then Chill
In a clean pot, combine the ingredients for the final layer: 2 cups plus 5 teaspoons of milk, 1/4 cup of sugar, 2 tablespoons of cornstarch, and 2 tablespoons of cocoa powder. Whisk everything together thoroughly until all ingredients are well combined and the cocoa powder and cornstarch are completely dissolved without lumps. Place the pot over medium heat and continuously stir, similar to Step 3. Keep stirring until the mixture comes to a boil and thickens into a rich, velvety chocolate pudding. Once it reaches the desired thick consistency, remove it from the heat. Allow it to cool for a minute or two, then carefully pour this dark chocolate pudding on top of the second, caramel layer in your dessert cups. Gently smooth the top with a spoon. For an elegant finish, sift a light dusting of cocoa powder over the top of each pudding. Finally, place your dessert cups in the refrigerator for at least a couple of hours. Chilling is crucial as it allows the pudding to fully set and firm up, ensuring the layers are distinct and the flavors meld beautifully. Serve cold and enjoy!
Tips for a Perfect No-Bake Chocolate Pudding Every Time
Achieving a flawless no-bake chocolate pudding is simple with a few expert tips:
- Whisk Thoroughly: Always whisk cornstarch into cold milk before heating. This prevents lumps and ensures a silky-smooth pudding.
- Constant Stirring: When cooking the pudding layers, stir continuously, especially once the mixture starts to heat up and thicken. This prevents burning at the bottom and ensures even cooking.
- Caramel Caution: When making the caramel, keep a close eye on it. Sugar can go from perfect to burnt in seconds. Remove from heat as soon as it turns amber. If it burns, it will taste bitter, and you’ll need to start that part over.
- Cool Before Pouring: Allow the cooked pudding layers to cool slightly before pouring them over the previous layer. This prevents the layers from mixing too much, resulting in distinct, beautiful lines.
- Chill Properly: The chilling time is not optional. At least 2-3 hours, or even overnight, is essential for the pudding to set completely, develop its firm texture, and allow the flavors to meld.
- Quality Ingredients: While it’s a simple recipe, using good quality cocoa powder and fresh milk can make a noticeable difference in the final taste.
Customization and Serving Ideas
This 5-ingredient no-bake chocolate pudding is fantastic as is, but don’t hesitate to get creative with variations:
- Toppings Galore: Beyond cocoa powder, consider adding a dollop of whipped cream, chocolate shavings, fresh berries (strawberries or raspberries are excellent), a sprinkle of chopped nuts, or even a drizzle of chocolate sauce or caramel.
- Different Cookie Bases: Experiment with different types of cookies for the base. Oreo cookies (crushed with the cream), shortbread, or even gluten-free alternatives can work.
- Flavor Boosters: A dash of instant espresso powder can deepen the chocolate flavor. A hint of orange zest in the chocolate layers can add a sophisticated touch. Mint extract for a mint chocolate experience is also delightful.
- Individual vs. Large Dish: While individual cups are elegant, you can also make this in a larger trifle dish for a communal dessert, simply adjusting the chilling time slightly.
Why Choose No-Bake Desserts?
No-bake desserts, like this chocolate pudding, offer numerous advantages:
- Time-Saving: Eliminate oven time and often reduce active preparation time significantly.
- Energy Efficient: Perfect for hot summer days when you want to avoid heating up your kitchen.
- Simplicity: Often require fewer specialized techniques or equipment, making them ideal for beginners.
- Versatility: Many no-bake recipes are highly adaptable, allowing for easy customization of flavors and textures.
- Always a Crowd-Pleaser: Their creamy, rich textures are almost universally loved, making them a safe bet for any gathering.
Your New Favorite Easy Chocolate Pudding Recipe
This 5-ingredient no-bake chocolate pudding truly is a marvel of simplicity and flavor. It’s the kind of recipe you’ll return to again and again, whether you need a quick weeknight treat, a dessert for unexpected guests, or a delightful finish to a special meal. Its distinct layers of crunchy cookie, creamy caramel-kissed pudding, and rich dark chocolate, all finished with a delicate dusting of cocoa, create a sensory experience that belies its minimal effort. So, go ahead, gather your ingredients, follow these straightforward steps, and treat yourself and your loved ones to this delightful, hassle-free chocolate masterpiece. You won’t regret it!