
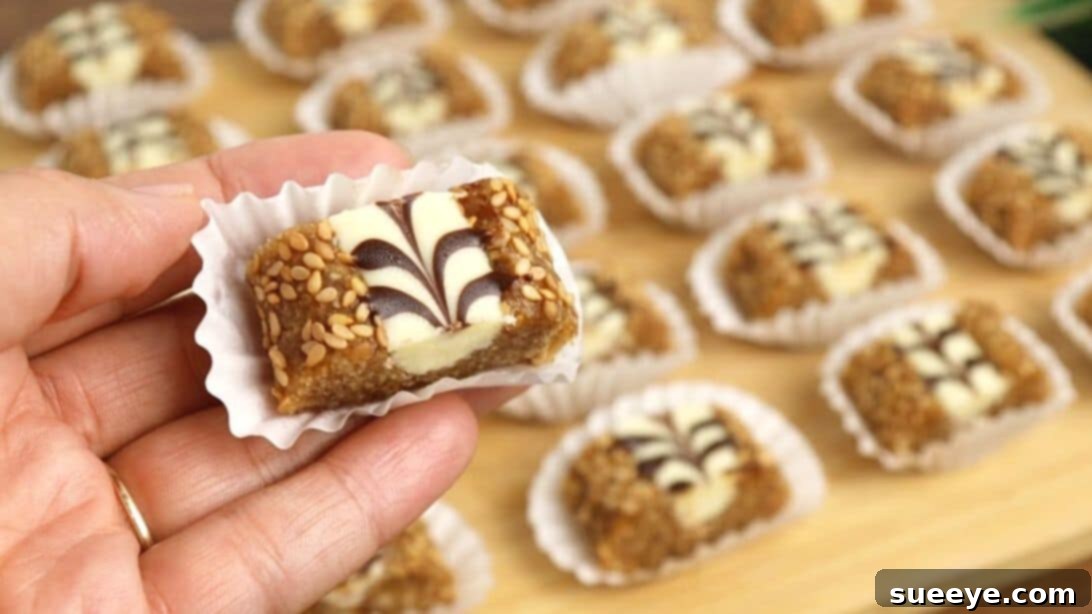
Discover the delightful simplicity of these 3-ingredient no-bake fruit bites, a recipe that promises a quick, easy, and incredibly satisfying treat. Perfect for anyone craving a healthy yet indulgent snack, these bites melt in your mouth, offering a harmonious blend of sweet, nutty, and fruity flavors. Crafted with minimal effort, this recipe requires no oven, making it an ideal choice for busy individuals, aspiring home bakers, or anyone looking for a wholesome dessert. Get ready to savor every bite of this irresistible creation, brought to you by the inspiration of Quick Simple & Delicious. Follow our comprehensive guide to create these delicious bite-sized marvels.
Why You’ll Love These No-Bake Fruit Bites
These no-bake fruit bites are more than just a dessert; they’re a revelation in healthy snacking. The beauty of this recipe lies in its elegant simplicity and the incredible flavor profile it delivers. You’ll adore them for several reasons:
- Effortlessly Easy: With just three core ingredients and no baking required, this recipe is perfect for beginners and seasoned cooks alike. It minimizes kitchen time and maximizes deliciousness.
- Wholesome Goodness: Packed with the natural sweetness of dates and the protein power of peanuts, these bites offer a guilt-free indulgence. They’re a much healthier alternative to processed sugary snacks.
- Versatile & Customizable: While the basic recipe is fantastic, it serves as a wonderful canvas for your culinary creativity. Easily swap out nuts, add spices, or experiment with different chocolate coatings to suit your taste.
- Perfect for Any Occasion: Whether you need a quick energy boost, a post-dinner treat, a lunchbox addition, or a thoughtful homemade gift, these fruit bites fit the bill perfectly.
- Kid-Friendly: Their bite-sized nature and delicious flavor make them a hit with children, offering a nutritious snack that tastes like a special treat.
The Magic Behind the 3 Ingredients
The secret to these sensational fruit bites lies in the thoughtful combination of just three primary ingredients, each playing a crucial role in taste, texture, and nutrition.
Dates: The Natural Sweetener and Binder
Dates are the cornerstone of this recipe, acting as both the primary sweetener and the natural binder that holds everything together. Beyond their rich, caramel-like sweetness, dates are nutritional powerhouses. They are an excellent source of dietary fiber, promoting digestive health and providing a sustained energy release. They also contain essential minerals like potassium, magnesium, and copper, contributing to overall well-being. Using fresh, soft dates will yield the best results, as they blend more easily and impart a richer flavor and stickier consistency, essential for forming the bites.
Peanuts: The Hearty Crunch and Protein Boost
Peanuts bring a delightful crunch and a robust, nutty flavor to these bites. They are a fantastic source of plant-based protein, healthy monounsaturated fats, and various vitamins and minerals, including biotin, copper, and niacin. The fats in peanuts help to make the bites more satisfying and contribute to their melt-in-your-mouth texture. When ground, they transform into a meal that perfectly complements the dates, creating a balanced and fulfilling snack.
Chocolate: The Indulgent Coating
Chocolate provides that irresistible finishing touch, adding a layer of sophisticated sweetness and a pleasant snap. Whether you choose white chocolate for its creamy sweetness or dark chocolate for its rich, slightly bitter notes, it elevates the bites from a simple snack to an elegant dessert. Dark chocolate, in particular, is celebrated for its antioxidant properties. The chocolate not only enhances the flavor but also adds to the visual appeal, making these bites truly special.
For the best results, opt for high-quality ingredients. Fresh, plump dates will blend more easily, and good quality chocolate will melt smoothly and offer a superior taste. Using unsalted peanuts allows you to control the overall flavor balance.
Essential Equipment
While this recipe is incredibly simple, having the right tools can make the process even smoother and more enjoyable:
- Food Processor: Absolutely essential for grinding the peanuts and blending them seamlessly with the dates. A powerful food processor ensures a smooth, consistent mixture.
- Mixing Bowl: For transferring and combining the mixture before shaping.
- Parchment Paper: To line your baking tray, preventing sticking and making cleanup a breeze.
- Baking Tray: To hold your shaped bites while they chill.
- Wooden Spoon or Similar Utensil: The handle is perfect for creating the wells in the bites.
- Heatproof Bowls: If using a double boiler method for melting chocolate.
- Saucepan: For boiling water if using the double boiler method.
- Piping Bags: Crucial for neatly filling the wells with melted chocolate and for decorative drizzling.
- Sharp Knife: For clean cuts once the bites are chilled.
- Cutting Board: A stable surface for shaping and cutting.
Ingredients:
- 1 and 1/4 cups of soft Medjool dates, pitted and packed
- 1 and 1/3 cups of unsalted roasted peanuts
- 3.5 oz (approx. 100g) of white chocolate, high quality for best melting and flavor
For garnish (optional, but highly recommended for visual appeal and added flavor):
- A sprinkle of sesame seeds, toasted or raw, for a subtle nutty flavor and texture.
- A small amount of dark chocolate (e.g., 1 oz or 30g), for elegant drizzling and contrast.
Step-by-Step Instructions for Your Perfect Fruit Bites:
Step 1: Preparation: Grinding the Peanuts
Begin by placing 1 and 1/3 cups of unsalted roasted peanuts into the bowl of your food processor. Pulse and grind the peanuts until they achieve a fine, crumbly consistency. Be careful not to over-process, as they can quickly turn into peanut butter. The goal is a texture that resembles coarse sand or fine breadcrumbs, which will provide a pleasant bite without being too greasy.
Step 2: Combining Dates and Peanuts
Carefully wash your dates, then remove all pits. It’s crucial to ensure no pits remain to avoid damaging your food processor or encountering an unpleasant surprise in your finished bites. Add the pitted dates to the food processor with the ground peanuts. Process the mixture again, scraping down the sides of the bowl as needed, until the dates and peanuts are thoroughly combined. The mixture should come together into a sticky, uniform dough that pulls away from the sides of the food processor bowl. It should be pliable and easy to handle.
Step 3: Forming the Base Block
Transfer the sticky date and peanut mixture from the food processor into a clean mixing bowl. Using your hands, firmly press and squeeze the mixture together, forming it into a cohesive, solid block or ball. This step ensures that all the ingredients are well integrated and that the mixture is compact, making it easier to shape in the next step. If the mixture feels too sticky, you can lightly dampen your hands with water or oil.
Step 4: Rolling and Shaping Your Bites
Take a portion of the mixture from your block and place it on a clean, flat work surface. Roll it gently between your palms or on the surface to form an elongated log shape, approximately 1 inch in diameter. If desired, sprinkle some sesame seeds onto your work surface before rolling, allowing them to coat the log for added texture and a delicate nutty flavor. Repeat this process with the remaining mixture, creating several uniform logs. Arrange these rolls neatly on a baking tray that has been lined with parchment paper. This will prevent them from sticking and make them easy to handle later.
Step 5: Creating the Indentations
Once all your logs are formed and placed on the parchment-lined tray, it’s time to create the signature wells. Take the end of a wooden spoon or any similar rounded utensil. Gently but firmly press the end of the spoon into the center of each roll, creating a shallow indentation along its entire length. These wells will be the perfect cavity for your melted white chocolate filling. Be careful not to press too hard and break the log.
Step 6: Melting the Chocolate
Now, prepare your chocolate. For the white chocolate, place it in a heatproof bowl. You have two excellent options for melting:
Double Boiler Method: Place the bowl over a pot of simmering water, ensuring the bottom of the bowl does not touch the water. Stir gently and continuously until the chocolate is smooth and fully melted. This method provides gentle, even heat, preventing the chocolate from scorching.
Microwave Method: If using a microwave, place the chocolate in a heatproof bowl and heat in 20-30 second intervals, stirring well after each interval, until melted and smooth. Be extremely cautious not to overheat, as white chocolate can seize easily.
Repeat the same melting process for your dark chocolate garnish, if using. Allow both chocolates to cool slightly before moving to the next step; they should be warm and fluid, but not hot.
Step 7: Preparing for Decoration
Once both the white and dark chocolates are melted and slightly cooled to a workable temperature (they should still be fluid but not too hot to handle), transfer them into two separate piping bags. If you don’t have piping bags, you can use a sturdy zip-top bag and snip off a tiny corner. This ensures precise application and neat decoration.
Step 8: Filling and Decorating
Take your piping bag filled with white chocolate and carefully fill the wells you created in each fruit roll. Aim for an even fill that reaches just below the top edge of the well. Next, use the piping bag with dark chocolate to drizzle decorative lines or patterns over the white chocolate. Get creative with swirls, zigzags, or simple dots! The contrast between the white and dark chocolate will make your bites visually stunning. Once decorated, place the tray of fruit bites into the refrigerator or a cool place for about 5 minutes, or until the chocolate is set. This chilling step is essential for clean cutting.
Step 9: Slicing into Perfect Portions
Once the chocolate has fully set, remove the rolls from the refrigerator. For the cleanest, most effortless cuts, heat a sharp knife under hot water for a few seconds, then wipe it completely dry. The warm blade will glide through the chocolate and the date-peanut mixture without sticking or cracking. Cut each log into individual bite-sized pieces, typically about 1 to 1.5 inches long. Reheat and wipe the knife as needed between cuts. Arrange your beautifully crafted no-bake fruit bites on a platter and prepare to impress!
Creative Variations and Customizations
While the original recipe is fantastic, don’t hesitate to personalize your no-bake fruit bites. Here are some ideas to inspire your creativity:
Nut Alternatives:
Swap peanuts for other nuts like almonds, cashews, walnuts, or pecans for a different flavor profile. For a nut-free option, use sunflower seeds or pumpkin seeds.
Dried Fruit Swaps:
Experiment with other dried fruits like dried apricots, figs, cranberries, or even prunes for varying textures and sweetness levels. Just ensure they are soft and pliable for easy blending.
Flavor Boosters:
Add a pinch of cinnamon, a dash of vanilla extract, a teaspoon of cocoa powder to the date-peanut mixture, or even a hint of orange zest for an aromatic twist.
Different Coatings:
Instead of just chocolate, consider rolling the finished bites in shredded coconut, finely chopped nuts, matcha powder, or even colorful sprinkles before they set for extra visual appeal and flavor.
Vegan Options:
To make these bites entirely vegan, simply ensure you use a high-quality dairy-free or vegan chocolate for both the filling and the garnish.
Storage and Shelf Life
These no-bake fruit bites are best stored in an airtight container in the refrigerator. They will maintain their freshness, texture, and flavor for up to 1-2 weeks. You can also freeze them for longer storage (up to 1-2 months); simply thaw them in the refrigerator before serving.
Serving Suggestions
These versatile bites are perfect for a variety of occasions:
- Everyday Snack: A healthy and satisfying pick-me-up during your workday or as an after-school treat.
- Dessert: An elegant, light dessert to finish a meal, especially with a cup of coffee or tea.
- Entertaining: Arrange them on a platter for guests, adding a touch of homemade charm to your spread.
- Homemade Gift: Package them beautifully in a box or jar for a thoughtful, personalized present.
Nutritional Benefits of These No-Bake Treats
Beyond their incredible taste, these fruit bites offer significant nutritional advantages:
- Fiber-Rich: Dates are packed with dietary fiber, aiding digestion and promoting a feeling of fullness.
- Protein Power: Peanuts contribute valuable plant-based protein, essential for muscle repair and sustained energy.
- Healthy Fats: The healthy monounsaturated and polyunsaturated fats in peanuts are beneficial for heart health.
- Antioxidants: If you opt for dark chocolate, you’ll be adding a boost of antioxidants, which help combat oxidative stress in the body.
- Natural Sweetness: Relying on dates for sweetness minimizes the need for refined sugars, making it a healthier alternative.
Conclusion: Your New Go-To Healthy Treat
These 3-ingredient no-bake fruit bites are a testament to how simple ingredients can come together to create something truly extraordinary. They are not just incredibly easy and quick to make, but they also offer a satisfying balance of flavor, texture, and nutrition. Whether you’re a seasoned chef or a kitchen novice, this recipe is designed for success, delivering delicious results every time. Say goodbye to complicated desserts and hello to your new favorite healthy treat. Give this recipe a try today and delight in the sweet, nutty, and utterly irresistible magic of these homemade fruit bites!