
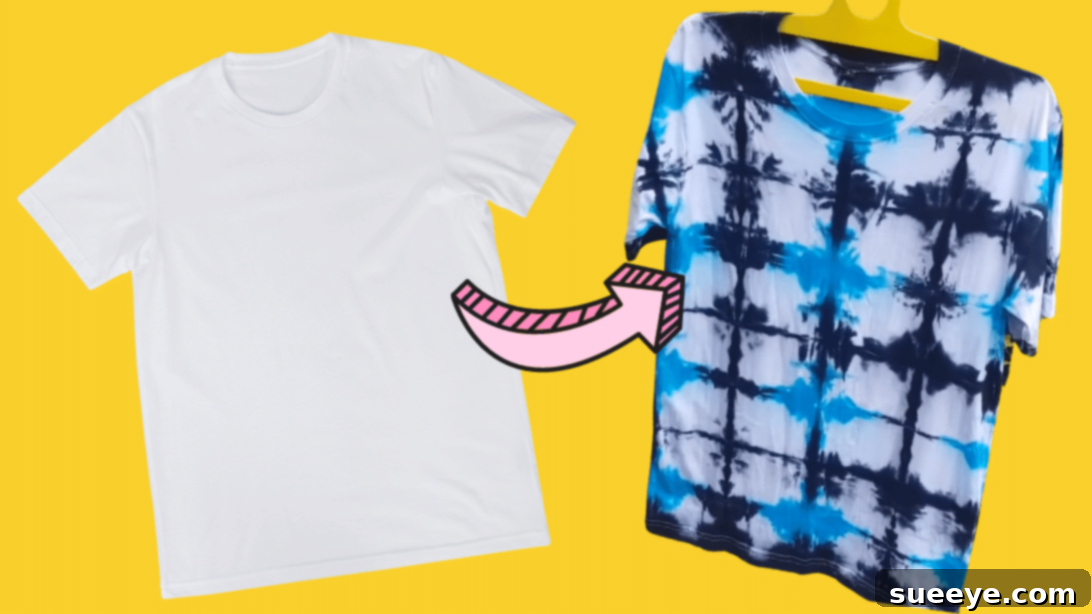
Mastering the Art of Tie-Dye: Your Easy Guide to a Stunning Shibori T-Shirt
In recent years, tie-dye has exploded back into popular culture, evolving from a nostalgic trend into a timeless fashion statement. Everywhere you look, from chic streetwear to cozy loungewear, you’ll find vibrant tie-dye patterns adorning everything from t-shirts and hoodies to bags and hats. This resurgence highlights the enduring appeal of personalized, colorful clothing, making it the perfect time to dive into the world of DIY fabric dyeing. Tie-dying isn’t just a craft; it’s a wonderfully expressive and fun summer activity that anyone can enjoy from the comfort of their home. It’s incredibly simple to start and immensely satisfying to create something truly unique that reflects your personal style.
Are you ready to give your wardrobe a fresh, artistic update? Now is the perfect moment to transform those forgotten plain white shirts lurking in your closet into vibrant, wearable masterpieces. This easy-to-follow tie-dye t-shirt tutorial, inspired by the creative techniques of Erpart, will guide you through the captivating Shibori accordion-fold method. This specific technique produces a distinct, geometric pattern that is both sophisticated and strikingly beautiful, offering a more structured look than typical free-form tie-dye. Don’t be afraid to experiment with different folding styles, color combinations, and application methods—the beauty of tie-dye lies in its endless possibilities and the delightful surprise of the final reveal. Prepare to be amazed by the stunning results you can achieve with just a few simple steps!
Why Embrace the Art of DIY Tie-Dye?
Beyond its undeniable aesthetic appeal, creating your own tie-dyed garments offers a multitude of benefits. Firstly, it’s an incredibly accessible and affordable hobby. With just a few basic materials, you can breathe new life into old clothing, reducing textile waste and promoting sustainable fashion practices. Instead of discarding an item, you can give it a second life with a vibrant makeover. Secondly, it’s a fantastic creative outlet. The tactile process of folding, binding, and applying dyes is wonderfully meditative and allows for immense personal expression. Each piece you create will be one-of-a-kind, a true original reflecting your unique style and artistic flair. Imagine the satisfaction of wearing a t-shirt that no one else in the world possesses, a garment infused with your own effort and creativity. Furthermore, tie-dying is a versatile activity that can be enjoyed solo for a moment of calm creation, or shared with family and friends, making lasting memories while crafting beautiful items together. It’s a rewarding experience that combines art, fashion, and fun, perfect for all ages and skill levels.
Understanding Shibori: A Glimpse into Tie-Dye History
While often associated with the vibrant psychedelic culture of the 1960s, tie-dye techniques boast a rich and ancient history, particularly in Japan. The term “Shibori” refers to a traditional Japanese dyeing method that involves folding, twisting, bunching, or compressing fabric before dyeing to create intricate patterns. Originating centuries ago, Shibori encompasses a range of techniques, each designed to achieve specific textural and visual effects. The accordion fold we’ll be using in this tutorial is a simplified take on one of these classic Shibori techniques, known for producing elegant linear or geometric designs that are both modern and deeply rooted in tradition. By learning this method, you’re not just making a t-shirt; you’re connecting with centuries of textile art tradition, adapted for modern crafting in a way that yields stunningly contemporary results.
Gathering Your Essential Tie-Dye Supplies
Before you begin your colorful journey, it’s crucial to assemble all your materials. Having everything ready beforehand ensures a smooth, safe, and enjoyable crafting experience, preventing interruptions once the dyeing process begins. Here’s a detailed list of what you’ll need, along with some important considerations and recommendations:
- 100% Cotton White T-shirt (or other natural fiber garments): The choice of fabric is paramount for successful tie-dye. Reactive dyes, which are typically used for vibrant, long-lasting results, bond chemically with natural fibers like cotton, rayon, hemp, and linen. Synthetic fabrics like polyester will not absorb these dyes effectively, leading to faded or washed-out results. A pre-washed, plain white t-shirt provides the best canvas, ensuring there are no fabric softeners, starches, or sizing agents that could interfere with dye absorption or create resist areas where you don’t intend them. Always wash new garments before dyeing.
- Fiber Reactive Dyes: For this tutorial, we’ll be using black and blue dyes to create a striking two-tone effect. Fiber reactive dyes are highly recommended as they create permanent, washable colors that chemically bond with the fabric and won’t fade quickly with washing. You can find these in various forms, often as powders that need to be mixed with water. Always follow the manufacturer’s instructions for dye preparation, including water temperature and mixing ratios, for optimal color results.
- Waterglass (Sodium Silicate) or Soda Ash (Sodium Carbonate): This is a crucial ingredient often referred to as a “dye fixer” or “soda ash fixer.” It plays a vital role by raising the pH level of the fabric, creating an alkaline environment that allows the reactive dyes to chemically bond with the cotton fibers. Without a fixer, your colors will be dull, wash out easily, and lack permanence. Soda ash is widely available in powdered form and typically mixed with water to create a soaking solution. Waterglass (liquid sodium silicate) works similarly and provides slightly different results, sometimes leading to crisper lines and a slightly firmer fabric feel.
- Natural Rubber Bands: These are essential for creating the resistance patterns that define tie-dye. The tighter the bands, the more defined and precise the un-dyed areas will be. Have a good variety of sizes on hand for different binding techniques and to accommodate various fabric thicknesses. Heavy-duty rubber bands are generally preferred for their durability.
- Gloves: Safety first! Reactive dyes are designed to permanently stain fabric, which means they will also permanently stain your skin. Wear robust rubber or nitrile gloves throughout the entire dyeing process, from mixing dyes and preparing the soda ash solution to applying the dyes and rinsing the finished garment.
- Mask: When working with powdered dyes or soda ash, wearing a dust mask (N95 or similar) is highly recommended. This prevents inhaling fine particles, which can be irritating to the respiratory system and potentially harmful.
- Water: You’ll need plenty of water at various temperatures. Use warm water for mixing dyes and soda ash (unless specified otherwise by dye instructions) and cool water for rinsing your dyed t-shirt. Ensure you have access to a faucet or a large bucket of clean water.
- Containers: Prepare several plastic containers. You’ll need one large enough to completely submerge your t-shirt in the soda ash solution, and separate, wide containers for each color of dye you plan to use. Old food storage containers, disposable aluminum baking pans, or sturdy plastic buckets work well. Label them if you’re working with multiple colors.
- Protective Surface Cover: Cover your entire workspace (table, floor, or outdoor area) with plastic sheeting, old newspapers, a tarp, or heavy-duty garbage bags. This is crucial to protect surfaces from dye spills, which can be permanent.
- Squeeze Bottles (Optional but Recommended): While not strictly necessary, squeeze bottles are excellent tools for precise dye application. They allow you to control where the dye goes and create cleaner, more defined patterns, especially when working with multiple colors or intricate folds. They also reduce mess compared to dipping.
- Measuring Spoons/Cups: For accurate mixing of soda ash and dyes, ensuring consistent results.
- Large Sink or Tub: Dedicated for rinsing your dyed garment, preferably one that won’t be easily stained (like a utility sink or an outdoor area).
- Drying Rack or Clothesline: For air drying your finished tie-dye piece.
Step-by-Step Tie-Dye Transformation: The Shibori Accordion Fold
Now that you have all your materials meticulously gathered and your workspace adequately protected, let’s embark on the exciting journey of transforming your plain white t-shirt into a vibrant work of art. Remember to work in a well-ventilated area and keep your protective gear (gloves and mask) on throughout the entire process.
Step 1: Preparing Your T-Shirt with the Accordion Fold
The foundation of this particular tie-dye design lies in the precise accordion fold, which is key to achieving the distinctive linear patterns characteristic of Shibori. Begin by laying your pre-washed, dry t-shirt completely flat on your protected workspace, smoothing out any wrinkles or creases. For this tutorial’s design, you will fold the t-shirt accordion-style lengthwise. Start at one side and fold a section of the fabric (e.g., 1-2 inches wide, depending on your desired pattern scale) over onto itself, creating a neat pleat. Then, flip the shirt over and fold it back in the opposite direction, creating another pleat. Continue this process, meticulously folding the fabric back and forth like you’re folding a paper fan, ensuring each fold is as even and crisp as possible. Pay close attention to the sleeves, making sure they are incorporated neatly into the main body of the fold rather than hanging loose; this will ensure a more uniform and cohesive pattern across the entire garment. Once you have a long, narrow rectangle of tightly pleated fabric, proceed to fold this rectangle accordion-style into a smaller, more compact square or rectangle. Again, maintain consistent fold widths for the best results. The precision of these folds will directly influence the symmetry, crispness, and clarity of your final tie-dye pattern.
Step 2: Securing Your Folded Design with Rubber Bands
With your t-shirt neatly folded into a compact and tightly pleated shape, it’s time to secure it firmly with natural rubber bands. The placement and tightness of these bands are absolutely crucial for creating the resist areas that will remain undyed or take on less dye, forming the core of your design. For the specific Shibori pattern demonstrated in this tutorial, you will secure your shirt by placing two (2) rubber bands lengthwise across the folded rectangle and two (2) rubber bands crosswise. Ensure the bands are snug and tight around the fabric bundle. The tighter the rubber bands, the less dye will penetrate those specific areas, resulting in sharper, more defined lines and starker contrasts in your final pattern. You can experiment with different numbers and placements of bands to create various patterns and shapes; however, for this initial project, sticking to the suggested four bands will yield a predictable and beautifully geometric outcome. This binding technique is fundamental to the Shibori aesthetic, creating the tension that prevents dye from reaching certain parts of the fabric.
Step 3: Activating Your Fabric with Soda Ash or Waterglass
This step is absolutely vital for ensuring your dyes bond permanently and vibrantly with the cotton fibers of your t-shirt. If you are using soda ash, prepare your solution by dissolving the recommended amount of soda ash (typically 1 cup per gallon of warm water, but always double-check your product’s specific instructions) in a plastic container large enough to fully submerge your t-shirt. Stir until the soda ash is completely dissolved. If you are using liquid waterglass (sodium silicate), simply pour it into a similar container. With your gloves securely on, carefully dip your folded and banded t-shirt into the waterglass or soda ash solution. Ensure the entire fabric bundle is completely saturated, pushing it down if necessary to remove any air pockets. Allow it to soak for at least 5-15 minutes to ensure thorough saturation; this time allows the chemical to penetrate every fiber. Once soaked, gently lift the t-shirt out of the solution and lightly press or squeeze it to remove any excess liquid, ensuring it’s damp but not dripping wet. This pre-soak conditions the fabric, creating the perfect alkaline environment that is essential for the fiber reactive dyes to chemically bond and “fix” to the cotton, resulting in permanent, brilliant colors.
Step 4: Applying the First Color – Blue Dye
Now for the most exciting and creative part – applying the colors! Prepare your chosen dyes by mixing them according to their specific instructions. For this two-tone design, you’ll need separate wide containers for your black and blue dye solutions. Holding your folded t-shirt firmly by one corner of the bundled fabric, carefully dip the opposite corner into the blue dye solution. Submerge only a portion of the fabric bundle, allowing the dye to wick up into the fabric fibers. Hold it in the dye for several seconds, or even a minute, depending on the desired intensity and saturation. The longer it stays submerged, the deeper and more saturated the blue color will be in that area. Gently lift the t-shirt, allowing any excess dye to drip back into the container, or give it a light shake to remove drips. Try to keep the blue dye concentrated on one distinct section, leaving clear boundaries for the next color application. Precision here helps achieve a crisp color separation and a clean, defined pattern.
Step 5: Applying the Second Color – Black Dye and Curing
Once the blue dye has been applied to its intended section, it’s time to introduce the second color. For the remaining corners or sections of your folded t-shirt that are still undyed, repeat the dipping process, this time using the black dye solution. Carefully submerge the desired undyed areas into the black dye, allowing the dye to seep and wick into the fabric. Again, hold it for a sufficient time to achieve your desired color saturation, then gently lift and allow excess dye to drip off. Once you have applied both colors to the desired areas, the active dyeing process itself is complete. Now, the crucial step of curing begins, where the dyes need time to chemically bond with the fabric fibers. Carefully place your dyed t-shirt in a location where it can sit undisturbed, ideally with enough ventilation for air to circulate around and underneath it. A wire rack placed over a protective sheet or an old plastic bag works well to contain moisture and mess. Leave the t-shirt to cure for a minimum of 4-24 hours. The longer the curing time (within recommended limits, usually up to 24 hours), the more vibrant and fade-resistant your colors will be, as the chemical bond strengthens. Avoid direct sunlight or extreme temperatures during this period, as they can negatively affect the curing process.
Step 6: Rinsing, Unbinding, and Drying Your Masterpiece
After the recommended curing time has elapsed, it’s time for the moment of truth and the big reveal! Still wearing your gloves to protect your hands from any residual dye, carefully take your t-shirt to a large utility sink, outdoor hose, or a designated tub. Before removing the rubber bands, rinse the t-shirt under cool running water. This initial rinse helps flush out any excess, unbonded dye from the surface of the fabric. You’ll notice a significant amount of color washing away, which is perfectly normal and expected; continue rinsing until the water runs mostly clear. This can take several minutes. Once the water is mostly clear, you can carefully remove all the rubber bands, unraveling your beautifully dyed t-shirt. Be prepared for a moment of delightful anticipation as the intricate Shibori pattern is fully revealed! After unbinding, continue rinsing the opened t-shirt thoroughly under cool water until absolutely no more dye is visible in the runoff. This thorough, clear-water rinse is critical for preventing future bleeding of colors onto other garments. Finally, wash your tie-dyed shirt separately in a washing machine on a cold cycle with a small amount of mild detergent. This “batch wash” removes any remaining unbonded dye and sets the fabric for future wear. After washing, gently wring out excess water and hang your vibrant, newly tie-dyed t-shirt to air dry completely. Avoid machine drying for the first few washes to further preserve color intensity and prevent premature fading.
Congratulations! You’ve successfully created an awesome, unique tie-dyed shirt using the traditional Shibori accordion fold technique. This handcrafted garment is a testament to your creativity and a stylish, personalized addition to any wardrobe.
Pro Tips for Stunning Tie-Dye Results
- Pre-wash Your Fabric: Always wash new garments before dyeing to remove any sizing agents, oils, or finishes that can repel dye and lead to uneven color absorption.
- Experiment with Folds: The accordion fold is just one of many fascinating tie-dye techniques! Once you’re comfortable, try spirals, crumples, bullseyes, or pleats to achieve a wide array of different patterns and textures. Each fold creates a unique outcome.
- Vary Dye Saturation: For a more faded, pastel, or vintage look, use less dye or dilute your dye solutions. For intense, deep, and highly saturated colors, ensure thorough dye penetration and adhere to longer curing times.
- Workspace Protection is Key: Dyes can stain permanently and quickly. Always protect your work surfaces, your clothing, and your skin meticulously to avoid unwanted discoloration.
- Warmth Aids Curing: Fiber reactive dyes cure best in warm environments (ideally around 70-80°F / 21-27°C). If it’s cold in your workspace, consider placing your wrapped, dyed fabric bundle in a sealed plastic bag to keep it moist and warm during the curing period, which can significantly enhance color vibrancy.
- Thorough Rinsing Prevents Bleeding: The initial clear-water rinse and subsequent separate cold wash are absolutely crucial for washing out all unbonded dye particles. This prevents colors from bleeding onto other clothes during future washes and ensures the longevity of your design.
Troubleshooting Common Tie-Dye Issues
Even experienced crafters can encounter hiccups. Here’s how to address some common tie-dye problems:
- Colors Aren’t Vibrant/Look Faded: The most common reasons are not using a dye fixer (soda ash/waterglass) or using the wrong type of dye for your fabric (e.g., all-purpose dye on cotton). Ensure your fabric was 100% natural fiber, check dye expiration dates, and ensure sufficient curing time.
- Dye Bled Too Much/Muddy Colors: This usually indicates insufficient rinsing after curing, or bands that weren’t tight enough to create a strong resist. Next time, rinse longer and more vigorously, and consider using tighter binds. Mixing too many colors in close proximity can also lead to muddy results.
- Uneven Dye Coverage: This can happen if the fabric wasn’t fully saturated in the soda ash solution, or if the dye application wasn’t even. For more consistent and even coverage, try using squeeze bottles to thoroughly saturate the fabric bundle from all sides.
- Stains on Skin/Surfaces: This is preventable by always wearing gloves and thoroughly protecting your workspace. For minor skin stains, a mixture of baking soda and lemon juice can sometimes help (test on a small, inconspicuous area first). For stubborn surface stains, try specialized dye remover products, but prevention is always best.
Caring for Your Tie-Dyed Garment to Maintain Vibrancy
To ensure your beautiful tie-dyed creation remains vibrant and looks its best for years to come, follow these essential care instructions:
- Initial Washes: For the first 2-3 washes, always wash your tie-dyed item separately. Use cold water and a small amount of mild, color-safe detergent. This helps to remove any minuscule residual unbonded dye that might still be present and prevents it from transferring to other garments.
- Subsequent Washes: After the initial washes, you can wash your tie-dyed garments with similar colors (especially darks if your tie-dye is dark) in cold water. To further protect the design and minimize wear, turn them inside out before placing them in the washing machine.
- Avoid Bleach: Bleach will mercilessly strip the vibrant color from your tie-dye and should be avoided at all costs. Even color-safe bleaches can sometimes cause fading.
- Mild Detergent: Always opt for a gentle, color-safe detergent. Harsh detergents with strong chemicals can accelerate fading over time and diminish the brilliance of your colors.
- Air Dry When Possible: While you can machine dry tie-dyed items on a low-heat setting, air drying helps to preserve the life and vibrancy of the colors, as excessive heat can sometimes cause dyes to break down. If machine drying, tumble dry on the lowest heat setting to minimize color loss.
Unleash Your Creativity: Beyond the Basic T-Shirt
This tutorial provides a fantastic entry point into the mesmerizing world of tie-dye, but don’t let it be the end of your creative journey! Once you’ve mastered the Shibori accordion fold on a t-shirt, consider expanding your horizons and applying these exciting techniques to a myriad of other items. Think creatively: tote bags, pillowcases, socks, scarves, bandanas, bed sheets, or even denim jackets can all be transformed into unique, personalized statements. Experiment with different color palettes—from bold and bright neons to subtle pastels, or even sophisticated monochromatic schemes using various shades of a single color. Explore other folding techniques (like spirals, crumples, or bullseyes) to discover a kaleidoscope of patterns, from intricate mandalas to simple, organic designs. The possibilities are truly endless, limited only by your imagination and the fabric you choose. Tie-dye is a continuous journey of discovery and artistic expression!
Conclusion: Your Unique, Handcrafted Statement Piece Awaits
The satisfaction of creating something beautiful and functional with your own hands is truly unparalleled, and tie-dyeing offers that joy in spades. This easy tie-dye t-shirt tutorial, inspired by the captivating and historically rich Shibori technique, empowers you to transform ordinary garments into extraordinary works of wearable art. Whether you’re looking for a fun and engaging summer project, a unique and thoughtful handmade gift, or simply want to express your individuality through distinctive fashion, tie-dye is an incredibly rewarding and accessible craft. It’s a wonderful way to rejuvenate old clothes, reduce waste, and add a splash of personalized color to your life. So gather your materials, unleash your inner artist, and get ready to reveal a stunning, one-of-a-kind tie-dyed t-shirt that’s as unique and vibrant as you are. Happy dyeing!