
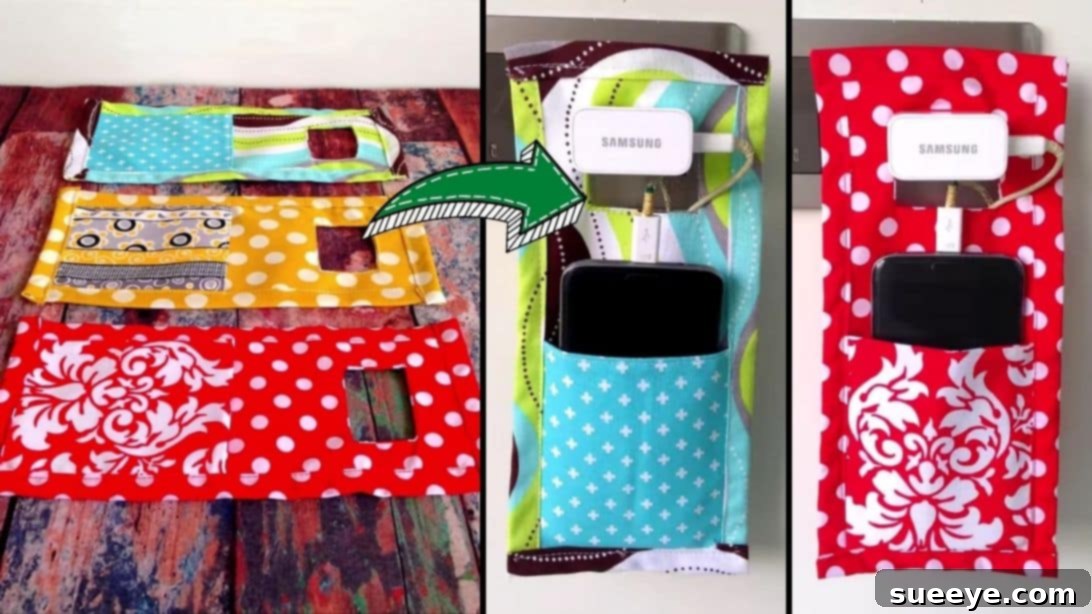
Do you often find yourself struggling with inconveniently placed outlets, leaving your phone dangling precariously or lying on the floor while it charges? It’s a common dilemma that can lead to tangled cords, scuffed screens, or even accidental damage. But what if there was a simple, elegant solution that also added a touch of personal style to your space? Enter the fabric phone charger holder – a practical and charming accessory that keeps your device safe, secure, and easily accessible while it powers up.
This ingenious DIY project is not only incredibly functional but also surprisingly easy to make, even if you’re new to sewing. With just a few basic materials and some simple steps, you can create a custom holder that perfectly complements your home décor. We’re excited to share this fantastic tutorial, inspired by the creative genius of Sewcraftyme on YouTube, who demonstrates just how straightforward this sewing endeavor can be for crafters of all skill levels.
Imagine no more worrying about your phone getting stepped on or knocked over. This fabric holder neatly cradles your phone, providing a dedicated spot right next to the wall outlet. It’s an ideal solution for any room in the house, from the kitchen to the bedroom, and makes for a wonderful handmade gift. Ready to transform your charging routine with a touch of DIY magic? Let’s gather our supplies and get started on this rewarding sewing adventure!
Why Sew Your Own Fabric Phone Charger Holder?
There are numerous benefits to crafting your own fabric phone charger holder instead of buying a generic one. Beyond the satisfaction of a handmade item, here’s why this project is a must-try:
- Customization at its Best: Unlike store-bought options, you have complete control over the aesthetics. Choose fabrics that perfectly match your interior design, favorite colors, or even seasonal themes. From vibrant patterns to subtle solids, the possibilities are endless!
- Cost-Effective Crafting: This project is incredibly budget-friendly. You can often use fabric scraps you already have on hand, making it an excellent way to utilize leftover materials from previous sewing endeavors.
- Practicality and Organization: This holder isn’t just pretty; it’s a true problem-solver. It elevates your phone off surfaces, keeping it clean and safe from spills or clutter. The integrated pocket can even hold earbuds or a charging cable.
- Perfect for Beginners: The construction involves basic sewing techniques like straight seams, turning, and topstitching, making it an ideal project for those just starting their sewing journey. It’s a great way to build confidence and hone fundamental skills.
- Thoughtful Handmade Gift: A personalized fabric phone charger holder makes a unique and practical gift for friends and family. Tailor the fabric choice to their personality, and you’ll have a present that’s both useful and heartfelt.
- Reduce Clutter and Enhance Safety: By providing a designated spot for your phone while charging, you eliminate the need to leave it on the floor or precarious ledges, reducing trip hazards and clutter.
Materials You’ll Need:
Before diving into the sewing process, ensure you have all the necessary materials. Gathering everything beforehand will make your crafting experience smooth and enjoyable.
- Main Fabric: Choose a sturdy, non-stretch fabric like quilting cotton, canvas, or denim. This will be the outer visible part of your holder, so pick a print or color you love! You’ll need enough to cut one main piece.
- Lining Fabric: This will be the inside of your holder. While it won’t be as visible, a complementary fabric will add a professional touch. Again, quilting cotton is an excellent choice. You’ll need enough for one main lining piece.
- Interfacing Fabric: A medium-weight fusible interfacing is recommended. This provides structure and stability to your holder, ensuring it stands up well and holds its shape. You’ll need enough for one main interfacing piece and one pocket interfacing piece.
- Pins: Essential for holding fabric layers together securely before sewing, ensuring accuracy.
- Needle and Matching Thread: A universal sewing machine needle (size 80/12 or 90/14) will work well. Choose a thread color that matches or complements your main fabric for a seamless finish.
- Sewing Machine: Your trusty sewing machine will make quick work of this project. Ensure it’s in good working order and threaded correctly.
- Marking Pen/Chalk: For transferring pattern markings onto your fabric. A washable fabric marker or tailor’s chalk is ideal.
- Sharp Fabric Scissors: Clean, sharp cuts are key to a professional-looking finish. Avoid using these scissors on paper!
- Iron and Ironing Board: Pressing your seams at each step is crucial for crisp, flat, and professional results. Don’t skip this step!
- Pattern: (Click on this link to download the printable PDF pattern directly. This is crucial for accurate sizing and shaping of your holder.)
Step-by-Step Instructions:
Follow these detailed steps carefully, and you’ll have a beautiful and functional fabric phone charger holder in no time!
Step 1: Preparing Your Fabric Pieces and Fusing Interfacing
The first step involves accurately cutting your fabric and applying the interfacing to give your holder its necessary structure.
- Download and Cut the Pattern: Begin by clicking on the provided link to download the pattern here. Print it out at 100% scale to ensure the dimensions are correct. Carefully cut out all the pattern pieces with precision. You should have templates for the main holder and the pocket.
- Cut Main Fabric and Lining: Place the main holder template onto your main fabric. Using your marking pen, carefully trace around the template. Cut out one main piece from your main fabric, remembering to leave the small rectangular opening in the center untouched for now; you will cut this out later. Repeat this process for your lining fabric, cutting one identical main piece.
- Cut Pocket Pieces: Next, use the smaller pocket pattern template. Cut two pocket pieces from your main fabric. These will form the functional pocket on the front of your holder.
- Cut Interfacing Pieces: Now, for the interfacing. Cut one main piece and one pocket piece from your fusible interfacing, using the same main holder and pocket templates. Once these are cut, trim off approximately 3/8 inch from all around the edges of both the main interfacing piece and the pocket interfacing piece. This slightly smaller size prevents bulk in the seam allowances when fused.
- Prepare Bias Binding Strips (Optional, if not using pre-made): If your pattern includes instructions for bias binding strips or if you choose to make them, cut these according to the pattern’s specifications. These will be used to finish the edges of your holder for a clean look.
- Fuse Interfacing: Take your main fabric piece. Place the main interfacing piece onto the wrong side of the main fabric, ensuring it is centered and that there is approximately a 3/8 inch border of main fabric visible all around the edges (this is why you trimmed the interfacing slightly smaller). Following the interfacing manufacturer’s instructions, use a warm iron to fuse the interfacing securely to the fabric. Press firmly and evenly. Repeat this fusing process with one of your pocket pieces and its corresponding interfacing piece. The interfacing adds crucial stability.
- Mark and Cut the Center Rectangle: Layer your main fabric piece (with interfacing) and your lining fabric piece together, aligning all the outer edges perfectly. Place the original main holder pattern template directly on top of these layered fabrics. Using your marking pen, accurately mark the small rectangular opening located at the center of the template onto the top fabric layer. Carefully fold the layered fabrics in half lengthwise, ensuring the marked rectangle also folds precisely. Using sharp scissors, cut out this small rectangle through both layers of fabric. This opening is where your charger will pass through.
Step 2: Constructing the Main Holder and Attaching the Pocket
This step focuses on forming the core structure of your holder and adding the functional pocket.
- Sew the Center Opening: Stack the main fabric piece (right side up) and the lining fabric piece (right side down) together, so their right sides are facing each other. Align all the outer edges precisely. Use pins to secure them in place, especially around the edges of the newly cut rectangular opening. Carefully sew around this small rectangle with a 1/4 inch seam allowance.
- Notch and Turn: Once sewn, carefully make small notches (snips) into the corners of the sewn rectangle, being careful not to cut through your stitching. Then, proceed to make small notches all around the seam allowance of the rectangle, spaced about 1/2 inch apart. These notches will help the fabric lie flat and prevent bulk when turned.
- Turn Right Side Out and Press: Push the lining piece through the rectangular opening, turning the entire assembly right side out. Carefully poke out all the corners and edges of the rectangle so they are crisp and well-defined. Give it a good press with your iron to flatten the seams and create a neat opening.
- Topstitch the Opening: To give the opening a professional finish and added durability, topstitch along the edge of the rectangle, about 1/8 inch from the fold. This also helps to keep the lining fabric from rolling to the front.
- Assemble the Pocket: Take your two pocket pieces. Place them together with their right sides facing each other, aligning all edges. Pin them in place. Sew along one of the shorter sides with a 1/4 inch seam allowance. Turn the pocket piece right side out, so the sewn edge is now visible and clean. Press this seam flat.
- Topstitch the Pocket Opening: Topstitch along the sewn edge of the pocket (the top opening of the pocket) about 1/8 inch from the fold. This provides a neat finish and reinforces the pocket’s opening.
- Attach the Pocket to the Main Holder: Now, it’s time to attach the assembled pocket to the main holder piece. Place the pocket onto the lower part of the main holder, aligning the raw edges of the pocket with the raw bottom edge of the main holder. Ensure the pocket is centered. Pin the pocket securely in place along its raw edges (the bottom and two side edges) to the main holder. Carefully sew along these pinned edges with a 1/4 inch seam allowance to join the pocket to the main piece. Make sure to backstitch at the beginning and end for reinforcement.
Step 3: Finishing with Bias Binding
The final step involves applying bias binding to the raw edges of your holder, giving it a clean, durable, and professional finish.
- Prepare the Binding Strips: Take one of your binding strips. Fold both long raw edges towards the wrong side by approximately half an inch and press firmly to create crisp folds. This neatens the raw edges internally. Then, fold the entire strip in half lengthwise again, enclosing the previously folded edges, and press once more. This creates a finished bias tape. Repeat this process for all your other binding strips, ensuring they are all uniformly prepared.
- Attach Longer Binding Pieces to Holder Sides: Take the longer prepared binding pieces. Align one longer binding piece with one of the longer raw side edges of your holder. Open up the final fold of the binding strip slightly, and carefully sandwich the raw edge of the holder in between the folds of the binding. Ensure the holder’s raw edge sits snugly against the crease of the binding. Pin the binding securely along the entire length. Repeat this process for the other longer side of the holder with another binding piece.
- Sew the Longer Bindings Shut: With the holder’s edges nestled perfectly within the binding, sew along the pinned edges, very close to the inner fold of the binding. Stitch slowly and carefully to ensure you catch both sides of the binding. Repeat for both longer sides.
- Attach Shorter Binding Strips: Now, take the shorter prepared binding strips. For these, you’ll also need to fold the raw ends (the short edges) by half an inch inwards before applying them. This creates a neat, finished edge for the ends of your binding. Position a shorter binding strip over one of the shorter raw edges of the holder, again sandwiching the holder’s raw edge within the folds of the binding, and ensuring the folded-in ends of the binding create a clean finish at the corners. Pin it securely in place.
- Sew the Shorter Bindings Shut: Carefully sew along the pinned edges of the shorter binding strips, just as you did with the longer ones, catching both sides of the binding. Repeat this for the remaining shorter side of the holder.
- Final Press: Give your entire finished fabric phone charger holder a final press with the iron. This will flatten all the seams and binding, giving your handmade item a polished and professional look.
Tips for Sewing Success
To ensure your fabric phone charger holder turns out perfectly, keep these expert tips in mind:
- Always Press: We can’t emphasize this enough. Pressing after every sewing step makes a huge difference in the final appearance of your project. It flattens seams, helps fabric lay smoothly, and gives your work a professional finish.
- Use Sharp Tools: Sharp scissors and a fresh sewing machine needle prevent frayed edges, skipped stitches, and overall frustration. Change your needle every 8-10 hours of sewing time.
- Pin Generously: Don’t be shy with pins, especially when aligning multiple fabric layers or applying binding. They are your best friend for keeping everything in place and preventing fabric shifting.
- Slow and Steady: When sewing curves or intricate parts like the center rectangle, slow down your sewing machine speed. Precision over speed will yield better results, especially for beginners.
- Test Stitches: Before sewing on your actual project, always test your stitch length and tension on a scrap piece of your project fabric. This ensures your machine is set up correctly.
- Read Ahead: Always read through all the instructions for a step before you start sewing. This helps you understand the entire process and avoid mistakes.
Variations and Customization Ideas
Once you’ve mastered the basic holder, feel free to get creative and personalize your creations:
- Fabric Play: Experiment with different fabric combinations. Use a vibrant print for the main body and a solid coordinating color for the lining, or mix and match contrasting patterns for a bold statement.
- Embellishments: Add small embroidered details, iron-on patches, decorative buttons, or even a small fabric tag with your initials for a truly unique touch.
- Pocket Adjustments: Make the pocket slightly larger or divide it into two smaller sections to hold different accessories like a USB drive or spare cable.
- Hanging Loop: Instead of relying on the charger opening, you could add a small fabric loop at the top for alternative hanging options.
- Size Adjustments: If you’re comfortable with pattern modifications, you can subtly adjust the size to perfectly fit larger or smaller phone models.
Care Instructions for Your Fabric Holder
To keep your handmade phone charger holder looking its best, follow these simple care guidelines:
- Washing: Most cotton fabrics can be machine washed on a gentle cycle with cold water. If your fabric is delicate or has embellishments, handwashing is recommended.
- Detergent: Use a mild detergent. Avoid harsh chemicals or bleach, which can fade fabric colors.
- Drying: Air dry your holder by laying it flat or hanging it. This helps maintain its shape and prevents shrinkage. If you must use a dryer, tumble dry on a low setting.
- Ironing: If wrinkles appear, iron your holder on a medium setting, using a pressing cloth if necessary, especially over any fusible interfacing areas.
Easy To Sew Fabric Mobile Charger Holder: Your New Favorite DIY!
Congratulations! You’ve successfully created a functional, stylish, and completely personalized fabric phone charger holder. No more dropped phones, tangled cords, or cluttered countertops. This simple yet effective sewing project brings order and convenience to your charging routine, all while showcasing your newfound or seasoned crafting skills.
This tutorial, inspired by the wonderful Sewcraftyme, proves that even beginners can tackle practical and beautiful sewing projects. We encourage you to experiment with different fabrics, colors, and embellishments to make each holder uniquely yours. They make fantastic gifts for friends and family, a testament to your thoughtfulness and creativity.
So, plug in your phone, slip it into its new handmade home, and enjoy the satisfaction of a job well done. Happy sewing, and remember to explore more creative projects!
*All image credit belongs to Sewcraftyme via YouTube. Follow and subscribe to her channel for more inspiring DIY sewing tutorials!