
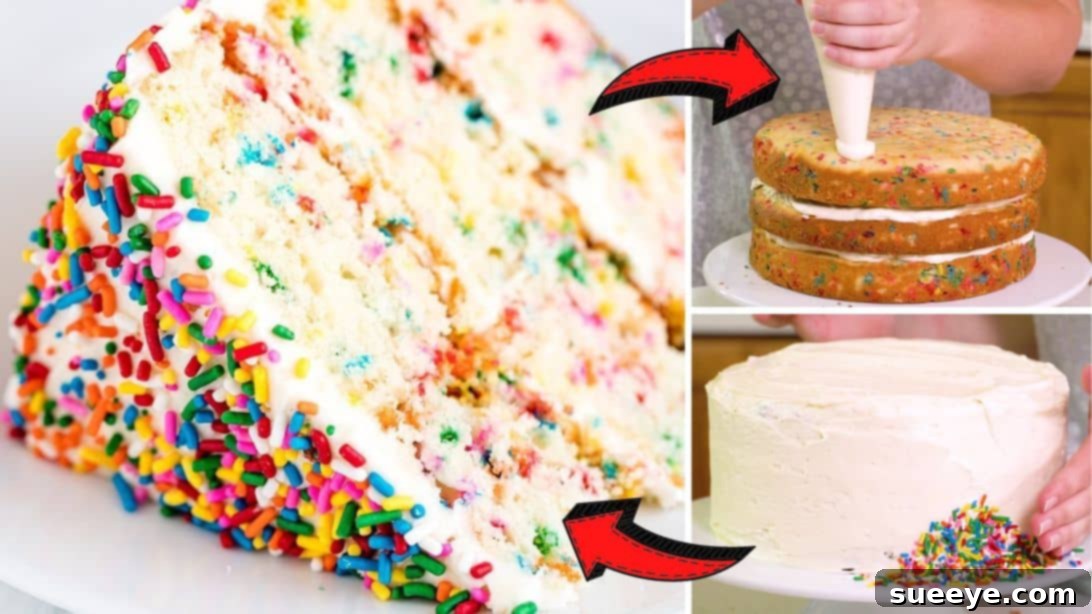
Planning a birthday celebration for a cherished family member or dear friend and searching for the perfect centerpiece dessert? Look no further! This delightful and visually stunning Funfetti Birthday Cake recipe, brought to you by the talented The Stay At Home Chef on YouTube, is an absolute game-changer. Imagine a cake that’s incredibly fluffy, bursts with delicious vanilla flavor, and is adorned with a kaleidoscope of colorful sprinkles – it’s truly the epitome of festive baking, making it ideal for any birthday bash or special occasion. You’ll be amazed at how straightforward it is to create this show-stopping dessert, especially with our enhanced, step-by-step written instructions below, designed to guide you effortlessly through the baking process. For an even more immersive experience, be sure to watch the accompanying video tutorial for visual cues and expert tips.
This isn’t just any cake; it’s an experience. The magic of funfetti lies in its ability to bring smiles and a touch of whimsy to any gathering. The vibrant sprinkles embedded within the cake batter create a joyful surprise with every slice, making it particularly appealing to both children and adults alike. Paired with a luscious, tangy cream cheese frosting, this cake strikes the perfect balance between sweetness and richness, guaranteeing it will be the highlight of your celebration. Forget store-bought cakes; mastering this homemade funfetti masterpiece will earn you endless compliments and create lasting memories.
Ingredients for Your Festive Funfetti Birthday Cake
Crafting a truly exceptional homemade Funfetti Birthday Cake begins with the right ingredients. Using high-quality components ensures the best flavor and texture for your celebration cake. Below is a comprehensive list for both the wonderfully moist cake batter and the rich, creamy frosting that perfectly complements it.
For the Fluffy Funfetti Cake Batter:
- 1 cup (2 sticks) salted butter, softened to room temperature
- 1½ cups granulated sugar
- 2 tsp pure vanilla extract
- 3½ cups all-purpose flour, spooned and leveled
- 4 tsp baking powder
- ½ tsp fine sea salt
- 3 large eggs, at room temperature
- 1½ cups buttermilk, at room temperature
- 1 cup high-quality rainbow sprinkles (jimmie-style work best to prevent excessive bleeding)
For the Decadent Cream Cheese Frosting:
- 1½ cups (3 sticks) unsalted butter, softened to room temperature
- 8 ounces (1 block) full-fat cream cheese, softened to room temperature
- 3 tsp pure vanilla extract
- 6 cups powdered sugar (confectioners’ sugar), sifted
- 2 tbsp whole milk (or heavy cream), adjust as needed for desired consistency
- 2 cups additional rainbow sprinkles, for generously decorating the finished cake
Step-by-Step Directions to Bake Your Perfect Funfetti Birthday Cake
Follow these detailed instructions to create a show-stopping Funfetti Birthday Cake that tastes as incredible as it looks. Each step is designed for clarity and success, ensuring a delightful baking experience.
Step 1: Preparing Your Pans and Initial Batter Mixing
Begin by preheating your oven to a steady 350°F (175°C). This ensures your cake bakes evenly from the moment it enters the oven. Next, meticulously prepare three 9-inch round cake pans. Lightly grease the sides and bottoms of each pan with butter or baking spray, then line them perfectly with parchment paper circles. This crucial step prevents sticking and ensures your beautiful cake layers release flawlessly. In a large mixing bowl, combine the softened salted butter and granulated sugar. Using an electric mixer, beat these two ingredients together on medium speed for approximately 1½ to 2 minutes. The goal here is to “cream” them until the mixture becomes visibly light, fluffy, and pale in color. This process incorporates air, which contributes significantly to the cake’s tender crumb. Once creamy, beat in the pure vanilla extract for just about 2 seconds, ensuring it is fully incorporated without overmixing. Vanilla is key to the classic flavor profile of a funfetti cake.
In a separate, medium-sized bowl or a large measuring cup, whisk together the room-temperature buttermilk and large eggs using a fork until they are thoroughly combined and uniform in consistency. Setting these aside ensures they are ready to be added to the batter at the appropriate time. In yet another mixing bowl, combine the dry ingredients: all-purpose flour, baking powder, and salt. Stir these together thoroughly with a whisk to ensure the leavening agent (baking powder) and salt are evenly distributed throughout the flour. This prevents pockets of leavener and guarantees an even rise. Now, gradually add approximately one-third of this dry flour mixture into your creamed butter and sugar mixture. Mix on low speed until just combined, being careful not to overmix. Then, gently pour in about half of the prepared buttermilk and egg mixture. Continue to mix on low speed until it’s just well combined, ensuring all ingredients are incorporated without developing the gluten too much.
Step 2: Completing the Batter, Baking, and Preparing the Frosting
To finish the cake batter, repeat the alternating addition process: add the second third of the dry flour mixture, mix until just combined, then add the remaining half of the wet milk mixture, and mix again. Finally, incorporate the last third of the dry flour mixture, mixing just until no streaks of flour remain. The key throughout this process is to mix until *just* combined after each addition. Overmixing develops gluten, which can lead to a dense, tough cake. With the batter nearly complete, it’s time for the star of the show: the sprinkles! Gently fold in the cup of rainbow sprinkles by hand using a spatula. Be very careful not to overmix at this stage, as excessive agitation can cause the colors from the sprinkles to bleed into the batter, turning your vibrant funfetti into a dull, muddy color. A few gentle folds are all it takes to distribute them beautifully.
Evenly divide the beautifully speckled batter among your three meticulously prepared 9-inch pans. A kitchen scale can be helpful here to ensure each layer is uniform in size, promoting even baking. Place the pans into your preheated 350°F (175°C) oven and allow them to bake for approximately 25 to 30 minutes. Baking times can vary slightly depending on your oven, so rely on the classic doneness test: insert a clean wooden toothpick into the center of each cake. If it comes out clean or with a few moist crumbs attached, your cakes are perfectly baked. Once baked, remove the cakes from the oven and let them rest in their pans for about 5 to 10 minutes. This brief cooling period helps the cake structure set before unmolding. After this, carefully invert the cakes onto a wire cooling rack, remove the parchment paper, and allow them to cool completely. It is absolutely crucial that the cake layers are entirely cool before frosting, otherwise, your frosting will melt and slide off.
While your cake layers are cooling, prepare the luxurious cream cheese frosting. In a large mixing bowl, combine the softened unsalted butter and softened cream cheese. Using an electric mixer, beat these together on medium-high speed until the mixture is light, fluffy, and completely smooth, with no lumps of cream cheese remaining. This usually takes about 2-3 minutes. Beat in the vanilla extract. Now, gradually add the sifted powdered sugar, one cup at a time, mixing on low speed after each addition to prevent a cloud of sugar from erupting. Once all the sugar is incorporated, increase the speed to medium-high and beat for another 2-3 minutes until the frosting is incredibly light, airy, and fluffy. If the frosting seems too thick, add the milk one tablespoon at a time until it reaches your desired spreadable consistency. If it’s too thin, you can add a little more sifted powdered sugar.
Step 3: Assembling and Decorating Your Funfetti Masterpiece
With your cake layers perfectly cooled and your luscious cream cheese frosting ready, it’s time for the exciting part – assembly and decoration! Place one cake layer on your serving platter or cake stand. Spread a generous, even layer of frosting over the top. Repeat this process with the second cake layer, and then carefully place the third and final cake layer on top. Once stacked, apply a thin “crumb coat” of frosting all over the entire cake – sides and top. This thin layer traps any loose crumbs, ensuring a smooth finish for your final frosting layer. Chill the cake in the refrigerator for about 15-20 minutes to set the crumb coat.
After the crumb coat is set, apply the remaining frosting more generously to cover the entire cake. Use an offset spatula or bench scraper to smooth out the sides and top for a professional look. Now for the grand finale – the sprinkles! Take your additional 2 cups of rainbow sprinkles and generously press them onto the sides and top of the cake until it is completely adorned with a vibrant, celebratory coating. Don’t be shy; more sprinkles mean more fun! Once decorated, your beautiful Funfetti Birthday Cake is ready to be served and enjoyed. Slice into its fluffy layers, reveal the colorful speckles, and delight in the joyous flavor!
Tips for the Perfect Funfetti Birthday Cake Every Time:
- Room Temperature Ingredients: Ensure butter, eggs, buttermilk, and cream cheese are all at room temperature. This allows them to emulsify properly, creating a smoother batter and frosting.
- Don’t Overmix: Overmixing develops gluten, leading to a tough, dry cake. Mix until just combined at each stage.
- Quality Sprinkles: Use jimmie-style sprinkles (the rod-shaped ones) as they are less prone to bleeding color into the batter compared to nonpareils (the tiny round ones).
- Sift Powdered Sugar: Sifting your powdered sugar for the frosting removes lumps, ensuring a silky-smooth finish.
- Cool Completely: Frosting a warm cake is a recipe for disaster! Patience during the cooling process is key.
- Crumb Coat: Don’t skip the crumb coat! It’s your secret weapon for a professional-looking, crumb-free final frosting layer.
Serving and Storage Suggestions:
This Funfetti Birthday Cake is best served at room temperature, allowing the frosting to be perfectly soft and the cake to be at its most tender. Pair it with a scoop of vanilla ice cream or a fresh berry compote for an extra special treat. Any leftover cake should be stored in an airtight container in the refrigerator for up to 3-4 days. For optimal freshness, bring it to room temperature for about 30 minutes before serving. You can also freeze individual slices, wrapped tightly in plastic wrap and then foil, for up to 2-3 months. Thaw in the refrigerator overnight before bringing to room temperature to serve.
Customization Ideas:
- Color Theme: Use sprinkles that match a specific party theme or color scheme.
- Flavor Variations: Add a teaspoon of almond extract for a subtle nutty flavor, or a touch of lemon zest for a brighter cake.
- Different Frosting: While cream cheese frosting is divine, a classic vanilla buttercream or even a chocolate ganache could also be used.
- Mini Cakes: Adapt this recipe to make adorable funfetti cupcakes or mini layered cakes for individual servings.
There’s a unique joy that comes with presenting a homemade cake, especially one as vibrant and cheerful as this Easy Funfetti Birthday Cake. It’s more than just a dessert; it’s a labor of love that speaks volumes. Whether you’re a seasoned baker or just starting your culinary journey, this recipe from The Stay At Home Chef provides all the guidance you need to create a memorable centerpiece for any celebration. Dive into the world of colorful baking, and enjoy the delicious results!
*All image credit for the inspiring visuals in this recipe belongs to The Stay At Home Chef via YouTube. We highly recommend following and subscribing to their channel for more fantastic recipes and baking tutorials!