
Craft Your Own Trendy No-Sew Handbag: Affordable DIY Fashion Statement
Are you tired of endlessly browsing for the perfect summer handbag, only to be deterred by the exorbitant prices of designer brands? Do you crave a unique accessory that truly reflects your personal style without emptying your wallet? If your answer is a resounding “yes,” then you’ve landed on the perfect guide! We understand the desire for fashionable accessories that don’t compromise on budget or individuality. That’s why we’re excited to share a fantastic DIY solution that allows you to create your very own trendy handbag without a single stitch.
Inspired by the brilliant tutorial from My things my way on YouTube, this no-sew handbag project is not only super cute and incredibly chic but also remarkably affordable. The best part? You can often make it by upcycling materials you might already have around your home, transforming everyday items into a stylish statement piece. Get ready to unleash your creativity and accessorize your outfits with a unique, handcrafted bag that’s sure to turn heads!
Why Choose a DIY No-Sew Handbag?
Embracing the world of DIY fashion, especially for accessories like handbags, offers a multitude of benefits beyond just saving money. Here’s why crafting your own no-sew handbag is a brilliant idea:
- Unleash Your Unique Style: Forget mass-produced bags! With DIY, you have complete control over the design, fabric choices, colors, and embellishments. This allows you to create a truly one-of-a-kind accessory that perfectly matches your personality and wardrobe.
- Budget-Friendly Fashion: Designer bags can cost hundreds, if not thousands. This DIY project significantly cuts down on expenses, allowing you to achieve a high-fashion look without the hefty price tag. You can even repurpose old clothes, curtains, or fabric scraps, making it even more economical.
- Eco-Conscious Choice: Upcycling materials not only saves you money but also contributes to a more sustainable lifestyle. By giving new life to old fabrics and cardboard, you reduce waste and minimize your environmental footprint.
- Beginner-Friendly: The “no-sew” aspect is a huge advantage for those who don’t own a sewing machine or lack sewing skills. This project relies primarily on precise cutting and strong adhesive, making it accessible to crafters of all experience levels.
- Sense of Accomplishment: There’s immense satisfaction in creating something beautiful and functional with your own hands. Every time you carry your DIY handbag, you’ll feel a sense of pride and accomplishment.
- Customizable for Any Occasion: Whether you need a casual everyday bag, a sophisticated evening clutch, or a vibrant summer accessory, this versatile design can be adapted. Simply choose different fabrics and decorative elements to suit various events and seasons.
Essential Materials Needed for This No-Sew Handbag Project
Before you dive into crafting your stunning new accessory, gathering all your materials is crucial. While the core items are simple, understanding their purpose will help you choose wisely and achieve the best results. For a visual and highly detailed material list, we highly recommend checking out the description box of My things my way’s YouTube video.
- Fabric Of Your Choice: This is where your personal style shines! Choose a fabric that is relatively sturdy yet pliable. Good options include sturdy cotton, canvas, denim, faux leather, upholstery fabric, or even a thick satin. Consider the pattern and color – will it complement your wardrobe? You’ll need enough for the main exterior of the bag.
- Cardboard: This forms the structural foundation of your handbag. Opt for sturdy cardboard, like that from an old shipping box or poster board, to ensure your bag holds its shape. Avoid flimsy cardboard.
- Black Dull-Faced Bridal Satin (or similar lining fabric): While bridal satin offers a luxurious feel and neat finish, any sturdy lining fabric will work. Its purpose is to cover the cardboard structure, providing a smooth interior and adding durability. A dark color is often chosen for practicality.
- Evostik Gum (or a strong fabric adhesive of your choice): This is your “no-sew” hero! A high-quality fabric glue or craft adhesive that forms a strong, permanent bond is essential. Ensure it’s suitable for both fabric and cardboard. Alternatives include heavy-duty craft glue, super glue (used sparingly), or a hot glue gun with strong, fast-drying sticks.
- Sharp Scissors: You’ll need a good pair of fabric scissors for clean, precise cuts on your chosen fabric. Dull scissors can fray edges and make the work frustrating.
- Razor Blade or Craft Knife: For cutting the cardboard, a razor blade or a sharp craft knife (like an X-Acto knife) will provide cleaner and straighter edges than scissors. Always use this with a cutting mat and extreme caution.
- Optional but Recommended Tools:
- Pencil or Marker: For tracing circles and lines.
- Ruler or Measuring Tape: For accurate measurements.
- Plate or Compass: For drawing perfect circles.
- Clips or Clothes Pins: To hold pieces together while the glue dries.
- Cutting Mat: To protect your work surface when using a razor blade.
- Decorative Elements: Think chains, buckles, magnetic snaps, tassels, appliques, or studs to personalize your bag further.
Crafting Your Custom No-Sew Handbag: A Step-by-Step Guide
Now that you have all your materials ready, let’s embark on the exciting journey of creating your very own no-sew handbag. Follow these detailed steps carefully for the best results.
Step One: Preparing Your Circular Stencils
Precision is key in this initial stage. Begin by selecting a round object, such as a dinner plate, a large bowl, or even a compass, to trace a large, perfect circle onto your sturdy cardboard. This will form the main shape of your handbag. Next, about an inch down from the top edge of this first circle, trace a slightly smaller circle inside it. This inner circle defines the opening of your bag. You will need to create four identical sets of these circular stencils. These four pieces will make up the front and back panels of your bag, including their underlying cardboard structure. Carefully cut out these cardboard stencils using your razor blade or craft knife for clean, sharp edges. Remember to also cut out the inner, smaller circle from each of the four stencils. This creates the window for your bag’s opening.
Image by My things my way via YouTube video.
Step Two: Applying Fabric to Your Main Panels
Take two of your cardboard stencils from Step One. These will be the structural base for the front and back of your bag. Lay one stencil onto the backside of your chosen main fabric. Apply an even layer of your fabric adhesive to one side of the cardboard stencil, making sure to go all the way to the edges. Carefully place the fabric over the glued stencil, pressing down firmly to ensure a strong bond and smoothing out any air bubbles or wrinkles. Allow adequate drying time as per your adhesive’s instructions. Once dry, trim the excess fabric around the outer edge of the stencil, leaving a small seam allowance if you wish, or cutting precisely along the cardboard edge for a crisp look. Critically, you will also need to cut out the middle circle of the fabric for the bag’s opening. Repeat this process for the second cardboard stencil, ensuring you create two well-covered main panels.
Step Three: Creating the Base and Side Strip
Now, let’s create the foundational strip that will give your bag its depth and form the bottom. Using your sturdy cardboard, measure and cut a rectangular stencil approximately 18 inches long by 3 inches wide. These dimensions are a great starting point, but you can adjust them to make your bag wider or narrower, shorter or taller. A longer strip will result in a wider bag. Use your razor blade or craft knife and a ruler to ensure perfectly straight and clean cuts for this piece, as it will be highly visible and crucial for the bag’s structure.
Step Four: Covering the Base Strip with Lining Fabric
This 18×3 inch strip needs to be covered beautifully to create a neat finish for the bag’s interior and exterior base. Take your black dull-faced bridal satin (or chosen lining fabric). Apply your fabric adhesive meticulously to both sides of the cardboard strip. Carefully adhere the satin fabric to both sides, pressing firmly and smoothing out any imperfections. Ensure the fabric is wrapped tightly around the cardboard and secured at the edges for a clean, professional look. This step provides durability and a polished aesthetic to the bag’s structural components.
Image by My things my way via YouTube video.
Step Five: Assembling the Main Structure
It’s time to bring your bag to life! Take the 18×3 inch covered strip and your two main circular panels (from Step Two, where the outer fabric is already attached). Carefully apply a strong line of adhesive along one long edge of the 18×3 inch strip. Then, align and attach it to the curved edge of one of your circular panels, starting from the bottom of where the bag would sit, and working your way up. You’ll be creating the side wall of the bag. Repeat this process for the other circular panel, attaching it to the opposite long edge of the 18×3 strip. Ensure that both circular panels are aligned symmetrically and that the base strip forms a clean curve between them. Use clips or clothes pins to hold the pieces in place while the adhesive fully cures. This step forms the core three-dimensional shape of your handbag.
Step Six: Adding the Decorative Outer Fabric and Finishing Touches
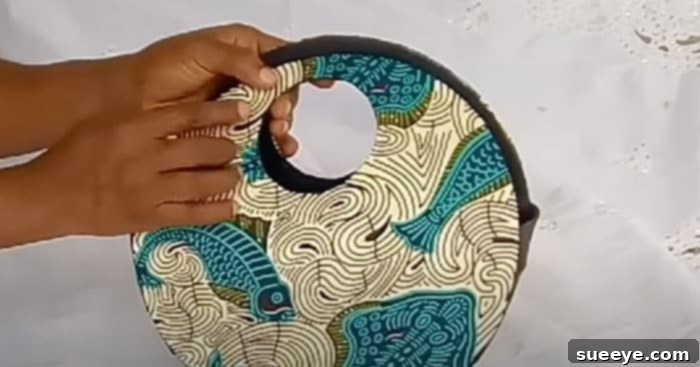
Almost there! Now, take the two remaining cardboard stencils (from Step One, which you cut the inner circles out of). These are your decorative front and back pieces. Apply your chosen patterned or main fabric to these two stencils, just as you did in Step Two, ensuring clean cuts and smooth adherence. Once these are ready and dry, carefully glue these finished patterned fabric pieces onto the *outer* side of the structure you created in Step Five. This is where your chosen design truly comes alive, giving your handbag its exterior appeal. Ensure they align perfectly with the underlying structural pieces. Allow the entire bag to dry thoroughly, ideally overnight, to ensure all adhesive bonds are strong and permanent.
After the glue is completely dry, your trendy new no-sew handbag is ready to be showcased! Fill it with your essentials and step out in style, knowing you created a unique fashion piece with your own hands.
Personalizing Your No-Sew Handbag: Make It Truly Yours
The beauty of DIY projects lies in the freedom to customize. While the basic structure is simple, countless ways exist to add your personal flair to your no-sew handbag:
- Fabric Play: Don’t limit yourself to one fabric! Mix and match patterns, textures, and colors. A plain body with a patterned flap, or a combination of faux leather and a vibrant print, can create stunning effects.
- Handles and Straps: Instead of simple fabric handles, consider adding a pre-made chain strap for a sophisticated look, or a leather strap for a more rustic feel. You can also craft braided fabric handles, or even use old belts!
- Embellishments Galore: This is where creativity knows no bounds.
- Appliques & Patches: Iron-on or glue-on patches can instantly transform the bag’s theme.
- Tassels & Fringe: Attach homemade or store-bought tassels to the zipper pull or side seams for a bohemian vibe.
- Beads & Sequins: Carefully glue on beads, pearls, or sequins for a glamorous evening bag.
- Studs & Rivets: For an edgy look, use screw-back studs or carefully glue on decorative rivets.
- Closures: While the basic design might be open, you can easily add a magnetic snap closure for security. Simply glue one half to the front panel and the other to the back panel’s inner top edge before the final exterior fabric is applied. Velcro is another easy, no-sew option.
- Internal Pockets: If you’re feeling ambitious, you can create small fabric pockets and glue them onto the inner lining before attaching the final exterior fabric, adding functionality to your custom bag.
Maintenance Tips for Your DIY Handbag
To ensure your handcrafted no-sew handbag remains beautiful and functional for as long as possible, a little care goes a long way:
- Spot Cleaning is Best: Since your bag is held together with adhesive, avoid fully submerging it in water. For minor spills or marks, gently spot clean with a damp cloth and mild soap. Always test a small, inconspicuous area first.
- Fabric Specific Care: If you used a specific fabric (e.g., faux leather, satin), follow general care guidelines for that material type.
- Avoid Overloading: While the cardboard structure is sturdy, overloading your bag with heavy items can stress the adhesive bonds and cause the bag to lose its shape.
- Proper Storage: When not in use, store your handbag in a dust bag or a clean pillowcase to protect it from dust and potential damage. Stuff it lightly with tissue paper to help it retain its shape.
- Re-Adhere if Needed: If any part of the fabric starts to lift over time, simply apply a small amount of fabric adhesive to re-secure it promptly.
Your New Favorite Accessory Awaits!
Congratulations! You’ve successfully navigated the steps to create a chic, personalized, and incredibly trendy no-sew handbag. This project is a testament to the fact that you don’t need a huge budget or advanced sewing skills to enjoy custom fashion. You’ve not only saved money but also created a unique piece that reflects your individual style and sustainability values.
We hope this detailed guide, inspired by the wonderful tutorial from My things my way, empowers you to explore more DIY fashion projects. Embrace the joy of crafting and the satisfaction of carrying an accessory that truly tells your story. Now go forth, enjoy your stunning new bag, and don’t be shy to share your beautiful creations with the world!