
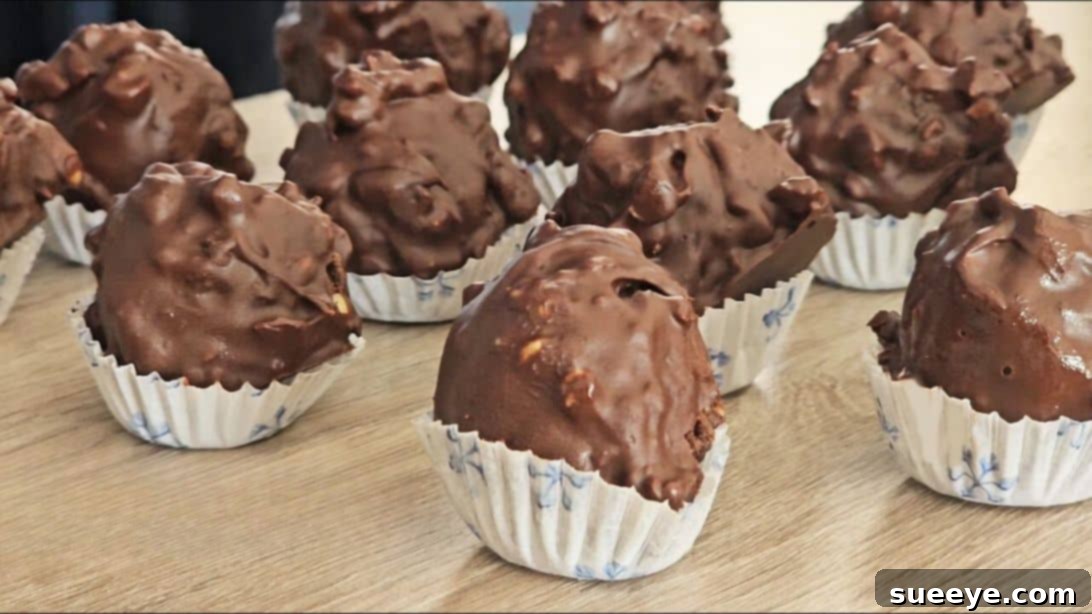
Irresistible No-Bake Chocolate Balls: Your Ultimate Easy Dessert Treat
Prepare to discover your new favorite dessert with this incredibly simple and utterly delicious no-bake chocolate balls recipe, originally inspired by the culinary creators at I am NOW!. Perfect for satisfying those chocolate cravings without ever needing to turn on your oven, these delightful treats combine wholesome ingredients with rich flavors and an irresistible crunch. Crafted from a luscious blend of softened dates, crunchy walnuts, aromatic cocoa powder, a hint of coconut oil, and an optional splash of milk, each ball is then generously enrobed in a velvety dark chocolate coating studded with finely chopped peanuts. The result? A perfectly textured, deeply satisfying, and highly addictive snack that promises to disappear as quickly as you make them.
Whether you’re looking for a quick dessert fix, a wholesome snack option, or a crowd-pleasing treat for gatherings, these no-bake chocolate balls tick all the boxes. Their elegant appearance belies their ease of preparation, making them suitable for beginner bakers and seasoned dessert enthusiasts alike. Get ready to impress your taste buds and guests with these fantastic, fuss-free chocolate wonders!
Why These No-Bake Chocolate Balls Are a Must-Try
Beyond their delightful taste, these chocolate balls offer a host of benefits that make them an essential addition to your recipe repertoire:
- Effortless Preparation: No baking required! The entire process involves simple blending, mixing, and melting, making it perfect for busy schedules or hot days.
- Wholesome Ingredients: Dates provide natural sweetness and fiber, while walnuts contribute healthy fats and protein, making these a relatively guilt-free indulgence.
- Customizable: Easily adapt the recipe with different nuts, dried fruits, or coatings to suit your preferences and dietary needs.
- Crowd-Pleasing: Their rich chocolate flavor and satisfying texture appeal to almost everyone, making them ideal for parties, potlucks, or family snacks.
- Perfect Texture: The combination of soft date-walnut filling and a crisp chocolate-nut shell creates an incredible mouthfeel that keeps you coming back for more.
- Quick to Make: From start to finish, these treats come together quickly, with only a short chilling time needed to firm them up.
What Exactly Are No-Bake Chocolate Balls?
No-bake chocolate balls, sometimes referred to as energy balls or bliss balls, are confections that don’t require an oven. Instead, they typically rely on ingredients that bind together when processed, often requiring refrigeration to firm up. In this particular recipe, the base is a mixture of dates and walnuts, which, when blended, form a sticky, pliable dough. This dough is then shaped into bite-sized balls and coated with melted chocolate, offering a rich and satisfying experience. They are celebrated for their simplicity, versatility, and ability to deliver a delicious dessert with minimal fuss.
Essential Ingredients for Your Delicious No-Bake Chocolate Balls
Creating these delectable treats requires a handful of accessible ingredients. Opting for quality ingredients will elevate the flavor and texture of your finished chocolate balls. Here’s what you’ll need:
- 5.3 oz (approx. 150g) of Dates: Medjool dates are highly recommended for their soft, caramel-like texture and natural sweetness. Soaking them overnight (or for at least a few hours) is crucial to soften them and make them easier to blend into a smooth paste. This also helps in creating a perfectly pliable dough.
- 2.12 oz (approx. 60g) of Ground Walnuts: Finely ground walnuts provide structure, a subtle nutty flavor, and healthy fats to the base mixture. You can grind them yourself from whole walnuts using a food processor or buy them pre-ground.
- 7 Whole Walnuts (chopped into small pieces): These are specifically for stuffing inside the chocolate balls, adding an extra layer of crunch and a delightful surprise with every bite.
- 3 Tablespoons of Bitter Cocoa Powder: Unsweetened cocoa powder is key to achieving that deep, rich chocolate flavor in the base, balancing the sweetness from the dates.
- 2 Tablespoons of Coconut Oil: This acts as a binder, helps create a smoother dough, and adds a subtle tropical note. It also contributes to the rich mouthfeel of the chocolate balls.
- 1 Splash of Milk (optional): A small amount of milk (dairy or non-dairy like almond or oat milk) can be added if your dough feels too dry and needs a little extra moisture to come together. Add it gradually to achieve the desired consistency.
- 1.4 oz (approx. 40g) of Peanuts (chopped into small pieces): These chopped peanuts are mixed into the melted dark chocolate coating, providing a fantastic crunchy texture and a salty-sweet contrast that enhances the overall flavor.
- 4.5 oz (approx. 125g) of 70% Dark Chocolate: High-quality dark chocolate is essential for the rich and luxurious coating. 70% cacao offers a beautiful balance of bitterness and sweetness. You can use chocolate chips or a chopped bar.
Step-by-Step Guide: Crafting Your Irresistible No-Bake Chocolate Treats
Follow these simple steps to create your batch of delicious no-bake chocolate balls. Precision in preparation will yield the best results!
Step 1: Prepare the Dates for Blending
Begin by carefully draining all the water from your pre-soaked dates. Place the softened dates on a clean chopping board. Each date contains a pit or seed, which must be removed before blending. Carefully slice each date open and extract the pit. Once pitted, cut the dates into smaller, manageable pieces. This step ensures easier blending and a smoother final dough consistency.
Step 2: Create the Date and Walnut Base
Transfer your chopped, pitted dates into a high-speed blender or food processor. Add the pre-ground walnuts to the blender. Process the mixture until it is well combined and forms a thick, sticky paste. You might need to pause and scrape down the sides of the blender a few times to ensure everything is thoroughly incorporated. The resulting mixture should be uniform and slightly crumbly yet able to hold its shape when pressed.
Step 3: Form the Chocolate Ball Dough
Transfer the date and walnut paste from the blender into a medium-sized mixing bowl. Now, add 3 tablespoons of bitter cocoa powder and 2 tablespoons of coconut oil. If your mixture feels too dry and isn’t coming together, add a splash of milk (dairy or non-dairy) gradually, just a teaspoon at a time, until the desired consistency is reached. Using a sturdy rubber spatula or clean hands, mix all the ingredients thoroughly until a firm, cohesive dough forms. This dough should be pliable and easy to work with. Once combined, cover the bowl and place it in the refrigerator for at least half an hour. This chilling period helps the dough firm up, making it much easier to shape.
Step 4: Shape and Fill Your Chocolate Balls
Remove the chilled dough from the refrigerator. To prevent the dough from sticking to your hands, lightly wet your palms with a little water. Take a small, spoonful amount of the mixture and roll it between your palms to form a smooth ball. Gently make a small indentation in the center of the ball. Carefully place a couple of the finely chopped whole walnuts into this indentation. Then, gently fold the sides of the dough over the nuts and reshape it into a perfect, round ball, ensuring the nuts are fully enclosed. Place the formed ball onto a clean plate or a baking sheet lined with parchment paper. Repeat this process with the remaining dough until all the chocolate balls are shaped and filled. Once completed, place the plate or baking sheet back into the refrigerator to chill for another 15-20 minutes, allowing them to firm up further before coating.
Step 5: Prepare the Crunchy Chocolate Coating
It’s time for the delicious chocolate coating! Using the double boiler method, gently melt the 70% dark chocolate. To do this, place a heat-proof bowl over a saucepan of simmering water, ensuring the bottom of the bowl does not touch the water. Stir the chocolate continuously until it is completely melted and beautifully smooth and glossy, with no lumps. Once melted, remove the bowl from the heat and carefully stir in the chopped peanuts. Mix them well until every piece is thoroughly coated with the rich dark chocolate. This creates a wonderfully textured and flavorful outer layer for your chocolate balls.
Step 6: Coat and Chill Your No-Bake Delights
Retrieve the chilled chocolate balls from the refrigerator. One by one, carefully drop each ball into the melted chocolate and peanut mixture. Use a fork or a skewer to roll and lift each ball, ensuring it is completely covered with the chocolate coating. Gently tap off any excess chocolate before carefully placing the coated ball onto a baking sheet lined with parchment paper. This parchment paper will prevent sticking and make for easy removal. Once all the balls are coated, return the baking sheet to the refrigerator for at least 30 minutes. This final chilling period allows the chocolate coating to set firmly, giving your no-bake chocolate balls their perfect finish and delightful crunch. Serve chilled and enjoy the fruits of your effortless labor!
Expert Tips for Perfecting Your No-Bake Chocolate Balls
Achieving the best results with your no-bake chocolate balls is easy with a few simple tricks:
- Soak Dates Thoroughly: Don’t skip or rush the date soaking process. Well-hydrated dates are key to a smooth, pliable dough that binds perfectly.
- Adjust Dough Consistency: If your dough feels too dry and crumbly, add milk (or water) sparingly, a teaspoon at a time, until it reaches a sticky yet manageable consistency. If it’s too sticky, try adding a tiny bit more ground walnuts or cocoa powder.
- Use a Food Processor: While a blender can work, a good food processor will make quick work of blending the dates and walnuts into a uniform paste.
- Chill the Dough: Refrigerating the dough twice (after mixing and after shaping) is essential. It prevents stickiness and helps the balls maintain their shape during coating.
- Wet Hands for Shaping: Lightly wetting your hands with water before shaping each ball will prevent the sticky dough from adhering to your palms, making the process much cleaner and easier.
- Double Boiler for Chocolate: The double boiler method ensures the chocolate melts smoothly without scorching. Avoid direct heat which can seize or burn the chocolate.
- Quality Chocolate Matters: Using good quality dark chocolate for the coating makes a significant difference in the final taste and texture of your treats.
- Experiment with Coatings: If you don’t have peanuts, or prefer another nut, feel free to substitute. Toasted shredded coconut, sprinkles, or a simple drizzle of white chocolate can also create beautiful finishes.
Delicious Variations to Customize Your Chocolate Balls
One of the best things about this no-bake recipe is its versatility. Feel free to get creative and customize your chocolate balls to suit your taste preferences:
- Nut Swaps: Instead of walnuts, try almonds, pecans, cashews, or even hazelnuts in the base or as the inner filling.
- Spice It Up: Add a pinch of cinnamon, a dash of cardamom, or a hint of chili powder to the date mixture for an exotic flavor profile.
- Citrus Zest: A teaspoon of orange or lemon zest mixed into the dough can add a bright, refreshing counterpoint to the rich chocolate.
- Nut Butter Infusion: Incorporate a tablespoon of peanut butter, almond butter, or cashew butter into the date mixture for extra richness and flavor.
- Different Coatings: Beyond dark chocolate and peanuts, consider coating them in milk chocolate, white chocolate, or a mixture of both. Roll them in shredded coconut, finely crushed pistachios, cocoa powder, or even colorful sprinkles for a festive touch.
- Add Extracts: A few drops of vanilla extract, almond extract, or peppermint extract can dramatically change the flavor profile.
- Dried Fruit Boost: Mix in a small amount of other finely chopped dried fruits like cranberries, cherries, or apricots into the dough for added chewiness and flavor.
Storage and Shelf Life for Your No-Bake Chocolate Balls
These no-bake chocolate balls are best enjoyed fresh, but they also store wonderfully, making them excellent for meal prep or making ahead for entertaining. To maintain their freshness, texture, and flavor:
- Refrigeration: Store the chocolate balls in an airtight container in the refrigerator for up to 1-2 weeks. Placing parchment paper between layers can prevent them from sticking together.
- Freezing: For longer storage, these chocolate balls freeze beautifully. Place them in a single layer on a baking sheet to freeze solid, then transfer them to a freezer-safe airtight container or bag. They can be stored in the freezer for up to 1-2 months. Thaw them in the refrigerator for a few hours or at room temperature for about 15-30 minutes before serving.
- Room Temperature: While they won’t spoil immediately, they are best kept chilled, especially if your kitchen is warm, to maintain the integrity of the chocolate coating and the firm texture of the balls. They can sit at room temperature for a couple of hours for serving.
Frequently Asked Questions About No-Bake Chocolate Balls
Q1: Can I make these chocolate balls vegan?
Absolutely! The recipe is almost entirely vegan. Just ensure you use a plant-based milk (like almond milk or oat milk) for the optional splash of milk, and verify that your dark chocolate is vegan-friendly (many 70% dark chocolates are, but always check the ingredients for dairy). Coconut oil is already plant-based, and dates and walnuts are naturally vegan.
Q2: Do I have to soak the dates?
While technically you can use un-soaked dates, soaking them is highly recommended. Soaked dates become much softer and easier to blend into a smooth, consistent paste, which is crucial for the dough’s texture. If you’re short on time, you can soak them in hot water for about 30 minutes, but overnight soaking in cool water yields the best results.
Q3: What if my chocolate coating seizes?
Chocolate seizing (becoming thick, grainy, and unworkable) usually happens when even a tiny drop of water gets into the melting chocolate or if it’s overheated. To prevent this, ensure your bowl and utensils are completely dry, and avoid letting the simmering water touch the bottom of your double boiler. If it does seize, sometimes you can rescue it by stirring in a tablespoon of hot coconut oil or shortening, but it’s often best to start over.
Q4: Can I omit the nuts if I have an allergy?
Yes, you can omit the nuts if you have an allergy. For the base, you could try using rolled oats or seeds (like sunflower or pumpkin seeds) processed into a flour-like consistency as a replacement for the ground walnuts, though the texture will be different. For the inner filling and coating, simply leave them out or use allergy-friendly alternatives like seeds or sprinkles if desired. Always be mindful of cross-contamination if preparing for someone with severe allergies.
The Irresistible Allure of No-Bake Desserts
No-bake desserts hold a special place in the hearts of home cooks and dessert lovers alike. Their appeal stems from their sheer simplicity, allowing for delicious creations without the complexities of oven temperatures, baking times, or intricate techniques. These chocolate balls perfectly embody that spirit – they are easy to assemble, require minimal equipment, and deliver maximum flavor. They represent a smart approach to dessert making, offering quick gratification and a refreshing alternative, especially during warmer months when firing up the oven is less appealing. Moreover, the emphasis on whole, natural ingredients like dates and nuts often makes no-bake treats a healthier option compared to their baked counterparts.
Conclusion: Enjoy Your Homemade No-Bake Chocolate Balls!
You’ve now mastered the art of creating these fantastic no-bake chocolate balls! With their rich chocolate flavor, delightful crunch from the nuts, and wholesome ingredients, they are truly a treat for any occasion. Perfect as an after-dinner indulgence, a quick energy boost, or a delightful gift, these balls are sure to become a staple in your kitchen. So go ahead, whip up a batch, and savor every single bite of these easy, irresistible, and utterly satisfying chocolate delights. Happy snacking!
Looking for more effortless dessert ideas? Check out these amazing no-bake recipes:
- 4-Ingredient Chocolate Balls Ready in 10 Minutes (for an even quicker fix!)
- Easy No-Bake Millionaire Pie Recipe
- Easy No-Bake Chocolate Peanut Butter Dessert Recipe
- Easy No-Bake Banana Pudding Pie Recipe