
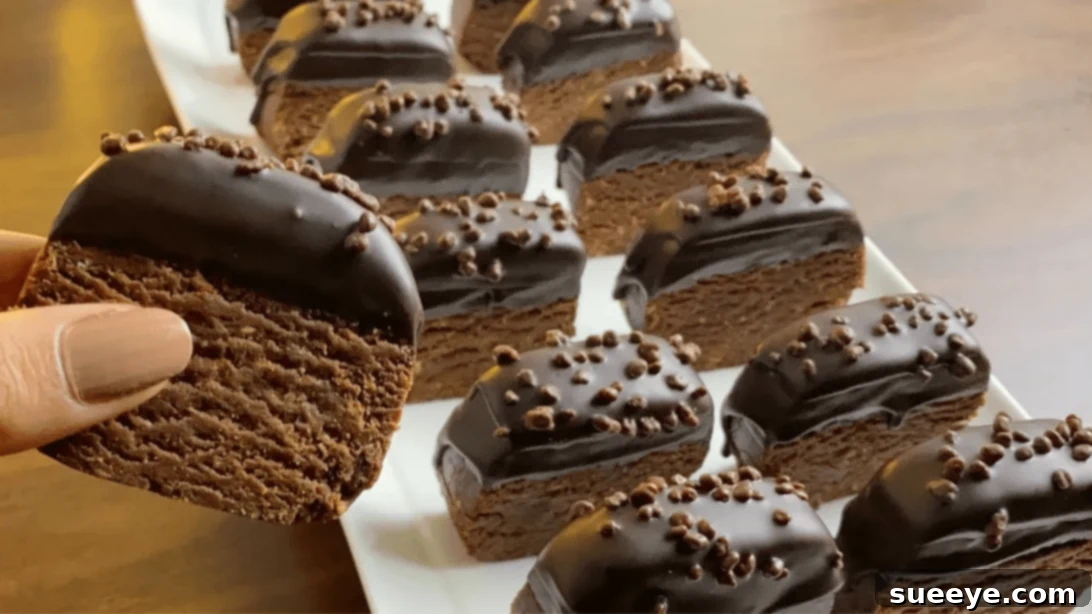
Welcome to a world of effortless indulgence! Our family adores sweet treats, and there’s nothing quite like a delightful dessert to round off a delicious meal. That’s why I’m always on the lookout for simple yet sensational recipes that can be prepared in advance and enjoyed at a moment’s notice. Today, I’m thrilled to share one of our absolute favorite go-to creations: an incredibly easy No-Bake Chocolate Candy that will revolutionize your dessert routine. Forget the oven and complicated steps; this recipe is all about pure, unadulterated chocolate bliss with minimal effort, perfect for anyone who loves homemade treats.
If you’re searching for the ultimate homemade sweet treat that requires no baking and comes together in a flash, you’ve found it. This recipe is not just a dessert; it’s a revelation for busy individuals, aspiring bakers, and anyone who loves the rich taste of chocolate. It’s ideal for impromptu gatherings, last-minute cravings, or simply keeping a stash of deliciousness in your refrigerator for when that sweet tooth strikes. Get ready to impress your friends and family with a treat that tastes far more complex than it truly is to make, all while enjoying the simple pleasure of a quick and easy dessert.
RELATED: 5-Ingredient No-Bake Oreo Truffles Recipe
This fantastic recipe, inspired by the talented EasyEats on YouTube, is a game-changer for anyone seeking an easy no-bake dessert. It’s incredibly quick to prepare, requires no oven, and the results are consistently delicious, making it an ideal choice for beginner bakers. Whether you’re a seasoned dessert enthusiast or just starting your culinary journey, you’ll find this no-bake chocolate candy recipe to be a delightful addition to your repertoire. Let’s dive in and discover how you can create these irresistible homemade chocolate candies right in your own kitchen.
Why You’ll Love This Easy No-Bake Chocolate Candy
There are countless reasons why this particular no-bake chocolate candy has earned its spot as a household favorite. Firstly, its simplicity is unmatched. The absence of baking means you don’t have to worry about preheating ovens, precise temperatures, or cakes rising. This makes it a fantastic project for kids to help with (under supervision, of course!), or for anyone who prefers a hands-off approach to dessert making. It’s truly a beginner-friendly chocolate recipe.
Secondly, the speed at which these homemade chocolate candies come together is a huge plus. From start to finish, the active preparation time is incredibly short, leaving you more time to focus on other tasks or simply relax. The chilling time is mostly passive, allowing the ingredients to meld and the candy to firm up perfectly, making it an excellent quick dessert solution for busy days.
Finally, the taste is simply divine. The clever combination of crushed crackers, rich cocoa, and sweet milk chocolate creates a unique texture and flavor profile that is both comforting and incredibly satisfying. It’s a delightful treat that appeals to almost everyone, making it perfect for parties, gifts, or just a personal indulgence. This no-bake treat provides all the joy of a sophisticated dessert without any of the stress.
Ingredients for Irresistible No-Bake Chocolate Candy:
Crafting these delectable no-bake chocolate candies requires just a handful of common pantry staples. The magic lies in how these simple ingredients come together to create something truly special and profoundly delicious.
- 350g or 12.3oz of Crackers: These are the foundational element of our candy, providing a subtle savory crunch that beautifully balances the sweetness of the chocolate. Plain, lightly salted crackers (like Ritz or saltines) work wonderfully, but you can also experiment with digestive biscuits or even graham crackers for a different flavor profile. The key is to crush them into very fine crumbs for a smooth dough texture that binds well.
- 2 tbsp of Powdered Sugar: Also known as confectioners’ sugar, this ingredient contributes significantly to the candy’s sweetness and helps create a smooth, homogenous mixture. Unlike granulated sugar, powdered sugar dissolves easily, preventing any gritty texture in your finished homemade chocolate candy.
- 4 tbsp of Cocoa Powder: For that rich, deep chocolate flavor, unsweetened cocoa powder is absolutely essential. It provides the core chocolate taste to the cracker base, enhancing the overall indulgence. Dutch-processed cocoa powder can be used for a darker color and milder chocolate flavor if preferred.
- ¼ cup of Melted Butter: Unsalted butter, melted and cooled slightly, acts as a crucial binding agent, bringing all the dry ingredients together to form a pliable dough. It also adds a touch of richness and helps in achieving that coveted melt-in-your-mouth texture that makes these no-bake candies so irresistible.
- ¾ cup of Milk: This liquid ingredient moistens the cracker crumbs and helps form the cohesive dough. The exact amount might vary slightly depending on the type of crackers you use and their absorbency, so be prepared to add a little more if the dough feels too dry. Whole milk typically yields the best results for richness, but any dairy or non-dairy milk alternative (like almond or soy milk) can also work effectively.
- 1 cup of Milk Chocolate Chips: These are primarily used for dipping and coating our cracker candies, providing a luscious, smooth outer shell. Milk chocolate offers a classic, sweet, and creamy taste that pairs perfectly with the slightly savory cracker base. You’ll want to have some extra on hand for additional topping and decoration. Feel free to use semi-sweet or dark chocolate chips if you prefer a less sweet or more intense chocolate flavor.
Essential Kitchen Tools for Your No-Bake Adventure:
While this easy chocolate candy recipe is incredibly simple, having the right kitchen tools can make the entire process even smoother, more efficient, and more enjoyable. Here’s what you’ll need to gather before you begin your no-bake candy journey:
- Food Processor or Blender: This is essential for quickly and efficiently crushing the crackers into those fine crumbs required for the perfect dough consistency. If you don’t own one, a sturdy Ziploc bag and a rolling pin will also do the trick, though it may require a bit more manual effort.
- Large Mixing Bowl: A spacious bowl is necessary for comfortably combining all your dry ingredients, then later incorporating the wet ingredients to form the cohesive cracker-chocolate dough.
- Spatula or Wooden Spoon: For mixing the ingredients thoroughly and ensuring everything is well incorporated without overworking the dough.
- Parchment Paper: Crucial for rolling out the dough without sticking to your work surface or the rolling pin. It also makes cleanup remarkably easy and helps in handling the dough.
- Rolling Pin: To flatten your dough into an even log or rectangle, ensuring uniform candy pieces.
- Measuring Cups and Spoons: For accurate ingredient measurements, which are important even in no-bake recipes to maintain consistency.
- Microwave-Safe Bowl or Double Boiler (Bain Marie): For melting your chocolate chips smoothly and preventing scorching. A double boiler offers more gentle heat, while a microwave is quicker with careful monitoring.
- Sharp Knife: A good quality, sharp knife is key for slicing the chilled dough into neat, uniform pieces without crumbling.
- Serving Platter or Baking Sheet Lined with Parchment Paper: For placing your dipped candies to set after coating, preventing them from sticking to the surface.
How to Make the Ultimate No-Bake Chocolate Candy:
Crafting these delightful no-bake treats is a straightforward process, broken down into a few simple steps. Follow along carefully to create your own batch of homemade chocolate happiness that everyone will adore.
Step 1: Crush, Mix, and Form the Dough
Begin by taking your chosen crackers and placing them into a food processor or a high-powered blender. Pulse the crackers until they are transformed into very fine crumbs. The finer the crumbs, the smoother and more uniform your chocolate candy will be. Once pulverized, carefully transfer these cracker crumbs into a large mixing bowl. To this bowl, add the powdered sugar and cocoa powder. Use a spatula or whisk to thoroughly combine these dry ingredients, ensuring an even distribution of flavor and a consistent chocolate color throughout the cracker base. Next, pour in the melted butter and the milk. Start with the recommended ¾ cup of milk, mixing vigorously until all ingredients are well incorporated and a cohesive dough begins to form. The dough should be moist enough to hold together when pressed and shaped, but it should not be overly sticky. If the dough seems too dry and crumbly, add a tiny bit more milk, a tablespoon at a time, until the desired pliable consistency is achieved. Conversely, if it’s too wet and sticky, you can add a tablespoon or two of extra cracker crumbs to balance the moisture.
Step 2: Roll, Chill, and Slice
Once your chocolate cracker dough is perfectly mixed and has the right consistency, transfer it onto a piece of parchment paper. Using your hands, gently form the dough into a rough log or rectangle shape. Then, place another piece of parchment paper on top and use a rolling pin to roll the dough into a uniform log or rectangle, aiming for a thickness of approximately 1 to 1.5 inches. Strive for an even thickness across the entire length of the dough to ensure consistent candy sizes when slicing later. Secure both ends of the parchment paper around the dough, wrapping it tightly. This not only helps maintain its shape but also prevents the dough from drying out in the refrigerator and helps it firm up properly. Carefully place the wrapped dough into the refrigerator and allow it to chill for a minimum of 2 to 3 hours. This chilling period is absolutely crucial as it allows the butter to solidify, the cracker crumbs to fully absorb the moisture, and the dough to firm up, making it much easier to slice neatly without crumbling. Once thoroughly chilled and hardened, unwrap the dough and use a sharp knife to slice it into thick, uniform pieces, about ½ to ¾ inch thick.
Step 3: Melt, Dip, and Decorate
Now for the most delicious part – coating your candies! Place your milk chocolate chips in a microwave-safe bowl or in the top of a double boiler (bain-marie) set over simmering water. If using a microwave, heat the chocolate in short 20-30 second intervals, stirring well after each interval, until the chocolate is completely melted and smooth. Be careful not to overheat the chocolate, as it can seize and become lumpy. If using a double boiler, stir consistently until you achieve a glossy, smooth consistency. Once your chocolate is perfectly melted, take each sliced candy bar and dip it halfway into the luscious melted chocolate. You can coat one end, both ends, or even fully immerse them – the choice is entirely yours! Gently shake off any excess chocolate and then place the dipped candy pieces onto a serving platter or baking sheet lined with fresh parchment paper. You can stand them upright or lay them flat. While the chocolate is still wet, feel free to decorate the top or dipped side with additional chocolate chips, colorful sprinkles, a delicate sprinkle of sea salt, or even finely chopped nuts for extra texture and visual appeal. Allow the candies to set for a few minutes at room temperature, or for quicker setting, place them in the refrigerator for about 10-15 minutes until the chocolate shell is completely firm. Serve and enjoy these irresistible homemade no-bake chocolate candies!
Tips for the Perfect No-Bake Chocolate Candy
To ensure your no-bake chocolate candies turn out absolutely perfect and delicious every single time, consider incorporating these helpful tips into your preparation process. These small details can make a big difference in the final texture and taste of your homemade treats.
- Achieve Fine Crumb Consistency: Aim for very fine cracker crumbs. Any larger pieces can make the dough lumpy and harder to form evenly, affecting the candy’s texture. A food processor is your best friend here, ensuring uniform, fine crumbs.
- Master Dough Moisture: The dough should be pliable and hold its shape well, but it should not be overly sticky or crumbly. Adjust milk or cracker crumbs sparingly until you achieve the right consistency. Too dry, and it crumbles; too wet, and it’s difficult to handle and shape properly.
- Embrace the Chill Time: Do not rush the chilling process. A minimum of 2-3 hours ensures the dough is firm enough to slice cleanly without falling apart and prevents the candies from melting too quickly when dipped in warm chocolate. Overnight chilling is even better for optimal firmness.
- Melt Chocolate Properly: Overheating chocolate can cause it to seize, becoming thick, grainy, and unusable for dipping. Use a double boiler for gentle, even melting, or microwave in short 20-30 second bursts, stirring frequently between each interval. Add a teaspoon of coconut oil or vegetable shortening if your melted chocolate seems too thick for smooth dipping.
- Slice Evenly for Presentation: Use a sharp knife and wipe it clean between slices for neat, uniform candy pieces. This not only makes them look professional but also ensures consistent portion sizes.
- Get Creative with Toppings: Don’t limit yourself to just chocolate chips for decoration! Experiment with colorful sprinkles, finely chopped nuts (pecans, walnuts, almonds), shredded coconut, a delicate dusting of sea salt for a sweet and salty contrast, or even a drizzle of contrasting white chocolate for an elegant touch.
Creative Variations and Customizations for Your No-Bake Candies
While the classic No-Bake Chocolate Candy is undeniably delicious, this recipe is incredibly versatile and open to creative adaptations. Don’t hesitate to experiment with different ingredients and toppings to make these homemade treats uniquely yours and cater to various tastes.
- Explore Cracker Choices: Beyond plain crackers, consider using graham crackers for a s’mores-like flavor base, digestive biscuits for a more European touch, or even gluten-free crackers to accommodate specific dietary needs. Each cracker type will bring a slightly different flavor and texture.
- Experiment with Chocolate Types: Swap out milk chocolate for dark chocolate for a richer, less sweet candy experience, or use semi-sweet chocolate for a beautifully balanced flavor profile. You could also use white chocolate for a different aesthetic and a creamy, distinct taste.
- Boost Flavors with Extracts and Spices: Mix in a teaspoon of vanilla extract, a pinch of cinnamon, or even a tiny amount of instant coffee powder (espresso powder) into the dry ingredients for added depth and complexity of flavor. A drop or two of peppermint extract can instantly transform these into festive holiday treats.
- Add Nutty Delights: Fold in finely chopped toasted nuts (like pecans, walnuts, or almonds) directly into the cracker dough for an extra layer of crunch, richness, and nutty flavor that complements the chocolate beautifully.
- Infuse with Dried Fruit: Incorporate finely chopped dried cranberries, cherries, or apricots into the dough for a chewy texture and a burst of fruity sweetness that contrasts wonderfully with the chocolate.
- Try Unique Coatings: After dipping in chocolate, consider rolling the candies in toasted coconut flakes, crushed peppermints for a holiday twist, colorful sprinkles for a festive look, or even finely crushed pretzels for an exciting sweet and salty combination.
Storage and Shelf Life of Your No-Bake Chocolate Candy
One of the many fantastic benefits of this easy no-bake chocolate candy is its excellent shelf life, making it perfect for preparing ahead of time, enjoying over several days, or even freezing for future indulgence. Proper storage ensures your treats remain fresh and delicious.
- Refrigerator Storage: Store your finished, set candies in an airtight container in the refrigerator for up to 1-2 weeks. To prevent them from sticking together, lay them in a single layer or separate layers with sheets of parchment paper. Chilling also keeps them firm and prevents the chocolate from melting too easily.
- Freezer Storage: For longer preservation, these homemade chocolate candies freeze beautifully! Once the chocolate coating has completely set, place them in a single layer on a baking sheet and freeze until solid. Then, transfer them to an airtight, freezer-safe container or bag. They can be stored in the freezer for up to 1-2 months. When you’re ready to enjoy them, thaw in the refrigerator for a few hours, or for a firmer, chewier texture, you can even enjoy them straight from the freezer.
Serving Suggestions for Your No-Bake Treats
These versatile and incredibly delicious no-bake chocolate candies are perfect for a wide variety of occasions and can be enjoyed in many ways. Their simple elegance makes them suitable for almost any setting.
- Everyday Sweet Treat: Keep a batch readily available in the fridge for a quick, satisfying dessert after dinner, a delightful afternoon pick-me-up, or a guilt-free late-night indulgence.
- Elegant Party Platter Addition: Arrange them beautifully on a platter for birthday parties, holiday gatherings, potlucks, or any celebration. Their appealing appearance belies their incredibly easy preparation, making them a crowd-pleaser.
- Thoughtful Homemade Gifts: Package them in pretty boxes, decorative bags, or charming jars as thoughtful, homemade gifts for friends, family, neighbors, or teachers. A handmade gift always feels special.
- Coffee or Tea Companion: Pair these rich chocolate candies with a warm cup of freshly brewed coffee, a comforting mug of tea, or even a cold glass of milk for a truly satisfying and cozy moment.
- Dessert Bar Feature: Set up a DIY dessert bar with these candies alongside other small treats, allowing guests to choose their favorites.
The Magic of No-Bake Desserts
No-bake desserts hold a truly special place in the culinary world, offering a unique blend of convenience, creativity, and undeniable deliciousness. They are perfect for those sweltering summer days when turning on the oven is the last thing you want to do, or for times when you need a quick dessert without the fuss of complex baking techniques and extensive cleanup. This particular no-bake chocolate candy recipe perfectly exemplifies everything wonderful about this category: simple, accessible ingredients, minimal specialized equipment, and consistently impressive results. These recipes prove that you don’t need a fancy kitchen, advanced baking skills, or hours of dedicated time to create something truly remarkable and satisfying. They represent the ultimate in culinary ease and indulgence, allowing everyone to enjoy homemade goodness with minimal effort.
Frequently Asked Questions (FAQ) About No-Bake Chocolate Candy
Here are some common questions you might have about making these delightful no-bake chocolate candies, along with helpful answers to ensure your success.
- Can I use other types of crackers? Absolutely! While plain, lightly salted crackers provide a neutral base that lets the chocolate shine, feel free to experiment with graham crackers for a different, sweeter profile, digestive biscuits for a more crumbly texture, or even slightly sweetened butter biscuits for a richer flavor. Just ensure they crush well into fine crumbs.
- What if my dough is too sticky or too dry? If the dough is too sticky to handle, add a tablespoon or two of extra cracker crumbs until it reaches a manageable, pliable consistency. If it’s too dry and crumbly to hold its shape, add milk, half a tablespoon at a time, mixing well after each addition, until it comes together into a cohesive dough.
- How long do these candies last? When stored properly in an airtight container in the refrigerator, these no-bake chocolate candies will stay fresh and delicious for an impressive 1 to 2 weeks, making them perfect for advance preparation.
- Can I use dark chocolate instead of milk chocolate? Yes, you absolutely can! Dark chocolate will lend the candies a richer, more intense flavor profile and a less sweet finish. Semi-sweet chocolate chips are also a fantastic option if you prefer something in between milk and dark chocolate.
- Can I freeze these candies? Yes, they freeze wonderfully! Once the chocolate coating has fully set, place the candies in a single layer on a baking sheet and freeze until solid. Then, transfer them to a freezer-safe bag or airtight container for up to 1-2 months. Thaw them in the refrigerator before serving, or enjoy them straight from the freezer for a firmer, chewier treat.
- Do I have to use a food processor for the crackers? No, you don’t. While a food processor makes the job quick and easy, you can also place the crackers in a sturdy Ziploc bag and crush them thoroughly with a rolling pin or the bottom of a heavy pan. Just ensure they are as finely crushed as possible for the best dough consistency.
*All these amazing images are thanks to EasyEats via YouTube. Do visit her channel to see more delightful videos and recipes like this!
Indulge in Homemade Bliss: The Easy No-Bake Chocolate Candy Recipe
There you have it – a truly effortless and incredibly delicious recipe for No-Bake Chocolate Candy. It’s a testament to the fact that you don’t need a lot of time, a complicated oven, or specialized skills to create something wonderfully sweet, satisfying, and perfect for any occasion. This recipe offers a delightful combination of textures and flavors, from the slightly savory and tender cracker base to the rich, smooth chocolate coating. Whether you’re making them for your beloved family, a festive party, or simply for yourself to enjoy as a quiet indulgence, these homemade chocolate candies are sure to be a resounding hit. So go ahead, gather your ingredients, follow these simple steps, and prepare to indulge in some homemade bliss. Happy no-baking, and enjoy every single bite of these irresistible treats!