
Master the Classic Jacob’s Ladder Quilt Block: A Beginner’s Guide
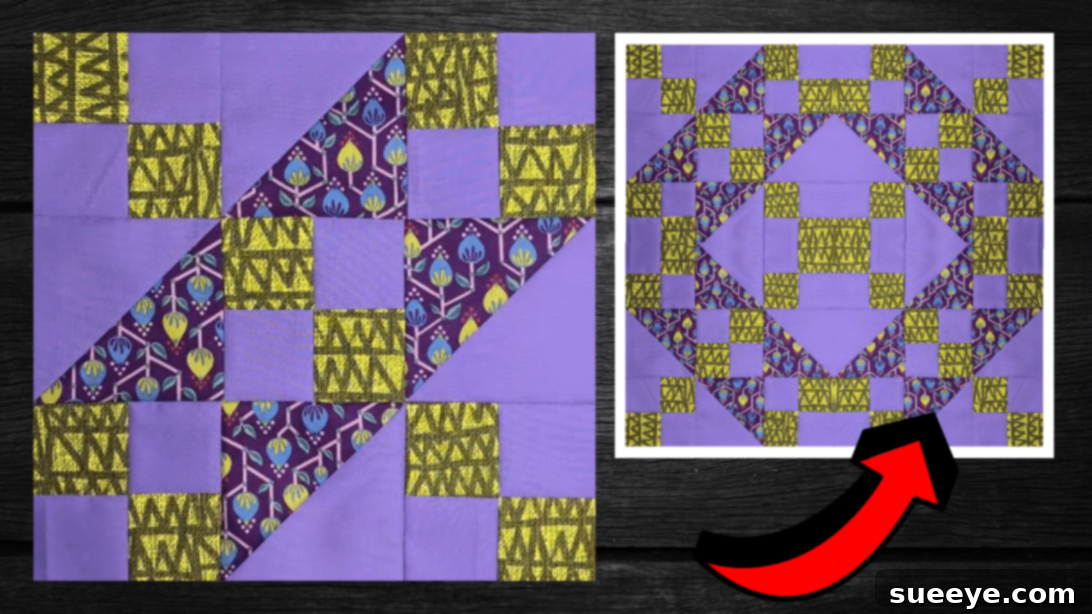
Embark on your quilting journey or rediscover a timeless favorite with the Jacob’s Ladder quilt block. This project is a cherished classic, celebrated for its striking visual appeal and surprising ease of assembly, making it an ideal choice for both aspiring quilters and seasoned crafters looking for a quick and satisfying make. Requiring just three distinct fabrics, you have endless opportunities to play with color and print combinations, ensuring each block you create is uniquely yours.
The Jacob’s Ladder block, named for its resemblance to the biblical ladder to heaven, is constructed from simple units: half-square triangles (HSTs) and four-patch blocks. This foundational design allows for incredible versatility, whether you’re creating a full quilt, a charming table runner, or decorative placemats. Its repetitive nature also makes it a wonderfully meditative project, perfect for unwinding on a weekend afternoon or dedicating a few focused hours to your craft.
Ready to stitch your way to a beautiful quilt block? Follow our detailed instructions below, and for a visual walkthrough, be sure to watch the helpful video tutorial by Sewers Club on YouTube. Let’s gather our materials and begin creating something truly special!
RELATED: Easy Large Tulip Quilt Tutorial for Beginners
Essential Materials for Your Jacob’s Ladder Quilt Block
Successful quilting begins with having the right tools and materials. For the Jacob’s Ladder block, we keep it simple, focusing on key fabrics and basic sewing equipment. Ensure all your fabrics are pre-washed and pressed to prevent shrinking and achieve the crispest cuts and stitches.
- Background Fabric: This fabric provides the base for your design, often a light or solid color, but feel free to experiment with a subtle print that complements your other choices.
- Dark Print Fabric: Choose a fabric with a darker value or a bold print to create contrast and define the “ladder” effect.
- Light Fabric: A lighter value fabric, possibly a contrasting solid or a delicate print, will highlight the intricate piecing of the four-patch units.
- Marking Pen, Pencil, or Chalk: Essential for drawing accurate cutting and stitching lines on your fabric. A fine-tipped fabric marker is often preferred for precision.
- Ruler: A clear acrylic quilting ruler with precise measurements is indispensable for accurate cutting and squaring up your blocks.
- Needle and Thread: High-quality thread that matches your fabric or is a neutral color is key. Use a sharp sewing machine needle appropriate for your fabric type.
- Scissors or Rotary Cutter and a Cutting Mat: A rotary cutter with a self-healing mat offers the most efficiency and accuracy for cutting fabric strips and squares. Sharp fabric scissors are also vital for trimming.
- Iron and Ironing Board: Crucial for pressing seams flat and crisp at every stage of the quilting process. Remember, pressing is not ironing; it involves lifting and lowering the iron, not sliding it.
- Sewing Machine: A reliable sewing machine with a good quarter-inch foot will make your piecing much smoother and more accurate.
- Pattern Download: (Click here to download your free Jacob’s Ladder quilt block pattern) Print this pattern to ensure you have all the correct cutting dimensions for your fabrics.
Mastering the Jacob’s Ladder Quilt Block: A Step-by-Step Guide
This tutorial breaks down the Jacob’s Ladder block into manageable steps, focusing on accuracy and efficient piecing techniques. Remember that precision in cutting and a consistent 1/4-inch seam allowance are your best friends in quilting!
Step 1: Crafting Perfect Half-Square Triangles (HSTs)
The half-square triangle (HST) is a fundamental unit in quilting, forming the diagonal lines in your Jacob’s Ladder block. You will need to create several of these units, combining your background fabric with your dark print fabric. Start by downloading and printing your pattern, then carefully cut your large background and dark print squares according to the pattern’s specifications. Accurate cutting is paramount for perfectly matched points later on.
To create an HST, take one background square and one dark print square. Place them right sides together, ensuring all edges are perfectly aligned. Using your marking tool and ruler, draw a diagonal line from one corner to the opposite corner on the back (wrong) side of the lighter fabric square. This line will serve as your guide for stitching and cutting.
Now, take your unit to the sewing machine. Stitch a seam a scant 1/4 inch away from your drawn line on both sides. This means your stitching lines will be parallel to and on either side of the diagonal line you drew. Stitch slowly and steadily to maintain an accurate seam allowance. Once stitched, use your rotary cutter and ruler to carefully cut along the original diagonal line. This will yield two half-square triangle units from each pair of squares.
Press the seams of your newly formed HSTs. For best results and to reduce bulk, press the seam allowance towards the darker fabric. This technique, known as “pressing to the dark side,” helps conceal the seam allowance and creates a flatter, more stable block. Trim your HSTs to the size specified in your pattern, ensuring they are perfectly square. A specialty HST ruler can be very helpful for this step, but a regular quilting ruler works well too.
Step 2: Assembling the Four-Patch Units
Next, we will create the four-patch blocks, which are another essential component of the Jacob’s Ladder design. These units are made from smaller squares and contribute to the “ladders” and “stars” within the block. Gather your small light and background squares as instructed by your pattern. You will need two of each color for each four-patch unit you create.
Lay out your small squares to form a four-patch unit. Typically, this involves alternating the light and background squares in a checkerboard fashion (e.g., light, background; background, light). This arrangement ensures the contrasting visual effect of the four-patch.
Stitch the squares together in pairs. For instance, sew the top left light square to the top right background square, and then sew the bottom left background square to the bottom right light square. Use a consistent 1/4-inch seam allowance for these seams. After stitching each pair, press the seams. For the top pair, you might press the seam to the dark fabric. For the bottom pair, press the seam to the light fabric (or the opposite direction from the top pair). This creates “nesting seams” when you join the two pairs, allowing your seams to lock together for a flatter and more accurate finish.
Once your pairs are sewn and pressed, align them carefully, right sides together, ensuring the center seams nest perfectly. Stitch the two pairs together to complete your four-patch unit. Give the final seams a good press, again aiming for flatness. You’ll make several of these four-patch units, depending on the size of your final Jacob’s Ladder block and how many blocks your overall project requires.
Step 3: Bringing it All Together – The Jacob’s Ladder Block Assembly
Now that you have your half-square triangles and four-patch units ready, it’s time to assemble them into the iconic Jacob’s Ladder block. Refer to your pattern or the video tutorial by Sewers Club to see the correct layout for the block. The Jacob’s Ladder block is typically arranged in a 3×3 grid, where HSTs and four-patch units are strategically placed to create the “ladder” effect.
Carefully arrange your HSTs and four-patch units on your workspace, following the pattern’s diagram. Take a moment to ensure all units are oriented correctly – the direction of the half-square triangles is crucial for the design to emerge properly. Once satisfied with the layout, you will begin stitching them together in rows.
Take the units from the first row and sew them together, end to end, using your reliable 1/4-inch seam allowance. As you sew, pay attention to how the seams from adjacent units meet. If you pressed your seams in opposing directions in the previous steps, you should find that they “nest” together beautifully, helping you achieve perfectly aligned points. After stitching the first row, press the seams. For the first row, you might press all seams in one direction (e.g., to the left). Repeat this process for the second and third rows, pressing the seams of the second row in the opposite direction (e.g., to the right), and the third row in the same direction as the first. This prepares your rows for seamless joining.
Finally, with your three rows pieced and pressed, align the first row with the second row, right sides together. Ensure all intersection points are precisely matched. Pin generously, especially at the seam intersections, to prevent shifting. Stitch the first two rows together. Then, align and stitch the third row to the combined first two rows. After each row is joined, give the entire block a thorough and final press. Lay the block flat on your ironing board, apply gentle pressure with the iron, and allow the heat to set the seams. This final pressing step is crucial for a flat, professional-looking block.
Once assembled and pressed, it’s a good practice to “square up” your Jacob’s Ladder block. Using your rotary cutter and a large square ruler, trim the block to the exact dimensions specified in your pattern. This ensures all your blocks are uniform in size, making the final assembly of a larger quilt much easier and more accurate.
Choosing Your Fabrics: Creating a Stunning Jacob’s Ladder
The beauty of the Jacob’s Ladder quilt block largely lies in your fabric choices. With only three fabrics required – a background, a dark print, and a light fabric – the possibilities are truly endless. Consider the following when selecting your fabrics:
- Contrast is Key: Ensure a clear difference in value between your dark and light fabrics. This contrast is what makes the “ladder” design pop. A medium fabric can bridge the two, or you can opt for high contrast for a more dramatic effect.
- Color Palette: Decide on a color scheme. Do you want warm tones, cool tones, or a vibrant mix? Analogous colors (colors next to each other on the color wheel) create a harmonious look, while complementary colors (opposite on the color wheel) offer dynamic visual tension.
- Print Scale: Think about the scale of your prints. Large, busy prints might get lost in the smaller pieces of the block. Smaller, more subtle prints or solids often work best for the detailed piecing, allowing the block’s design to shine.
- Background Impact: Your background fabric doesn’t have to be white or cream. A light blue, soft gray, or even a very subtle patterned fabric can provide an interesting base without overwhelming the main design elements.
Tips for Quilting Success
To ensure your Jacob’s Ladder journey is smooth and enjoyable, keep these tips in mind:
- Accurate Cutting: This cannot be stressed enough. Small inaccuracies in cutting accumulate quickly and can lead to distorted blocks. Use a sharp rotary blade and a non-slip ruler.
- Consistent Seam Allowance: A perfect 1/4-inch seam allowance is the cornerstone of accurate piecing. Practice on scrap fabric if you’re unsure. A specialized 1/4-inch foot for your sewing machine can be a game-changer.
- Press, Don’t Iron: As mentioned, pressing involves lifting and placing the iron, not sliding it. This prevents stretching your fabric and distorting your pieced units.
- Chain Piecing: For repetitive units like HSTs, consider chain piecing. Stitch one unit, then feed the next unit directly under the needle without cutting your thread. This saves time and thread.
- Take Breaks: Quilting should be enjoyable! If you’re feeling frustrated, step away for a bit and come back with fresh eyes.
*All image credit belongs to Sewers Club via YouTube. Follow and subscribe to her channel for more inspiring quilting tutorials!
Your Journey into Quilting Begins Here
The Jacob’s Ladder quilt block is more than just a pattern; it’s a gateway to understanding fundamental quilting techniques and experiencing the joy of creating something beautiful with your own hands. By mastering half-square triangles and four-patch units, you’re building a strong foundation for tackling countless other quilt designs.
Whether you’re making a single block to practice your skills or envisioning an entire quilt, the process of bringing these fabric pieces together is incredibly rewarding. Experiment with different fabric choices, envision new color palettes, and most importantly, enjoy every stitch of your creative journey. The Jacob’s Ladder block offers a perfect blend of challenge and satisfaction for any quilter. We hope this comprehensive tutorial empowers you to create stunning blocks and fosters a lifelong love for the art of quilting. Happy stitching!