
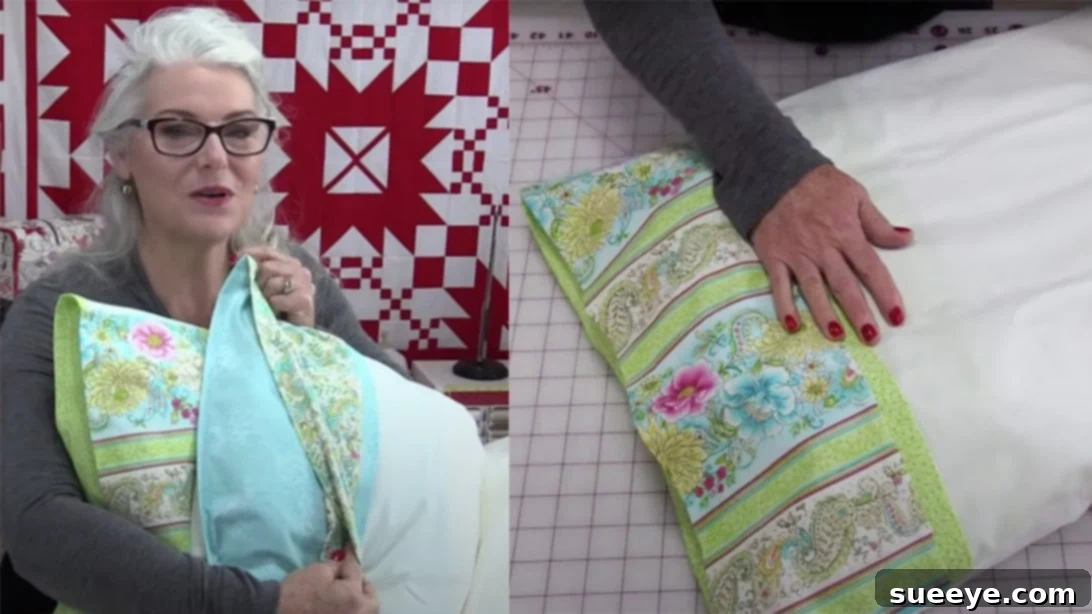
Are you looking to elevate your home decor with custom touches, or perhaps you’re simply tired of your pillows slipping out of their cases? A handmade pillowcase with a hidden flap, often called an envelope pillowcase, offers both elegance and practicality. Not only does it secure your pillow neatly inside, providing a polished look, but it also eliminates the need for buttons or zippers, making it extra comfortable for sleeping. This comprehensive tutorial, inspired by the clear instructions from SewVeryEasy on YouTube, will guide you through creating your very own custom pillowcase with an elegant envelope closure. You’ll learn essential sewing techniques and adapt the project to fit any pillow size, resulting in a professional-looking finish that you’ll be proud to display.
This project is perfect for sewers of all skill levels, especially those looking to expand their fundamental sewing repertoire. We’ll cover everything from selecting the right fabrics to mastering a neat rolled hem and assembling your pillowcase with precision. Get ready to transform your living space or bedroom with a touch of personalized comfort and style!
Essential Materials for Your Flap Pillowcase Project
Before diving into the sewing process, gathering all your materials is crucial for a smooth and enjoyable experience. The beauty of this project lies in its simplicity and the ability to customize it with your favorite fabrics. Here’s what you’ll need:
- Three Coordinated Fabrics: Selecting your fabrics is arguably the most exciting part! You’ll need three different patterns or solid colors that complement each other.
- Main Body Fabric: This will be the primary color or pattern for the front and back of your pillowcase. A nice, light color often works well, but feel free to choose something that matches your existing decor. Cotton or cotton blends are ideal for their breathability, comfort, and ease of sewing.
- Main Cuff Fabric: This fabric will form the wide band at the opening of your pillowcase. It’s an opportunity to introduce a contrasting color or a bold pattern.
- Decorative Accent Fabric: A smaller piece, this fabric is used for a narrow trim or band, adding a subtle touch of elegance or a pop of color between the body and cuff. A delicate floral print or a solid coordinating color can work wonders here.
Pro Tip: Always pre-wash and dry your fabrics before cutting. This prevents shrinkage and ensures colors won’t bleed after your pillowcase is finished.
- Sharp Fabric Scissors or Rotary Cutter: Essential for precise fabric cuts. If using a rotary cutter, ensure you have a self-healing mat.
- Matching Thread: Choose a high-quality polyester all-purpose thread that matches your main body fabric or blends well with all your chosen fabrics.
- Sewing Machine: Any standard sewing machine will work for this project. Ensure it’s in good working order and you have a fresh needle.
- Pins or Fabric Clips: To hold fabric pieces together securely before sewing.
- Tape Measure or Quilting Ruler: For accurate measurements and straight cuts. A clear quilting ruler can be particularly helpful.
- Iron and Ironing Board: Pressing seams as you go is vital for a professional finish and makes subsequent steps much easier.
Step-by-Step Directions: Crafting Your Custom Envelope Pillowcase
This pillowcase design involves several key components: the main body (front and back), the large decorative cuff, the accent band, and an inner flap. All pieces will share the same width, which will be determined by your pillow. The key difference lies in their length.
Step 1: Accurate Fabric Measurements and Cutting
Precise cutting is paramount for a professional-looking pillowcase. Begin by measuring your actual pillow. A standard pillow is typically around 20 inches wide by 26 inches long. For our calculations, we’ll generally assume a standard width, but you can easily adjust it to fit queen (20″x30″) or king (20″x36″) sizes.
Determine Your Pillowcase Width:
Measure the width of your pillow. Let’s say it’s 20 inches. To ensure a comfortable fit and account for seam allowances, add 1 inch to this measurement. So, for a 20-inch wide pillow, your fabric width will be 21 inches. This width will be consistent across all your cut pieces.
Cutting the Lengths of Each Fabric Piece:
- Main Body Front Piece: This piece will form the main visible front of your pillowcase. Cut this fabric to your determined width (e.g., 21 inches) by 30 inches long. This length includes sufficient allowance for the top and bottom seams.
- Main Body Back Piece (Flap Foundation): This piece forms the main part of the back, which will include the inner flap. Cut this fabric to your determined width (e.g., 21 inches) by 36 inches long. The extra length here is crucial for creating the effective inner flap that holds your pillow in place.
- Main Cuff Fabric: This forms the wide decorative band at the pillowcase opening. Cut this fabric to your determined width (e.g., 21 inches) by 12.5 inches long.
- Inside Flap Cover Fabric: This piece will be sewn to the back piece to create the full envelope flap. Cut this fabric to your determined width (e.g., 21 inches) by 12.5 inches long.
- Decorative Accent Band: This narrow strip adds a touch of detail. Cut this fabric to your determined width (e.g., 21 inches) by 2 to 2.5 inches long. A 2.5-inch length will result in a slightly wider accent band once folded and sewn.
Remember: If your pillow is wider or narrower, adjust all your width measurements accordingly by adding 1 inch to your pillow’s actual width.
Step 2: Assembling the Front Panel with Cuff and Accent
This is where your pillowcase begins to take shape. You’ll work with the main body front piece, the main cuff fabric, and the decorative accent band.
- Prepare the Decorative Accent Band: Take your decorative accent fabric strip. Fold it in half lengthwise, with the wrong sides of the fabric touching. This creates a neat, finished edge and hides the raw seam. Press this fold well with your iron.
- Attach the Accent Band to the Front Piece: Lay your main body front fabric piece right-side up on your work surface. Take the folded accent band and align its raw edges (the unfolded edges) with one of the short edges of the front body piece. Make sure the folded edge of the accent band is facing towards the center of the front body piece. Pin it securely in place along this edge.
- Prepare the Main Cuff: Take your main cuff fabric. Place it on top of the accent band and the front body piece, with its right side facing down. Align the raw edge of the cuff fabric with the raw edges of the accent band and the front body piece. This means you’ll have three layers aligned at this edge: the front body (right side up), the accent band (raw edges aligned), and the main cuff (right side down). Pin all three layers together securely, adding about 4-5 pins across the width.
- Stitch the Layers: Using your sewing machine, stitch a straight seam 1/4 inch from the aligned raw edge, through all three layers. Be sure to backstitch at the beginning and end of your seam to secure the stitches.
- Press and Fold the Cuff: Remove the pins. Open up the fabrics so the main cuff and accent band are extending away from the main body front. Press the seam allowance towards the main cuff fabric. Now, take the main cuff fabric and fold it over so its wrong side is against the wrong side of the accent band, covering the seam you just sewed. The cuff should now be extending towards the main body front.
- Secure the Cuff: Fold the raw edge of the main cuff fabric over again, aligning it with the edge of the accent band on the right side of the main body front. This effectively creates a clean, finished cuff with the decorative accent peeking out. Pin this folded cuff securely in place across the width.
- Final Stitch for the Front Panel: Stitch another seam about 1/4 inch from the folded edge of the cuff, securing it to the main body front. This creates a beautiful, layered front panel with no exposed raw seams on the visible side. Press this entire front panel assembly thoroughly.
You now have a complete and beautifully finished front panel for your pillowcase!
Step 3: Creating the Back Panel with the Envelope Flap
Now, let’s turn our attention to the back of the pillowcase, which includes the all-important envelope flap. You’ll be working with the larger back piece and the inside flap cover fabric.
- Prepare the Inside Flap Cover Fabric: Take your inside flap cover fabric piece (e.g., 21″ x 12.5″). Choose one of the long edges to create a finished hem. This will be the visible edge of your inner flap. We’ll use a simple rolled hem for a clean finish.
- Fold the edge over 1/2 inch towards the wrong side of the fabric and press firmly.
- Fold it over another 1/2 inch (or slightly less, depending on your preference) towards the wrong side and press again. This creates a double-folded hem, completely enclosing the raw edge.
- Stitch close to the inner folded edge, securing the rolled hem. Backstitch at the beginning and end.
- Attach the Inside Flap to the Main Back Piece: Lay your main body back fabric piece (e.g., 21″ x 36″) right-side up on your work surface. Take your newly hemmed inside flap cover fabric. Place it on top of the main back piece, with its right side facing down, aligning one of its raw (unhemmed) long edges with one of the short edges of the main back piece.
- Stitch the Flap: Pin these two pieces together along the aligned edge. Stitch a 1/4-inch seam allowance. Backstitch to secure.
- Press the Flap Seam: Press the seam allowance open, then press it towards the inside flap cover fabric. Then, fold the inside flap cover fabric away from the main back piece, so its wrong side is now against the wrong side of the main back piece, and the hemmed edge is exposed. This effectively extends the main back piece with the added flap. Press this entire assembly well.
- Create the Back Flap Fold: Now, identify the hemmed edge of the inside flap. Fold the entire back panel assembly so that this hemmed edge aligns with the desired opening for your pillow (usually about 6-8 inches from the top of the main back piece). This creates the overlap for your envelope flap. The goal is to have the hemmed edge of the flap extend roughly 6-8 inches into the main body of the pillowcase when it’s finished. This fold will be crucial for the final assembly.
Step 4: Final Assembly of Your Pillowcase
With your front and back panels complete, it’s time to bring them together to form the finished pillowcase.
- Orient the Back Panel: Lay your assembled back panel (the larger piece with the inner flap) right-side up on your work surface. Ensure the fold you created in the previous step (where the inner flap overlaps) is positioned correctly for your pillow opening.
- Position the Front Panel: Place your assembled front panel (with the cuff and accent band) directly on top of the back panel. Make sure the right side of the front panel is facing down, so that the “good” sides of both your front and back fabrics are facing each other. This is crucial for hiding all the seams inside once the pillowcase is turned right-side out.
- Align and Pin: Carefully align all the raw edges of the three sides that will be sewn (the two long sides and the bottom short side). The top opening (where the cuff is on the front panel, and the flap is on the back panel) should remain unpinned. Pay special attention to matching up the side seams, especially where the cuff and accent band meet. Pin all three layers (front, back, and the inner flap that’s folded over) securely around these three edges.
- Stitch the Sides and Bottom: Using your sewing machine, stitch a 1/2-inch seam allowance along these three pinned edges. For added durability and to prevent fraying, especially since pillowcases get a lot of use and washing, use a zigzag stitch or a serger if you have one. If using a straight stitch, you may want to finish the raw edges with a zigzag stitch or by pinking them after trimming. Remember to backstitch at the beginning and end of each seam.
- Trim and Turn: Trim any excess fabric from your seam allowances if necessary, being careful not to cut your stitches. Clip the corners diagonally to reduce bulk. Now, carefully turn your entire pillowcase right-side out. Gently push out the corners with a blunt tool (like a chopstick or point turner) to make them crisp.
- Final Press: Give your newly assembled pillowcase a final, thorough press with your iron. This will make all your seams lie flat and give it a beautifully finished, professional appearance.
Enjoy Your Custom Handmade Pillowcase!
Congratulations! You’ve successfully sewn a beautiful, custom envelope pillowcase with a flap. Slip your pillow inside, and marvel at the neat, secure closure that keeps your pillow tucked away and looks fantastic. This project not only adds a personal touch to your home decor but also hones your sewing skills with practical techniques like rolled hems, layered stitching, and precise assembly.
This tutorial provides a solid foundation, but don’t hesitate to experiment! Consider playing with different fabric combinations, adding piping to the cuff, or even embroidering the main body for an extra special touch. Handmade items carry a unique charm and story, and your new pillowcase is a testament to your creativity and effort. Enjoy the comfort and style it brings to your home!