
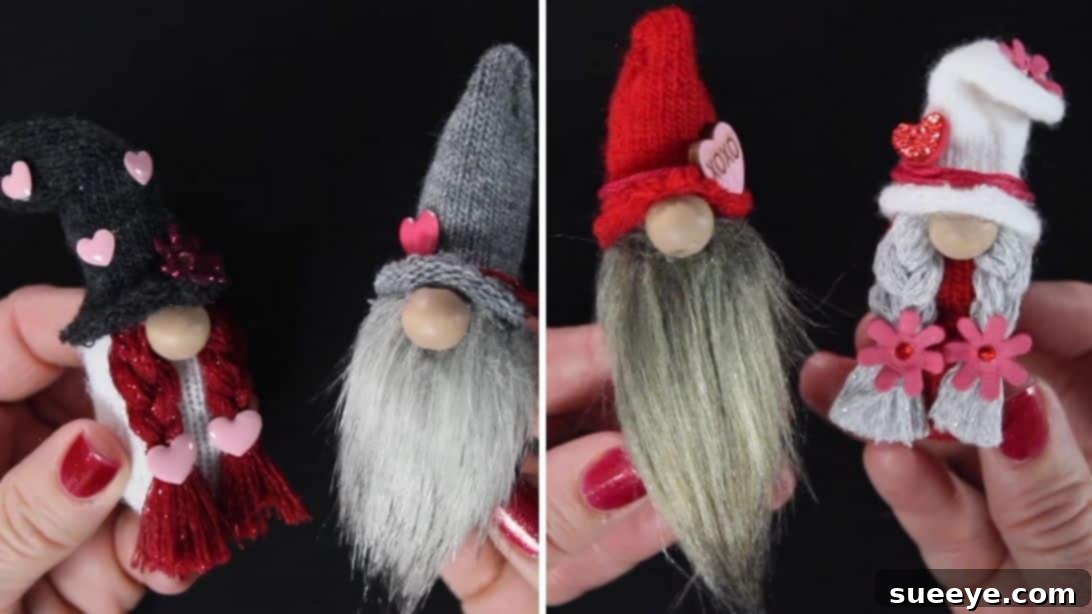
Crafting Joy: Create Adorable Valentine’s Day Gnomes from Recycled Knitted Gloves
Looking for a delightful and heartwarming craft project to share with loved ones or brighten your home? Imagine transforming a pair of old knitted gloves into an enchanting duo of Valentine’s Day gnomes! This incredibly simple yet rewarding DIY project is perfect for crafters of all skill levels, offering a fantastic opportunity to bond with friends and family over a fun, creative activity. These charming gnomes, inspired by the brilliant tutorial from Emilie Lefler on YouTube, are not only quick to assemble but also eco-friendly, utilizing materials you might already have or can easily source from your local craft store.
Once completed, these adorable gnome couples make wonderful additions to your home decor, bringing a touch of whimsical charm to any shelf, mantelpiece, or desk. They’re also incredibly thoughtful, personalized gifts for Valentine’s Day, anniversaries, or just to show someone you care. And for those with an entrepreneurial spirit, these handcrafted treasures can even be a delightful item to sell at craft fairs or online, spreading joy one gnome at a time. Let’s dive into creating these irresistible little characters!
Why DIY Valentine’s Day Gnomes Are the Perfect Craft Project
Crafting offers more than just a finished product; it provides a therapeutic escape, a chance to express creativity, and the satisfaction of making something with your own hands. This particular gnome project stands out for several compelling reasons:
- Simplicity for All Ages: The steps are straightforward, making it an excellent project for beginners, teenagers, and even older children (with adult supervision for hot glue).
- Sustainable & Budget-Friendly: By repurposing old knitted gloves, you’re embracing sustainable crafting practices. Many other materials are inexpensive and readily available.
- Personalization Galore: While we provide a guide, there’s ample room to customize your gnomes with different colors, embellishments, and expressions, making each one uniquely yours.
- Heartfelt Gifts: A handmade gift carries immense sentimental value. These gnomes are perfect for expressing love and appreciation on Valentine’s Day or any special occasion.
- Charming Home Decor: Gnomes are a timeless symbol of luck and warmth. A Valentine’s Day pair adds a cozy, festive touch to your seasonal decor.
- Fun Group Activity: Gather your friends, family, or a crafting club for a memorable session. It’s a fantastic way to create lasting memories together.
Ready to embark on this enchanting journey? Let’s gather our supplies and bring these lovable gnomes to life!
Materials You’ll Need:
Before starting, ensure you have all the necessary items. Gathering everything beforehand makes the crafting process smoother and more enjoyable. Most of these can be found at your local craft store or even around your home.
- Knitted Gloves: Old gloves are perfect! Look for ones with interesting textures or colors. The fingers will form the gnome’s body and hat.
- Faux Fur: A small piece (around 1×1.5 inches per gnome) is needed for the male gnome’s beard. Choose a color that complements your glove.
- Embroidery Floss (White and Pink): White is ideal for the female gnome’s braids, and pink adds a lovely touch to hats or other embellishments, especially for Valentine’s Day.
- Wooden Beads: These will serve as the gnomes’ noses, bringing their faces to life. One bead per gnome.
- Polyfill (Polyester Fiberfill): For stuffing the gnomes, giving them a soft and plump appearance.
- Poly Bands (Small Rubber Bands): Essential for securing the stuffing and weighted beads.
- Hot Glue Gun and Glue Sticks: Your primary tool for assembling all the pieces securely. Always exercise caution when using a hot glue gun.
- Cork or Wine Corks: These provide a sturdy, flat base, ensuring your gnomes stand upright without toppling over.
- Small Decorative Flowers: Perfect for embellishing the female gnome’s hair or hat.
- Small Foam Hearts (Optional): To add extra Valentine’s Day flair to the hats.
- Scissors: Sharp craft scissors are crucial for clean cuts on fabric and faux fur.
- Weighted Beads (e.g., poly pellets, rice, or small pebbles): These are key to giving your gnomes a stable, weighted base so they don’t fall over easily.
- Utility Knife or Craft Knife: For carefully slicing the wine corks. Always use on a protected surface and with extreme care.
Step-by-Step Guide: Crafting Your Valentine’s Day Gnomes
Follow these detailed instructions to bring your adorable gnome couple to life. Remember, creativity is encouraged, so feel free to personalize your gnomes as you go!
Step 1: Preparing the Gnome Body and Base
This initial step focuses on creating a stable and weighted foundation for your gnomes.
- Prepare the Knitted Gloves: Take your chosen knitted gloves and carefully trim off all the fingertips. These individual “fingers” will become the main body and hat components of your gnomes. Set the remaining parts of the glove aside; you might find other uses for them in future crafts!
- Cut the Faux Fur Beard (Male Gnome): For the male gnome’s beard, take your faux fur and cut a small rectangular piece, approximately 1 x 1½ inches. When cutting faux fur, it’s crucial to only snip the fabric backing with the tips of your scissors, rather than cutting through the fur strands themselves. This technique helps preserve the natural look and fullness of the fur, preventing a blunt, unnatural edge.
- Prepare the Cork Base: Slice a wine cork in half horizontally. Ensure you create a flat, stable bottom for each gnome. The flat side should always be at the bottom to provide maximum stability, allowing your gnome to stand proudly without wobbling.
- Assemble the Body: Take one of the trimmed fingertips from the glove. Roll the hemmed edge back, much like you would roll up the brim of a tiny hat. Gently slide this over one of the sliced cork pieces, pushing it down firmly and tightly. The snug fit helps secure the body to the base.
- Add Weight and Stuffing: Carefully fill approximately two-thirds of the gnome’s body (the glove fingertip) with weighted beads. These beads are essential for giving your gnome a low center of gravity, preventing it from toppling over. After the beads, stuff a small amount of polyfill on top. This polyfill acts as a barrier, preventing the weighted beads from falling out or shifting excessively.
- Secure the Body: Gather the open end of the fingertip above the polyfill and use several poly bands to tie it off tightly. Wrap the bands multiple times to ensure a secure closure. Trim off any excess fabric above the bands, creating a neat finish for the top of the body.
Step 2: Assembling the Male Valentine Gnome
Now, let’s give your male gnome character with his hat and beard.
- Shape the Hat: Take another knitted fingertip for the hat. Roll back the hem. Then, pinch it halfway to the top, but in the opposite direction of the seam. Apply a dab of hot glue inside the pinched area and press firmly. This creates a subtle crease or “bend” in the hat, giving it shape and dimension.
- Attach the Beard: Turn the faux fur beard piece over and cover the fabric back entirely with hot glue. Carefully lay this flat onto the front of the gnome’s body, just below where the nose will be positioned. Press down firmly to ensure it adheres well.
- Position the Nose: Locate the center of the faux fur beard. Gently part the fur in half to create a small space. Apply a small dot of hot glue in this cleared spot, then firmly press a wooden bead onto it to create the gnome’s nose.
- Attach the Hat: With the nose in place, slide the prepared hat over the top of the gnome’s head. Adjust it so it sits nicely, partially covering the top edge of the beard and resting just above the nose. Roll the hat’s hem back slightly, add a line of hot glue along the inside of the brim, and then roll the hat back down, pressing to secure it.
- Embellish the Hat: For a festive Valentine’s touch, take your pink embroidery floss. Wrap it around the top portion of his hat about three times, securing the ends with a tiny dab of glue. Finally, hot glue a small foam heart (or a felt heart you’ve cut) at the very top of his hat for a charming finish.
Step 3: Crafting the Female Valentine Gnome
The female gnome adds a lovely contrast with braided hair and floral accents.
- Prepare the Hair (Braids): Instead of a beard, the female gnome will feature charming braided hair. Cut several strands of white embroidery floss, ensuring they are long enough to form two braids that will frame her face. Braid these strands into two separate, neat braids. You can secure the ends temporarily with a knot or a tiny dab of glue.
- Attach the Nose and Hair: Apply a small dot of hot glue where her nose will be positioned on the body. Press a wooden bead firmly onto this spot. Then, apply glue to the top of each braid and position them over the beaded nose, allowing them to hang down naturally on either side of her face.
- Attach and Shape the Hat: Take another knitted fingertip for her hat. Attach it to her head, similar to the male gnome, ensuring it rests comfortably above her nose and braided hair. For a cute, whimsical look, tilt the tip of her hat slightly downwards. Apply glue to the underside of the tilted tip and press it down firmly until the glue sets, holding the bend in place.
- Embellish the Hat and Braids: Wrap pink embroidery thread around her hat about three times, dabbing glue to secure it at various points. For extra charm, glue small decorative flowers at the end of each of her braids. Finally, use foam hearts and glue them at the top of her hat, and add another small flower at the spot where the hat’s tip is pressed down, creating a focal point.
Tips for Gnome-Making Success
To ensure your crafting experience is as smooth and enjoyable as possible, consider these helpful tips:
- Safety First with Hot Glue: Always be cautious when using a hot glue gun. Work in a well-ventilated area, and if crafting with children, ensure adult supervision is constant. Silicone finger protectors can also be a lifesaver!
- Sharp Scissors Make a Difference: Using sharp fabric scissors will give you cleaner cuts, especially on the knitted gloves and faux fur, leading to a more professional-looking finish.
- Experiment with Materials: Don’t be afraid to substitute materials! If you don’t have faux fur, felt or even yarn can be used for the beard. Get creative with different types of beads for noses or various embellishments for hats.
- Pre-Plan Embellishments: Before gluing, lay out your flowers, hearts, and other decorative elements on the gnomes to visualize the final look. This helps prevent mistakes and ensures you’re happy with the placement.
- Weight Matters: The weighted beads are crucial for stability. Don’t skimp on them! If you don’t have poly pellets, rice, small dried beans, or even clean sand in a small baggie can work as alternatives.
- Patience with Glue Drying: Allow sufficient time for the hot glue to cool and set completely before moving on to the next step, especially when attaching hats or heavy embellishments. This prevents parts from shifting.
- Personalize Your Gnomes: While this tutorial provides a guide, let your imagination run wild! Use different colored gloves, add tiny glasses, create different expressions, or even give them tiny arms made from felt.
Beyond Valentine’s Day: Customizing Your Gnomes for Any Season
The beauty of this project lies in its adaptability. While perfect for Valentine’s Day, you can easily modify these gnomes to fit any season or holiday:
- Christmas Gnomes: Use red, green, and white gloves. Add tiny jingle bells, miniature pinecones, or sparkly embellishments to their hats.
- Fall Gnomes: Opt for orange, brown, and deep red gloves. Decorate with tiny artificial leaves, acorns, or miniature pumpkins.
- Spring Gnomes: Choose pastel-colored gloves. Embellish with small butterflies, ladybugs, or an abundance of tiny spring flowers.
- Everyday Gnomes: Select neutral-colored gloves and minimalist decorations to create gnomes that can adorn your home year-round.
Conclusion: Your Handmade Gnomes Await!
There you have it – a comprehensive guide to crafting your very own adorable Valentine’s Day couple gnomes! This project is a testament to how simple materials, a dash of creativity, and a bit of hot glue can result in something truly magical. Whether you’re making them as a heartfelt gift, a charming addition to your holiday decor, or simply enjoying the therapeutic process of creation, these gnomes are sure to bring a smile to anyone’s face.
We extend our sincere gratitude to Emilie Lefler on YouTube for sharing her ingenious and inspiring tutorial. Her creative vision makes crafting accessible and enjoyable for everyone. Be sure to check out her channel for more fantastic DIY ideas and support her incredible work!
So, grab those old gloves, unleash your inner crafter, and start making memories (and gnomes!) today. Happy crafting!