
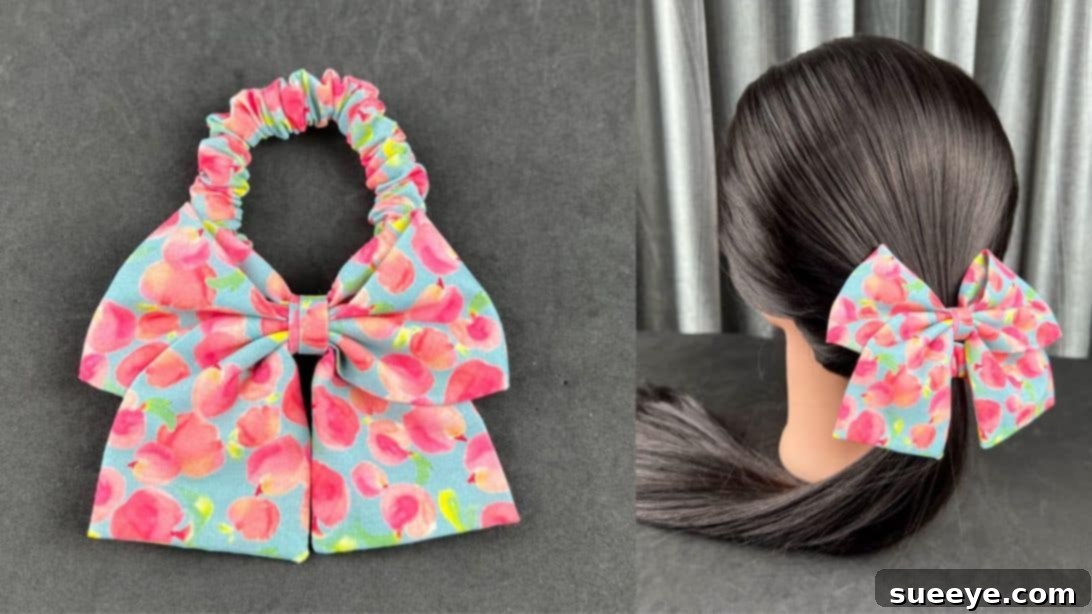
The timeless charm of bows has experienced a remarkable resurgence in recent fashion trends, captivating hearts and dominating accessory collections everywhere. From runway apparel to everyday outfits, bows are appearing on dresses, hats, earrings, handbags, and virtually every conceivable item. This delightful trend is truly pervasive, transforming simple accessories into statements of elegance and playfulness. Many retailers have reported significant sales increases attributed to their bow-embellished merchandise, underscoring the immense popularity and market demand for these charming details. This widespread enthusiasm makes crafting your own DIY bow scrunchies not just a fun personal project, but also an excellent make-and-sell idea, offering a fantastic opportunity for crafters to tap into a thriving market.
RELATED: How To Tie A Perfect Bow Easily
If you’ve been contemplating venturing into the world of selling handmade accessories, consider this your definitive sign to start with bow scrunchies! These delightful hair ties are not only quick and easy to make, but they also offer endless possibilities for customization, allowing you to create unique pieces that cater to various tastes and styles. Whether you aim to create a personal collection of stylish hair accessories, craft thoughtful handmade gifts for friends and family, or launch a burgeoning small business, this tutorial is your perfect starting point. Join us as Rin DIY guides you through the simple, step-by-step instructions below. This project requires only basic sewing skills, making it accessible to beginners and satisfying for experienced crafters alike. You’ll soon be able to produce stunning hair ties in a spectrum of colors, adjust bow sizes to your preference, and experiment with different fabrics to create truly unique accessories. Unleash your creativity and enjoy the process of this rewarding small sewing project!
Essential Materials for Your Easy DIY Bow Scrunchie
Gathering the right materials is the first step towards crafting your perfect bow scrunchie. The beauty of this project lies in its simplicity and the accessibility of its components. You likely already have many of these items in your crafting stash, or they can be easily found at any fabric or craft store. Choosing your fabric is where your creativity truly begins, as it will define the final look and feel of your scrunchie. Consider different textures, patterns, and colors to create a diverse range of accessories.
- 4.5 x 54 cm fabric strip: This piece will form the main scrunchie band. We recommend using a lightweight to medium-weight fabric like cotton, satin, or even velvet for a luxurious touch.
- Safety pin: An indispensable tool for turning fabric tubes right side out and threading elastic with ease.
- 20 cm elastic: A soft, comfortable elastic band, typically 0.5-1 cm wide, is ideal. This length provides a good stretch for most hair types, but you can adjust it for a tighter or looser fit.
- 15 x 40 cm fabric rectangle: This larger piece is dedicated to forming the elegant bow that will adorn your scrunchie. Again, consider the same fabric types as the scrunchie band for a cohesive look.
- 4 x 12 cm fabric rectangle: This smaller rectangle serves as the vital centerpiece, used to gather the bow and secure it neatly onto the scrunchie, giving it a polished finish.
Beyond these primary items, ensure you have basic sewing essentials on hand, including matching thread, a pair of sharp fabric scissors, sewing pins, an iron for pressing seams, and either a sewing machine or a hand-sewing needle. These tools will ensure a smooth and professional finish for your handmade bow scrunchie.
Step-by-Step Guide: Crafting Your Perfect Bow Scrunchie
Creating your own bow scrunchie is a rewarding process that combines simple sewing techniques with creative flair. Follow these detailed instructions to transform your fabric pieces into a chic and functional hair accessory. Take your time with each step, and don’t hesitate to refer to the accompanying images for visual guidance.
Step 1: Preparing the Scrunchie Band
Begin with your 4.5 x 54 cm fabric strip. Lay it flat and fold it in half lengthwise, ensuring the right sides of the fabric are facing each other. This means the side of the fabric that you want to be visible on your finished scrunchie should be on the inside of the fold. Align the raw edges perfectly. Using your sewing machine (or needle and thread), sew along the raw long edge with a 1 cm seam allowance. Remember to backstitch at the beginning and end of your seam to secure the stitches and prevent unraveling. This will create a long, narrow tube of fabric.
Step 2: Turning the Fabric Tube
Now, it’s time to turn your fabric tube right side out. Attach a safety pin to one end of the tube. Close the safety pin securely. Carefully insert the pinned end into the tube, pushing it all the way through until it emerges from the other end. This clever trick allows you to invert the fabric, revealing the right side and hiding the raw seam inside. Once turned, gently smooth out the fabric tube, ensuring the seam is neatly tucked away.
Step 3: Inserting and Securing the Elastic
Take your 20 cm elastic piece and attach the safety pin to one end. Close the safety pin. Insert this pinned end into one opening of the fabric tube. Carefully feed the safety pin and elastic through the entire length of the tube, gathering the fabric as you go. As the safety pin approaches the other end of the tube, make sure to hold onto the starting end of the elastic, preventing it from disappearing inside the tube. Once the two ends of the elastic are aligned, remove the safety pin. Overlap the two elastic ends by about 1-1.5 cm and securely hand stitch them together with strong, tight stitches, forming a closed loop. Alternatively, you can use your sewing machine for extra durability, carefully sewing back and forth over the overlapped ends.
Step 4: Finishing the Scrunchie Loop
With the elastic secured, you now have a fabric tube with the elastic inside, and two open fabric ends. To complete the scrunchie, you need to join these fabric ends seamlessly. Take one end of the fabric tube and insert it into the other end by about 1-1.5 cm. This creates a neat, continuous loop. Carefully sew the raw edges together, either by hand using an invisible stitch (ladder stitch) for a flawless finish, or by machine for added strength. Make sure your stitches go through all layers of fabric to secure the join. Once closed, gently push the seam to the inside of the scrunchie to conceal it. Your scrunchie base is now complete! Set it aside while you prepare the bow.
Step 5: Crafting the Bow Base
Retrieve your 15 x 40 cm fabric rectangle. Similar to the scrunchie band, fold it in half lengthwise with the right sides together. This time, before sewing, make a small mark in the center of one of the long folded edges. This mark will serve as a small opening that you will leave unstitched, allowing you to turn the bow right side out later. Now, sew along the two short ends and the remaining long edge (excluding the marked opening) with a 1 cm seam allowance. Once sewn, carefully trim the excess fabric from the seams, especially at the corners, cutting as close to the stitching as possible without snipping the threads. This reduces bulk and ensures crisp corners when turned. Turn the bow fabric right side out through the unstitched opening. Use a blunt tool (like a chopstick or a turning tool) to gently push out the corners, making them sharp and defined. Press the entire piece flat with an iron to create crisp edges and a smooth finish. Finally, hand stitch the opening closed using an invisible stitch to create a neat, seamless look.
Step 6: Shaping the Bow
Now for the artistic part: shaping your bow. Begin by folding the pressed fabric rectangle in half to create a visible crease exactly in the center. Unfold it. From this central crease, measure 4.5 cm outwards towards one side. Fold the fabric diagonally at this point, creating the first loop of your bow. Repeat this process on the other side: measure 4.5 cm from the center towards the opposite side and fold the fabric diagonally. When you’re done, the top edge of your bow should ideally measure approximately 9 cm across. Refer closely to the provided photo for visual guidance on how these diagonal folds should look to achieve the classic bow shape. Ensure both sides are symmetrical for a balanced bow.
Step 7: Securing the Bow’s Center
Once you are satisfied with the shape and symmetry of your bow, it’s time to secure its center. Gently gather and scrunch the middle section of the bow, creating a defined cinched waist. This will give your bow its distinctive shape. While holding the scrunch firmly, wrap a strong thread around the gathered center several times, pulling it tight. Tie off the thread securely with a knot. This step is crucial for maintaining the bow’s form and ensuring it stays perfectly shaped.
Step 8: Assembling the Bow Scrunchie
Finally, let’s bring it all together. Take your 4 x 12 cm rectangle, which will serve as the bow’s center wrap. Fold both long sides of this rectangle towards the center, meeting in the middle. Then, fold it again lengthwise, encasing the raw edges to create a neat, narrow strip. Position this strip over the gathered center of your bow. Now, place the bow, with its wrap, onto your finished scrunchie, aligning the center of the bow with the seam of the scrunchie for a clean look. Carefully wrap the small fabric strip around both the bow’s gathered center and the scrunchie. Adjust its position until the bow sits perfectly on the scrunchie. Secure the ends of this small strip together on the underside of the scrunchie using hand stitches, ensuring they are very strong and neat. Trim any excess fabric from the strip, leaving a small allowance. Fold this allowance inwards and sew it down neatly to hide all raw edges and create a professional finish. Double-check all your stitches to ensure the bow is firmly attached to the scrunchie and won’t come loose with wear.
The Allure of Handmade Bow Scrunchies: More Than Just an Accessory
The appeal of the DIY bow scrunchie extends far beyond its functional purpose. Crafting your own hair accessories offers a unique blend of creativity, personal style, and practicality. Handmade bow scrunchies stand out because they offer unparalleled personalization. Unlike mass-produced items, your handmade creation can reflect your exact preferences in terms of fabric, color, and bow size, making it a true expression of your individual style. This project also makes for truly thoughtful and unique gifts. A handmade scrunchie, tailored to a friend’s favorite color or pattern, carries a personal touch that store-bought items simply cannot replicate. Furthermore, embracing DIY projects like this can be a more eco-friendly and sustainable choice, allowing you to repurpose fabric scraps or choose ethically sourced materials. The process of sewing itself can be wonderfully therapeutic, providing a calming and focused activity that reduces stress and offers a sense of accomplishment. It’s a small project with big rewards.
Unleash Your Creativity: Customization Ideas and Variations
One of the most exciting aspects of making your own bow scrunchies is the endless potential for customization. Don’t limit yourself to just one style; experiment and create a collection that suits every mood and occasion. Consider the following variations to make your scrunchies truly unique:
- Fabric Choices: Explore different textures and weights.
- **Luxury:** Silk or satin for a sophisticated, gentle-on-hair feel, perfect for evening wear.
- **Elegance:** Velvet for a rich, opulent look, ideal for cooler seasons or special events.
- **Everyday Chic:** Cotton for its versatility, ease of washing, and ability to hold vibrant prints. Think florals, polka dots, gingham, or quirky novelty prints.
- **Seasonal:** Linen for summer, flannel for winter.
- Patterns and Colors: Mix and match! Create scrunchies with contrasting scrunchie and bow fabrics, or keep it monochrome for a sleek look. Experiment with bold patterns, subtle textures, or classic solid colors to complement various outfits.
- Bow Size and Shape: The dimensions provided are a starting point. Make your bow larger for a dramatic statement or smaller for a subtle touch. You can also experiment with different bow tying or folding techniques to achieve varied shapes.
- Scrunchie Thickness: Adjust the width of your main fabric strip to create a thicker, more voluminous scrunchie, or a thinner, more understated one.
- Embellishments: Add small charms, beads, or a delicate lace trim to the edges of your bow for an extra touch of glamour.
Building a Business: Tips for Selling Your DIY Bow Scrunchies
If you’re considering turning your scrunchie-making hobby into a small business, here are some key tips to help you succeed in the make-and-sell market:
- Focus on Quality: High-quality craftsmanship is paramount. Ensure your stitches are neat, seams are strong, and every scrunchie is consistently well-made. Use durable fabrics and good quality elastic.
- Unique Branding and Packaging: Develop a simple logo and create attractive packaging. Even a small tag with your brand name or a beautifully tied ribbon can elevate your product and make it feel special.
- Photography: Invest time in taking clear, well-lit photos of your scrunchies. High-quality images are crucial for online sales, showcasing the textures, colors, and how the scrunchies look in hair.
- Pricing Strategy: Calculate your costs (materials + your time per scrunchie) and add a reasonable profit margin. Research what similar handmade scrunchies are selling for to stay competitive.
- Selling Platforms: Explore various avenues for sales. Etsy, local craft fairs, social media (Instagram, Facebook Marketplace), or even setting up a small shop on your own website are great options.
- Customer Service: Provide excellent customer service. Be responsive to inquiries, process orders promptly, and handle any issues professionally to build a positive reputation.
Care and Maintenance for Your Handmade Scrunchies
To ensure your beautiful handmade bow scrunchies last as long as possible and maintain their pristine look, proper care is essential. Different fabrics may require different handling, but here are some general guidelines:
- Washing: For most cotton scrunchies, hand washing in cool water with a mild detergent is recommended. Gently agitate, then rinse thoroughly. For delicate fabrics like silk or velvet, hand washing is a must. Avoid harsh chemicals or bleach.
- Drying: After washing, gently squeeze out excess water (do not wring!). Reshape the scrunchie and lay it flat on a clean towel or hang it to air dry. Avoid using a dryer, as high heat can damage elastic and shrink or distort fabric, especially delicate ones.
- Storage: Store your scrunchies neatly to prevent them from getting stretched out, tangled, or crushed. A small basket, a dedicated drawer, or even hanging them on a scrunchie holder will help maintain their shape and keep them organized.
- Ironing: If your scrunchie or bow becomes wrinkled, a light press with a cool iron (on the appropriate fabric setting) can restore its smooth appearance. Avoid ironing directly over elastic if possible, and use a pressing cloth for delicate fabrics.
Troubleshooting Common Issues
Even with simple projects, you might encounter a few minor hurdles. Here’s how to troubleshoot common issues when making your bow scrunchie:
- Elastic Too Loose/Tight: If the scrunchie doesn’t feel right, unpick the elastic seam and adjust the length. A slightly longer elastic offers more give, while a shorter one provides a firmer hold.
- Uneven Seams: Practice makes perfect! Ensure your fabric edges are perfectly aligned before sewing, and use pins generously to hold them in place. Guide the fabric evenly through your machine.
- Bow Not Symmetrical: Re-fold and press your bow piece. Use a ruler to ensure your 4.5 cm measurements are precise on both sides, and continually refer to the visual guide.
- Fabric Fraying: If your fabric frays easily, consider finishing your raw edges with a zigzag stitch or a serger before assembling, especially for the opening seam of the bow piece.
- Stitches Unraveling: Always backstitch at the beginning and end of every seam. Use a good quality thread and ensure your machine tension is correctly set.
Your Beautiful DIY Bow Scrunchie Awaits
Congratulations! You’ve successfully navigated the steps to create your very own stunning DIY bow scrunchie. This project is a testament to how a few simple materials and basic sewing skills can transform into a beautiful, functional, and fashionable accessory. Whether you’ve crafted this scrunchie for yourself, as a thoughtful gift, or as a potential product for a burgeoning handmade business, the satisfaction of creating something with your own hands is truly unparalleled. Remember, the possibilities for customization are endless, so feel empowered to experiment with different fabrics, colors, and bow sizes to reflect your unique style. We encourage you to embrace the joy of sewing and continue exploring the vast world of DIY crafts. Share your beautiful creations with friends, family, and online communities—your handmade bow scrunchies are sure to inspire! Happy crafting!