
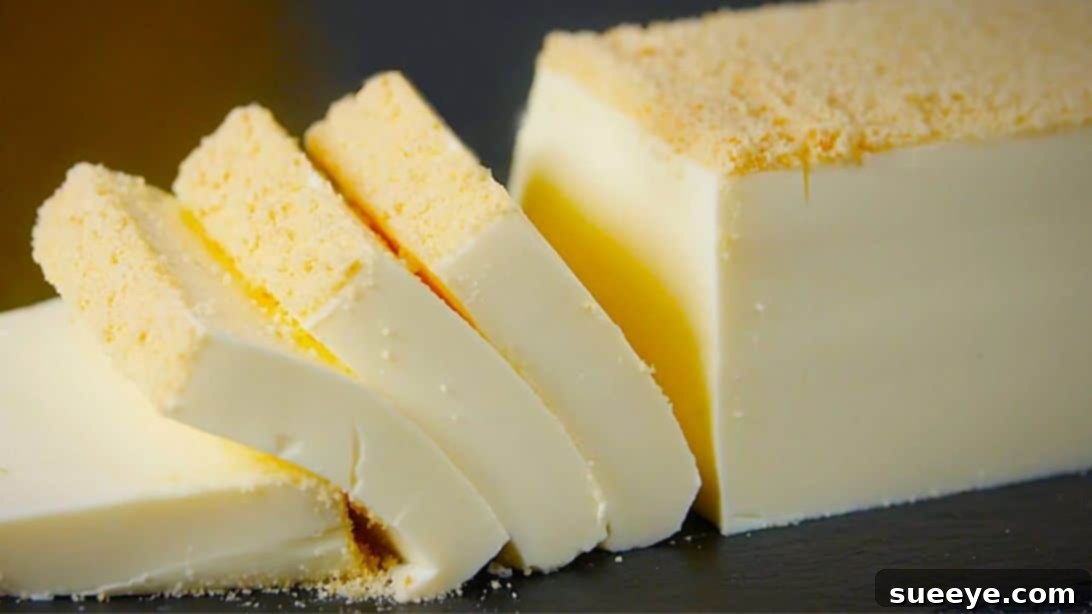
Indulge in Creamy Bliss: The Ultimate No-Bake Milk Pudding Recipe
Imagine a dessert so delightfully smooth, so exquisitely jiggly, that it practically melts the moment it touches your tongue. This isn’t a dream; it’s the magical reality of this incredible No-Bake Milk Pudding! With just a handful of everyday ingredients like eggs and milk from your fridge, you can whip up a treat that promises pure, creamy bliss. Perfect for any occasion, this pudding is not only irresistibly delicious but also remarkably simple to prepare, requiring no oven and minimal effort. Get ready to impress your family and friends with a dessert that will leave everyone craving for “just one more bite.”
Whether you’re a seasoned baker or a complete beginner in the kitchen, this recipe is designed for success. We’ll guide you through each step with clear, concise instructions, ensuring a perfect pudding every time. For those who love a visual aid, we highly recommend watching the helpful video tutorial by Stacy’s Home on YouTube. Get ready to embark on a sweet journey that culminates in a dessert so good, you’ll wonder why you hadn’t made it sooner!
Why You’ll Fall in Love with This No-Bake Milk Pudding
There are countless reasons why this creamy milk pudding stands out as a go-to dessert. Its simplicity is truly a game-changer; forget about preheating ovens or complex baking techniques. This recipe eliminates the stress, making it ideal for busy weekdays, spontaneous gatherings, or when you simply need a delightful treat without the fuss. The “no-bake” aspect means less time in the kitchen and more time enjoying your creation.
Beyond its ease, the texture of this pudding is unparalleled. It boasts a unique, jiggly consistency that is both light and rich, creating a luxurious mouthfeel. Each spoonful delivers a velvety smoothness that is utterly comforting and satisfying. Furthermore, its versatility allows for endless customization. While delicious on its own, it serves as a fantastic base for various flavor additions and toppings, meaning you can tailor it to suit any palate or dietary preference.
Finally, the minimal cleanup required is a huge bonus! With fewer dishes to wash, you can truly relax and savor your homemade dessert. This no-bake milk pudding is not just a recipe; it’s an invitation to effortlessly create joy in your kitchen.
Essential Ingredients for Your Creamy Milk Pudding
Crafting this melt-in-your-mouth milk pudding requires only a few humble ingredients, each playing a crucial role in achieving its perfect texture and flavor. Here’s what you’ll need:
- 3 large egg yolks
- 5 tbsp of granulated sugar
- 1 cup + ½ cup of whole milk, divided (preferably whole milk for richer flavor and creaminess)
- 3 tbsp of agar-agar powder or 8 tbsp (½ cup) of unflavored gelatin powder
- 1½ cups of sour cream or heavy whipped cream (chilled)
- 1 tsp of pure vanilla extract
- Cookie crumbs, for decoration (optional, but highly recommended for added texture and visual appeal)
Ingredient Tips and Substitutions for Perfection
- Egg Yolks: These contribute significantly to the pudding’s rich flavor and vibrant yellow hue. Ensure they are well separated from the whites to avoid altering the texture.
- Sugar: Adjust the amount to your preference. For a less sweet pudding, you can reduce it slightly, but remember sugar also aids in the overall texture.
- Milk: While whole milk is recommended for its richness, you can use 2% milk for a lighter version. Plant-based milks like almond or soy milk can also work, but results may vary slightly in consistency and flavor, especially with agar-agar.
- Agar-Agar vs. Gelatin:
- Agar-Agar: A plant-based gelling agent, perfect for vegans. It sets firmer than gelatin and requires boiling to activate. If using agar-agar, ensure it fully dissolves in the milk and reaches a rolling boil to activate its gelling properties.
- Gelatin Powder: A protein-based gelling agent. It creates a softer, more “jiggly” texture. Gelatin needs to be “bloomed” in cold liquid first (the ½ cup of milk) before being dissolved in warm liquid. Make sure it’s unflavored!
Choose wisely based on your dietary needs and desired texture. The specified amounts are for achieving a similar outcome.
- Sour Cream or Whipped Cream: This is where the pudding gets its incredible creaminess. Sour cream adds a slight tang that beautifully balances the sweetness, while whipped cream (ensure it’s not overly sweetened) delivers a milder, richer finish. Both work wonderfully, so choose based on your flavor preference.
- Vanilla Extract: Use good quality pure vanilla extract for the best flavor. This simple addition elevates the entire dessert.
- Cookie Crumbs: Finely crushed digestive biscuits, graham crackers, or even shortbread cookies add a fantastic textural contrast. You can also experiment with chocolate cookie crumbs for a different twist.
Step-by-Step Guide to Crafting Your Perfect Milk Pudding
Follow these detailed instructions carefully to ensure your no-bake milk pudding turns out beautifully smooth, creamy, and perfectly set every time. Patience is key, especially during the chilling phase!
Step 1: Preparing the Velvety Custard Base
Begin by carefully separating the egg whites from the yolks. For this recipe, we only need the yolks, which contribute to the pudding’s rich flavor and creamy texture. Place the three egg yolks into a medium-sized, heavy-bottomed saucepan. Add the 5 tablespoons of granulated sugar to the yolks. Using a whisk, vigorously whisk the egg yolks and sugar together until the mixture becomes pale yellow, fluffy, and well combined. This process incorporates air, making the final pudding lighter.
Next, pour 1 cup of whole milk into the egg yolk and sugar mixture. Continue to whisk until the milk is thoroughly incorporated and the mixture is smooth. Place the saucepan on your stove over medium-high heat. Stir consistently with your whisk or a rubber spatula as the milk warms up. The goal here is to gently heat the mixture, not to boil it, to prevent the eggs from scrambling. Once the milk is warm to the touch (but not simmering), remove the saucepan from the heat and set it aside to cool slightly. It’s important for this mixture to cool down before the next step.
While the custard base cools, prepare your gelling agent. In a small cup or a separate mixing bowl, add either the 3 tablespoons of agar-agar powder or the 8 tablespoons of gelatin powder. Pour in the remaining ½ cup of milk. If using agar-agar, stir thoroughly to dissolve any clumps; a short microwave burst can help here if needed, but ensure it’s not boiling. If using gelatin, let it sit for 5-10 minutes (this is called “blooming”) until it swells and softens. Once bloomed or dissolved, gently warm the gelatin mixture (if needed, a quick zap in the microwave or a double boiler method) until fully dissolved and no granules remain. Then, slowly pour this dissolved agar-agar or gelatin mixture into the cooled milk-and-egg mixture in the saucepan, whisking constantly to ensure it’s perfectly integrated and lump-free.
Step 2: Thickening and Enriching the Pudding Mixture
Now, place the saucepan with the combined mixture back on the stove over medium-high heat. It is crucial to whisk continuously during this stage. For agar-agar, you must bring the mixture to a full rolling boil and let it simmer for at least 1-2 minutes to ensure the agar-agar fully activates and sets properly. If using gelatin, heat the mixture until it is hot and steaming, ensuring the gelatin is completely dissolved, but do not bring it to a vigorous boil as excessive heat can degrade gelatin’s setting power. You will notice the mixture starting to thicken as you whisk, taking on a slightly more viscous consistency similar to a light custard. Once it has reached the desired thickness and the gelling agent is fully activated, remove the saucepan immediately from the heat and off the stove.
Carefully transfer the hot pudding mixture into a clean, large mixing bowl. This helps it cool slightly and prevents it from setting too quickly in the hot saucepan. Now, it’s time to add the creamy element. Add the 1½ cups of sour cream or chilled heavy whipped cream, along with 1 teaspoon of vanilla extract. Gently whisk all the ingredients together until they are thoroughly combined and the mixture is smooth, uniform, and velvety. Be careful not to over-whisk, which can incorporate too much air into the whipped cream option. The goal is to achieve a consistent texture and flavor throughout.
Step 3: Setting and Unmolding Your Masterpiece
Prepare your chosen mold for the pudding. A standard loaf pan works perfectly, and lining it with an acetate sheet or plastic wrap (leaving an overhang on the sides for easy lifting) will ensure a pristine, easy release. Alternatively, you can use a clean, empty milk carton with the top cut off, which also makes for simple unmolding. Carefully pour the smooth pudding mixture into your prepared mold, ensuring an even distribution. Gently tap the mold on your countertop a few times to release any trapped air bubbles and create a perfectly smooth top surface.
Once poured, transfer the mold into the refrigerator. Allow the pudding to set for a minimum of 3 hours, or preferably overnight, to ensure it is firm and holds its shape beautifully. The chilling process is vital for the agar-agar or gelatin to fully set, giving the pudding its characteristic jiggly texture.
When your pudding is perfectly set, it’s time for the grand reveal! Place a serving plate upside down over the top of your mold. Holding both the mold and the plate firmly together, quickly flip them over to unmold the pudding onto the plate. Gently remove the acetate sheet or plastic wrap. If using a milk carton, you might need to carefully cut away the carton. For a beautiful finish, lightly dust the top with your chosen cookie crumbs. Now, slice the creamy, jiggly pudding into generous portions, serve immediately, and prepare to delight in every single bite!
Creative Variations & Serving Suggestions for Your Milk Pudding
While this classic no-bake milk pudding is heavenly on its own, it also serves as a fantastic canvas for culinary creativity. Here are some ideas to customize and enhance your dessert:
Flavor Twists:
- Coffee/Mocha: Dissolve 1-2 teaspoons of instant coffee or espresso powder in a small amount of warm milk before adding it to the main mixture. For mocha, add a tablespoon of unsweetened cocoa powder along with the coffee.
- Matcha Green Tea: Whisk 1-2 teaspoons of ceremonial grade matcha powder into the milk until dissolved before heating, for an earthy, sophisticated flavor.
- Chocolate Delight: Incorporate 2-3 tablespoons of unsweetened cocoa powder into the dry ingredients for a rich chocolate pudding. You can also melt some dark chocolate into the warm milk mixture.
- Citrus Zest: Add the finely grated zest of half a lemon or orange to the milk mixture for a bright, refreshing note.
- Fruit Purees: Swirl in a few tablespoons of pureed berries (strawberry, raspberry) or mango puree after the pudding has slightly cooled, but before it sets, for a fruity marble effect.
Texture Additions:
- Chopped Nuts: Sprinkle finely chopped almonds, pistachios, or walnuts on top along with cookie crumbs for an extra crunch.
- Fresh Fruit Pieces: Layer the bottom of your mold with thinly sliced fruits like kiwi, berries, or peaches before pouring in the pudding mixture.
- Chocolate Chips: Gently fold in a handful of mini chocolate chips into the cooled pudding mixture before pouring into the mold.
Topping Ideas:
- Fresh Berries: A colorful medley of strawberries, blueberries, and raspberries adds freshness and a hint of tartness.
- Whipped Cream: A dollop of freshly whipped cream can enhance the creaminess.
- Sauces: Drizzle with chocolate sauce, caramel sauce, or a fruit coulis for an elegant touch.
- Mint Leaves: A few fresh mint leaves can provide a beautiful garnish and a refreshing aroma.
- Different Cookie Crumbs: Experiment with Oreo crumbs, shortbread crumbs, or even granola for varied textures.
Serving Styles:
- Individual Portions: Pour the mixture into small ramekins or dessert glasses for elegant single servings.
- Layered Parfait: Alternate layers of milk pudding with fruit, granola, or cake crumbs in a glass for a stunning parfait.
Storage Tips for Optimal Freshness
To keep your delicious no-bake milk pudding fresh and enjoyable, proper storage is key. Once set, cover the pudding tightly with plastic wrap or transfer it to an airtight container. Store it in the refrigerator. The pudding will maintain its best texture and flavor for up to 3-4 days. While it can last a little longer, the quality might start to diminish. It is not recommended to freeze this pudding, as the texture can become grainy or watery upon thawing due to the gelling agents. Always ensure it is well-chilled before serving for the best experience.
Common Questions About No-Bake Milk Pudding (FAQ)
Q1: Why didn’t my pudding set properly?
This is usually due to issues with the gelling agent. If using agar-agar, ensure the mixture reached a full, rolling boil and simmered for at least 1-2 minutes to fully activate it. If using gelatin, make sure it was properly bloomed in cold milk and then fully dissolved in the warm mixture without boiling excessively. Also, ensure the pudding was chilled for a sufficient amount of time (at least 3 hours, preferably overnight).
Q2: Can I use plant-based milk for this recipe?
Yes, you can! Unsweetened almond milk, soy milk, or oat milk can be used as alternatives to dairy milk. However, be aware that the final texture and flavor might vary slightly. Some plant-based milks have different fat and protein contents, which can affect how the gelling agent interacts. Agar-agar generally works well with plant-based milks, making this recipe easily adaptable for vegan diets if paired with a plant-based cream alternative.
Q3: Can I reduce the amount of sugar?
Absolutely. The amount of sugar can be adjusted to your personal preference. For a less sweet pudding, you can reduce the sugar by 1-2 tablespoons. However, keep in mind that sugar also contributes to the overall texture and mouthfeel of the pudding, so drastically reducing it might alter the consistency slightly.
Q4: How can I ensure my pudding is smooth and lump-free?
The key to a smooth pudding lies in thorough whisking at every stage. Ensure the egg yolks and sugar are whisked until very fluffy, and the milk is incorporated smoothly. When adding the dissolved agar-agar or gelatin, whisk continuously to prevent lumps. Lastly, when adding the sour cream or whipped cream, gently whisk until completely integrated, avoiding any separation or curdling.
Q5: Is this recipe vegan if I use agar-agar?
If you choose agar-agar instead of gelatin, and use a plant-based milk, the only remaining non-vegan ingredient is the egg yolks and the sour cream/whipped cream. To make it fully vegan, you would need to omit the egg yolks (which would significantly change the recipe’s richness and require other adjustments for thickening) and use a vegan sour cream alternative or a plant-based whipped cream.
The Final Word: A Simple Dessert, Unforgettable Taste
This No-Bake Milk Pudding is more than just a dessert; it’s a testament to how simple ingredients, combined with a little care, can create something truly extraordinary. Its delicate texture, rich flavor, and effortless preparation make it an instant favorite for anyone with a sweet tooth. Whether you’re looking for a quick treat to satisfy a craving or an elegant dessert to impress, this recipe delivers on all fronts.
We encourage you to try this delightful pudding and experience the joy of creating a creamy, jiggly masterpiece right in your own kitchen. Don’t forget to explore the various customization options to make it uniquely yours. A special thank you to Stacy’s Home via YouTube for the wonderful inspiration behind this fantastic recipe. Enjoy every luscious bite!
*All images for this recipe are credited to Stacy’s Home via YouTube. We highly recommend visiting her channel and subscribing for more amazing culinary ideas!