
Effortless Organization: Sew Your Own Reversible Hanging Door Pockets
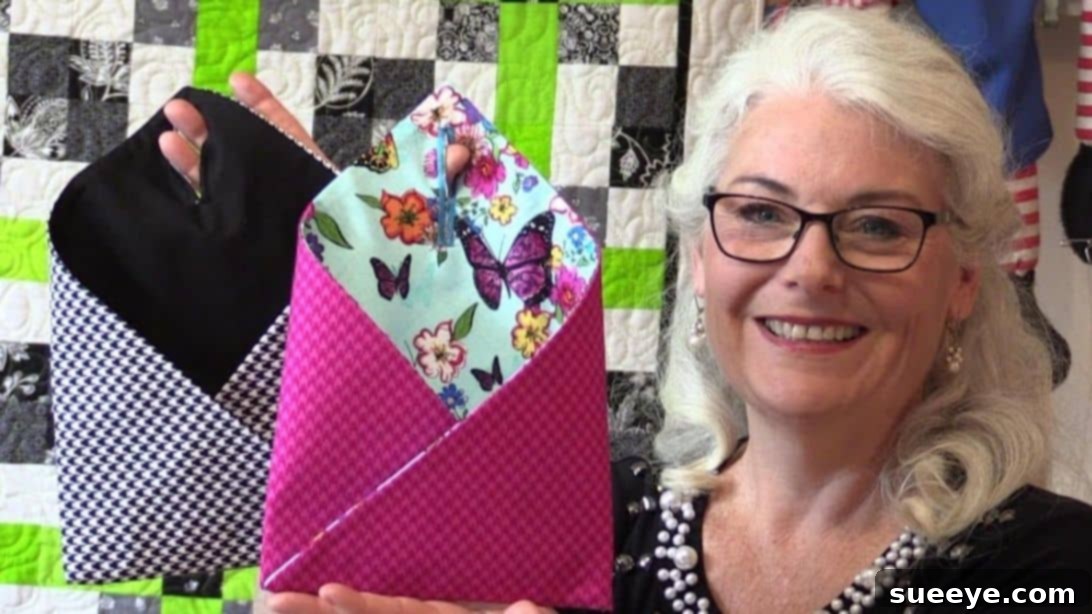
The joy of sewing lies in its incredible versatility. With just a few simple pieces of fabric, a needle, and thread, you can transform ordinary materials into practical, beautiful, and personalized items for your home. Today, we’re diving into an incredibly useful and surprisingly simple sewing project: reversible hanging pockets. This fantastic DIY storage solution, inspired by the talented creators at SewVeryEasy on YouTube, is perfect for decluttering small essentials like keys, mail, remote controls, or craft supplies. Even if you’re a complete beginner to sewing, you’ll find this project approachable, rewarding, and a wonderful way to add a touch of handmade charm and organization to any room.
Imagine a world where your most-used small items are always within reach, neatly tucked away yet easily accessible. These fabric door organizers offer exactly that convenience. What makes them truly special is their reversible design, allowing you to easily switch up your decor with a flip – perfect for seasonal changes or just a quick refresh. Made with contrasting fabrics, they’re not just functional; they’re a stylish addition to any door, wall, or even inside a cabinet. Let’s gather our supplies and get ready to create some clever, customizable storage!
Why You Need These DIY Hanging Pockets in Your Life
- Instant Decluttering: Say goodbye to misplaced keys, scattered mail, or untamed charging cables. These pockets provide a designated spot for all those small items that tend to accumulate on countertops and tables.
- Space-Saving Solution: Utilize vertical space on doors, inside cupboards, or on walls, freeing up valuable surface area in smaller rooms or entryways.
- Customizable Style: Choose fabrics that perfectly match your home decor. The reversible feature means you get two looks in one, allowing you to easily refresh your space without extra sewing.
- Beginner-Friendly: With straightforward cutting and basic sewing techniques, this project is designed for success, even if you’re just starting your sewing journey.
- Cost-Effective: Create functional storage using fabric scraps or inexpensive remnants, making it a budget-friendly alternative to store-bought organizers.
- Personal Touch: There’s immense satisfaction in creating something useful with your own hands. These pockets add a unique, handmade charm that off-the-shelf items can’t replicate.
Materials You’ll Need
Before we begin, ensure you have all your materials ready. High-quality tools and fabrics will make your sewing experience much more enjoyable and result in a more professional-looking finished product.
- Two Fabrics with High Color Contrast: The magic of these reversible pockets comes from choosing two distinct fabrics. Opt for medium-weight cottons (like quilting cottons, duck cloth, or linen blends) for durability and ease of sewing. A high contrast in color or pattern will ensure that both sides of your pocket stand out when reversed. You’ll need enough fabric to cut 16½-inch squares from each.
- Matching Thread: Select a good quality all-purpose polyester thread that either matches one of your fabrics or is a neutral color that blends well with both.
- Fusible Interfacing Fabric: This is crucial for giving your pockets structure and stability. Choose a medium-weight fusible interfacing. It adds body, helps the pockets hold their shape, and prevents sagging. You’ll need enough to cut a 16-inch square.
- Iron and Ironing Board: Essential for pressing seams, fusing interfacing, and achieving crisp, professional results. Don’t underestimate the power of a good press!
- Rotary Fabric Cutter: While scissors can work, a rotary cutter with a self-healing mat and a clear quilting ruler will provide much more precise and straight cuts, which are vital for a clean finish.
- Fabric Scissors: For smaller snips and trimming corners. Make sure they are sharp and reserved only for fabric to maintain their edge.
- Basic Sewing Machine: Any standard sewing machine capable of a straight stitch and a zigzag stitch will be sufficient.
- Optional but Recommended: Fabric marking pen/chalk, seam ripper (just in case!), pins or fabric clips.
Step-by-Step Instructions: Creating Your Reversible Hanging Pockets
Follow these detailed steps carefully, and you’ll soon have beautiful and functional hanging pockets:
Step 1: Preparing Your Fabric and Interfacing
- Cut Your Main Fabrics: Lay out your two chosen fabrics smoothly. Using your rotary cutter and quilting ruler (or sharp fabric scissors), cut one 16½-inch square from each of your two contrasting fabrics. Accuracy here is key, as it will affect how well your pocket comes together.
- Cut Diagonally: Take each of your 16½-inch fabric squares and cut them in half diagonally. To do this, align your ruler from one corner to the opposite corner and make a clean cut. You will now have four triangular pieces of fabric, two from each color/pattern. Set these aside.
- Cut and Prepare Interfacing: Next, cut your fusible interfacing fabric into one 16-inch square. This is a half-inch smaller than your main fabric pieces on all sides. This slight reduction in size helps to reduce bulk in the seams later on, ensuring a smoother finish.
- Cut Interfacing Diagonally and Trim Corners: Just like your main fabrics, cut the 16-inch interfacing square in half diagonally from corner to corner. Now you will have two triangular pieces of interfacing. To further reduce bulk, trim a small piece (about ¼ to ½ inch) off from all three corners of each interfacing triangle. This simple trick prevents lumpy corners when the fabric is turned right side out.
- Stack and Fuse the First Set: Take two pieces of your contrasting triangular fabrics. Place them together with their right sides facing each other. Ensure the edges align perfectly. Now, take one of your triangular interfacing pieces and place it on top of this stack, aligning its squared (straight) sides with the squared sides of your fabric triangles. Notice that the longer, bias-cut edge of the fabric triangle will extend slightly beyond the interfacing, creating a small seam allowance exposure at the bottom.
- Apply Heat: Carefully take this stacked unit to your ironing board. Following the manufacturer’s instructions for your specific fusible interfacing, use a hot iron to press and fuse the interfacing to the wrong side of the top fabric triangle. Apply even heat and pressure to ensure a strong bond. This step gives the pocket its crucial structure. Repeat this process for the second set of contrasting fabric triangles and the remaining interfacing piece.
Step 2: Sewing, Trimming, and Turning
- Stitch Around the Edges: With your two fabric triangles (now fused with interfacing) still right sides together, head to your sewing machine. Using a ¼-inch seam allowance, sew all the way around the perimeter of the triangle. Start and end with a few backstitches to secure your seams.
- Leave an Opening for Turning: This is a critical detail! As you sew, remember to leave an unstitched opening of about 3-4 inches along one of the longer, straight edges. This opening will be used later to turn your fabric right side out. Without it, your pocket will be sealed shut.
- Snip Corners: Once you’ve finished sewing, carefully snip off the excess pointed corners of all three sides. Trim as close to the stitching line as possible without cutting through your threads. This reduces bulk in the corners, allowing them to turn out much sharper and neater.
- Press Seams Open: Before turning, take your sewn triangle back to the ironing board. Gently press the seams open. This helps to set the stitches and makes the subsequent turning process easier and results in a flatter, more professional edge.
- Turn Right Side Out: Now, carefully reach through the opening you left and turn the entire fabric piece right side out. Use a point turner or a blunt object (like a chopstick) to gently push out all the corners until they are as crisp and pointed as possible.
- Lightly Press Again: Once turned, lightly press the entire triangle again, paying special attention to flattening the seams and crisping up the edges. At the opening you left, tuck the raw edges inwards so they align with the sewn seam, then press them flat. This prepares the opening for a neat closure later.
Step 3: Creating the Buttonhole and Finishing the Pocket
- Mark the Buttonhole: Locate the upper, pointed corner of your fabric triangle. Measure down approximately 2½ inches from the very tip and make a small mark. From this mark, draw a straight line that is 2½ inches long. This line indicates where your buttonhole opening will be, which is essential for hanging the pocket.
- Create the Buttonhole:
- Machine Buttonhole: If your sewing machine has an automatic or 4-step buttonhole function, now is the time to use it. Follow your machine’s manual to create a buttonhole along the marked 2½-inch line. This will provide a strong, clean opening.
- Manual Buttonhole (Alternative): If your machine doesn’t have a buttonhole function, you can create a reinforced slit. Carefully cut along the marked line with sharp scissors. Then, use a dense zigzag stitch or a satin stitch on both sides of the cut line to prevent fraying and reinforce the opening.
- Form the Pocket Shape: Lay the triangle flat. Take the two lower “flaps” (the two bottom points of the triangle) and fold them inwards towards the center. Ensure that these folds are even and that the outer edges of the folded flaps meet cleanly in the middle, forming the bottom of your pocket. You should now have three layers of fabric meeting at the center point of the bottom edge. This forms the distinctive pocket shape.
- Secure the Layers (Whipstitch or Machine Stitch):
- Whipstitch: Using a needle and matching thread, carefully whipstitch all three layers together along the bottom, folded edge where they meet. A whipstitch is a simple hand-sewing stitch that creates a neat, strong closure. This step secures the pocket’s shape.
- Machine Stitch (Alternative): For added durability or if you prefer machine sewing, you can machine stitch across the bottom point where the three layers meet. Ensure you sew slowly and carefully over the bulk, using a strong needle. You can stitch a small triangle or square to really secure it.
- Close the Turning Opening: The final step is to close the opening you left earlier for turning. You can hand-stitch this closed using an invisible ladder stitch for a seamless finish, or if it’s on a less visible part of the pocket, you can topstitch it closed with your sewing machine. Give your finished pocket one last press to ensure all seams are crisp and everything lies flat.
Tips for Success and Customization
- Pre-Wash Your Fabric: Always pre-wash and dry your fabrics before cutting and sewing, especially if they are cotton. This prevents shrinking and ensures your finished project maintains its size and shape after its first wash.
- Sharp Tools are Key: A sharp rotary cutter or scissors and a fresh sewing machine needle will make a significant difference in the quality of your cuts and stitches, preventing frayed edges and skipped stitches.
- Press, Press, Press: Ironing isn’t just for removing wrinkles; it’s a vital part of the sewing process. Pressing seams open, pressing folds, and final pressing will give your hanging pockets a professional, crisp finish.
- Practice Your Buttonhole: If you’re new to buttonholes, practice on a scrap piece of fabric with interfacing first. This will help you get the settings just right before working on your actual project.
- Experiment with Sizes: Once you’ve mastered the basic technique, feel free to adjust the initial square size to create larger or smaller pockets to suit different storage needs.
- Add Embellishments: Personalize your pockets further by adding embroidery, appliqué, decorative stitches, or even small labels to the front.
- Consider Different Hanging Methods: While a buttonhole is classic, you could also sew a fabric loop into the top corner before turning, or add grommets after construction for a more industrial look.
And there you have it! A stylish, practical, and reversible hanging pocket, ready to bring organization and a pop of handmade charm to your home. This project is a fantastic way to practice fundamental sewing skills while creating something truly useful. Whether you’re making one for your entryway, bathroom, craft room, or as a thoughtful gift, these DIY door organizers are sure to be a hit.
We extend our gratitude to SewVeryEasy via YouTube for inspiring this wonderful project. Be sure to check out their channel for more fantastic sewing tutorials and creative ideas!