
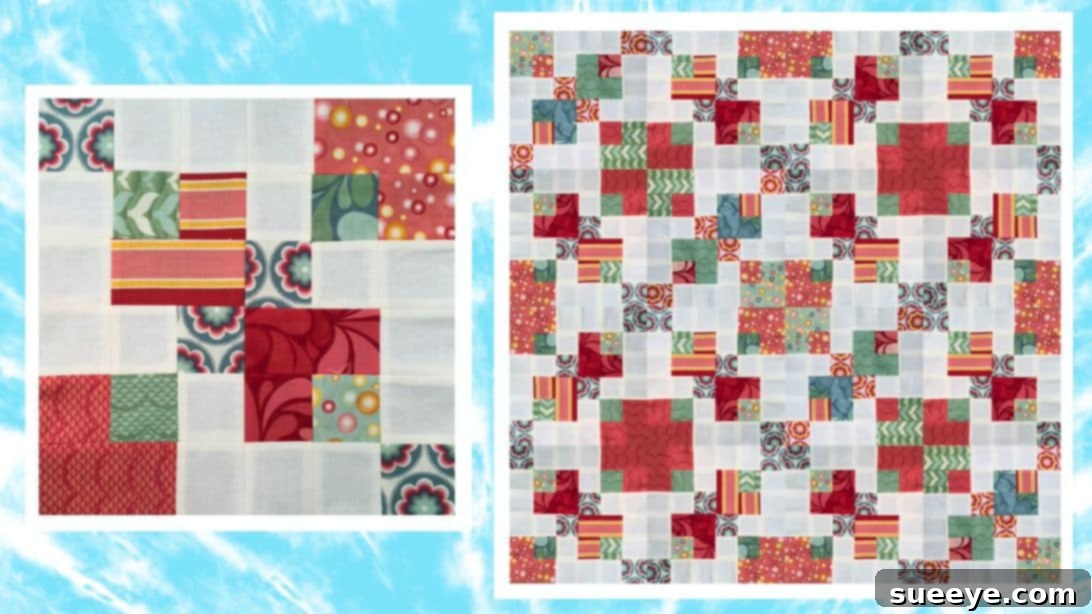
Master the Double Disappearing 9-Patch Quilt Block: A Beginner-Friendly Guide
Embark on a delightful quilting journey with one of the most beloved and visually captivating designs: the Double Disappearing 9-Patch block. This ingenious variation, popularized by talented quilters like Teresa DownUnder, is an absolute gem for quilters of all skill levels, especially those just starting out. Its magic lies in its simplicity – transforming basic 5-inch fabric squares into a complex, intricate pattern that will leave onlookers wondering about your secret technique. Yet, despite its sophisticated appearance, it’s incredibly easy and quick to construct, making it a perfect project for a weekend afternoon or a focused crafting session.
The beauty of the Double Disappearing 9-Patch lies in its deceptive nature. You begin with a straightforward 9-patch block, a fundamental building block in quilting. But then, with a few strategic cuts and rearrangements, the original 9-patch seems to “disappear,” giving rise to a fresh, dynamic design with floating squares and intersecting lines. This tutorial will guide you through each step, ensuring you achieve perfect results and gain confidence in your quilting abilities. Prepare to be amazed by how easily you can create stunning textile art. Beyond just one block, the techniques learned here can be applied to create a variety of patterns, from small decorative pieces to full-sized quilts, limited only by your imagination. Get ready to experience the pure joy of sewing and witness the transformation of fabric into a masterpiece!
Gathering Your Materials: The Foundation of Your Quilt
Success in quilting often begins with meticulous preparation and selecting the right materials. For this Double Disappearing 9-Patch block, you’ll be primarily working with easily manageable 5-inch squares, making it an excellent stash-buster project for those leftover fabric scraps. Here’s a detailed list of what you’ll need, along with some insights into choosing your fabrics:
- Five 5″ x 5″ squares in your main print: This fabric will form a significant part of your first 9-patch block. Choose a vibrant pattern or a solid color that you love.
- Five 5″ x 5″ squares in a matching or complementary print: This will be the focal point of your second 9-patch block and will provide lovely contrast when swapped. Consider a print that harmonizes with your main print, perhaps with a smaller scale or a different color value to create visual interest.
- Eight 5″ x 5″ squares in a background fabric: A neutral solid like white, cream, or light grey often works best for the background, allowing your prints to truly pop. However, feel free to experiment with subtle tone-on-tone prints for added texture, ensuring they don’t overpower your main fabrics.
Essential Notions and Tools: Equipping Your Sewing Space
Beyond the fabric, having the right tools makes the entire quilting process smoother, more accurate, and much more enjoyable. Don’t underestimate the impact of good quality notions:
- Sewing Machine: A reliable machine capable of a consistent straight stitch is paramount. Ensure it’s threaded with good quality cotton thread that blends or contrasts with your fabrics as desired.
- Rotary Cutter: A sharp 45mm or 60mm rotary cutter is indispensable for precise fabric cuts. A dull blade can lead to frayed edges and inaccurate sizing.
- Self-Healing Cutting Mat: Protect your work surface and prolong the life of your rotary cutter blade with a sturdy self-healing mat.
- Quilting Ruler: An acrylic ruler, ideally 6″ x 12″ or larger, with clear measurements is crucial for accurate cutting and trimming.
- Fabric Scissors: Keep a pair of sharp scissors exclusively for fabric to avoid dulling them on paper or other materials.
- Pins or Fabric Clips: To hold fabric pieces together securely before sewing, preventing shifting and ensuring accurate seams.
- Iron and Ironing Board/Pressing Mat: Proper pressing is as vital as accurate sewing in quilting. An iron helps set seams and keeps your blocks flat and square.
- Seam Ripper: Every quilter needs one! Don’t be afraid to use it to correct mistakes – accuracy is key to a beautiful finish.
- Thread: High-quality 100% cotton thread is recommended for quilting, matching the weight of your fabric.
Before you even make your first cut, consider pre-washing your fabrics. This can prevent future shrinkage and color bleeding, especially if you’re mixing different fabric types or intense colors. Always press your fabrics before cutting to remove any wrinkles, ensuring your squares are perfectly flat and true to size.
Step-by-Step Instructions: Crafting Your Double Disappearing 9-Patch
Now that you have all your materials ready and your workspace prepared, let’s dive into the creative process. Each step is designed to be clear and straightforward, guiding you toward a beautiful finished block. Remember to maintain a consistent 1/4-inch seam allowance throughout this project for the best results.
Step 1: Constructing Your First 9-Patch Block
The journey begins with the classic 9-patch block. This foundational step requires five 5-inch squares of your main print and four 5-inch background squares. The arrangement is crucial here, as it sets the stage for the ‘disappearing’ effect. Lay out your squares in three rows of three, alternating between your main print and background fabric. Visually, you’ll have three print squares in the first row (corner, center, corner), two background squares and one print square in the second row (background, print, background), and three print squares in the third row (corner, center, corner). Alternatively, you can visualize it as having your main print in all four corners and the very center, with background fabrics filling the remaining four spots. This creates a balanced visual with the print dominating. Take a moment to admire your layout before sewing. Carefully sew the squares together in rows, pressing your seams after each row. Then, join the three rows to form your complete 9-patch block. Press the entire block thoroughly, ensuring it lies flat and square. Accuracy in this initial step is paramount for the subsequent cuts.
Step 2: Creating the Second Complementary Block
Repeat the exact same process you followed in Step 1, but this time, use your five 5-inch squares of the matching or complementary print and the remaining four 5-inch background squares. The arrangement should mirror that of your first block: the complementary print in the corners and center, and the background fabric in the remaining four positions. This second block is crucial for achieving the “double” aspect of the disappearing 9-patch, as its elements will be swapped with the first block. Again, pay close attention to your 1/4-inch seam allowance and press all seams carefully. Having two perfectly constructed 9-patch blocks forms the foundation for the exciting transformation that’s about to occur.
Step 3: The “Disappearing” Cut – Strategic Trimming
This is where the magic begins! Take your first completed 9-patch block. Using your quilting ruler and rotary cutter, carefully cut one 2 1/2-inch strip off each of the four sides of the block. Measure precisely from the raw edge of the block inwards. It’s vital that these cuts are straight and accurate, as they define the new design elements. What you’ll be left with is a smaller, central square and four detached strips around it. Repeat this exact same cutting process for your second 9-patch block. You should now have two central squares and eight detached strips (four from each block). These strips are the key to the ‘disappearing’ effect and the subsequent visual rearrangement.
Step 4: Swapping for Transformation – The Core of the “Double” Effect
Now comes the unique “double” aspect of this block variation. Take the four strips you cut from the first 9-patch block and set them aside. Then, take the four strips you cut from the second 9-patch block and place them around the central square of the *first* block. Conversely, take the four strips from the first block and arrange them around the central square of the *second* block. Essentially, you’re swapping the outer strips between the two initial blocks. This creates an immediate visual contrast and introduces the intricate pattern that will emerge. This exchange of elements is what gives the “Double Disappearing” its distinctive and captivating appearance, making it look much more complex than its construction truly is.
Step 5: Reassembling the Blocks – Bringing the New Design to Life
With your strips swapped, it’s time to reassemble your transformed blocks. Pick up one of the blocks (a central square with the newly swapped strips surrounding it). First, sew the top and bottom strips to the central square. Ensure you align them carefully and maintain your consistent 1/4-inch seam allowance. Once these two strips are sewn, press the seams flat, preferably towards the newly added strips, and trim any excess fabric if necessary to keep the edges neat. Next, attach the left and right strips to the central unit (the center square with its top and bottom strips already attached). Again, use a 1/4-inch seam allowance. Press these seams flat as well, and trim any overhang. At this stage, you should have two reassembled blocks, each showcasing a new, striking design due to the swapped fabrics. Take a moment to appreciate the new pattern emerging.
Step 6: The Final Transformation and Quadrant Rotation
This final step unveils the true “disappearing” effect and creates the intricate visual complexity. Take one of your reassembled blocks. Using your ruler, find the exact middle point of each side. Carefully cut the block in half, both horizontally and vertically, through these middle marks. You will now have four equal quadrants from that single block. This is where the magic really happens: Rotate the top-left quadrant 180 degrees. Then, rotate the bottom-right quadrant 180 degrees. The top-right and bottom-left quadrants remain in their original orientation. This rotation is crucial for creating the dynamic, pinwheel-like effect that gives the Double Disappearing 9-Patch its signature look. Once rotated, pin the quadrants in pairs (top two, bottom two) and sew them together with a 1/4-inch seam allowance. Press seams open or to one side to reduce bulk. Finally, sew the two resulting halves together to complete your first Double Disappearing 9-Patch block. Repeat this entire process (cutting into quadrants, rotating, and reassembling) with your second reassembled block. You will now have two unique and stunning Double Disappearing 9-Patch blocks, each a testament to a clever quilting technique.
Tips for Quilting Success: Elevate Your Craft
Achieving beautiful, professional-looking quilt blocks is all about precision and patience. Here are some extra tips to help you succeed with your Double Disappearing 9-Patch and future quilting projects:
- Accuracy is Paramount: From cutting your initial squares to making your 2.5-inch cuts and sewing your seams, strive for precision. Even a slight deviation can lead to blocks that don’t fit together perfectly.
- Consistent Seam Allowance: The 1/4-inch seam allowance is a quilter’s best friend. Use a seam guide on your machine or mark it with tape to ensure consistency.
- Press, Don’t Iron: When pressing seams, use an up-and-down motion rather than sliding the iron. This prevents stretching and distorting your fabric. Pressing after every seam helps keep your work flat and square.
- Sharp Tools: A sharp rotary cutter blade makes clean, accurate cuts. Replace it regularly.
- Pin Generously: Don’t skimp on pins, especially when joining rows or pieces where seams need to match up. This prevents fabric from shifting.
- Trim Threads: Trim loose threads as you go. This prevents them from getting caught in later seams or showing through lighter fabrics.
- Square Up Your Blocks: After each major step, especially after reassembling the larger blocks and then again after the final quadrant assembly, use your ruler to square up your blocks. This means trimming them to a consistent size, ensuring all corners are 90 degrees and all sides are straight. This makes joining multiple blocks much easier.
- Practice Makes Perfect: Don’t be discouraged if your first block isn’t absolutely perfect. Each block you make will improve your technique and confidence.
Expanding Your Quilt Project: Beyond the Block
Once you’ve mastered making individual Double Disappearing 9-Patch blocks, the possibilities for expanding your quilt project are endless. These blocks are incredibly versatile and can be used in a myriad of ways to create stunning finished pieces:
- Quilt Top Assembly: Arrange multiple blocks in a grid to create a larger quilt top. Experiment with different layouts – you can rotate adjacent blocks to create even more intricate secondary patterns.
- Sashing and Borders: Add sashing (strips of fabric between blocks) to give your blocks definition and provide visual breathing room. Borders around the entire quilt top can frame your design and increase the overall size.
- Varied Projects: These blocks aren’t just for full-sized quilts! Make a few blocks to create charming placemats, hot pads, cushion covers, tote bag panels, or even a unique table runner.
- Color Play: Experiment with different color palettes. High contrast fabrics will emphasize the “disappearing” effect, while analogous colors will create a softer, more blended look. Don’t be afraid to try monochromatic schemes or bold, vibrant combinations.
- Quilting and Binding: Once your quilt top is complete, layer it with batting and a backing fabric. Quilt through all three layers (by hand or machine) to secure them and add texture. Finally, finish the edges with binding for a professional, durable finish.
The Double Disappearing 9-Patch block is a fantastic example of how simple shapes and clever cutting can lead to incredibly beautiful and complex-looking results. It’s a rewarding project that offers endless creative possibilities for both new and experienced quilters.
Did you love learning this easy and quick pattern? If so, make sure to check out Teresa DownUnder’s YouTube channel for a wealth of other inspiring video tutorials. She has tons of creative ideas and detailed instructions for various patterns that will surely fuel your quilting passion. Happy sewing, and enjoy creating your unique textile art!
Double Disappearing 9-Patch Block Variation: Your Next Quilting Adventure