
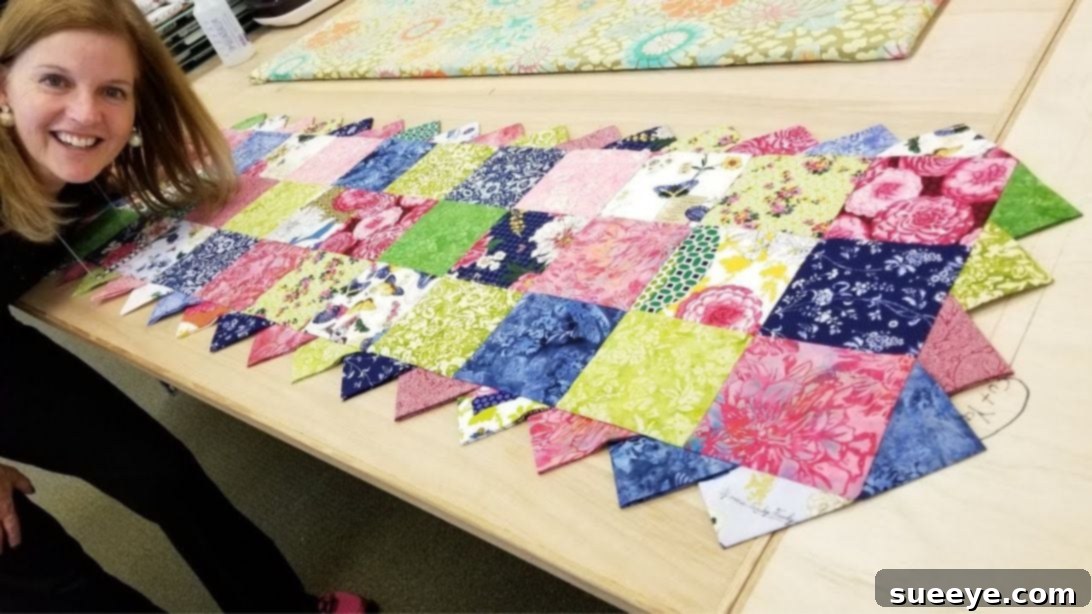
Transform your living space with a touch of handmade elegance! This exquisite prairie points runner, inspired by the creative brilliance of Jordan Fabrics, is more than just a decor piece; it’s a statement of style and craftsmanship. Perfect for adding a boutique-style accent to your dining table, coffee table, or any surface that craves a vibrant splash of color and texture, this project is incredibly rewarding. Featuring a delightful interplay of various patterns and harmonizing hues, this runner is designed to catch the eye and warm the heart. Whether you’re a seasoned quilter or just embarking on your sewing journey, this prairie points runner offers an accessible, enjoyable, and ultimately successful quilting experience. Its straightforward steps make it an ideal project for beginners, yet the stunning final product will impress even the most experienced crafters. Dive into the world of fabric artistry and create something truly unique for your home with our detailed guide below.
Why Choose a Prairie Points Runner?
The charm of a prairie points runner lies in its distinctive dimensional edges, created by small folded fabric triangles, known as prairie points. This classic quilting technique adds an appealing texture and a playful border that elevates a simple table runner into a piece of textile art. Beyond its aesthetic appeal, a handmade runner offers numerous benefits:
- Personalized Decor: Select fabrics that perfectly match your home decor or reflect seasonal themes, allowing for endless customization.
- Budget-Friendly Style: Achieve a high-end, boutique look without the hefty price tag, using fabric scraps or affordable charm packs.
- Skill Building: This project reinforces fundamental quilting skills such as precise cutting, consistent seam allowances, and accurate pressing, which are essential for future projects.
- Unique Gift Idea: A handmade prairie points runner makes a thoughtful and cherished gift for weddings, housewarmings, or holidays.
- Creative Expression: It’s an opportunity to experiment with color theory, fabric placement, and your own artistic vision, bringing joy and satisfaction with every stitch.
Materials for Your Prairie Points Runner:
Gathering the right materials is the first step towards a successful quilting project. For this stunning Donna’s Prairie Points Runner, you’ll need the following items. The use of 5-inch fabric squares (often found in “charm packs”) makes this project incredibly efficient and beginner-friendly, eliminating the need for extensive fabric cutting.
- 33 pieces of 5″ squares for the runner top: These squares will form the main body of your runner. Consider using a mix of complementary patterns and solids to create visual interest. Pre-cut charm packs are perfect for this, offering a coordinated collection of fabrics.
- 40 pieces of 5″ squares for the prairie points: These squares will be transformed into the signature dimensional triangles. Choose fabrics that either contrast beautifully or subtly complement the runner top, ensuring the prairie points truly stand out.
- 54″ x 16″ backing fabric: This piece will provide a neat and finished look to the back of your runner, as well as add stability. You might opt for a solid color that matches one of your chosen prints or a subtle coordinating pattern.
- 54″ x 16″ batting fabric: Batting is the soft, fluffy layer sandwiched between the runner top and the backing. It gives the runner its loft, warmth, and quilted texture. Cotton or cotton-poly blend battings are popular choices for their drape and ease of quilting.
- Basic Sewing Supplies: Don’t forget your sewing machine, thread (matching or neutral), rotary cutter and mat, quilting ruler, fabric scissors, pins or fabric clips, and an iron with a pressing surface.
Step-by-Step Guide to Crafting Your Prairie Points Runner:
Follow these detailed instructions to bring your beautiful prairie points runner to life. Precision in cutting and pressing, along with consistent seam allowances, will ensure a professional-looking finish.
Step 1: Planning and Arranging Your Runner Top Squares
Begin by laying out your 33 pieces of 5-inch squares. Visualize the final look of your runner by arranging them into three distinct rows, with each row containing eleven squares. This is your chance to unleash your creativity! Experiment with different color combinations, pattern placements, and orientations until you achieve a design that is visually appealing and harmonious. You might aim for a gradient effect, a checkerboard pattern, or a completely random yet balanced layout. Take your time during this crucial planning stage, as it will determine the overall aesthetic of your finished runner. Once you are satisfied with your arrangement, it’s helpful to snap a photo with your phone for reference, especially if you need to move pieces around later.
Step 2: Stacking and Securing Your Rows
Once your ideal layout is established, carefully pick up each row. Starting with the first row, create a staggered stack of your eleven squares. To do this, simply pick up the first square, then place the second square on top of it, slightly offset so you can see the edge of the first, and continue until all eleven squares are stacked. Place a pin or a fabric clip through the entire stack to keep them in order. Repeat this process for the second and third rows, ensuring each row remains separate and distinct. To prevent any confusion later on, especially when you start sewing, label each stack as “Row 1,” “Row 2,” and “Row 3.” This meticulous organization will save you time and potential headaches down the line.
Step 3: Assembling the Runner Rows
Now it’s time to begin sewing your individual rows. Take your third row first. Select the first two squares from the stack. Place them right sides together, aligning all edges precisely. Using your sewing machine, stitch along one edge with a consistent 1/2-inch seam allowance. This seam allowance is crucial for ensuring your finished runner dimensions are accurate. Continue this process, taking the next square from the stack, placing it right sides together with the previously sewn pair, and stitching with the same 1/2-inch seam allowance. Work your way along the entire row until all eleven squares in the third row are securely joined. Repeat this entire sewing process for the second row and then for the first row. Once each row is complete, set them aside carefully.
Step 4: Pressing Seams for a Flat Finish
Proper pressing is an often-underestimated step in quilting that greatly impacts the final appearance and durability of your project. For the bottom row (Row 3), carefully flip the sewn fabric squares and press all the seam allowances towards the left side using a warm iron. For the second row (Row 2), press all the seam allowances towards the right side. Finally, for the top row (Row 1), press the seam allowances towards the left, just like the bottom row. This alternating pressing technique (left, right, left) is essential because it allows the seams to “nest” perfectly when you join the rows together, reducing bulk and creating flatter, more professional-looking intersections.
Step 5: Joining the Rows and Final Pressing
With your individual rows sewn and precisely pressed, it’s time to assemble the main runner top. Take your first row and place it right sides together with the second row. Align the seams carefully, making sure the “nested” seams from the previous step fit snugly against each other. Pin extensively at each seam intersection and along the length of the fabric to prevent shifting. Sew along the joined edge with a 1/4-inch seam allowance. This smaller seam allowance is standard for joining quilt blocks and rows. Once sewn, open the fabric and use your fingers to “finger press” the new seam open to check for any puckers or misalignments. Next, repeat this process to sew the third row to the second row, again ensuring precise alignment and using a 1/4-inch seam allowance. After all rows are joined, give the entire runner top a thorough steam press. This final press will set your seams, flatten any remaining wrinkles, and give your runner top a crisp, finished appearance.
Step 6: Crafting Your Prairie Points
The prairie points are the charming, dimensional elements that define this runner. To create them, take one of your 5-inch squares designated for the points. Lay it flat, wrong sides facing up. Fold the square diagonally, bringing two opposite corners together to form a triangle. Press this fold sharply with a warm iron to create a crisp crease. Next, fold this newly formed triangle one more time, aligning the raw edges of the base to meet the folded edge, effectively creating a smaller, double-folded triangle. Press this second fold firmly. The raw edges of this smaller triangle should align, and the point should be sharp. Repeat this folding and pressing process for each of the remaining 39 squares. This attention to detail will ensure all your prairie points are uniform and well-defined, contributing significantly to the polished look of your runner.
Step 7: Attaching the Prairie Points to the Runner Top
Now, let’s add the signature prairie points to your runner. Begin by focusing on one of the long sides of your runner top. You will start by placing two prairie point triangles at each corner of this long side, ensuring their raw edges align with the raw edge of the runner top and their points face inward towards the runner’s center. Next, arrange 14 additional prairie points evenly spaced between these corner points. A key detail here is to ensure the points are approximately 3 inches apart, which will create a slight overlap, giving them a fuller, more continuous look. Critically, make sure you do not place a prairie point triangle with the same fabric pattern directly on top of a matching square on the runner top itself; vary the patterns for visual interest. Pin each prairie point securely in place. Then, using your sewing machine, stitch along the raw edge of the runner, a little less than a quarter-inch from the edge. This is called “stay stitching,” and it temporarily holds the prairie points in place before the final layers are added. Repeat this entire process for the other long side of the runner. For the two shorter ends of the runner, you will use 4 prairie point triangles for each side, arranging them evenly with the same attention to spacing and pinning.
Step 8: Finishing and Turning Your Runner
You’re almost there! Lay your backing fabric flat, right side up. Place your batting fabric directly on top of the backing, aligning all edges. Finally, place your runner top (with the prairie points attached and folded inward towards the center of the runner) on top of the batting, with its right side facing down. Essentially, you have a sandwich: backing (right side up), batting, runner top (right side down, prairie points tucked inside). Pin all three layers securely around the perimeter. Stitch around the entire perimeter of the runner, just inside the stay stitching you previously made for the prairie points, using a consistent seam allowance (e.g., 3/8 or 1/2 inch). However, remember to leave an 8-inch opening along one of the long sides. This opening is essential for turning the runner right side out. Before turning, carefully trim off any excess batting and backing fabric, getting as close to your stitch line as possible without cutting through the stitches. Also, clip the little corners at an angle to reduce bulk and create crisp points when turned. Carefully reach into the opening and gently pull the entire runner right side out. Use a point turner or a blunt tool to push out the corners evenly. Smoothen the edges with your fingers, ensuring the prairie points pop out neatly. Hand-stitch or machine-stitch the 8-inch opening closed, creating an invisible seam. As a final touch, “stitch in the ditch” along all the seams of your runner top. This means sewing directly into the seam lines where your squares are joined, which helps to flatten the runner, create a quilted effect, and prevent shifting of the batting. This final step adds a beautiful, professional finish to your Donna’s Prairie Points Runner.
Tips for a Perfect Prairie Points Runner:
- Precision is Key: In quilting, accuracy in cutting and seam allowances makes a huge difference. Use a rotary cutter and ruler for the most precise cuts.
- Press, Don’t Iron: When pressing seams, lift and place your iron rather than sliding it, which can distort your fabric.
- Use Good Quality Thread: A strong, good-quality thread will ensure your runner lasts.
- Don’t Rush the Layout: The arrangement of your fabric squares is a creative step. Spend time on it to get a design you truly love.
- Test Your Seam Allowance: Before starting your project, sew a test strip of fabric to ensure your 1/4-inch and 1/2-inch seam allowances are consistent.
- Pin Generously: Use plenty of pins, especially when joining rows and attaching prairie points, to prevent fabric shifting.
Caring for Your Handmade Runner:
To ensure your beautiful prairie points runner remains a cherished part of your home decor for years to come, proper care is essential. How you wash and maintain it will depend largely on the fabric choices you made. Generally, if you used 100% cotton fabrics and batting, the runner can be machine washed, but gentle care is recommended. Always wash in cold water on a delicate cycle to prevent shrinking, fading, or distorting the stitches. Use a mild detergent and avoid harsh chemicals or bleach. It’s often best to air dry your runner by laying it flat on a clean surface or hanging it over a shower rod to prevent wrinkles and maintain its shape. If machine drying, use a low heat setting and remove it while still slightly damp to avoid over-drying and potential shrinkage. A light press with a steam iron on a cotton setting can help flatten and refresh the runner after drying. For runners with delicate embellishments or if you’re unsure about the fabric content, hand washing or spot cleaning may be a safer alternative. Regularly dusting or gently vacuuming with a soft brush attachment can also help keep it clean between washes.
Embrace the Joy of Quilting with Donna’s Prairie Points Runner!
Congratulations on embarking on this wonderful quilting journey! Creating Donna’s Prairie Points Runner is an incredibly satisfying project that yields a stunning, handcrafted piece for your home. This runner, with its delightful blend of colors, patterns, and dimensional prairie points, is sure to become a focal point in any room, sparking conversations and admiration. Remember, every stitch tells a story, and this runner will be a testament to your creativity and patience. Whether it graces your dining table, brightens a console, or becomes a thoughtful gift, its handmade charm is unparalleled. We hope this comprehensive guide has empowered you to create your own masterpiece. Don’t hesitate to experiment with different fabrics and color palettes to truly make it your own. Happy quilting, and enjoy the beauty you’ve brought to life!