
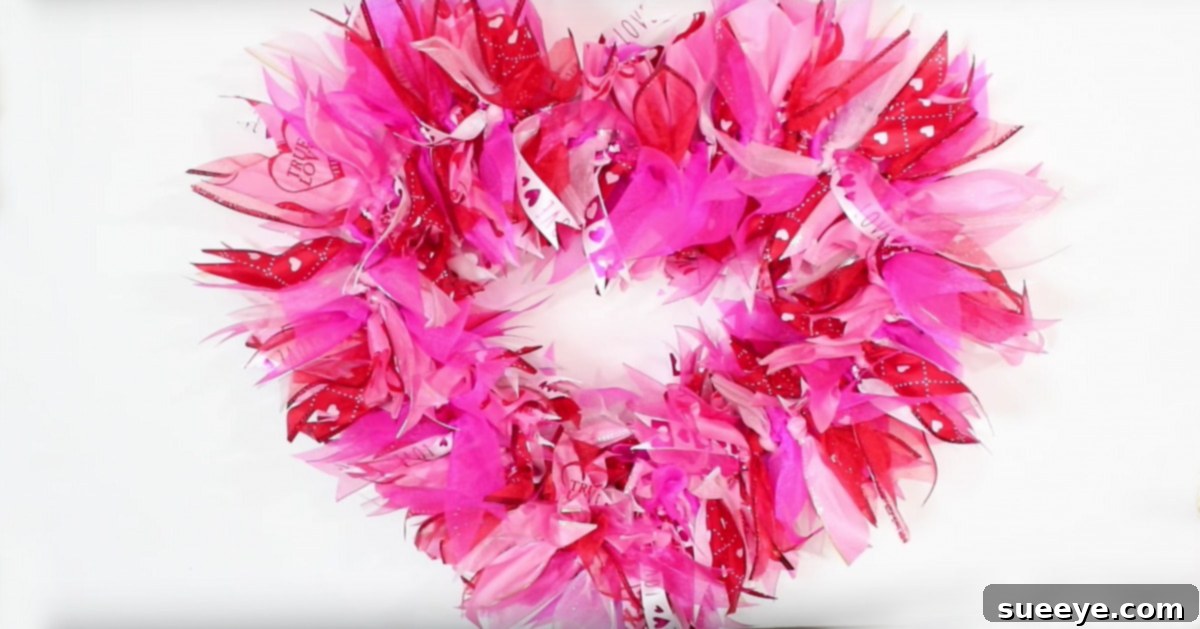
Transform your front door into a welcoming beacon of love and festive charm with this incredibly simple DIY heart wreath tutorial. Crafted with budget-friendly supplies from the Dollar Tree, this project promises to add a touch of romance to your home without breaking the bank. Imagine the smiles and warmth it will bring every time you or your guests approach your door! This mood-lifting decoration is not just for Valentine’s Day; its versatile design means you can adapt it for any season, making it a truly valuable addition to your seasonal decor collection.
Craft Your Own Dollar Tree DIY Valentine’s Day Heart Wreath: A Simple & Sweet Tutorial
There’s something uniquely satisfying about creating beautiful home decor with your own hands, especially when it’s as effortless and affordable as this stunning heart wreath. While we’ve chosen a vibrant Valentine’s Day theme for this particular guide – complete with romantic reds, pretty pinks, and crisp whites – the fundamental technique is so adaptable that you can easily swap out colors and ribbons to suit any holiday or personal aesthetic. Craving a spring refresh? Opt for pastels and florals. Dreaming of autumn coziness? Rich oranges, browns, and golds will work wonders. The possibilities are truly endless, making this DIY wreath a year-round crafting favorite.
We understand that life can be busy, and elaborate DIY projects might feel daunting. However, this Dollar Tree heart wreath defies all expectations of complexity. It’s so ridiculously easy to assemble that there’s genuinely no excuse not to infuse your home with some delightful holiday spirit. All the essential supplies can be sourced from your local Dollar Tree, keeping the total cost well under $20. Yes, you read that right – beautiful, personalized decor for less than the price of a fancy coffee! What’s stopping you from adding a heartwarming touch to your entrance this holiday season?
Why Choose a DIY Wreath?
Beyond the undeniable cost savings, embarking on a DIY wreath project offers a wealth of benefits. Firstly, it allows for unparalleled personalization. You get to select every ribbon, every shade, and every embellishment to perfectly match your home’s unique style and your personal taste. No more settling for mass-produced decor that doesn’t quite capture your vision. Secondly, crafting can be incredibly therapeutic. The repetitive motion of tying ribbons, the focus required, and the satisfaction of seeing your creation come to life can be a wonderful way to unwind and de-stress. It’s a moment of mindful creation in a busy world. Lastly, a handmade wreath carries a special sentiment. Whether it’s displayed proudly on your own door or given as a thoughtful gift, it speaks volumes about the care and effort invested, making it far more meaningful than any store-bought alternative.
The Magic of Dollar Tree: Quality & Affordability
The Dollar Tree is a true treasure trove for crafters on a budget, and this Valentine’s Day heart wreath project perfectly showcases its potential. For just a few dollars, you can gather all the necessary components without compromising on visual appeal. The sheer variety of ribbons available – from classic satins to patterned grosgrains, and even seasonal specials – ensures you’ll find exactly what you need to bring your creative vision to life. Don’t underestimate the quality; with a little creativity, these affordable materials can be transformed into high-end looking decor that will surprise and impress. This project is a testament to smart shopping and the power of DIY.
Gathering Your Essential Supplies: What You’ll Need
Creating this charming heart wreath is a straightforward process, and the list of materials is wonderfully short and sweet. Most importantly, everything listed below can be found at your local Dollar Tree, ensuring this project remains incredibly budget-friendly. Here’s what you’ll need to gather to get started on your DIY journey:
- Heart Wire Wreath Form: This is the foundation of your wreath, readily available in the craft or seasonal section of Dollar Tree. Its sturdy wire frame provides the perfect base for tying ribbons and shaping your heart.
- Assorted Ribbons: The true stars of the show! We recommend visiting the Valentine’s Day section first for themed options, then exploring the new spring arrivals and the general floral/craft sections. Look for a variety of widths, textures, and patterns to add visual interest. For a rich, full look, consider mixing and matching.
- Small Ribbon Rolls: Aim for approximately 1 roll of each small ribbon you choose. Small rolls are great for introducing accent colors or thinner textures. For this project, we used 3 small rolls in total to provide diverse accents.
- Large Ribbon Rolls: These will form the bulk and fullness of your wreath. We recommend cutting from approximately 2 rolls of each large ribbon selected, totaling about 12 segments for a lush appearance. Feel free to adjust based on the desired density and your chosen ribbon widths.
**Pro Tip:** It’s always better to have a little extra ribbon than not enough. In our experience, we had about 2 rolls of large ribbon left over, which can be saved for future projects or to make a matching bow. The total estimated cost for all materials to create one gorgeous wreath came in at an incredible $16!
Crafting Your Heart Wreath: A Step-by-Step Overview
While an actual tutorial video would provide the best visual guidance, we can outline the general process here to give you a clear understanding of how to assemble your beautiful ribbon wreath. The core technique involves cutting ribbons into manageable strips and tying them securely to the wire wreath form. This method is incredibly forgiving and allows for creative layering.
1. Prepare Your Ribbons:
Start by unrolling your chosen ribbons. For consistency and a neat finish, cut all your ribbon into uniform lengths. A good starting point is about 8-10 inches per strip, but you can adjust this based on how long you want your ribbon tails to be. Using a ruler or a cutting mat will ensure even pieces. For a varied texture, you might cut some thicker ribbons slightly shorter and thinner ribbons a bit longer.
2. Attach Ribbons to the Wreath Form:
Take one ribbon strip, fold it in half, and thread the looped end under one of the wire strands of your heart-shaped frame. Pull the loose ends of the ribbon through the loop and tug gently to secure it into a simple knot. This creates a “lark’s head knot” or “cow hitch knot” that will hold your ribbon firmly in place. Continue this process, placing ribbons closely together around the entire wire frame. Alternate colors and patterns as you go to create an appealing visual flow. Don’t be afraid to mix widths and textures for a dynamic look.
3. Fill for Fullness:
The key to a lush, full wreath is ample ribbon. Continue adding ribbons, pushing them together tightly on the wire frame. The closer they are, the more voluminous your wreath will appear. Once you’ve covered the entire heart form, step back and assess. Are there any sparse areas? Go back and add more ribbons until you are happy with the density and shape.
4. Fluff and Arrange:
Once all your ribbons are tied, gently fluff and arrange them. You can trim any uneven ends if desired, or leave them varied for a more organic feel. Adjust the ribbons so they lay nicely and completely obscure the wire frame. This final step brings your wreath to life, giving it that professional, handcrafted look.
Tips for a Perfect Wreath Every Time
To ensure your DIY heart wreath turns out beautifully, keep these handy tips in mind:
- Vary Your Ribbons: Don’t stick to just one type. Mix satin with grosgrain, sheer with patterned, and different widths. This adds depth and visual interest to your finished wreath.
- Cut Uniformly: While a little variation is fine, generally try to cut your ribbon strips to similar lengths. This creates a cohesive and tidy appearance.
- Tie Tightly: Make sure each ribbon knot is snug against the wire frame. This prevents ribbons from slipping or moving around, especially if your wreath will be exposed to outdoor elements.
- Consider Your Color Palette: For Valentine’s Day, think traditional reds, pinks, and whites, perhaps with touches of gold or silver. For other seasons, choose colors that reflect that time of year.
- Add Embellishments: While our basic design is ribbon-focused, don’t hesitate to add extra touches like faux flowers, glittery hearts, small signs, or even battery-operated fairy lights for extra sparkle. These can be hot-glued on once the ribbons are secure.
- Don’t Be Afraid to Experiment: The beauty of DIY is that you can always adjust. If a ribbon isn’t working, simply untie it and try another.
Beyond Valentine’s Day: Customizing Your Ribbon Wreath for Any Occasion
The basic technique of creating a ribbon wreath on a wire frame is incredibly versatile, allowing you to adapt this project for almost any holiday or season. Once you’ve mastered the Valentine’s Day version, consider these ideas for year-round decorating:
- Spring & Easter: Use pastel ribbons – light blues, soft yellows, mint greens, and lavender. Add small faux flowers, plastic eggs, or bunny cutouts.
- Patriotic (4th of July, Memorial Day): Red, white, and blue ribbons are a must. Incorporate star-shaped embellishments or small flags.
- Fall & Halloween: Embrace autumn hues like deep oranges, rustic browns, golden yellows, and rich purples. You can add mini pumpkins, artificial leaves, or spooky-cute spiders for Halloween.
- Christmas & Winter: Classic reds and greens, silver and gold, or icy blues and whites. Pinecones, berry sprigs, miniature ornaments, or festive bows will complete the look.
- Everyday Decor: Choose ribbons that match your home’s existing color scheme and display your wreath year-round as a chic accent piece.
This ensures that your investment in a wire wreath form and a few extra rolls of ribbon can provide beautiful, handcrafted decor for every season, maximizing your crafting value!
Displaying and Storing Your Handmade Wreath
Once your beautiful heart wreath is complete, it’s ready to adorn your home! Most commonly, these wreaths are hung on the front door, offering a warm welcome to all who arrive. However, don’t limit its potential to just the entryway. A ribbon wreath can also look fantastic above a mantelpiece, on an accent wall, or even as part of a gallery wall arrangement indoors. Its lightweight nature makes it easy to hang with a simple command hook or a wreath hanger.
When the season is over, storing your wreath properly will ensure it lasts for many years to come. Gently flatten any ribbons that might be sticking out and place the wreath in a sturdy box or a dedicated wreath storage bag. Keep it in a cool, dry place away from direct sunlight to prevent colors from fading. This simple care routine will allow you to bring out your beloved heart wreath year after year, making it a cherished part of your seasonal traditions.
Ready to get started? Watch how Bianca Andress brings this darling wreath to life in her detailed step-by-step tutorial. Following along with her will make the process even smoother and more enjoyable, so you can quickly get busy making one for your door! You’ll be amazed at how simple it is to achieve such a charming and inviting piece of decor. Happy crafting!