
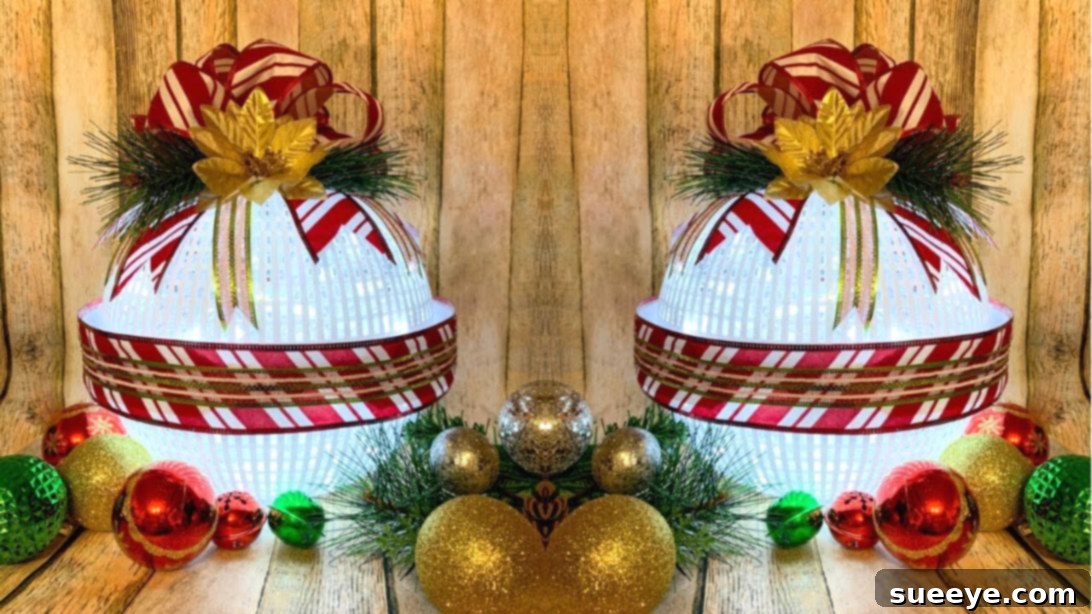
Are you looking for a unique, budget-friendly, and incredibly charming way to elevate your holiday decor this Christmas season? Imagine transforming ordinary household items into breathtaking festive ornaments that capture the spirit of joy and creativity. This guide will walk you through crafting a spectacular, oversized Christmas decoration that looks like it came straight out of a high-end boutique, but is cleverly made from two simple Dollar Tree colanders! Inspired by the ingenious idea from This Southern Girl Can on YouTube, this DIY project is not only easy and fast to complete but also guarantees to add a radiant glow and a touch of whimsy to any space. Whether placed majestically beside your Christmas tree, adorning your entryway, or becoming the radiant focal point of a festive tablescape, this sparkling creation will undoubtedly brighten your room and impress all your holiday guests. Get ready to unleash your inner crafter and create a dazzling piece that truly stands out!
Transform Dollar Tree Colanders into Stunning Christmas Decor: A DIY Guide
The Magic Behind the Dollar Tree Strainer Christmas Decoration
The holiday season is all about warmth, cheer, and those special touches that make your home feel inviting. While store-bought decorations are convenient, there’s a unique satisfaction and charm in displaying handmade pieces. This Dollar Tree Strainer Christmas Decoration epitomizes affordable elegance and creative ingenuity. It takes two humble kitchen colanders and, with a few simple steps, transforms them into a magnificent, illuminated ornament. The beauty of this project lies in its simplicity and the dramatic impact it creates. It’s perfect for those who love to infuse their personality into their holiday arrangements without breaking the bank. By following our detailed instructions, you’ll craft a durable, eye-catching decoration that can be cherished for many Christmases to come.
Why Choose DIY for Your Holiday Decor?
Diving into DIY Christmas decorations offers a wealth of benefits beyond just saving money. Firstly, it allows for unparalleled personalization. Instead of generic decor, you create pieces that reflect your unique style, color scheme, and preferences. This ensures your home truly feels like “yours” during the festive period. Secondly, crafting can be a wonderfully therapeutic and enjoyable activity, providing a much-needed break from holiday stress. It’s an opportunity to unwind, get creative, and experience the satisfaction of making something beautiful with your own hands.
Furthermore, DIY projects like this colander ornament can become cherished family traditions. Gathering loved ones to create holiday crafts fosters bonding and creates lasting memories. Imagine years from now, recalling the fun you had making this very decoration! It’s also an eco-friendlier option; by repurposing everyday items like colanders, you contribute to less waste and embrace sustainable decorating practices. Ultimately, handmade decor injects a profound sense of warmth, history, and personality into your home, making your holiday celebrations even more special and meaningful.
Gathering Your Crafting Essentials: Materials List
Before embarking on your crafting journey, ensure you have all the necessary materials at hand. The beauty of this project is that most items are either readily available or easily sourced from your local dollar store, making it incredibly budget-friendly.
- 2 pieces of Dollar Tree white colander: These are the stars of our show! Opt for white colanders for a classic, clean look, but don’t hesitate to choose other colors if they better suit your decor theme.
- 2-inch wired ribbon: This wide ribbon will form the central band of your ornament, adding structure and a touch of elegance. Wired ribbon is excellent as it holds its shape beautifully for bows and accents.
- LED cool white mini lights: These lights will illuminate your ornament from within, creating a magical glow. Cool white offers a crisp, modern look, but warm white can also be used for a cozier ambiance. Ensure they are plug-in lights, or battery-operated for more versatile placement.
- Accent ribbon or nautical rope: This thinner ribbon or rope will overlay the wide ribbon, adding texture and visual interest. Consider metallic, glittery, or contrasting colors to make it pop.
- Hot glue: Essential for quick adhesion of ribbons and smaller embellishments. A reliable hot glue gun will make this process smooth.
- Contact adhesive glue (or strong craft glue): This type of glue provides a strong, long-lasting bond for joining the two colanders. Brands like E6000 or Gorilla Glue work wonderfully, ensuring your ornament stays intact for years.
- Clear cord or thin floral wire: Used to secure the LED lights inside the colanders. Its transparency ensures it won’t be visible once the ornament is complete.
- Heavy-duty wire cutters: Crucial for safely and efficiently removing the colander handles. Safety glasses are also highly recommended when using these tools.
Step-by-Step Guide to Crafting Your Colander Ornament
Step 1: Preparing Your Colanders – Safety and Efficiency
Safety should always be your top priority when undertaking any DIY project. Before you begin cutting, make sure to wear appropriate protective gear, especially safety glasses, to shield your eyes from any flying debris. Take your two Dollar Tree colanders and, using heavy-duty wire cutters, carefully remove the handles from both. The goal is to achieve a clean, smooth edge where the handles once were, as this will ensure a seamless join when the two colanders are brought together. Removing the handles is essential for creating the spherical, ornament-like shape and allows for easy ribbon application later on. Take your time with this step to avoid any jagged edges.
Step 2: Illuminating Your Ornament with LED Lights
Now comes the magical part: adding the lights! Take one of your prepared colanders and begin threading your LED cool white mini lights through the holes from the inside out. Use the clear cord or thin floral wire to secure the light strand around the inside rim and body of the colander. The key here is to distribute the lights as evenly as possible to ensure a consistent glow when illuminated. Don’t push all the lights entirely inside; make sure to leave a sufficient length of the light string (including the plug or battery pack) dangling outside the colander. This ensures you can easily plug it into an outlet or access the battery compartment once the two colanders are sealed together. Test the lights before proceeding to the next step to confirm they are all working correctly.
Step 3: Assembling Your Festive Sphere
This step is crucial for the structural integrity of your ornament. Apply a generous amount of contact adhesive glue around the entire rim of the colander that contains the lights. For immediate tackiness and extra reinforcement, you can also add a few dots of hot glue at various points along the rim. The hot glue will provide an instant hold, while the contact adhesive will create a permanent bond. Carefully align the second colander on top of the first, ensuring that their rims meet perfectly to form a globe shape. Apply even pressure around the entire seam to ensure a tight seal. Once you’re satisfied with the alignment, allow the glue to dry completely. For best results and maximum durability, it is highly recommended to let the ornament cure for a full 24 hours, ensuring a strong, lasting bond between the two pieces.
Step 4: Adding Elegance with Ribbons
With your colanders now securely joined, it’s time to add the decorative elements that will truly make your ornament shine. Take your 2-inch wired ribbon and begin wrapping it horizontally around the center seam where the two colanders meet. This ribbon not only covers the glue line but also adds a beautiful decorative band. Secure the ribbon in place with dots of hot glue as you wrap, ensuring it is snug and even. Once the wide ribbon is wrapped and secured, take your accent ribbon or nautical rope and carefully glue it directly over the center of the wide ribbon. This layering adds depth, texture, and a more polished, sophisticated look to your DIY Christmas decoration.
Step 5: The Grand Finale – Embellishing Your Creation
Now for the exciting part: adding the finishing touches that transform your colander sphere into a festive masterpiece! Start by crafting a beautiful bow from your wide wired ribbon. The wired edges will allow you to shape the bow perfectly, giving it volume and character. Next, cut three small pieces of the same wired ribbon, ensuring they are of equal length. For a decorative touch, cut a triangle shape into both ends of each piece, creating a stylish V-cut. Repeat this process with three small pieces of your accent ribbon.
Arrange these smaller ribbon pieces at the very top of your colander ornament, fanning them out slightly, and secure them with hot glue. These pieces will serve as the base for your main bow. Finally, firmly attach your large, pre-made bow on top of these accent ribbons using hot glue. To truly personalize and enhance your ornament, consider adding more Christmas decorations. Faux berries, sprigs of evergreenery, poinsettia flowers, small pinecones, or even a dusting of glitter can elevate its appearance dramatically. Don’t be afraid to experiment with different embellishments to match your unique holiday theme!
Tips for a Flawless DIY Christmas Decoration
- Patience is Key: Allow adequate drying time for all glues, especially the contact adhesive. Rushing can compromise the durability of your ornament.
- Test Your Lights: Always test your LED lights before permanently sealing the colanders to ensure all bulbs are working.
- Glue Selection: While hot glue offers quick adhesion, for structural integrity, rely on strong contact adhesive or craft glue. Use hot glue mainly for immediate tack and decorative elements.
- Ribbon Variety: Experiment with different ribbon widths, textures (velvet, satin, glitter), and patterns to create varied looks.
- Creative Freedom: Don’t be afraid to deviate from the exact instructions for embellishments. Your ornament is a canvas for your personal style!
Where to Display Your Dazzling Colander Ornament
The versatility of this DIY Dollar Tree Colander Christmas Decoration allows it to be showcased in numerous ways throughout your home, adding a touch of festive brilliance wherever it goes. Consider placing it as a grand focal point at the base of your Christmas tree, adding extra sparkle and drawing the eye. It also makes a magnificent statement piece in your entryway, warmly greeting guests as they arrive.
For those with a mantelpiece, this ornament can anchor a stunning holiday display, surrounded by smaller decorations, candles, and evergreen garlands. On a side table or console, it transforms into an instant conversation starter. For a truly enchanting outdoor display (if using weather-appropriate materials and lights), imagine it gracing your porch, illuminating the night with its gentle glow. Its substantial size ensures it won’t get lost in larger spaces, making it perfect for filling empty corners with holiday cheer.
Unleash Your Creativity: Customization Ideas
While the white colander design is elegantly classic, there are endless ways to customize your Dollar Tree Christmas Decoration to suit your specific taste and holiday theme.
- Color Power: Instead of white, consider using colanders in different colors. Spray paint them metallic gold, silver, or even a vibrant red or forest green before assembly for a completely different base look.
- Glitter and Glam: Once the colanders are joined, you can lightly spray the entire sphere with adhesive and dust it with fine glitter for a truly dazzling effect.
- Thematic Embellishments: If you have a specific theme (e.g., rustic, coastal, whimsical), choose ribbons and additional decorations that match. For rustic, think burlap ribbons and pinecones; for coastal, use jute rope and seashell accents.
- Different Sizes: If you can find colanders of varying sizes, create a set of these ornaments in different dimensions to make a more dynamic display.
- Personalized Touches: Add small hanging ornaments, family photos, or even small, written messages inside the colander (visible through the holes) for a deeply personal touch.
- Alternative Toppers: Instead of a bow, you could hot glue a large, faux poinsettia, a cluster of jingle bells, or even a miniature festive bird figure to the top.
Let your imagination guide you, and create a holiday decoration that is truly unique to you!
Caring for Your Handmade Holiday Treasure
To ensure your beautiful Dollar Tree Strainer Christmas Decoration brings joy for many holiday seasons, proper care and storage are essential. When the festivities conclude, gently dust the ornament with a soft cloth. Disconnect the lights from the power source. Store your ornament in a sturdy box, preferably wrapped in tissue paper or bubble wrap, to protect it from dust and damage. Choose a cool, dry place away from direct sunlight to prevent any fading or deterioration of materials. With a little care, this handmade gem will be a cherished part of your holiday traditions for years to come.
Your Handmade Holiday Masterpiece Awaits!
And there you have it – a magnificent, eye-catching Christmas decoration born from humble Dollar Tree colanders! This project is a testament to how creativity and a little effort can transform everyday items into extraordinary pieces of art. Not only will you save money, but you’ll also have the immense satisfaction of knowing you’ve crafted a truly unique and beautiful ornament. It’s an ideal activity for a cozy afternoon, yielding a stunning result that will undoubtedly be a conversation starter. So, gather your materials, follow these easy steps, and get ready to infuse your home with personalized holiday cheer. Don’t forget to share your dazzling Dollar Tree Strainer Christmas Decoration with friends and family – happy crafting, and may your holiday season be merry and bright!