
DIY Dollar Tree New Year’s Eve Crafts: Create Stunning & Budget-Friendly Party Serving Pieces
As another year draws to a close and a fresh beginning awaits, there’s no better time to infuse your home with festive cheer through creative and affordable DIY projects. New Year’s Eve is a celebration of new hopes and exciting possibilities, and what better way to set the mood than with dazzling decorations that don’t break the bank? We’ve stumbled upon an absolute gem of an idea that transforms simple Dollar Tree finds into spectacular New Year’s Eve serving pieces, perfect for displaying all your holiday treats. Inspired by a fantastic video tutorial by The Magnolia Housewife on YouTube, this craft is not only incredibly easy but also remarkably impactful, allowing you to craft a sophisticated display without the hefty price tag.
Imagine your dining table adorned with elegant, multi-tiered serving platters, glistening with an array of candies, mini desserts, or savory snacks. This project offers endless possibilities for customization and display. After discovering this brilliant idea, we couldn’t resist a trip to Dollar Tree to gather the necessary materials. The simplicity and affordability of this craft make it a standout choice for anyone looking to add a personalized touch to their New Year’s Eve festivities. Whether you’re hosting a grand party or enjoying a quiet evening at home, these DIY serving pieces will undoubtedly elevate your celebration. Plus, if you’re like us and found yourself with an abundance of delicious treats leftover from Christmas, these crafts provide the perfect, stylish solution for presenting them!
Why Choose DIY for Your New Year’s Eve Decorations?
In a world where store-bought decorations can often be expensive and generic, embracing DIY crafts offers a refreshing alternative. Crafting your own New Year’s Eve decor provides numerous benefits:
- Budget-Friendly Celebrations: The primary advantage, especially with Dollar Tree finds, is the significant cost savings. You can achieve a luxurious look for a fraction of the price.
- Personalized Touch: DIY projects allow you to inject your unique style and creativity into your decorations, making your party truly one-of-a-kind.
- Fun & Engaging Activity: Crafting can be a relaxing and enjoyable activity, perfect for getting into the holiday spirit. It’s also a fantastic project to do with family or friends.
- Sense of Accomplishment: There’s a special pride that comes from creating something beautiful with your own hands, knowing that your guests will admire your efforts.
- Sustainable Choice: Reusing and repurposing items, even inexpensive plasticware, can be a small step towards more sustainable decorating practices.
This particular craft, creating elegant serving pieces, perfectly embodies all these advantages. It’s an accessible project for crafters of all skill levels, promising a high reward for minimal effort and cost.
Essential Materials for Your Spectacular New Year’s Eve Crafts
One of the most appealing aspects of this DIY project is the simplicity and accessibility of the materials. Everything you need can be found at your local Dollar Tree, making it incredibly convenient and budget-friendly. Here’s a detailed look at what you’ll need:
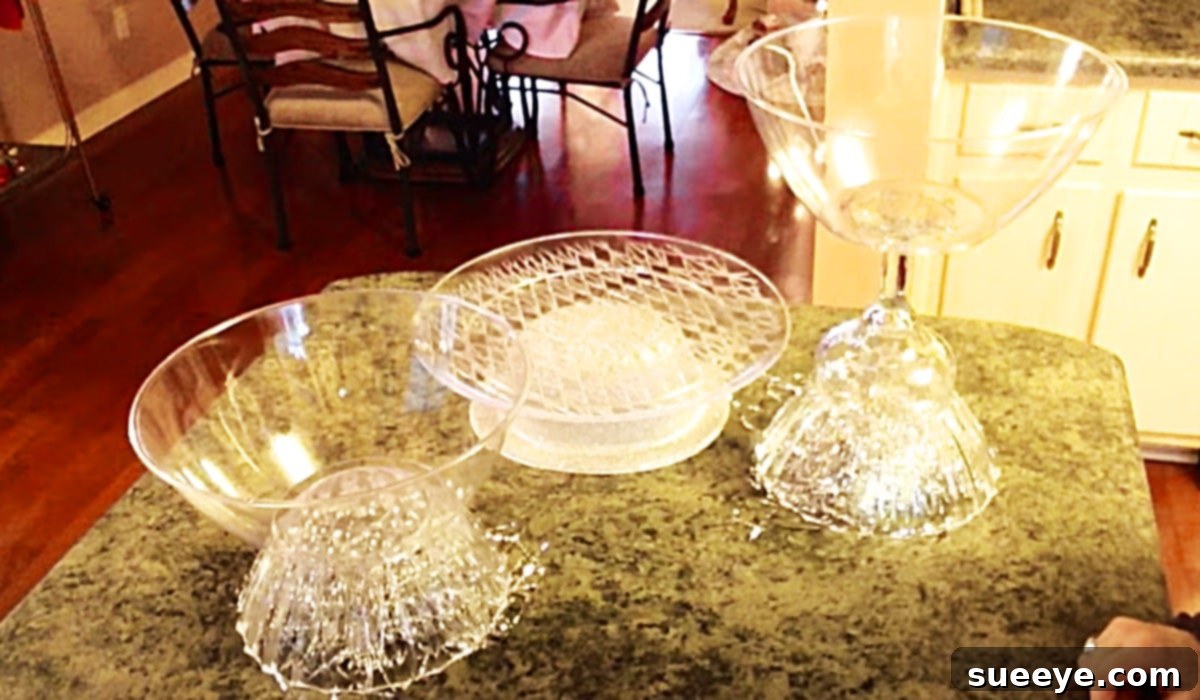
- Large Plastic Bowls (from Dollar Tree): These will form the main serving platforms of your tiered display. Dollar Tree offers a variety of sizes and shapes, from clear to metallic finishes, allowing for different aesthetic choices. Consider grabbing a few sizes to create varied height and diameter tiers.
- Large Plastic Champagne Glasses (from Dollar Tree): These ingenious items serve as the structural “stems” or bases for your serving pieces. Their elegant shape instantly elevates the look, mimicking professional serving stands. Again, clear or metallic options can add different flairs.
- A Hot Glue Gun: Your trusty hot glue gun is the MVP of this project. It provides a quick, strong bond essential for securing the plastic components together.
- Glue Sticks: Ensure you have an ample supply of glue sticks for your hot glue gun. It’s always better to have too many than to run out mid-project.
Optional Materials to Enhance Your Craft:
While the basic materials are all you need for a functional piece, adding a few extra touches can transform your Dollar Tree finds into truly dazzling display items:
- Metallic Spray Paint: Gold, silver, or rose gold spray paint can instantly give your plastic pieces a high-end, elegant finish, perfectly suited for New Year’s Eve.
- Glitter Spray or Loose Glitter: For an extra sparkle, apply a coat of glitter spray or brush on craft glue and sprinkle loose glitter over your pieces. A clear sealant spray will help keep the glitter in place.
- Rhinestones or Adhesive Gems: Small adhesive gems can be applied to the edges or bases of your bowls and glasses for a touch of glam.
- Ribbons or Tinsel: Wrap festive ribbons around the stems of the champagne glasses or add small pieces of tinsel for a celebratory flourish.
- Battery-Operated Fairy Lights: Small LED fairy lights can be draped inside the bowls or wrapped around the structure for a magical, glowing effect, especially effective in clear plastic pieces.
Step-by-Step Directions to Craft Your New Year’s Eve Serving Pieces
Creating these fantastic New Year’s Eve serving pieces is surprisingly straightforward, thanks to the simplicity of the materials and the ingenious design concept. We highly recommend watching The Magnolia Housewife’s video tutorial on YouTube for a visual guide, but here’s a detailed breakdown of the steps:
Step 1: Preparation is Key
Before you begin gluing, ensure your workspace is clean, well-ventilated, and protected (e.g., with newspaper or a craft mat). Unpack all your Dollar Tree bowls and champagne glasses. If they have any stickers or price tags, remove them carefully and clean the plastic surfaces with a damp cloth to ensure the hot glue adheres properly. Allow them to dry completely.
Step 2: Planning Your Design
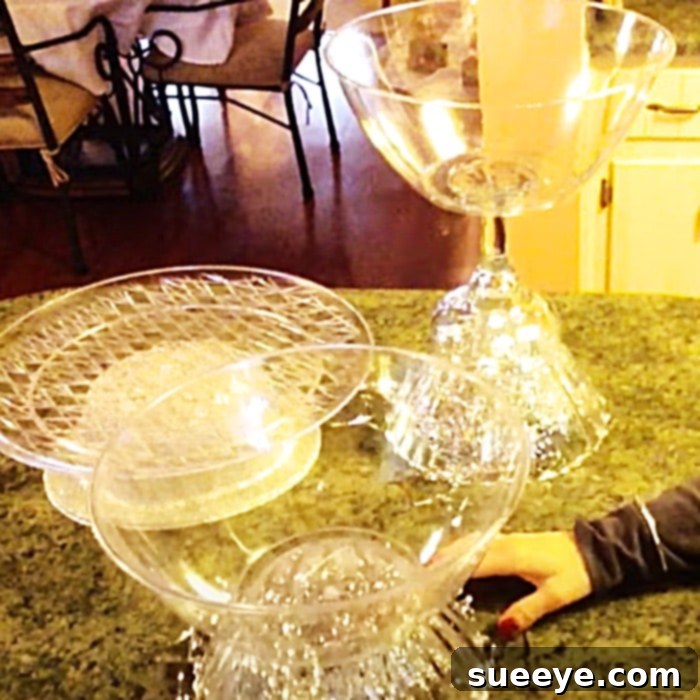
Consider the type of serving piece you want to create. The most common and elegant design involves using an upside-down champagne glass as a sturdy base, topped with a bowl. You can make single-tier stands, or for a more impressive display, stack multiple bowls using additional champagne glasses as connectors. Experiment with different bowl sizes to create varying heights and visual interest. For instance, a larger bowl at the bottom and a smaller one on top creates a classic tiered look.
Step 3: Assembling the Base (Glass to Bowl)
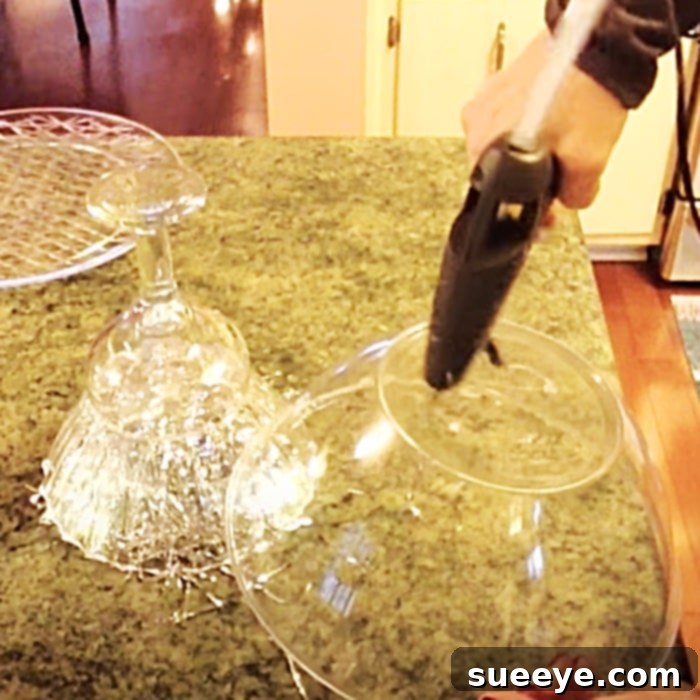
Heat up your hot glue gun. Once it’s ready, apply a generous but even bead of hot glue around the rim of the base of your inverted champagne glass (the wider part that would typically sit on a table). Carefully center this glued rim onto the bottom (outside) of a plastic bowl. Press firmly and hold it in place for about 30 seconds to allow the glue to set. Ensure the connection is stable and straight. The goal is to create a sturdy, elevated stand.
Step 4: Creating Tiers (Optional)
If you’re aiming for a multi-tiered serving platter, repeat Step 3. Once your first base and bowl are secure, take another champagne glass and apply glue to the rim of its base. Carefully center this onto the bottom of a *second* bowl (which will become the upper tier). Once set, you can then glue the stem of this second champagne glass (the part you’d drink from) onto the center of the first, lower bowl, creating a stable, multi-level display. Always ensure each joint is fully cured before adding more weight or layers.
Step 5: Optional Decoration and Embellishments
Now comes the fun part where you can truly personalize your creations! If you’ve opted for spray paint, do this in a well-ventilated area. Apply thin, even coats, allowing each coat to dry thoroughly before adding the next. Gold or silver paint will instantly elevate the look. For glitter, spray paint first, then apply craft glue to areas where you want glitter, and sprinkle it on. Shake off excess and seal with a clear coat. Attach rhinestones with a tiny dab of hot glue or use self-adhesive ones. Drape fairy lights for an enchanting glow. Remember, less is often more, but feel free to express your unique style.
Step 6: Allow to Cure and Display Your Masterpiece
Once all gluing and optional decorations are complete, allow your New Year’s Eve serving pieces ample time to fully cure – usually a few hours or overnight – to ensure maximum stability. After curing, your beautiful, custom-made serving pieces are ready to be filled with all your New Year’s goodies and displayed prominently at your celebration!
Creative Display Ideas and Usage for Your DIY Serving Pieces
The versatility of these Dollar Tree New Year’s Eve crafts extends far beyond just holding candy. Their elegant design makes them suitable for a variety of festive displays and practical uses during your celebration:
- Sweet Treats & Desserts: This is their most obvious use! Fill them with an assortment of chocolates, gumdrops, festive candies, mini cupcakes, macarons, or small tarts. The tiered design is perfect for showcasing a variety of sweets.
- Savory Snacks: Don’t limit yourself to sweets! These pieces can beautifully hold nuts, pretzels, crackers, small cheese cubes, or even individual portions of dips in small ramekins placed within the bowls.
- Party Favors: Arrange small party favors like noisemakers, confetti poppers, or personalized trinkets in the bowls for guests to grab as they arrive or depart.
- Stunning Centerpieces: Even without food, these crafts make gorgeous centerpieces. Fill them with shimmering tinsel, small New Year’s themed ornaments, battery-operated fairy lights, or even fresh flowers for an unexpected twist.
- Welcome Entryway Decor: Place a smaller stand near your entrance to hold keys, guest cards, or small decorative items to greet visitors.
- Bar Cart Enhancements: Elevate your New Year’s bar cart by using these stands to hold lemon and lime wedges, olives, or small garnishes for drinks.
Consider placing them on your main dining table, a buffet spread, a coffee table, or anywhere you want to add a touch of sparkle and functionality. Pairing them with other festive decor like confetti, streamers, and themed napkins will complete your celebratory ambiance.
The Impact of Affordable Elegance
This Dollar Tree New Year’s Eve craft truly embodies the concept of “affordable elegance.” It demonstrates that you don’t need to spend a fortune to create a sophisticated and festive atmosphere for your holiday celebrations. By utilizing readily available and inexpensive materials, you can craft decorations that look far more expensive than they actually are.
The beauty of this project lies in its simplicity and the immense potential for personalization. Each serving piece you create will reflect your individual style, making your New Year’s celebration uniquely yours. It’s an easy, beautiful, and highly recommended craft that brings a touch of glam and practicality to your party planning.
So, gather your supplies, unleash your creativity, and get ready to impress your guests with these stunning DIY serving pieces. Happy crafting, and here’s to a sparkling New Year filled with joy and delightful decorations!