
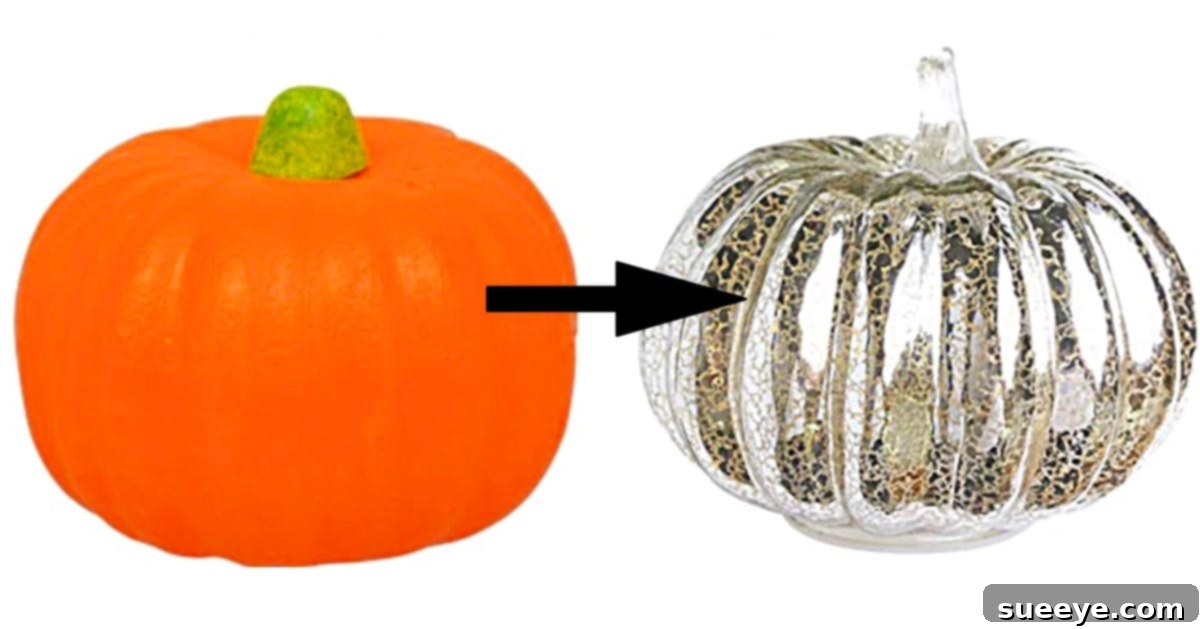
Dollar Tree Foam Pumpkin Transformation: Create Stunning DIY Mercury Glass
The allure of mercury glass is undeniable. With its shimmering, antique finish and captivating reflective quality, it adds a touch of timeless elegance to any home. However, genuine mercury glass pieces, with their delicate double-walled construction and silver nitrate coating, often come with a hefty price tag, making them a luxury item for many decor enthusiasts. What if you could capture that same exquisite vintage charm using an ordinary foam pumpkin and a few common craft supplies? Prepare to be amazed, because the secret to creating your own breathtaking mercury glass effect at home is not only achievable but incredibly simple and budget-friendly!
I was absolutely captivated when I first stumbled upon this ingenious mercury glass effect for a foam pumpkin, demonstrated in a brilliant video tutorial by Vanessa Vendetti on YouTube. Watching her transform a humble Dollar Tree foam pumpkin into a dazzling decorative accent was truly inspiring. This DIY project offers a fantastic opportunity to infuse your living space with sophisticated, vintage-inspired decor without breaking the bank. Whether you’re looking to enhance your fall display, add a unique touch to your Halloween decorations, or simply want an elegant piece for your mantelpiece, this mercury glass pumpkin tutorial is a game-changer. It’s a fantastic way to elevate inexpensive items into high-end looking statement pieces that will have everyone asking where you found them.
Essential Materials for Your Mercury Glass Pumpkin Project
One of the most appealing aspects of this DIY is how accessible the materials are. You likely have some of these items already, and the rest can be easily found at your local craft store or even a dollar store. Gather these simple components to begin your transformation:
- 1 Foam Pumpkin (from Dollar Tree or similar): The perfect starting canvas. Its lightweight nature and readily available status make it ideal for this project. Choose a size and shape that suits your decorative vision.
- White Chalk Paint: This will serve as your primer. Chalk paint is excellent for adhering to various surfaces, providing a matte base that promotes better adhesion for subsequent layers and contributes to the overall aged look.
- Grey Craft Paint: Applied as an undercoat, the grey paint adds depth and dimension to the final metallic finish. It peeks through the silver, mimicking the authentic tarnished look of antique mercury glass.
- Rustoleum Metallic Silver Spray Paint (or similar mirror-effect spray paint): This is the star of the show! A good quality metallic silver spray paint is crucial for achieving that authentic reflective, mirrored appearance. Look for one that specifies a ‘mirror’ or ‘metallic’ finish.
- Water (in a fine-mist spray bottle is recommended): The key ingredient for creating the iconic distressed, spotted effect of mercury glass. Water droplets will disrupt the silver paint, allowing the grey undercoat to show through and creating unique patterns.
- Optional but Recommended:
- Disposable gloves to protect your hands.
- Drop cloth or old newspapers to protect your workspace.
- Cardboard box or dedicated spraying area for ventilation.
- Natural sponge or paper towels for dabbing.
Step-by-Step Guide: Crafting Your DIY Mercury Glass Pumpkin
Now that you have all your materials ready, let’s dive into the creative process. This tutorial, inspired by Vanessa Vendetti’s brilliant technique, is designed to be straightforward and enjoyable. Remember to work in a well-ventilated area and follow the safety instructions on your paint cans.
Step 1: Prepare Your Foam Pumpkin
Begin by ensuring your foam pumpkin is clean and free of dust or debris. If your pumpkin has any tags or stickers, remove them carefully. A quick wipe-down with a damp cloth and then allowing it to air dry completely is usually sufficient. Set up your workspace in a well-ventilated area, preferably outdoors or in a garage, using a drop cloth or old newspapers to protect surfaces from overspray. Wearing gloves is also a good idea to keep your hands clean.
Image By: Vanessa Vendetti Via YouTube
Step 2: Apply the White Chalk Paint Primer
The first coat is your primer. Using your white chalk paint, apply a thin, even layer over the entire surface of the foam pumpkin. Chalk paint is fantastic because it adheres well and dries quickly, creating a perfect matte base for the subsequent layers. Ensure you cover all the orange areas of the pumpkin. Don’t worry if it looks a little streaky on the first coat; the goal here is even coverage for adhesion. Allow this layer to dry completely according to the manufacturer’s instructions, which is typically 20-30 minutes, or until it’s dry to the touch.
Step 3: Base Coat with Grey Craft Paint
Once the white chalk paint is thoroughly dry, it’s time for the grey base coat. Apply an even layer of grey craft paint over the entire pumpkin. This grey layer is crucial for achieving that authentic depth and aged look of mercury glass. When the silver eventually gets distressed, this grey will show through, mimicking the natural tarnishing and reflective imperfections of real antique pieces. Aim for good, opaque coverage. Again, allow this grey layer to dry completely before moving on. Patience during drying times ensures a professional and durable finish.
Step 4: The Magical Mercury Glass Effect (Water and Metallic Spray)
This is where the magic truly happens! Ensure your grey paint is absolutely dry. Now, working in small sections, lightly spray the pumpkin with water. You want fine droplets, not a heavy stream. Immediately after spraying water on a section (while the water droplets are still visible and wet), follow up with a light, even mist of the metallic silver spray paint. The water droplets will cause the silver paint to bead up and separate, creating those distinctive mottled, aged spots characteristic of mercury glass.
Continue this process around the entire pumpkin, section by section. The key is to spray the water first, then immediately the silver paint. Experiment with the amount of water and silver paint to achieve your desired level of distress and mirroring. For a more heavily aged look, you might use slightly more water. For a more mirrored effect, use less water and a slightly heavier (but still light) application of silver. Don’t overdo the silver in one pass; multiple light coats are always better than one heavy one to avoid drips and ensure even coverage.
Step 5: Final Drying and Optional Sealing
Once you’ve applied the mercury glass effect to the entire pumpkin, allow it to dry completely. This might take a few hours, or even overnight, depending on humidity and paint thickness. Resist the urge to touch it until it’s fully cured to prevent smudges or fingerprints. If you plan for your pumpkin to be handled frequently or used outdoors (though foam pumpkins aren’t ideal for prolonged outdoor exposure), you might consider applying a clear, matte sealant spray. This will protect the finish and make it more durable. However, for indoor decorative purposes, it’s often not strictly necessary.
Expert Tips for a Flawless Mercury Glass Finish
To ensure your DIY mercury glass pumpkin turns out perfectly every time, keep these expert tips in mind:
- Ventilation is Key: Always work in a well-ventilated area, especially when using spray paints.
- Light Coats are Best: For all paint applications, including the metallic spray, several light coats will always yield a smoother, more professional finish than one heavy coat, which can lead to drips and uneven texture.
- Experiment with Water: The amount and fineness of your water spray will directly impact the final look. A fine mist creates delicate speckles, while slightly larger droplets can produce more pronounced distressed areas. Practice on a scrap piece of cardboard if you’re unsure.
- Shake Your Spray Paint: Thoroughly shake your metallic spray paint can for at least a minute before and during use to ensure the metallic flakes are evenly distributed, preventing a dull finish.
- Drying Time Matters: Rushing the drying process between coats can compromise adhesion and the final appearance. Always allow each layer to dry completely.
- Protect Your Hands: Wear disposable gloves throughout the painting process.
- Consider the Stem: Decide if you want to paint the stem or leave it natural. Painting it silver can create a cohesive look, or you can add a real twig for an organic touch.
Decorating with Your Stunning DIY Mercury Glass Pumpkin
The beauty of these DIY mercury glass pumpkins lies in their versatility. They effortlessly blend with a variety of decor styles and are perfect for multiple occasions. Here are a few ideas to inspire you:
- Elegant Fall Centerpiece: Group several mercury glass pumpkins of varying sizes on a tray with some faux leaves, acorns, or small battery-operated fairy lights for a sophisticated autumnal table centerpiece.
- Chic Mantel Display: Arrange them on your fireplace mantel alongside candles, antique books, or other vintage treasures for a warm and inviting focal point.
- Seasonal Shelf Decor: Nestle them among your existing books or decorative objects on shelves to add a touch of sparkle and seasonal flair.
- Halloween Glam: While traditional Halloween decor leans spooky, these pumpkins offer a glamorous alternative. Combine them with black and white elements, or even some subtle glitter, for an upscale Halloween theme.
- Beyond Fall: Don’t limit these beauties to just fall! Their classic, reflective quality makes them suitable for year-round vintage decor. Place them in a living room vignette or on a console table for an instant touch of class.
- Gift Idea: These handmade pumpkins make thoughtful and unique gifts for friends and family, especially during the autumn holidays.
This mercury glass pumpkin idea is truly a standout project. The result is so incredibly impressive that it often fools even the most discerning eyes. As I learned firsthand, when my best friend visited and couldn’t believe I had crafted such a professional-looking piece, I had to pull up Vanessa Vendetti’s video tutorial to convince her! It’s a testament to how effectively this technique transforms an inexpensive item into something truly extraordinary.
Embrace the Charm of DIY Vintage Decor!
Gone are the days of admiring expensive mercury glass from afar. With this straightforward and enjoyable DIY project, you can bring the timeless beauty of vintage decor into your home for a fraction of the cost. The satisfaction of transforming a simple foam pumpkin into a dazzling, antique-inspired masterpiece is incredibly rewarding. So, grab your supplies, get creative, and prepare to elevate your home decor with these stunning DIY mercury glass pumpkins. Happy crafting!