
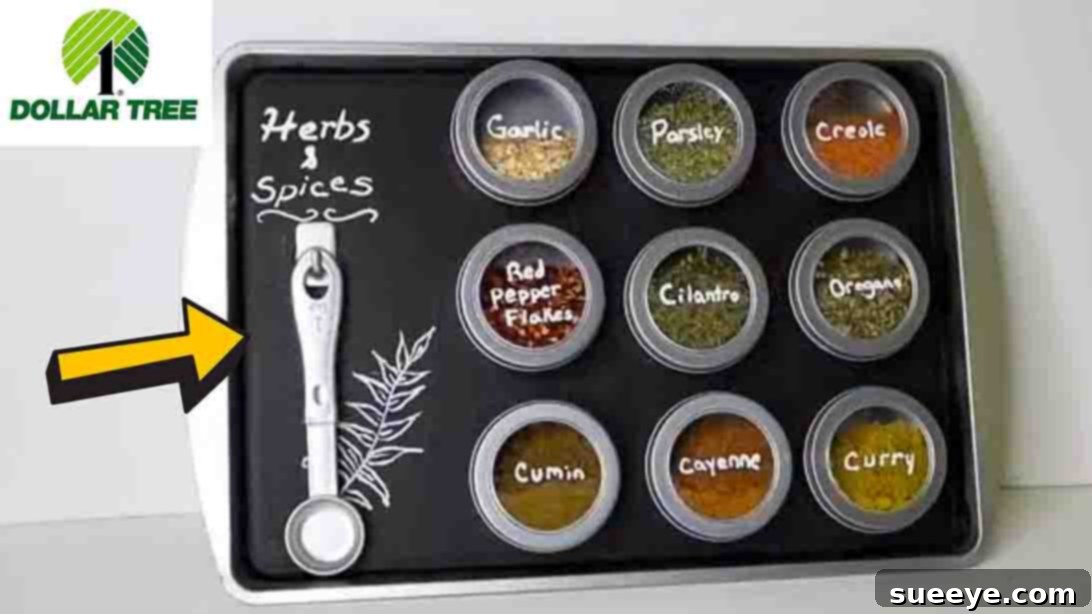
Imagine stepping into your kitchen, where every spice you need is not only impeccably organized but also beautifully displayed, adding a touch of personalized charm to your culinary haven. No more rummaging through cluttered cabinets or overflowing drawers for that elusive cumin or cinnamon. The solution? A brilliant, budget-friendly DIY magnetic spice display, a project popularized by creative minds like Jay Munee DIY. This innovative system combines affordability, practicality, and aesthetic appeal to revolutionize the way you store and use your spices, turning a common kitchen frustration into an elegant organizational triumph.
RELATED: 11 No-Cost Home and Kitchen Organization Ideas
The most compelling aspect of this DIY endeavor is its incredible cost-effectiveness. By strategically sourcing materials primarily from Dollar Tree, you can craft a sophisticated spice display without straining your budget. It’s truly remarkable how a few inexpensive items can be transformed into such a functional and visually appealing piece for your kitchen. This project stands out for its accessibility, making it suitable for crafters of all skill levels. Whether you’re a seasoned DIY enthusiast or a complete beginner looking for an rewarding project, you can achieve impressive results with this guide. Dive into the step-by-step instructions below and prepare to elevate your kitchen organization.
Why Choose a Magnetic Spice Display? The Ultimate Kitchen Game-Changer
In the quest for an organized and efficient kitchen, spice storage often presents a unique challenge. Traditional spice racks can take up valuable counter space, while storing spices in cabinets can lead to forgotten bottles and wasted ingredients. This is where a magnetic spice display truly shines, offering a multitude of benefits that extend far beyond simple organization:
- Space Optimization: Magnetic spice racks utilize vertical space, freeing up precious counter and cabinet real estate. This is particularly advantageous for small kitchens or those aiming for a minimalist, uncluttered look.
- Instant Visibility and Accessibility: With spices neatly arranged on a magnetic surface, you gain immediate visual access to your entire collection. No more digging or shuffling; simply grab what you need and get back to cooking.
- Enhanced Cooking Efficiency: When your spices are within arm’s reach and clearly labeled, meal preparation becomes smoother and faster. This allows for more spontaneous seasoning and experimentation with flavors.
- Aesthetic Appeal: A well-designed magnetic spice display can double as a decorative element. When thoughtfully arranged, it adds a vibrant touch of color and texture to your kitchen decor, transforming a utilitarian item into a focal point.
- Customization Potential: Unlike off-the-shelf solutions, a DIY magnetic display offers endless possibilities for customization, allowing you to tailor its size, style, and design to perfectly match your kitchen’s unique aesthetic.
- Durability and Cleanliness: Metal surfaces are easy to clean, ensuring your spice storage remains hygienic and sparkling.
The Dollar Tree Advantage: Crafting Smart on a Budget
One of the most appealing aspects of this project is its reliance on readily available and highly affordable materials from Dollar Tree. This makes high-quality kitchen organization accessible to everyone, regardless of budget. The Dollar Tree advantage isn’t just about saving money; it’s about smart, resourceful crafting. Here’s why it’s the perfect place to source your supplies:
- Unbeatable Value: Every item is just a dollar (or similar low price), making it incredibly budget-friendly to gather all the necessary components for your display.
- Accessibility: Dollar Tree stores are widespread, ensuring that these materials are within easy reach for most DIY enthusiasts.
- Versatility of Products: Items like pizza pans, magnetic tins, and craft supplies found at Dollar Tree are surprisingly versatile and can be repurposed creatively for projects like this.
- Satisfaction of Smart Saving: There’s immense satisfaction in knowing you’ve created a functional and beautiful item for your home using inexpensive finds, proving that great style doesn’t have to come with a hefty price tag.
Materials: Crafting Your Magnetic Spice Haven
Gathering your materials is the first exciting step in bringing your magnetic spice display to life. Here’s a detailed look at what you’ll need, along with some considerations for each item:
- Pizza Sheet Pan: This forms the foundational base of your display. Its flat, metallic surface is ideal for holding magnetic tins and can be easily painted and decorated. Look for one that’s sturdy and has a smooth surface for best results.
- Foam Paint Brush: Essential for applying paint smoothly and evenly, especially with chalkboard paint, which benefits from thin, consistent coats.
- Chalkboard Paint: This provides a versatile, matte black finish that allows for easy labeling and re-labeling of your display. It’s also incredibly stylish and provides a nice contrast for white text. Consider a small can, as you won’t need much.
- Whiteout Pen (or Chalk Marker): Perfect for writing clear, crisp labels on your chalkboard-painted surface or directly onto the magnetic tins. A chalk marker is an excellent alternative, offering better control and a dust-free finish.
- Command Hooks: These adhesive hooks are fantastic for adding small decorative elements, such as measuring spoons or a small kitchen utensil, to your display without permanent commitment. Choose hooks appropriate for light items.
- E6000 Adhesive (or Strong Craft Glue): A powerful, all-purpose adhesive vital for securely attaching the magnetic strips to the back of the pan, ensuring your display stays firmly mounted. It’s known for its strong bond and durability.
- Magnetic Tins (with clear lids, if possible): These are the stars of the show! Look for tins that are appropriately sized for your most-used spices. Tins with clear lids are a bonus, allowing you to see the spice inside. Ensure they have a strong magnetic backing or are suitable for attaching magnetic strips.
- Magnetic Strips (Peel-and-Stick): These will be applied to the back of your pizza pan, allowing it to adhere to any metallic surface like a refrigerator or a metal strip mounted on a wall. Ensure they are strong enough to hold the weight of the pan plus filled spice tins.
Directions: Your Step-by-Step Guide to a Stunning Spice Display
Step 1: Preparing and Personalizing Your Display Base
The first step involves transforming your plain pizza pan into a stylish base for your magnetic spice collection. This stage is all about creativity and preparation.
- Clean and Prep Your Pan: Begin by thoroughly cleaning the pizza sheet pan. Wash it with soap and water, then dry it completely. A clean surface ensures better paint adhesion. If the pan has a very shiny or greasy surface, a light sanding with fine-grit sandpaper can help the paint adhere better.
- Apply Chalkboard Paint: Using your foam paint brush, apply a thin, even coat of chalkboard paint across the entire surface of the pizza sheet pan. Work in one direction for a smooth finish. Avoid applying too much paint at once, as this can lead to drips or an uneven texture.
- Allow for Thorough Drying: Let the first coat of paint dry completely according to the manufacturer’s instructions, typically 1-2 hours. Applying a second thin coat will enhance durability and ensure full coverage. Allow the second coat to dry fully as well. Patience here is key for a professional-looking finish.
- Design and Personalize: Once the paint is fully cured (which might take up to 24 hours for chalkboard paint), it’s time to add your personal touch. Use the whiteout pen (or a chalk marker for better results) to draw designs, write a favorite kitchen quote, or simply create an attractive border. Practice on a scrap piece of paper first if you’re unsure. This decorative element adds unique character to your display.
- Attach Decorative Command Hook: Carefully glue a Command Hook onto a chosen spot on your painted pan using E6000 adhesive. Allow the glue to cure fully. This hook can be used to hang a small measuring spoon set, a decorative mini whisk, or a sprig of artificial herbs, adding a charming functional or decorative accent.
Step 2: Filling, Labeling, and Mounting Your Spice Tins
With your display base ready, it’s time to bring your spices into their new, organized home.
- Fill Your Magnetic Tins: Carefully transfer your spices into the magnetic tins. A small funnel can be very helpful here to prevent spills. Ensure the lids fit snugly to keep your spices fresh and prevent moisture from getting in.
- Label Each Tin Clearly: Using your whiteout pen or chalk marker, clearly label the lid of each tin with the name of the spice inside. Neat, legible handwriting is important for quick identification. For a more polished look, consider printing small labels or using a label maker. You can also wipe off and rewrite labels if your spice collection changes.
- Arrange and Organize: Now, arrange the filled and labeled magnetic tins directly onto your painted pizza sheet pan. Experiment with different layouts – you can organize them alphabetically, by frequency of use, by flavor profile, or even by color for an aesthetically pleasing display. Ensure there’s enough space between tins for easy access.
- Attach Magnetic Strips for Hanging: Turn the completed display over. Measure and cut magnetic strips to fit along the top and bottom edges (or sides) of the back of the pan. Peel off the backing and firmly press the magnetic strips into place. For extra security, you might want to use E6000 adhesive in addition to the self-adhesive backing of the strips, especially if your pan is heavier or you plan to fill the tins generously. Allow the adhesive to cure completely.
- Mount Your Display: Choose a suitable location for your magnetic spice display. Popular spots include the side of your refrigerator, the inside of a pantry door, or a wall where you’ve installed a metal strip. Ensure the surface is clean and dry before mounting. Carefully place the display against the chosen surface, allowing the magnetic strips to firmly hold it in place. Step back and admire your beautifully organized, functional, and decorative DIY magnetic spice display!
Tips for Success and Customization
To ensure your DIY magnetic spice display truly stands out and serves your needs perfectly, consider these additional tips and customization ideas:
- Seasoning Your Chalkboard Surface: If you used chalkboard paint, “season” it before writing your final designs. Rub the side of a piece of chalk over the entire surface, then erase it. This helps prevent ghosting and makes subsequent writing and erasing much cleaner.
- Alternative Labeling: While a whiteout pen or chalk marker is great, you can also use a permanent marker on lighter tins, or print small labels from your computer and attach them with a strong adhesive or clear tape for a more uniform look.
- Spice Freshness: Regularly check the freshness of your spices. Keep smaller quantities in your magnetic tins and replenish them from larger, airtight containers stored in a cool, dark place. This ensures your active spices are always potent.
- Cleaning and Maintenance: To clean your display, simply wipe the painted pan with a damp cloth. The magnetic tins can be wiped clean as well. If using chalk markers, a damp cloth is usually sufficient for erasing.
- Beyond Spices: This versatile magnetic display isn’t limited to spices! Consider using it to organize small craft supplies, office staples like paper clips and push pins, or even small hardware in a workshop.
- Color Customization: Don’t limit yourself to chalkboard paint. You can use any color of acrylic or spray paint to match your kitchen’s existing decor. Just ensure it’s suitable for metal surfaces and consider a clear sealant for durability.
- Adding a Frame: For an extra touch of sophistication, consider adding a lightweight picture frame around your pizza pan before mounting it. This can elevate the look and make it seem like a piece of wall art.
The Enduring Benefits of Your DIY Magnetic Spice Rack
Completing this DIY project brings a wealth of benefits that extend far beyond simply organizing your spices. It’s an investment in the efficiency, aesthetics, and overall joy of your kitchen experience:
- Enhanced Cooking Experience: With every spice at your fingertips, you’ll find yourself cooking more adventurously, experimenting with new flavors, and enjoying the process even more.
- Maximized Kitchen Space: By utilizing vertical surfaces, you reclaim valuable counter and cabinet space, making your kitchen feel larger, cleaner, and more functional.
- Cost-Effective Solution: Creating this display with Dollar Tree items demonstrates that smart, stylish organization doesn’t require a hefty investment, making it accessible to everyone.
- A Sense of Accomplishment: There’s immense satisfaction in crafting something beautiful and useful with your own hands, boosting your confidence and adding a personal touch to your home.
- Sustainable Practice: Reusing and repurposing items, coupled with the ability to refill spice tins, contributes to a more sustainable kitchen environment by reducing waste from single-use containers.
- Improved Kitchen Aesthetics: A well-organized and artfully displayed spice collection elevates the overall look and feel of your kitchen, transforming a chaotic area into a visually pleasing culinary workspace.
The DIY Dollar Tree Magnetic Spice Display is more than just a storage solution; it’s a statement about smart living, creative problem-solving, and personalized home decor. It empowers you to take control of your kitchen clutter, infuse your space with personality, and simplify your cooking routine—all without breaking the bank. So gather your materials, unleash your inner crafter, and embark on this rewarding project today. Your beautifully organized and highly functional kitchen awaits!