
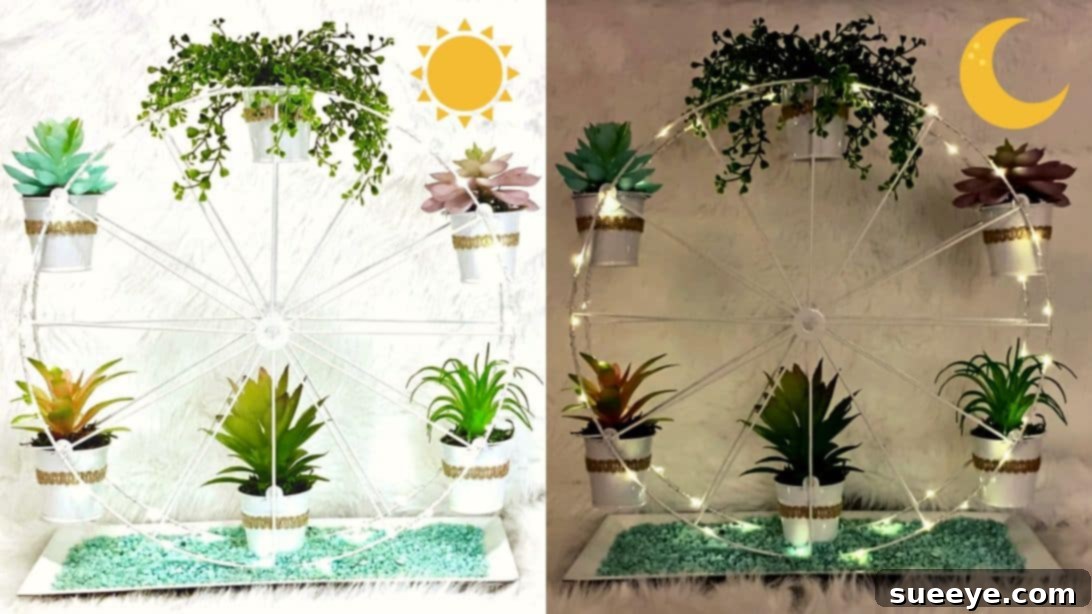
Create a Dazzling DIY Ferris Wheel Plant Stand: Your Ultimate Dollar Tree Craft Guide
Are you searching for a unique and eye-catching way to display your beloved plants while adding a touch of whimsical charm to your home? Look no further! This incredible project, inspired by the creative genius of The Crafty Shopper on YouTube, transforms everyday Dollar Tree items into a breathtaking Ferris Wheel Plant Stand. It’s an ingenious use of bicycle wheel wreaths that results in a stunning, illuminated plant display, perfect for anyone who loves a good plant aesthetic with a beautifully lit ambiance. Once you see how simple and rewarding this DIY is, you’ll be eager to gather your supplies and start crafting. The final result is not just a plant stand; it’s a statement piece that will captivate your guests and bring a serene glow to your space.
Imagine a mini Ferris wheel, adorned with lush artificial plants and twinkling fairy lights, rotating gently (in spirit!) in your living room or sunroom. This project makes that vision a delightful reality, all while being incredibly budget-friendly. After discovering the video tutorial, I was immediately inspired and headed straight to my local Dollar Tree to gather all the necessary materials. The excitement was palpable, and I can assure you, the finished plant stand absolutely exceeded all expectations. You’re about to embark on a crafting journey that promises not only a fun experience but also a truly magnificent piece of home decor. Learn how to make this now, and prepare to be amazed!
Materials You’ll Need for Your Ferris Wheel Plant Stand:
Crafting this enchanting Ferris Wheel Plant Stand is surprisingly easy, especially when you have all the right materials on hand. Most items can be found at your local Dollar Tree, making this an incredibly affordable and accessible DIY project. Here’s a detailed list of what you’ll need:
- 2 Dollar Tree Bicycle Wheel Wreaths: These form the core structure of your Ferris wheel. Look for the simple metal hoops, often found in the floral or craft sections. Their lightweight nature makes them ideal for this project.
- 6 Tin Metal Cans: These will serve as the charming “gondolas” for your plants. Upcycle old tin cans by cleaning them thoroughly, or purchase new ones. Ensure they are all roughly the same size for a uniform look.
- Fairy Lights: A string of battery-operated fairy lights will add that magical, illuminated glow to your Ferris wheel. Warm white lights are often preferred for a cozy ambiance, but feel free to choose colors that match your decor.
- Floral Moss: Used to cover the floral foam and give a natural, finished look to your plant containers. Any type of decorative moss will work, such as sheet moss or Spanish moss.
- Floral Foam Blocks: These blocks provide a stable base for your artificial plants within the tin cans. Opt for dry floral foam, as you won’t be using real plants that require water.
- 6 Artificial Plants: Choose small, lightweight artificial plants or flowers that fit well within your tin cans. Varieties like succulents, small ferns, or blooming flowers will add vibrant greenery and color.
- 12 Jenga Blocks: These wooden blocks will form the sturdy base for your Ferris wheel stand. They’re surprisingly strong when properly adhered and can be found in many dollar stores or toy sections.
- Dollar Tree Rectangle Platter: This will act as the foundation, providing stability and a neat display area for your entire Ferris wheel structure. A plain, flat platter works best.
- 2 Bags of Rocks or/and Sand: These are essential for weighing down the platter base, ensuring your Ferris wheel stand remains stable and upright. They also add a decorative touch.
- Ribbon: A decorative ribbon will be wrapped around the tin cans, adding a pop of color and a finished look. Choose a color and width that complements your chosen aesthetic.
- Scissors: For cutting ribbon and any other materials as needed.
- E6000 Adhesive: A strong, multi-purpose adhesive like E6000 is crucial for securely bonding the various components of your plant stand, ensuring durability.
- Spray Paint (optional): White spray paint is recommended for the Jenga block base and the platter if you want a clean, unified look. However, you can choose any color to match your home decor or skip this step if you prefer the natural look of the materials.
Step-by-Step Guide: Crafting Your Ferris Wheel Plant Stand
Now that you have all your materials, let’s dive into the exciting process of assembling your very own DIY Ferris Wheel Plant Stand. Follow these detailed steps carefully for the best results, and remember to allow sufficient drying time for adhesives between stages.
Phase 1: Building the Sturdy Base and Initial Assembly
The foundation of your Ferris wheel is crucial for its stability and aesthetic appeal. This phase focuses on creating a robust base and integrating the primary structural elements.
Step 1.1: Constructing the Jenga Block Base
Begin by meticulously adhering together your Jenga blocks to form a solid, rectangular base. You’ll create 4 rows, with each row consisting of 3 horizontal Jenga blocks laid side-by-side. Use a strong adhesive like E6000 for each joint, ensuring a firm bond. Once the individual rows are formed, stack and adhere them together to create a stable, elevated platform. This structure will serve as the central support for your Ferris wheel.
Step 1.2: Painting and Securing the Base
If you’ve opted for spray paint, now is the time to apply it. Lay out your freshly assembled Jenga block base and the Dollar Tree rectangle platter in a well-ventilated area. Apply several light, even coats of white spray paint (or your chosen color) to both pieces, allowing each coat to dry completely before applying the next. This ensures a smooth, professional finish. Once both are fully dry, carefully apply E6000 to the bottom of the painted Jenga block base and center it on the painted rectangle platter. Press firmly and allow the adhesive to cure completely, ideally for several hours, to ensure maximum stability.
Step 1.3: Preparing and Positioning the First Bucket
Take one of your tin metal cans and wrap a chosen ribbon securely around its exterior, adhering the ends with a dab of glue for a neat finish. This adds a decorative touch and helps conceal the tin. Once the central wood base is firmly adhered to the platter, apply E6000 to the bottom of this ribbon-wrapped bucket and center it directly on top of the wood base. This bucket will be the anchor point for your entire Ferris wheel structure. Position the two bicycle wheel wreaths, one on each side of this central bucket, ensuring they are symmetrical and upright. While they won’t be permanently attached to the base at this stage, visualizing their placement is key for the next steps.
Phase 2: Assembling the Ferris Wheel and Adding Greenery
With your base firmly established, this phase brings your Ferris wheel to life by attaching the wheels, illuminating them, and adding your beautiful plant displays.
Step 2.1: Securing the Wheels and First Top Bucket
Now, carefully position the two bicycle wheel wreaths so they are parallel to each other and flush against the sides of the central bucket on the wood base. Use a generous amount of E6000 to adhere the edges of the wreaths to the central bucket and, if necessary, to the wooden base for added stability. Take another one of your ribbon-wrapped tin cans and, using E6000, secure it at the very top of the joined bicycle wheel wreaths. This creates the symmetrical structure of your Ferris wheel. Ensure all adhesive points are robust before proceeding.
Step 2.2: Wrapping with Fairy Lights
Begin to wrap your fairy lights around the entire Ferris wheel structure. Start from the base, weaving the lights up and around the bicycle wheel wreaths. Ensure the battery pack is positioned discreetly, perhaps at the back of the central bucket or tucked into the base, where it’s easily accessible but out of sight. Distribute the lights evenly to achieve a magical, glowing effect across the entire display. Secure the light string at various points with small dabs of hot glue if needed, making sure not to damage the wires.
Step 2.3: Attaching the Remaining Buckets
With the lights in place, strategically attach the remaining four ribbon-wrapped tin cans around the perimeter of the bicycle wheel wreaths. Aim for even spacing to mimic the look of a traditional Ferris wheel. Use E6000 to securely adhere each bucket to the metal wreath. You can also use thin wire or zip ties for additional reinforcement if desired, ensuring they are camouflaged by the ribbon or plants. Allow ample drying time for all newly adhered buckets.
Step 2.4: Preparing the Plant Displays
For each of the six tin cans, cut a piece of floral foam block to size so it fits snugly inside the bottom of the can. This foam will hold your artificial plants upright. Next, cover the foam with a layer of floral moss. Gently press the moss down to create a natural-looking base within each “gondola.”
Step 2.5: Inserting Artificial Plants and Final Touches
Carefully insert your chosen artificial plants or flowers into the floral foam within each bucket. Arrange them artfully, ensuring they stand upright and create a pleasing visual display. Consider varying plant heights or types for added interest. Once all plants are in place, the final step is to spread the rocks and/or sand evenly all over the rectangle platter base. This not only adds a beautiful, naturalistic touch but also provides extra weight, significantly enhancing the stability of your Ferris Wheel Plant Stand.
Your magnificent DIY Dollar Tree Ferris Wheel Plant Stand is now complete! Step back and admire your handiwork. This charming piece is sure to be a conversation starter and a beloved addition to your home decor.
Why Choose a DIY Ferris Wheel Plant Stand?
Beyond its undeniable charm, there are numerous reasons why this DIY project stands out as an excellent choice for home decorators and craft enthusiasts alike. It’s more than just a place to put plants; it’s a statement of creativity and resourcefulness.
- Budget-Friendly Decor: Utilizing inexpensive Dollar Tree items makes this project incredibly affordable. You get a high-end look without the hefty price tag, allowing you to save money while beautifying your space.
- Unique Aesthetic: Unlike traditional plant stands, the Ferris wheel design offers a whimsical and nostalgic touch. It’s a conversation starter and a truly unique piece that reflects your personal style and ingenuity.
- Illuminated Ambiance: The integrated fairy lights add a soft, magical glow, especially enchanting during the evenings. This transforms your plant display into a radiant focal point, creating a cozy and inviting atmosphere.
- Customization Potential: As demonstrated, you can easily adapt the colors, ribbons, and plant choices to match your existing home decor. This flexibility ensures your Ferris wheel stand perfectly complements your personal aesthetic.
- Beginner-Friendly: Despite its impressive appearance, the construction process is straightforward and doesn’t require advanced crafting skills. It’s a rewarding project even for those new to DIY.
- Space-Saving Display: The vertical design of the Ferris wheel allows you to display multiple plants in a compact footprint, making it ideal for smaller rooms or apartments where space is at a premium.
Customization Ideas for Your Unique Plant Display
While the basic design is stunning on its own, don’t hesitate to personalize your Ferris Wheel Plant Stand to truly make it your own. Here are a few ideas to spark your creativity:
- Color Palette: Instead of white, spray paint your Jenga base and platter in bold colors like matte black for a modern look, a pastel shade for a softer touch, or even metallic gold for glamour.
- Ribbon Choices: Experiment with different textures and patterns of ribbon. Burlap for a rustic feel, satin for elegance, or polka dots for a playful vibe.
- Plant Varieties: Mix and match artificial plants. Combine trailing ivy with upright succulents, or alternate between vibrant flowers and muted greenery for dynamic visual interest.
- Embellishments: Add small decorative elements like miniature birds, butterflies, or even tiny flags to the tops of the cans. Small charms or beads glued onto the wheel structure can also enhance its charm.
- Thematic Decor: Adapt the theme for holidays or seasons. Use red and green plants with festive ribbons for Christmas, or pastel flowers for spring.
- Functional Additions: Consider using some cans to hold other small items besides plants, like pens on a desk, or makeup brushes in a vanity setting, making it multi-functional.
Perfect Placement for Your Ferris Wheel Decor
This versatile plant stand can enhance a variety of spaces within your home. Here are some ideal spots to showcase your beautiful creation:
- Living Room: As a centerpiece on a coffee table or end table, it draws attention and adds a warm glow.
- Bedroom: Place it on a nightstand or dresser for a serene and personalized touch. The fairy lights make for a wonderful soft nightlight.
- Home Office: Brighten up your workspace with a splash of greenery and a unique decorative element.
- Dining Room: A charming addition to a sideboard or hutch, especially during gatherings.
- Nursery or Kids’ Room: The whimsical design is perfect for adding a playful, magical element to a child’s space (ensure it’s placed securely out of reach of small hands).
- Entryway: Create a welcoming first impression with this eye-catching piece on a console table.
- Sunroom or Patio: While the materials are mostly artificial, a covered patio or sunroom can be a lovely place to enjoy this indoor-outdoor feel. Ensure it’s protected from direct harsh weather.
Conclusion: Elevate Your Home Decor with This Unique Project
Creating this DIY Ferris Wheel Plant Stand is a truly rewarding experience that culminates in a spectacular piece of home decor. From humble Dollar Tree origins, you’ll craft a unique, illuminated plant display that not only showcases your favorite artificial greenery but also serves as a charming focal point in any room. Its budget-friendly nature, ease of construction, and endless customization possibilities make it a must-try project for anyone looking to add a personal and whimsical touch to their living space.
So, gather your materials, follow these detailed steps, and unleash your inner crafter. You’ll be delighted by how effortlessly this project transforms simple items into an extraordinary decorative piece. Share your finished Ferris Wheel Plant Stand with friends and family – they’re sure to be impressed! This project proves that with a little creativity and a few affordable supplies, you can achieve truly stunning results that beautifully enhance your home’s plant aesthetic.
*A special thank you to The Crafty Shopper via YouTube for providing the brilliant inspiration and all images used here. If you found this DIY project enjoyable and inspiring, we highly recommend visiting her amazing YouTube channel for more fantastic video tutorials and creative ideas. Give her channel a visit and subscribe to stay updated with her latest crafting adventures!