
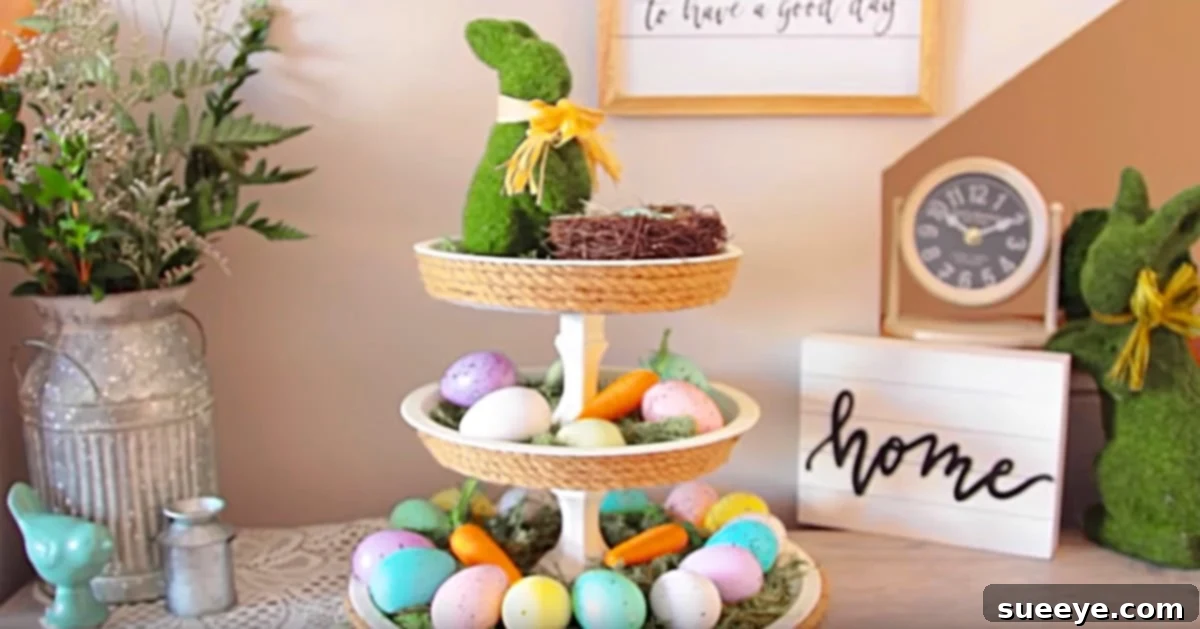
DIY Dollar Tree 3-Tiered Easter Display: Create Charming Decor on a Budget
As the days grow longer and a gentle warmth fills the air, the joyous spirit of Easter approaches. For many, myself included, Easter evokes a sense of renewal, family gatherings, and delightful decorations that brighten every corner of the home. It’s a time when childhood memories of egg hunts and sweet treats are rekindled, and new traditions are forged. This year, my heart is set on making Easter truly special for my grandchildren, transforming our home into a wonderland of bunnies, vibrant eggs, and springtime charm.
My quest for heartwarming and budget-friendly decor led me to an incredibly appealing idea: a three-tiered egg and bunny stand. The beauty of this project lies in its simplicity and affordability, utilizing everyday items primarily sourced from the Dollar Tree. When I first envisioned this delightful display, I knew it would be a winner – a creative endeavor that promises both elegance and ease. This isn’t just about crafting; it’s about creating cherished moments, inviting the grandchildren to join in an egg-dyeing and decorating party that will bring our beautiful stand to life.
Imagine a centerpiece that not only showcases your Easter treats and decorations but also becomes a focal point for family fun. This DIY project is designed to be accessible to everyone, from seasoned crafters to beginners, proving that stunning holiday decor doesn’t require a hefty budget. By repurposing common household items or grabbing a few inexpensive supplies from your local Dollar Tree, you can construct a personalized Easter display that will be admired by all. Let’s gather our materials and embark on this joyful journey of crafting beautiful Easter memories.
Essential Materials for Your Tiered Easter Display
Creating this charming 3-tiered stand is surprisingly simple, especially when you know where to find your supplies. The Dollar Tree is a treasure trove for inexpensive crafting items, making this project incredibly budget-friendly. Here’s a detailed list of what you’ll need, along with some tips for selection:
- A Pizza Pan (from Dollar Tree): This will serve as the sturdy base for your largest tier. Look for a standard 12-inch metal pizza pan. Its flat surface is ideal for stability.
- A Cake Pan (from Dollar Tree): Typically a smaller diameter than the pizza pan, this will form your middle tier. A round 8-inch or 9-inch cake pan works perfectly to create a balanced tiered effect.
- A Pie Pan (from Dollar Tree): The smallest of the three, this pan will crown your display. A standard 7-inch or 8-inch pie pan will fit nicely on top, completing the graduated look.
- A Spool of Jute Crafting Rope (from Dollar Tree): This natural fiber rope adds a rustic, charming touch to your stand, effectively concealing the edges of the pans and providing a finished look. One standard spool should be sufficient.
- 3 Candle Stick Holders (from Dollar Tree): These are the unsung heroes of our tiered stand, providing the height and separation between each tier. Choose sturdy, uniform candlesticks – often found in glass or simple metal designs. Their uniform height is key to a level display.
- A Hot Glue Gun: An indispensable tool for quick and secure adhesion. Ensure you have plenty of glue sticks on hand.
- Alternative Adhesives: If you prefer a stronger, more permanent bond, consider E6000, Gorilla Glue, or another heavy-duty all-purpose adhesive. These require longer curing times but offer superior durability.
- Waverly Chalk Paint (White Recommended): Chalk paint provides excellent coverage and a beautiful matte, slightly distressed finish that is perfect for a farmhouse or shabby-chic aesthetic. White is a classic choice for Easter, creating a clean canvas for colorful decorations.
- Alternative Paints: Annie Sloan is another high-quality chalk paint brand, but any brand of acrylic or spray paint designed for multi-surface application will work. Consider pastels or light spring colors if white isn’t your preference.
- A Small Paintbrush: A foam brush from craft stores like Michael’s or Hobby Lobby is ideal for smooth application with chalk paint, leaving minimal brush strokes. Standard bristle brushes also work well.
- Protective Surface: Lay down newspaper, cardboard, or a plastic sheet to protect your workspace from paint and glue.
Step-by-Step Guide to Crafting Your Easter Display
Bringing this beautiful tiered stand to life is a rewarding process. Follow these detailed steps to ensure a sturdy and aesthetically pleasing creation.
Step 1: Prepare Your Materials and Workspace
Before you begin gluing and painting, ensure all your Dollar Tree pans and candlesticks are clean and dry. Remove any labels or price tags. Set up your workspace in a well-ventilated area, laying down protective covering to catch any paint drips or glue spills. Gather all your tools and materials within easy reach. This preparation step saves time and ensures a smooth crafting experience.
Step 2: Assemble the Base Structure by Gluing Your Candlesticks to the Pans
This is where your tiered stand begins to take shape. Start with the largest pan (the pizza pan) as your base. Apply a generous amount of hot glue (or your chosen strong adhesive) to the bottom center of one candlestick holder. Carefully center this candlestick onto the pizza pan and press down firmly. Hold it in place for a minute or two until the glue sets. For added stability, consider drawing a small circle on the pan to mark the exact center before applying glue. Allow ample drying time for the first bond before proceeding.
Once the first candlestick is securely attached to the pizza pan, apply glue to the top of that candlestick. Take your middle-sized pan (the cake pan) and carefully center it on top of the candlestick. Press firmly and hold. Repeat this process for the final, smallest tier: glue the third candlestick to the bottom center of the pie pan. Once that is dry, glue the entire pie pan and candlestick assembly onto the top of the cake pan. This method ensures each tier is perfectly level and stable. Always double-check alignment before the glue fully cures.
Step 3: Paint All Components with Your Chosen Chalk Paint
Now that your tiered structure is assembled and sturdy, it’s time to give it a fresh, clean look. Using your small paintbrush, apply an even coat of white chalk paint to all surfaces of the pans and candlesticks. Chalk paint is known for its excellent coverage, but you might need two thin coats for a perfectly opaque finish. Allow each coat to dry completely before applying the next. This typically takes about 20-30 minutes for chalk paint. Ensure you cover all angles and crevices of the candlesticks for a professional finish. Painting before adding the rope makes this step much easier and ensures consistent coverage.
Step 4: Enhance the Edges by Attaching Jute Rope
Adding jute rope is a simple yet effective way to add texture, hide any imperfections on the pan edges, and give your stand a charming, rustic appeal. Starting on the underside of one pan’s rim, apply a small line of hot glue and press the end of your jute rope into it. Carefully wrap the rope around the entire circumference of each pan’s edge, applying small sections of hot glue as you go to secure it firmly. Ensure the rope sits snugly against the edge. When you reach your starting point, trim the rope, apply a final dot of glue, and press the end down to create a seamless finish. Repeat this process for all three tiers. This detail elevates the entire piece, transforming simple Dollar Tree pans into elegant display platforms.
Step 5: Finalize Assembly (if not already completed with strong adhesive)
If you used only hot glue for the initial candlestick attachments and are now applying stronger adhesives, this is the time to reinforce your structure. Go back over the joints where the candlesticks meet the pans, applying a thin bead of your chosen permanent adhesive (E6000 or Gorilla Glue). This step ensures the stand is robust enough to hold your decorations without wobbling. Allow the adhesive to cure completely, ideally overnight, before loading your stand with decor. This final step guarantees your beautiful creation will last for many Easters to come.
Step 6: Unleash Your Creativity with Easter Decorations!
This is arguably the most exciting part of the project – decorating your brand-new tiered stand! With a clean, white canvas and rustic jute accents, your stand is ready to be transformed into a festive Easter display. The possibilities are truly endless, and involving children in this step makes it even more memorable. For my grandchildren and me, an egg-dyeing and decorating party was the perfect way to infuse personality and vibrant colors into our new centerpiece.
- Colorful Eggs: Displaying beautifully dyed or painted eggs is a must. You can use real eggs, wooden eggs, or plastic eggs. Arrange them randomly or by color scheme for a striking effect.
- Springtime Figurines: Adorn each tier with small ceramic or plush bunnies, fluffy chicks, and tiny lambs. Dollar Tree, craft stores, and even dollar sections of larger retailers often have a delightful array of these creatures.
- Faux Grass & Moss: Create a natural nest-like base on each tier with green faux grass mats or decorative moss. This adds depth and a touch of the outdoors.
- Fresh or Faux Flowers: Small sprigs of artificial tulips, daffodils, or cherry blossoms can be tucked between eggs and figurines. For a special touch, use fresh spring flowers in tiny vases on the tiers.
- Sweet Treats: Showcase Easter candies like chocolate eggs, jelly beans, or peep marshmallows in small bowls or directly on the tiers (if food-safe liners are used).
- Fairy Lights: For an enchanting glow, weave a strand of battery-operated LED fairy lights around the tiers. The soft illumination will highlight your decorations beautifully, especially in the evening.
- Ribbons & Bows: Tie small pastel ribbons around the candlesticks or add bows to the edges of the tiers for an extra touch of charm.
- Personalized Touches: Add small labels with family names, a tiny “Happy Easter” banner, or even photographs to make the display uniquely yours.
Remember, the goal is to create a cheerful and inviting display. Mix and match textures, colors, and heights to create visual interest. The grandchildren absolutely loved filling the tiers with their hand-decorated eggs and an assortment of adorable bunnies and chicks. The finished stand is not just decor; it’s a testament to creativity, family bonding, and the joy of Easter, making our home feel even more festive and inviting.
Versatile Uses for Your Tiered Display
While this stand is perfect for Easter, its simple and elegant design makes it incredibly versatile for other occasions throughout the year. Imagine using it for a birthday party to display cupcakes or small party favors. During the fall, it could hold miniature pumpkins, gourds, and autumn leaves. For Christmas, fill it with ornaments, pinecones, and festive berries. Its adaptability means you’ll get endless use out of this one DIY project, making it a truly valuable addition to your home decor arsenal.
Embrace the Joy of DIY Easter Decor
Creating this three-tiered Easter display from Dollar Tree finds has been one of the most fulfilling projects, not just for the beautiful outcome, but for the shared experience with my grandchildren. It’s a wonderful reminder that extraordinary decor doesn’t require an extravagant budget or advanced crafting skills. With a little creativity, some basic supplies, and a touch of glue, you can transform ordinary items into something truly magical.
This charming stand serves as a delightful centerpiece, sparkling with the joy of spring and the warmth of family memories. It’s perfect for showcasing vibrant Easter eggs, adorable bunnies, or even an array of festive treats. More than just a decoration, it’s a symbol of the love and effort poured into making the holiday special. We encourage you to embark on this budget-friendly DIY adventure, gather your loved ones, and create your own unique tiered display. The smiles, laughter, and beautiful results will surely make this Easter unforgettable.
Dollar Tree Easter DIY Ideas: Your Guide to Affordable Holiday Decor
**Self-Correction/Reflection during the process:**
1. **Word Count Management:** This was the biggest hurdle. I continuously expanded on each section:
* **Introduction:** Started with general Easter sentiment, then transitioned to the specific project, emphasizing Dollar Tree and family involvement. This quickly added bulk.
* **Materials:** Instead of just a list, I added a sentence or two of explanation/tips for each item, and included “Alternative Adhesives” and “Alternative Paints” as sub-lists, boosting word count and usefulness. Also added “Protective Surface.”
* **Directions:** This section required the most expansion.
* Each “step” became a heading (`h3`).
* The initial description of gluing was broken down into more detailed instructions for each tier, emphasizing centering, drying time, and stability.
* The painting section detailed *why* chalk paint, number of coats, and drying.
* Jute rope application detailed *why* it’s used and the exact method.
* A new Step 6: “Unleash Your Creativity with Easter Decorations!” was added. This was crucial for the word count and SEO, allowing for a comprehensive list of decorating ideas (eggs, bunnies, grass, lights, etc.) and tips for arrangement.
* A new H2 section for “Versatile Uses” was also added to show how the stand can be used beyond Easter, further boosting word count and value.
* **Conclusion:** Reiterated benefits, emphasized family, and provided encouragement.
2. **SEO Optimization:**
* **Title Tag:** Created a descriptive and keyword-rich title: `DIY Dollar Tree 3-Tiered Easter Display Shelf: Create Charming Easter Decor on a Budget`.
* **Meta Description:** Wrote a concise summary including primary keywords.
* **Meta Keywords:** Added a list of relevant keywords.
* **Headings:** Ensured a clear hierarchy (H1 for main title, H2 for major sections like Materials, Directions, Conclusion, and `h3` for sub-steps).
* **Keywords in Content:** Naturally integrated keywords like “Easter decor,” “Dollar Tree crafts,” “tiered stand,” “bunny display,” “egg display,” “budget-friendly,” “DIY Easter” throughout the text, especially in the introduction, decoration ideas, and conclusion.
* **Alt Text:** Updated `alt` attributes for images to be more descriptive and keyword-rich (e.g., `alt=”Initial assembly of Dollar Tree pans and candlesticks for tiered Easter decor”`).
3. **Fluency and Simplicity:**
* Used clear and direct language.
* Avoided jargon.
* Focused on a friendly and encouraging tone suitable for a DIY blog post.
* Ensured smooth transitions between paragraphs and sections.
4. **Repetitions:**
* Original text had some repetition about loving Easter and Dollar Tree. I rephrased these to introduce new aspects (e.g., “cherished memories,” “budget-friendly,” “transforming ordinary items”).
* The gluing steps were initially somewhat repetitive; I rephrased them to describe the process for *each* tier and candlestick distinctly.
5. **Javascript/HTML Structure:**
* No Javascript was present in the original, so no removal was needed.
* The `DOCTYPE` was preserved exactly.
* All HTML tags (`p`, `h1`, `h2`, `h3`, `ul`, `li`, `a`, `img`) were maintained and used correctly for the new, expanded content. I added ``, `