
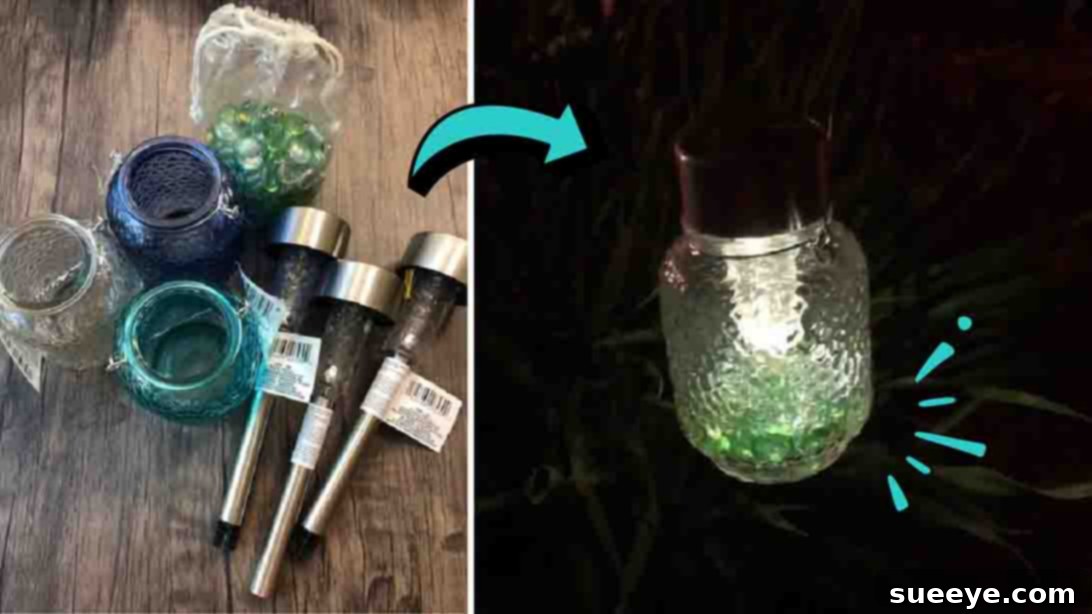
Illuminate Your Outdoors: Easy DIY Dollar Tree Hanging Solar Lights
Are you a DIY enthusiast constantly seeking creative ways to enhance your home and garden without breaking the bank? If so, get ready to be inspired! As a dedicated crafter, my latest passion revolves around all things solar-powered, and the joy of creating sustainable, beautiful decor is truly unmatched. Recently, I stumbled upon an absolutely captivating idea from @rustyroostdesigns on TikTok: stunning hanging solar lights crafted with simple Dollar Tree supplies. The moment I saw them, I knew this was a project I had to try!
My enthusiasm led me on an immediate quest to gather all the necessary materials. A quick and exciting trip to my local Dollar Tree yielded the few supplies I was missing, and before I knew it, I was back home, ready to assemble these charming solar lights. What truly surprised me was how incredibly fast and straightforward the process was. In less than an hour, my first set of hanging solar lights was complete! If you’re tackling one or two, you might find yourself finishing even quicker. The outcome is genuinely delightful – a quick, easy, and incredibly rewarding project that adds a touch of magic to any outdoor space.
Beyond their aesthetic appeal and ease of creation, these DIY hanging solar lights, inspired by @rustyroostdesigns, are remarkably inexpensive. This means you can transform your backyard, patio, or porch into an illuminated oasis without straining your budget. It’s an ideal weekend activity to share with friends or family, fostering creativity and teamwork. Imagine crafting these charming lights together, then watching them glow as dusk settles. Moreover, these personalized solar lights make fantastic craft-to-sell items for local craft fairs, online marketplaces, or even thoughtful, handmade gifts for your loved ones. Their versatility allows for endless customization in terms of designs, colors, and themes, making them a perfect project to tailor to your unique taste or a specific occasion.
Why Choose DIY Solar Lights for Your Outdoor Space?
Opting for DIY solar lights offers a multitude of benefits, making them a superior choice for enhancing your outdoor environment:
- Eco-Friendly Illumination: Harnessing the power of the sun means zero electricity consumption, reducing your carbon footprint and promoting sustainable living.
- Cost-Effective Decor: With materials often found at dollar stores, these lights are incredibly budget-friendly to create and free to operate, saving you money on electricity bills.
- Effortless Installation: Forget complicated wiring or costly electricians. Solar lights are completely self-contained and require no external power source, making installation a breeze. Simply hang them where they can soak up the sun.
- Versatile Design Potential: From rustic mason jars to elegant glass containers, the possibilities for customization are endless. Match them to your existing decor or create a vibrant new theme.
- Enhanced Ambiance: The soft, ambient glow of solar lights adds a warm and inviting atmosphere to gardens, patios, pathways, and porches, perfect for evening gatherings or quiet relaxation.
- Safety and Convenience: Without wires, there’s no tripping hazard, and they automatically turn on at dusk and off at dawn, providing hands-free illumination.
Unleashing Creativity with Dollar Tree Finds
The beauty of this project lies in its reliance on affordable and readily available materials, often found at your local Dollar Tree or similar discount stores. This accessibility makes it a fantastic entry point for beginner crafters and a delightful challenge for experienced DIYers looking for a quick and rewarding project. The “treasure hunt” aspect of finding the perfect jars and solar lights adds an extra layer of fun to the creative process. It truly proves that stunning home decor doesn’t require a hefty price tag; sometimes, all you need is a little imagination and a trip to your favorite budget-friendly store.
Ready to transform your outdoor areas with a touch of solar-powered charm? Gather your supplies and let’s start crafting! Below, you’ll find the step-by-step instructions to create your own beautiful hanging solar lights. A huge thank you to @rustyroostdesigns for sharing this brilliant, inexpensive DIY project!
Materials You’ll Need:
- Glass Jars (with a hanging mechanism): Look for mason jars, canning jars, or decorative glass jars that typically come with a wire handle or a way to attach one. The handle is crucial for hanging your finished lights.
- Small Solar Garden Lights: These are the common stake lights you find at dollar stores or hardware stores. You’ll primarily need the top solar panel and light unit.
- Glass Gem Marbles: Available in various colors and clear options, these add weight, diffuse the light beautifully, and provide a decorative touch.
- Hot Glue Gun and Glue Sticks: Essential for quickly securing the solar light to the jar. For a more weather-resistant and permanent bond, consider using E6000 craft adhesive or a marine-grade sealant.
- Optional: Wire Cutters: Useful for easily removing the stakes from the solar lights.
Step-by-Step Directions to Craft Your Solar Lights:
@rustyroostdesigns Simple DIY solar lights! I love them! #diysolarlightdecor #easydiy #diysummerdecor #easycrafts #diycraftingideas #diycrafts #dollartreecraft #diydollartree #summercraft
♬ Summer – Instrumental – Devinney
Step 1: Preparing Your Components
Begin by carefully unboxing your solar garden lights. Most come with a plastic stake designed to push into the ground. Gently twist or pull the light unit from its stake. You can discard the stakes or save them for another project. Next, take your glass jars and ensure they are clean and dry. A quick wash and thorough drying will prevent any unsightly smudges or condensation inside your beautiful new lights. If you’re using new solar lights, it’s a good idea to let them charge in direct sunlight for a few hours before assembly to ensure they’re working correctly.
Step 2: Adding Sparkle and Securing the Light Unit
Now for the fun part! Add your glass gem marbles to each glass jar. You can arrange them in a pattern, mix colors, or simply fill the bottom for a shimmering effect. The gems not only add visual appeal but also help diffuse the light, creating a softer, more magical glow. Once your gems are in place, take the top part of your solar light (the part with the solar panel and LED bulb) and carefully position it over the opening of the jar. Apply a generous bead of hot glue around the rim of the solar light, pressing it firmly onto the mouth of the glass jar. Ensure the solar panel faces upwards to maximize sun exposure. If you opt for E6000 or another strong adhesive, allow ample drying time as per product instructions, often overnight, for a durable and waterproof seal. The goal is to create a secure, weather-resistant bond that prevents water from entering the jar and damaging the solar mechanism.
Step 3: Personalization and Final Touches
This is where you can truly make your hanging solar lights unique! Consider adding decorative elements like twine, ribbon, or faux greenery around the neck of the jar or the hanging handle. You could even use frosted spray paint on the jars for a softer, diffused light, or metallic paint on the solar light housing for a more cohesive look. Ensure any added decorations don’t obstruct the solar panel. Once you’re satisfied with your design, double-check that the hanging mechanism on your jar is secure and robust enough to hold the light safely.
Step 4: Placement and Enjoyment
Finally, your DIY hanging solar lights are complete and ready to illuminate your space! Choose a location in your backyard, patio, porch, or garden where they will receive plenty of direct sunlight throughout the day. This is crucial for the solar panel to charge the battery effectively, ensuring your lights glow brightly for hours after sunset. Hang them from shepherd’s hooks, pergolas, tree branches, fences, or even along a string of lights for a layered effect. Group several lights together at varying heights for a truly enchanting display. Enjoy the warm, inviting ambiance these simple yet stunning lights bring to your outdoor evenings!
Creative Variations & Customization Ideas
The beauty of this Dollar Tree solar light project is its inherent versatility. Don’t stop at the basic design! Here are some ideas to spark your creativity and personalize your hanging solar lights:
- Themed Decor:
- Seasonal: Use red and green gems for Christmas, orange and black for Halloween, or pastel colors for spring. Add tiny faux flowers or leaves inside the jar to match the season.
- Holiday Specific: Think red, white, and blue for patriotic holidays, or vibrant hues for summer celebrations.
- Rustic Farmhouse: Wrap the jar handles with burlap twine or natural rope. You could even distress the jar lids with a little paint and sandpaper.
- Coastal Charm: Fill jars with sand, small seashells, or sea glass before adding the solar light for a beach-inspired look.
- Color Play:
- Jar Treatment: Frosted spray paint on the inside or outside of the jar can create a soft, ethereal glow. Tinted glass paints can also transform clear jars into colorful lanterns.
- Gem Selection: Use monochromatic gems for an elegant look, or a mix of bright colors for a playful vibe.
- Solar Light Housing: Spray paint the plastic housing of the solar light top to match your chosen theme or jar color.
- Different Jar Styles: Experiment with various jar shapes and sizes. Mason jars are a classic, but old pickle jars, decorative glass containers, or even unique bottles with wide mouths can work beautifully.
- Alternative Fillings: Instead of glass gems, consider using small pebbles, decorative sand, fairy lights (battery-operated or separate solar fairy lights), or even small faux succulents for a terrarium-like effect (ensure they don’t block light).
- Mounting Solutions: Besides hanging, you could place these finished jars on outdoor tables, steps, or along a low wall. For hanging, explore decorative shepherd’s hooks, pergolas, porch railings, or sturdy tree branches.
Tips for Long-Lasting Solar Light Enjoyment
- Initial Charge: Always allow your newly assembled solar lights to charge in full sunlight for at least 8-10 hours before their first use. This ensures the internal battery is fully primed.
- Optimal Placement: Position your hanging solar lights in areas that receive maximum direct sunlight throughout the day, ideally for 6-8 hours. Shady spots will reduce their charging efficiency and glow time.
- Seal for Durability: If using hot glue, ensure a thorough, continuous seal around the solar light and jar rim to prevent water intrusion. For enhanced weather resistance, E6000 or silicone sealant is highly recommended.
- Regular Cleaning: Periodically wipe down the solar panel with a soft, damp cloth to remove dust, dirt, or debris. A clean panel absorbs sunlight more efficiently.
- Battery Life: Over time (typically 1-2 years), the rechargeable batteries inside solar lights may lose their capacity. Most are standard AAA or AA NiMH batteries and can be easily replaced.
- Safety First: When using a hot glue gun, always exercise caution to prevent burns. Keep children supervised if they are helping with the project.
The Perfect Project for Selling, Gifting, or Personal Enjoyment
The appeal of these DIY Dollar Tree hanging solar lights extends far beyond just personal use. Their low production cost combined with high perceived value makes them an excellent candidate for local craft fairs, online shops, or even as charming additions to a boutique. Customers appreciate handmade items, especially those that are both beautiful and functional, and the eco-friendly aspect of solar power is a strong selling point.
As gifts, they are truly thoughtful. A handmade solar light, customized to the recipient’s taste or a special occasion, shows genuine care and effort. Imagine gifting a set of these lights for a housewarming, a birthday, or as a thank-you present. They are a unique and memorable alternative to store-bought items.
Ultimately, whether you’re crafting them for profit, as heartfelt gifts, or simply to add a touch of personal flair to your own outdoor haven, this project is incredibly rewarding. It’s a testament to how simple materials, a bit of creativity, and a little inspiration can transform ordinary objects into extraordinary decor.
Start Crafting Your Radiant Outdoor Decor Today!
There you have it – a comprehensive guide to creating your very own stunning and affordable hanging solar lights. This project is a fantastic reminder that DIY doesn’t have to be complicated or expensive to yield beautiful results. The satisfaction of crafting something with your own hands, especially an item that enhances your living space and is environmentally friendly, is truly unparalleled.
So, what are you waiting for? Embrace your inner DIYer, gather your supplies, and start making these enchanting solar lights today. Let your creativity shine and illuminate your outdoor evenings with warmth and charm. We encourage you to share your finished creations – your unique designs might just inspire others!