
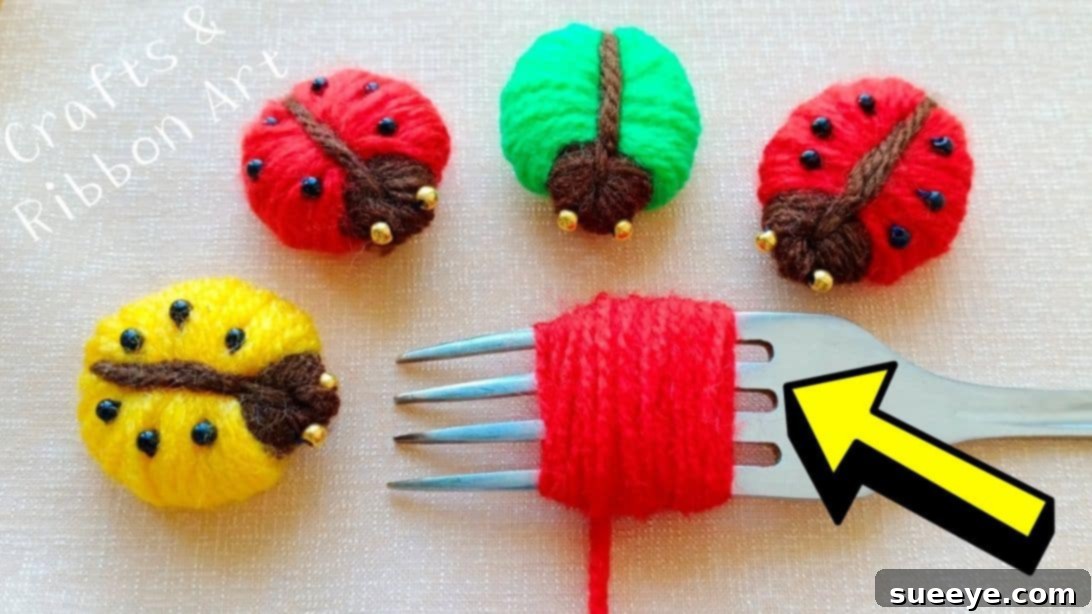
Welcome to the enchanting world of DIY crafts, where a simple fork and a few strands of yarn can transform into something truly delightful! Ladybugs, with their vibrant red shells and charming black spots, have always held a special place in our hearts. They’re not just symbols of good luck but also a fantastic source of inspiration for adorable home decor and heartwarming handmade gifts. If you’re looking for a quick, easy, and incredibly rewarding crafting project, you’re in the right place. We’re about to dive into making the cutest little yarn ladybugs, a project so straightforward that even absolute beginners can create a masterpiece in mere minutes. Forget complicated tools or advanced techniques – all you need is a fork, some colorful yarn, and a sprinkle of enthusiasm!
This particular project, inspired by the brilliant creativity of Crafts & Ribbon Art on YouTube, stands out for its simplicity and charm. It’s an ideal way to add a touch of whimsy to your space or to craft unique, personalized presents for friends and family. Imagine a cluster of these charming yarn ladybugs adorning a shelf, brightening a child’s room, or even acting as a cute fridge magnet. The possibilities are as endless as your imagination!
Discover the Endearing Charm of DIY Yarn Ladybugs
Ladybugs are more than just insects; they are tiny bursts of joy. Their distinctive red and black patterns make them instantly recognizable and universally loved. Bringing this natural beauty into your home through handmade decor is a wonderful way to infuse your space with cheer and personality. Crafting your own ladybugs allows for a unique expression of style, moving beyond mass-produced items to something truly personal and meaningful. Yarn, with its soft texture and vast array of colors, is the perfect medium to capture the gentle spirit of these beloved beetles.
Engaging in DIY projects like this yarn ladybug not only results in beautiful creations but also offers a therapeutic escape from daily stresses. The repetitive motion of wrapping yarn can be incredibly calming, allowing for a moment of mindful creativity. It’s a chance to disconnect from screens and reconnect with your hands, fostering a sense of accomplishment with every finished piece. Whether you’re a seasoned crafter or just starting your DIY journey, this project promises satisfaction and a tangible result that will surely bring a smile to your face.
Why This Fork Yarn Ladybug Project is Perfect for Beginners
Many people shy away from crafting, believing it requires special skills or expensive equipment. This yarn ladybug tutorial shatters those misconceptions. It’s designed to be incredibly accessible, making it an excellent entry point into the world of yarn crafts. The most exciting part? You can complete one of these adorable ladybugs in as little as six minutes once you get the hang of it! This rapid turnaround time means you can easily create a whole colony of ladybugs in an afternoon, perfect for decorating, gifting, or even selling at craft fairs.
A Quick & Rewarding Crafting Experience
The beauty of using a simple kitchen fork as your primary tool lies in its accessibility and ease of use. There’s no need for fancy looms, knitting needles, or complex patterns. If you can wrap yarn around a fork, you can make these ladybugs. This project is a fantastic confidence booster for new crafters, demonstrating that impressive results can be achieved with minimal fuss. The simple steps are easy to follow, and the instant gratification of seeing your ladybug take shape is truly motivating. It’s a testament to the fact that creativity doesn’t have to be complicated to be incredibly rewarding.
For those looking to introduce children to the joys of crafting, this project is also an excellent choice (with adult supervision for scissors and needles, of course). The vibrant colors and cute outcome are sure to capture their imagination, helping them develop fine motor skills and patience in a fun, engaging way. Imagine the delight on their faces as they create their own little yarn friends!
Gather Your Supplies: What You’ll Need for Your Charming Yarn Ladybug
One of the many advantages of this craft is that it requires only a handful of readily available and inexpensive materials. Most of these items you might already have around your house, making it an excellent last-minute project or a fun way to use up leftover yarn scraps. Quality materials will always enhance your finished product, but don’t hesitate to experiment with what you have on hand.
- Red Yarn: This will form the main body of your ladybug, giving it that iconic, cheerful color. Any weight of yarn will work, but a medium-weight (worsted weight) yarn is generally easiest to handle for beginners and provides a good fullness.
- Black or Dark Brown Yarn: Essential for creating the ladybug’s head and the crucial tie-off. Black is traditional, but a deep brown can offer a softer, more rustic look.
- Small Gold Beads: These will serve as the sparkly, observant eyes of your ladybug, adding a touch of personality. You can also use white, silver, or even tiny black beads if gold isn’t available.
- Small Black Beads: Perfect for creating the characteristic spots on your ladybug’s back. Varying sizes of black beads can add depth and realism.
- Embroidery Needle: A sharp needle with an eye large enough for your sewing thread is needed for attaching the beads securely.
- Sewing Thread: Use a strong, matching or neutral-colored thread to sew on the beads.
- Scissors: A good sharp pair of scissors will make cutting yarn and thread much easier and cleaner.
- Fork: Any standard kitchen fork with four tines will work as your primary winding tool. The tines provide the perfect structure for wrapping your yarn loops.
Step-by-Step Guide: Crafting Your Adorable Yarn Ladybug with a Fork
Now that you have all your materials ready, let’s embark on the fun journey of bringing your yarn ladybug to life. Follow these steps carefully, and remember that practice makes perfect. Don’t be afraid to experiment and personalize your creation!
Step 1: Building the Red Body Base
Begin by taking your vibrant red yarn. Hold the fork in one hand, and with the other, start wrapping the red yarn around all four tines of the fork. Aim for approximately 50 wraps. The more wraps you make, the fuller and plumper your ladybug’s body will be, so feel free to adjust this number based on your desired look. Ensure your wraps are snug but not overly tight, allowing for easy removal later. Once you’ve completed your wraps, cut the red yarn, leaving a tail of about 3-4 inches. Next, cut a small separate piece of black or dark brown yarn, roughly 6-8 inches long, and set it aside. This piece will be crucial for tying the different sections together.
Step 2: Creating the Distinctive Black Head
Now, take your black or dark brown yarn. Carefully wrap this yarn around only the two middle tines of the fork. This section will form the ladybug’s head. Wrap the black yarn about 30 times. Again, adjust the number of wraps to control the size and prominence of the head. Once wrapped, cut the black yarn, leaving a similar tail. With both the red and black yarn sections wrapped around the fork, take the small piece of black yarn you set aside earlier. Carefully thread this piece underneath both the red and black looped yarn, directly in the middle of the fork tines. Bring the ends of this tying yarn up between the two middle tines and knot them tightly, securing both the red body loops and the black head loops together. This central knot is what holds the entire structure in place.
Step 3: Securing the Form and Shaping the Body
After tying the central knot, you’ll have two loose ends of the tying yarn. Cut off any excess of these tying tails, leaving just enough to work with for a moment. Now, gently and carefully slide all the looped yarn off the fork. Be slow and deliberate to prevent the loops from unraveling or shifting too much. Once off the fork, you’ll see a distinct separation between the red and black sections, held together by your central knot. Bring the two tails of the tying yarn (that are now central to the creation) over to the back of what will be the ladybug’s head. Tie these tails together again, even more tightly this time, effectively cinching the ‘neck’ of the ladybug and further defining the head and body separation. This helps to create the characteristic rounded shape of the ladybug’s body and clearly distinguishes its head.
Step 4: Refining the Head Attachment
At this point, you’ll have two tails from the knot that secures the head. Cut off one of these tails very close to the knot, ensuring the knot remains secure. Take the remaining tail and thread it through your embroidery needle. This tail will be used to further secure and shape the head. Carefully sew this tail into the “head” part of the ladybug, weaving it through the black yarn loops. The goal here is to draw the head section together and give it a more rounded, distinct shape, pulling any loose ends inwards to make it neat. Stitch it a few times to lock it securely in place. This step is crucial for giving your ladybug a well-defined and sturdy head that won’t unravel.
Step 5: Adding Personality: Eyes and Dots
Once the head is secure and shaped, it’s time to add the finishing touches that bring your ladybug to life! First, take any remaining yarn tails from the red or black sections, gently push them inside the body of the ladybug, and trim off any excess that might be poking out. The goal is a neat, seamless appearance. Now, thread your embroidery needle with sewing thread. Pick up two small gold beads for the eyes. Position them on the black head section and sew them securely in place. Ensure they are evenly spaced and look forward. Next, take your small black beads. These will form the iconic spots on the ladybug’s red back. Sew these black beads onto the red body section. You can arrange them symmetrically or randomly, depending on your preference. Typically, ladybugs have between 5-7 spots, but feel free to add as many or as few as you like. Ensure all beads are firmly attached so they don’t fall off.
Unleash Your Creativity: Customizing Your Yarn Ladybug
The beauty of DIY is the endless potential for personalization. While the classic red and black ladybug is charming, don’t hesitate to let your imagination soar. Experiment with different yarn colors! Imagine a yellow ladybug with black spots, a blue ladybug with white spots, or even a rainbow-colored ladybug. You can also vary the size by using a larger fork for bigger ladybugs or fewer wraps for smaller ones. Consider adding other embellishments:
- Antennae: Use small pieces of floral wire or thin black pipe cleaners to create tiny antennae.
- Wings: Attach small pieces of felt or craft foam to mimic open wings.
- Magnets: Glue a small magnet to the back to turn your ladybug into a refrigerator decoration.
- Keychains: Attach a jump ring and a keychain finding to make a cute accessory.
- Garlands: Create multiple ladybugs and string them together to make a festive garland for a child’s room or a garden party.
These customizations allow you to create a truly unique piece that reflects your personal style or perfectly matches the decor of its intended home. It’s a simple way to elevate your craft from a basic tutorial into a distinctive work of art.
The Therapeutic Joy of DIY Yarn Crafts
Beyond the adorable end product, engaging in yarn crafts offers a wealth of benefits. It’s a fantastic way to relieve stress, improve hand-eye coordination, and foster a sense of accomplishment. The rhythmic motion of wrapping and tying can be incredibly meditative, providing a much-needed break from the fast pace of modern life. Crafting also allows you to tap into your creative side, exploring color combinations and design choices that are uniquely yours. Handmade items carry a special warmth and thoughtfulness, making them perfect gifts for birthdays, holidays, or just to show someone you care. When you give a handmade gift, you’re not just giving an item; you’re sharing a piece of your time, effort, and heart.
More Yarn Craft Inspirations
If you’ve enjoyed creating this yarn ladybug, you might be interested in exploring other similar projects. The same principles of wrapping yarn around objects can be applied to create a variety of adorable figures. For instance, if you loved this tutorial, you might also enjoy learning How to Make a DIY Kitten Using Yarn. These types of projects are excellent for refining your yarn crafting skills and expanding your repertoire of handmade creations.
Final Thoughts on Your Handcrafted Ladybug Masterpiece
Congratulations! You’ve successfully crafted your very own adorable yarn ladybug. This simple yet rewarding project is a testament to the fact that creativity doesn’t require complex tools or advanced skills. With just a fork and some yarn, you’ve brought a charming little creature to life, ready to brighten any space or make a heartfelt gift. We hope this tutorial has inspired you to continue exploring the wonderful world of DIY crafts. Share your creations with pride, and don’t forget to tag the original creator!
*All image credit for this delightful project belongs to Crafts & Ribbon Art via YouTube. We encourage you to follow and subscribe to their channel for more inspiring and easy-to-follow craft tutorials!