
Embrace the vibrant spirit of summer with a delightful sewing project that captures the essence of sunshine and sweet memories. For anyone who finds joy in the kitchen or simply cherishes the warmth of handmade crafts, this watermelon apron is an absolute must-have. Picture lazy summer evenings, the sweet taste of freshly cut watermelon, and the laughter of family gatherings – these are the cherished moments that this charming apron evokes. It’s more than just a kitchen accessory; it’s a nostalgic journey back to simpler times and a celebration of the season’s bounty. This apron isn’t just an item; it’s a conversation starter, a burst of color, and a functional piece of art that truly screams “summer!”
If your kitchen arsenal doesn’t yet include one of these cheerful culinary companions, now is the perfect opportunity to create your own before the glorious days of summer fully arrive. This adorable little apron serves not only as a practical garment for cooking but also as an incredibly thoughtful and personal gift. Imagine the delight on a friend’s face when they receive a handmade, reversible, and utterly charming watermelon apron. It’s a gift that speaks volumes about care, creativity, and a touch of seasonal cheer, making it ideal for birthdays, housewarmings, or just because you want to spread a little joy.
While the classic watermelon print holds a special place in our hearts, the world of fabric offers an endless array of possibilities to ignite your creative spirit. Dive into your local fabric store and explore other delightful fruity prints that might catch your eye: zesty lemons, tropical pineapples, exotic coconuts, sweet strawberries, or whatever vibrant design your heart desires! Beyond fruits, consider whimsical florals, cheerful polka dots, or even custom prints that reflect your personality or that of the recipient. Every print has its own unique charm, but for an undeniable splash of summer fun and a touch of nostalgic sweetness, the watermelon design remains an undisputed favorite that truly captures the season’s playful spirit.
Prepare to be utterly captivated and inspired to make one (or several!) of these fantastic aprons once you discover just how simple and utterly cute the project truly is. Adding to its impressive list of features, this apron boasts a brilliant reversible design. This means you effectively get two distinct looks from a single apron, doubling its versatility and allowing you to wear it for twice as long before it needs a trip to the laundry basket. It’s a practical innovation that makes this charming accessory even more appealing for everyday use and extended enjoyment in the kitchen.
One of the many thoughtful design elements of this apron is its customizable gathering. You have complete freedom to gather the fabric as much or as little as you desire, or even not at all, tailoring the fit and aesthetic precisely to your preference. This adaptability ensures that the apron drapes beautifully on any body type. Furthermore, the intelligent design, expertly crafted by Laura, allows the apron to sit comfortably high on your waist. This strategic placement offers enhanced protection for your clothing, shielding a larger area from spills, splatters, and general cooking mishaps, ensuring you stay clean and stylish even during the busiest kitchen adventures.
But the practical brilliance of this apron doesn’t end with its reversible design and custom fit. There’s a wonderfully functional hidden surprise: incredibly deep and spacious pockets strategically placed on each side of the apron! These aren’t just decorative pouches; they are a game-changer for anyone who spends time in the kitchen. Imagine the convenience of having everything you need right at your fingertips while you’re cooking up a storm. These pockets are perfect for stashing your cell phone, keeping it easily accessible for quick recipe checks or answering important calls without fumbling through drawers. They can also hold your spatula, a small whisk, measuring spoons, a packet of your favorite spices, a kitchen timer, recipe cards, or even a pen and notepad for jotting down last-minute grocery list additions. The sheer utility of these deep pockets makes cooking a more organized, efficient, and enjoyable experience, truly transforming how you interact with your kitchen tools and essentials.
Ready to bring this delightful creation to life in your own home? You’re in luck! Laura Coia, the gifted artisan behind Sew Very Easy, has masterfully demonstrated the step-by-step process of crafting this darling watermelon apron. Her clear, engaging tutorial makes it incredibly accessible for sewers of all skill levels, from complete novices to seasoned crafters. By following her expert guidance, you’ll not only be able to create one for yourself – ensuring your cooking sessions are both stylish and practical – but you’ll also gain the skills to whip up several more as thoughtful, personalized gifts for your nearest and dearest. Imagine the smiles when your friends unwrap these charming, handmade treasures; they are guaranteed to absolutely adore them!
How to Make A Watermelon Apron: A Step-by-Step Guide to Summer Fun
Crafting your own watermelon apron is a fulfilling and surprisingly straightforward project that will bring a touch of summer cheer to your kitchen. While specific measurements might vary based on your desired size and the original tutorial, the general steps below will guide you through the process of creating this charming, reversible, and highly functional accessory. Before you begin, we highly recommend watching Laura Coia’s full tutorial on Sew Very Easy for precise instructions and visual guidance. This guide provides a comprehensive overview of the construction process.
Step 1: Gather Your Materials and Prepare Your Fabric
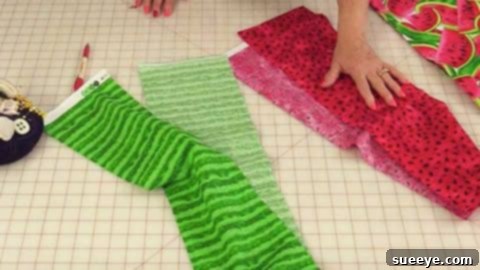
The first crucial step is to gather all the necessary supplies. You will need two complementary fabric prints for the reversible design. For the iconic watermelon apron, choose one fabric with a vibrant watermelon print or a solid red/pink for the “flesh” and another fabric in a green tone for the “rind.” Cotton fabric is highly recommended for aprons due to its durability, washability, and breathability. You’ll also need coordinating thread, a sewing machine, pins, fabric scissors or a rotary cutter and mat, an iron and ironing board, and a measuring tape or ruler. Pre-wash and dry your fabrics to prevent shrinking after your apron is made, then press them thoroughly to remove any wrinkles, ensuring accurate cutting and sewing.
Step 2: Cut the Main Apron Panel
Based on your desired apron size (a common width might be around 24-28 inches, and length 18-22 inches for a waist apron), cut two identical rectangles from your main apron fabrics – one from the watermelon print and one from the green fabric. These will form the main body of your reversible apron. Ensure your cuts are precise and straight. This is where the magic of the watermelon slice shape begins. You might need to gently round the bottom corners or shape the bottom edge slightly to resemble a watermelon slice, depending on the specific design shown in Laura’s tutorial. Remember to account for a seam allowance (typically 1/4 to 1/2 inch) around all edges.
Step 3: Prepare the Waistband and Ties
The waistband and ties are essential for securing your apron. For the waistband, cut two long strips of fabric (approximately 3-4 inches wide and the desired width of your apron panel, plus a few inches for overlap if desired) from one of your chosen fabrics, or a coordinating solid. For the ties, cut two even longer strips (perhaps 2-3 inches wide and 30-40 inches long each) from the same fabric. These tie lengths will allow you to comfortably knot or bow the apron around your waist. You will then fold these strips lengthwise, press them, and sew along the raw edges to create finished, clean ties and a sturdy waistband. Trim corners and turn them right side out, pressing them flat.
Step 4: Create the Deep Pockets
The functional deep pockets are a standout feature of this apron. From your fabric (you can choose either of your main fabrics or a coordinating solid), cut two rectangles for the pockets. The size will depend on how deep and wide you want them, but aim for generous dimensions (e.g., 8×10 inches). Hem the top edge of each pocket piece by folding it over twice and sewing. Then, press the remaining three raw edges under by about 1/2 inch. Position these pockets on one of your main apron panels (decide which side will feature the pockets) – typically one on each side – leaving ample room from the edges and the top. Pin them securely in place, then stitch them to the main apron panel along the side and bottom folded edges, reinforcing the top corners for durability.
Step 5: Assemble the Main Apron Body
With your pockets attached (if desired), it’s time to assemble the main reversible apron. Place your two main apron panels (watermelon print and green fabric) right sides together. Pin them securely around all edges. Carefully sew around the perimeter of the apron, leaving a small opening (about 3-4 inches) along one of the straight bottom edges. This opening will be used for turning the apron right side out. Trim the corners and any bulky seam allowances to ensure crisp edges once turned. Turn the apron right side out through the opening, gently pushing out all corners. Press the entire apron flat, making sure the seam allowance at the opening is tucked in neatly.
Step 6: Attach the Waistband and Ties
Now, to connect the main apron body to the waistband and ties. Take your prepared waistband piece (it might be a single long piece or two pieces sewn together to form one continuous strip). Find the center of the waistband and the center of the top edge of your apron panel. Align these centers. Pin the raw edge of the waistband to the top raw edge of the apron panel. If your apron is gathered, ensure the gathers are evenly distributed along this top edge. Stitch the waistband to the apron body. Then, attach your finished ties to the ends of the waistband, ensuring they are securely sewn. You can either incorporate the ties directly into the waistband construction or sew them onto the finished ends of the waistband securely. The goal is a continuous, strong tie system.
Step 7: Final Touches and Finishing
Once the waistband and ties are attached, you’re almost done! The final step involves topstitching. Carefully topstitch all around the outer edge of the apron, including around the opening that was used for turning. This not only closes the opening neatly but also gives the apron a professional, crisp finish and helps it lay flat. You can also topstitch along the top edge of the waistband to reinforce it. Give your newly sewn watermelon apron a final press with an iron to smooth out any wrinkles and achieve a perfectly polished look. Your adorable, reversible, and pocket-filled watermelon apron is now ready to make its debut in your kitchen!
This sewing project is incredibly rewarding, offering both a functional item and a delightful burst of personal style. Whether you’re making it for yourself to add some flair to your cooking routine or crafting it as a heartfelt gift for a loved one, the joy of creating something beautiful and practical with your own hands is truly unparalleled. So grab your fabric, thread your machine, and get ready to stitch up some summer fun with this irresistible watermelon apron!