
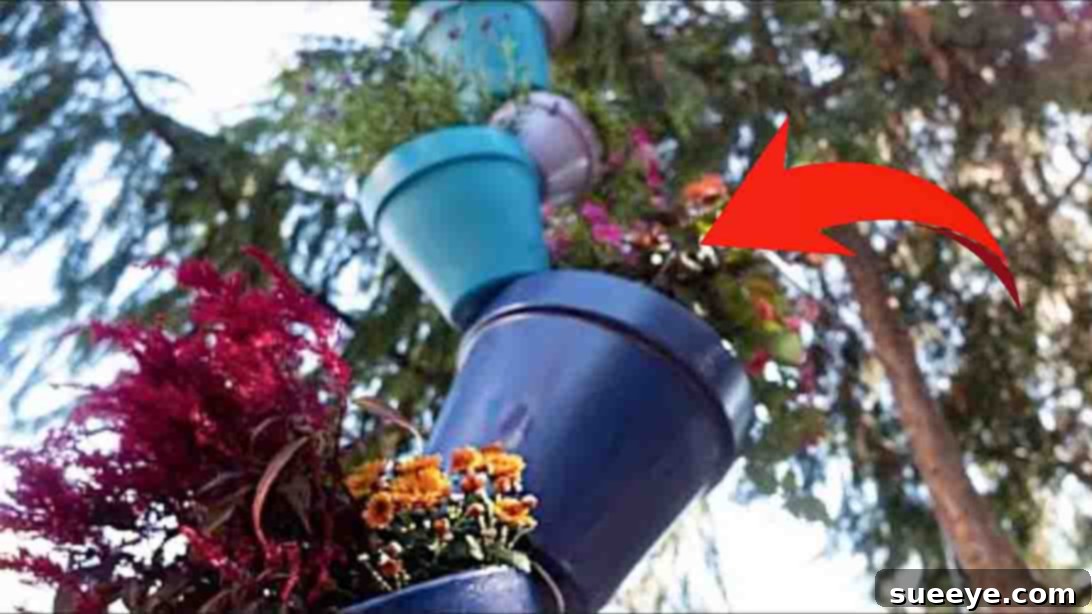
Are you searching for ingenious and aesthetically pleasing ways to revitalize your outdoor space and infuse it with vibrant life? Imagine transforming a drab corner of your garden into a cascading tower of color and texture. Look no further than this incredibly simple yet stunning DIY project: creating stackable flower pots. Inspired by brilliant ideas like those from Crafty House on Youtube, this DIY stackable flower pot tower promises to be a game-changer for your garden’s aesthetic. Not only will it introduce a dazzling pop of color, but it also offers a clever solution for maximizing planting space, making your garden truly vibrant and dynamic.
This engaging DIY endeavor requires just a handful of readily available materials: a selection of flower pots in descending sizes, a sturdy rebar, and your favorite selection of flowering plants or lush foliage. It’s an ideal weekend activity that the whole family can enjoy, providing a wonderful opportunity for kids to get involved in gardening and unleash their creativity. Having personally crafted several of these vertical planters for my own backyard, I can attest to their immediate impact; they instantly transformed an otherwise uninspired area into a focal point of beauty. This project remains one of my top DIY recommendations to date, celebrated for its remarkable ease of construction and its undeniably gorgeous outcome. Don’t delay—start creating your own breathtaking stackable flower pot display today and watch your garden flourish with renewed charm! Continue reading for a detailed, step-by-step guide to bring this vision to life.
Why Create DIY Stackable Flower Pots? Unlocking Your Garden’s Full Potential
The appeal of DIY stackable flower pots extends far beyond their charming appearance. This clever gardening solution offers a multitude of benefits that can enhance any outdoor space, regardless of its size or current aesthetic. Here’s why this project is a must-try for every gardening enthusiast:
- Maximize Space with Vertical Gardening: In urban environments or smaller backyards where ground space is limited, going vertical is a brilliant strategy. Stackable pots allow you to cultivate a significant number of plants within a compact footprint, effectively transforming a small area into a lush, multi-tiered garden.
- Instant Visual Impact: A stacked planter tower acts as an immediate focal point. Its unique, cascading design draws the eye upward, adding a dynamic architectural element to your garden that traditional horizontal layouts cannot achieve. The varying levels create depth and interest, making your plant display more captivating.
- Boost Curb Appeal: Whether placed near an entryway, on a patio, or within a flower bed, a beautifully arranged stackable planter can significantly enhance your home’s curb appeal. It signals care and creativity, welcoming visitors with a burst of natural beauty.
- Customizable Design and Color: The beauty of DIY lies in customization. You have complete control over the color scheme of your pots, allowing you to match them to your home’s exterior, garden theme, or personal preference. Experiment with vibrant hues, subtle pastels, or even a monochromatic scheme for a sophisticated look.
- Ideal for Beginners: This project is remarkably straightforward, making it perfect for novice gardeners or those looking for a quick and rewarding DIY. The steps are simple, and the immediate results are incredibly encouraging.
- Engaging Family Activity: Involving children in the process of painting pots and planting flowers is an enriching experience. It fosters creativity, teaches responsibility, and connects them with nature, all while building something beautiful together.
- Versatile Planting Options: Stackable pots are incredibly versatile. You can plant a variety of flowers, herbs, succulents, or even small vegetables. Consider trailing plants for the lower tiers to create a waterfall effect, while upright plants can crown the top, creating a diverse and interesting ecosystem.
- Cost-Effective Garden Elevation: Compared to purchasing pre-made vertical planters or elaborate garden structures, this DIY approach is highly economical. You can often reuse old pots or find new ones at a low cost, making it an accessible project for any budget.
Embracing this DIY stacked flower pot project isn’t just about adding plants; it’s about adding personality, efficiency, and a touch of artistic flair to your cherished outdoor haven.
Materials You’ll Need for Your Stacked Planter Project
Before you dive into the creation process, gathering all your materials is crucial. This DIY project is celebrated for its simplicity, requiring only a few key items that are readily available at most hardware stores, garden centers, or even online retailers. Here’s a detailed look at what you’ll need and some considerations for each item:
- 6 Plant Pots (Descending Sizes):
- Selection: The core of your stackable tower lies in having pots that can progressively fit over each other. Aim for pots that have a central drainage hole large enough to accommodate the rebar.
- Material: Plastic pots are lightweight, durable, and generally more forgiving to work with, especially when spray painting. Terracotta pots offer a classic look but are heavier and more fragile.
- Sizes: The “descending sizes” aspect is key to achieving the stacked, tilted effect. You’ll need one large base pot, and then each subsequent pot should be slightly smaller than the one below it, allowing them to nestle and tilt creatively without falling off the rebar.
- Spray Paint (Color of Your Choice):
- Type: Opt for outdoor-grade spray paint that is specifically designed for plastics, ceramics, or multi-surface use. Look for options that are weather-resistant and UV-protected to ensure your colors remain vibrant under sun and rain. A primer spray paint can be beneficial for better adhesion and a more even finish.
- Color Scheme: This is where your creativity shines! You can choose a single color for a cohesive look, use varying shades of one color for an ombre effect, or go bold with a rainbow of hues. Consider what colors will best complement your chosen flowers and your garden’s existing palette.
- Rebar (Reinforcing Bar):
- Purpose: The rebar acts as the central spine and anchor for your stacked planter, providing stability and support for all the pots. It prevents the tower from toppling over.
- Size: A standard rebar of about 1/2 inch to 3/4 inch diameter is usually sufficient. The length will depend on how many pots you plan to stack, but for 6 pots, a length of 4-5 feet is generally appropriate, allowing enough to be driven into the ground and extend through all the pots. Ensure the rebar can pass through the drainage holes of your chosen pots.
- Safety: Rebar can have rough edges. Consider wearing work gloves when handling it.
- Your Favorite Flower Plants or Herbs:
- Selection: Choose plants that thrive in similar light and water conditions. Consider a mix of upright plants for the top and trailing plants for the lower tiers to create a lush, overflowing look. Succulents, annuals, perennials, and herbs all work wonderfully.
- Soil: Have a good quality potting mix on hand, preferably one formulated for container gardening, as it provides excellent drainage and aeration.
Recommended Additional Tools:
- Hammer or Mallet: Essential for driving the rebar securely into the ground.
- Measuring Tape: For marking the rebar accurately.
- Gardening Gloves: To protect your hands during planting and when handling soil.
- Small Trowel: For scooping soil into the pots.
- Safety Glasses/Mask: Especially important when spray painting, to protect eyes and respiratory system.
- Drop Cloth or Cardboard: To protect your work surface during painting.
Having all these items ready before you start will ensure a smooth and enjoyable building process for your DIY stacked flower pot tower.
Step-by-Step Guide: How to Build Your Stackable Flower Pot Tower
Creating your stackable flower pot display is a straightforward and rewarding process. Follow these detailed instructions to ensure a stable, vibrant, and beautiful vertical garden that will last for seasons to come.
Step 1: Preparation and Painting Your Pots and Rebar
Begin by setting up your workspace. Choose a well-ventilated area, preferably outdoors, and lay down a drop cloth or old newspapers to protect the ground from paint. If your pots are new, give them a quick wipe to remove any dust. If they are used, clean them thoroughly to remove old dirt and debris, then let them dry completely.
Now, it’s time to add some color! Take your spray paint (and remember your safety glasses and mask). Shake the can vigorously for about a minute. Apply thin, even coats to all your flower pots and the rebar. It’s often better to apply several thin coats than one thick coat, as this prevents drips and ensures a smoother, more durable finish. Allow each coat to dry to the touch before applying the next, following the manufacturer’s instructions for drying times. Don’t forget to paint the rebar as well to give it a finished look that blends with your design, or choose a contrasting color for a bold statement. While the paint dries, you can begin planning your plant arrangements.
Step 2: Anchoring the Foundation: The First Pot
Once all your painted pots and rebar are thoroughly dry, you’re ready for assembly. Select the spot in your garden where you want your stackable planter to stand. This location should consider sunlight requirements for your chosen plants and be a visible area you wish to enhance.
Using your measuring tape, mark the rebar approximately 2 feet from one end. This segment will be driven into the ground, providing a stable anchor for the entire structure. Now, take your largest flower pot. Place it on the ground in your chosen location. Carefully thread the unpainted, unmarked end of the rebar through the drainage hole of this largest pot. Once the rebar is through the pot, begin to drive the rebar into the ground using a hammer or mallet until the 2-foot mark (or slightly more) is fully embedded. Ensure the rebar is firmly planted and standing straight. The stability of your entire tower depends on this foundational step.
With the rebar anchored, position the largest pot. Instead of sitting it flat, carefully tilt it to one side, allowing it to rest at an angle. This angle is crucial for the unique aesthetic of the stacked pots. To secure this angle and provide a planting base, add a layer of potting soil underneath the raised side of the pot, effectively propping it up and stabilizing its position. Fill the rest of the pot with potting mix and carefully plant your chosen flowers or plants into this bottom tier.
Step 3: Building Upward: Stacking and Planting
Now, it’s time to build your tower! Take the second largest pot. Slide it over the rebar, letting it rest on the rim of the first (largest) pot. Crucially, tilt this second pot in the opposite direction from the first one. This creates a visually appealing zig-zag pattern as you ascend. Once angled, stabilize it with a bit of soil underneath the raised side, then fill it with potting mix and plant your flowers. This alternating tilt is what gives the stackable pots their distinct, dynamic look, allowing each pot to present its plants clearly without being completely overshadowed by the one above.
Continue this process: slide the next pot onto the rebar, tilt it opposite to the pot below it, stabilize with soil, fill with potting mix, and plant. Repeat these steps with your remaining pots, always ensuring to alternate the tilt direction. As you add each pot, carefully adjust its angle to ensure maximum visual appeal and stability. By the time you reach the smallest pot at the top, your DIY stacked flower pot tower will have taken shape, displaying a beautiful cascade of color and foliage.
Tips for Success and Customization
To ensure your DIY stackable flower pot tower thrives and remains a stunning feature in your garden, consider these additional tips and customization ideas:
Choosing the Right Plants for Your Stacked Planter
- Sunlight and Water Needs: Select plants that have similar requirements for sunlight and water. This makes maintenance much easier, as all plants in the tower will likely receive the same amount of sun and require watering at similar intervals.
- Trailing vs. Upright: For a lush, overflowing look, plant trailing varieties (like petunias, sweet potato vine, or lobelia) in the lower and middle pots, allowing them to cascade downwards. Use upright plants (such as marigolds, geraniums, or small ornamental grasses) for the top and to add height and structure.
- Herbs and Vegetables: This vertical garden is also perfect for growing herbs (basil, thyme, oregano) or compact vegetables like strawberries or small lettuce varieties. It keeps them off the ground and can make harvesting easier.
- Succulents and Cacti: If you prefer low-maintenance options or live in a dry climate, a succulent tower can be incredibly striking. Ensure excellent drainage for these plants.
Watering and Maintenance for a Thriving Display
- Consistent Watering: Stacked pots, especially those exposed to full sun and wind, tend to dry out faster than in-ground plants. Check the soil moisture daily, especially during hot weather. Water thoroughly until you see water draining from the bottom of the lowest pot.
- Top-Down Watering: Always water from the top pot downwards. This allows water to filter through each layer, ensuring all plants receive moisture.
- Fertilization: Container plants quickly deplete soil nutrients. Incorporate a slow-release fertilizer into your potting mix or feed your plants with a liquid fertilizer every few weeks, following product instructions.
- Deadheading: Regularly remove spent blooms (deadheading) to encourage more flowering and keep your display looking tidy and vibrant.
- Pest Control: Keep an eye out for common garden pests. Treat them promptly with organic pest control methods if possible.
Creative Color Schemes and Designs
- Monochromatic Magic: Choose pots and flowers all within the same color family (e.g., various shades of blue or purple) for a sophisticated and cohesive look.
- Rainbow Riot: Paint each pot a different vibrant color and choose flowers to match for an energetic, cheerful display.
- Complementary Colors: Use colors opposite each other on the color wheel (e.g., blue and orange, purple and yellow) for a high-contrast and eye-catching arrangement.
- Themed Gardens: Create a theme, such as a “butterfly garden” with nectar-rich flowers, or a “fragrant tower” with aromatic herbs and flowers.
Safety Considerations
- Rebar Handling: Always wear sturdy gloves when handling rebar to protect your hands from rough edges. Be mindful of its sharp end when driving it into the ground.
- Paint Fumes: Ensure excellent ventilation when spray painting. Use a respirator mask to avoid inhaling fumes, especially if painting indoors or in an enclosed space.
- Stability: Before completing, give your stacked tower a gentle nudge to ensure it’s firmly planted and stable. If it wobbles, you may need to drive the rebar deeper or reinforce the base with more compacted soil.
- Children and Pets: If you have young children or pets, ensure the tower is in a location where it won’t be easily knocked over.
By following these tips, your DIY stackable flower pot garden will not only be beautiful but also a long-lasting and manageable addition to your outdoor living space.
Conclusion: Elevate Your Garden Today!
There you have it—a comprehensive guide to crafting your very own DIY stackable flower pot tower, a project that promises to transform your garden from ordinary to extraordinary. This ingenious vertical gardening solution is more than just a decorative piece; it’s a smart way to maximize planting space, introduce dynamic visual interest, and express your personal creativity in the heart of your home.
Imagine the compliments you’ll receive as friends and family marvel at your cascading display of vibrant blooms or fragrant herbs. The beauty of this project lies in its accessibility: it’s simple enough for gardening novices, yet offers ample opportunity for seasoned gardeners to experiment with plant varieties, color schemes, and design concepts. From selecting the perfect combination of pots and paints to carefully curating your floral selections, every step is an invitation to infuse your personality into your outdoor sanctuary.
So, why wait? Gather your materials, enlist the help of your family, and embark on this rewarding journey this weekend. With just a few basic tools and a dash of enthusiasm, you can create a stunning, space-saving masterpiece that elevates your garden to new heights, quite literally. This DIY stackable flower pot tower is not just a garden feature; it’s a statement—a testament to your creativity and your love for bringing beauty to life. Start building yours today and watch your garden flourish like never before!