
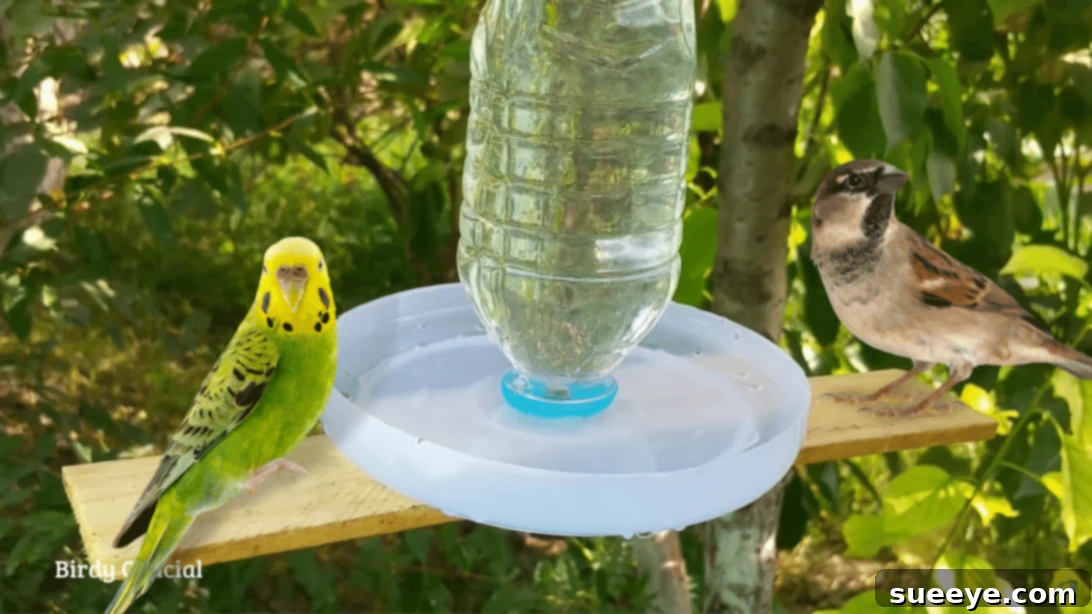
Craft Your Own Recycled Bird Water Feeder: An Eco-Friendly DIY Project
Are you passionate about helping local wildlife, or perhaps looking for a rewarding and sustainable project for your home? Creating a DIY bird water feeder from recycled materials is an excellent way to support feathered friends, especially during hot weather, while also contributing to environmental conservation. This guide will walk you through making a 100% recycled bird water dispenser using simple household items, primarily a plastic bottle. Not only is this project incredibly cost-effective, utilizing materials you likely already have, but it’s also surprisingly easy to assemble, requiring just four main steps.
This ingenious tutorial for a recycled bird water feeder is inspired by Birdy Official on YouTube. If you’re searching for engaging and impactful DIY projects this season, especially during summer’s heat, this is an activity you absolutely must try. Providing a reliable water source can significantly aid birds in your garden or local area, making a real difference to their well-being. Dive into the instructions below and discover how simple it is to craft a haven for your avian visitors.
Why Create a Recycled Bird Water Feeder? Benefits for Birds and the Planet
The decision to build a recycled bird water feeder goes beyond just a fun DIY activity; it brings a multitude of benefits for both the environment and the birds in your vicinity. Understanding these advantages can add an extra layer of satisfaction to your crafting efforts.
Environmental Stewardship and Waste Reduction
One of the most compelling reasons to undertake this project is its profound positive impact on the environment. By repurposing an ordinary plastic bottle, you’re actively diverting waste from landfills. Plastic bottles, often single-use items, can take hundreds of years to decompose, releasing harmful chemicals into the soil and water. Giving them a new life as a bird water feeder is a fantastic example of upcycling, transforming discarded materials into something useful and valuable. This small act of recycling makes a tangible difference, promoting sustainable living and reducing your carbon footprint.
Crucial Support for Local Wildlife
Water is an essential resource for all living creatures, and birds are no exception. They need water not only for drinking but also for preening their feathers, which is vital for insulation and flight. During periods of drought, extreme heat, or when natural water sources are scarce or contaminated, a clean, accessible water feeder can be a lifesaver for birds. Your DIY dispenser provides a consistent supply of fresh water, helping birds stay hydrated, regulate their body temperature, and maintain healthy plumage. By attracting birds to your garden, you also foster a healthier ecosystem, as birds play a crucial role in pest control and pollination.
Cost-Effective and Accessible DIY
Unlike store-bought bird feeders or baths, which can often be expensive, this recycled version requires minimal financial investment. The primary components—a plastic bottle, a small container, and a piece of wood—are likely items you already have lying around your house or can acquire very cheaply. This makes the project highly accessible to everyone, regardless of budget. It’s a testament to how creativity and resourcefulness can lead to meaningful contributions without breaking the bank.
An Engaging and Educational Family Activity
Building a bird water feeder is an excellent activity for families and children. It offers a hands-on learning experience that teaches about environmental responsibility, the importance of wildlife conservation, and basic engineering principles. Kids can get involved in gathering materials, following instructions, and ultimately observing the birds that visit their creation. It fosters a connection with nature and instills a sense of pride and accomplishment in their ability to make a positive impact.
Gathering Your Materials: What You’ll Need
Before you begin assembling your recycled bird water feeder, ensure you have all the necessary components. Most of these items are common household scraps, emphasizing the eco-friendly nature of this project. Here’s a detailed list:
- Plastic Bottle: A standard plastic soda or water bottle (e.g., 1 or 2 liters) works perfectly. Ensure it’s clean and dry before use. This will serve as the primary water reservoir.
- Bolt and Nut: A small to medium-sized bolt and corresponding nut are needed to securely attach the bottle cap assembly to the base. Choose one that fits through the hole you’ll create in the bottle cap.
- Piece of Wood: A small, sturdy piece of scrap wood will form the stable base of your feeder. It provides a platform for birds to perch and drink. A piece approximately 4×4 inches or 6×6 inches and about 1/2 to 1 inch thick would be ideal.
- 2 Metal Wires: Strong, flexible metal wires are essential for creating the hanger. Garden wire, picture-hanging wire, or even coat hanger wire can be repurposed. Ensure they are sturdy enough to bear the weight of a full water bottle.
- Small Round Plastic Container: This container, such as the bottom half of a yogurt cup or a small plastic food container, will serve as the water dish. It should be wide enough for birds to drink from easily.
- Super Glue: A strong adhesive like super glue is necessary to firmly attach the bottle cap to the water dish and other components.
- Small Screwdriver: A small, flat-head screwdriver will be heated to create precise holes in the plastic. Ensure it has a handle that is safe to heat near (or use pliers to hold the metal part if the handle is not heat-resistant).
- Glue Gun and Glue Sticks: A hot glue gun is vital for sealing the bolt and securing the wooden base, providing extra stability and leak prevention.
- Pliers: Pliers will be used for cutting and bending the metal wires, ensuring a neat and secure hanger for your feeder.
Step-by-Step Instructions: Building Your Recycled Bird Water Feeder
Follow these detailed steps to construct your durable and functional recycled bird water feeder. Remember to exercise caution when working with heated tools and adhesives.
Step 1: Preparing the Water Dish and Bottle Cap
Begin by taking the cap from your plastic bottle. Center it carefully on the inside bottom of your small round plastic container, which will act as the water dish. Use super glue to firmly attach the bottle cap to the container, ensuring it forms a secure bond. Allow the glue ample time to dry completely according to the manufacturer’s instructions, as this bond is critical for the feeder’s integrity.
Next, you’ll need to create a hole. Carefully heat the tip of a small screwdriver using a lighter or a heat gun. Once hot, use the heated tip to gently melt and create a clean hole directly in the middle of both the bottle cap and the attached container. This hole should be large enough to comfortably accommodate the bolt you’ve chosen, allowing it to pass through without being too loose. Precision here will ensure a stable connection in the next step.
Step 2: Securing the Base Assembly
With the hole successfully created, insert your bolt through the combined bottle cap and container assembly from the top (inside the container). Fasten the nut onto the bolt from the underside, tightening it securely. This connection will form the core stability of your feeder’s base. To ensure no leaks and to provide maximum stability, use your glue gun to generously seal around the bolt and nut on both sides of the assembly. This hot glue will create a watertight seal and prevent the bolt from loosening over time.
Immediately after sealing the bolt, use the hot glue gun to attach the piece of wood to the bottom of this assembly. The wood will serve as the main base, providing weight and a stable platform for the feeder to rest on or hang from. Apply a generous amount of hot glue to the top surface of the wood, then press the sealed bolt assembly firmly onto it, holding it in place until the glue sets. This ensures a robust and durable base for your bird water dispenser.
Step 3: Preparing the Water Bottle for Dispensing
Now, take your main plastic bottle. Again, carefully heat the tip of your small screwdriver. Using the heated tip, create two small holes on opposite sides of the bottle’s neck, just below the threaded part where the cap screws on. These holes will allow air to enter the bottle as water is dispensed, preventing a vacuum and ensuring a continuous flow. Immediately below these two holes, create a third hole in the middle. This central hole, slightly larger than the others, will be the primary water outlet. The placement of this hole is crucial as it determines the water level in the dish. When the bottle is inverted, water will flow out until the water level reaches this hole, then stop, creating a self-regulating dispenser.
Once the holes are made and the bottle has cooled, screw the bottle onto the cap that is already secured to your water dish and wooden base. Ensure it is tightened firmly to prevent any leaks from the cap area. The bottle should now be inverted, with the neck facing down into the plastic container water dish.
Step 4: Creating the Hanger and Final Assembly
Take your first piece of metal wire and tie it securely around the body of the plastic water bottle, about a third of the way down from the bottom (which is now the top). Ensure this wire is snug but doesn’t deform the bottle. This first wire provides a secure anchor point for the hanger.
Next, use the second piece of metal wire to create the actual hanger. Attach the ends of this second wire to opposite sides of the first wire loop on the bottle. Form a loop at the top, creating a sturdy handle for hanging. Use your pliers to twist and secure all wire ends, ensuring there are no sharp edges that could harm birds or people. Cut off any excess wire using the pliers to give your feeder a neat and finished appearance.
Finally, the moment of truth! While holding the entire assembly in an upright position (with the wooden base and water dish at the bottom), carefully add water to the plastic bottle through its open base. Fill it completely. Once full, swiftly place the original bottle cap firmly back onto the bottle’s base (which is now the top). Invert the feeder, and watch as water begins to fill the small round container dish. The water flow will automatically stop once it reaches the level of the small holes you created earlier in the bottle’s neck, ensuring the dish is always topped up without overflowing.
There you have it: a fully functional, 100% recycled bird water feeder, ready to bring life and refreshment to your garden!
Tips for Placement and Maintenance of Your Bird Water Feeder
Once your beautiful recycled bird water feeder is complete, proper placement and regular maintenance are key to its success and the health of your visiting birds.
Optimal Placement
- Shade is Key: Position your feeder in a shaded area. This helps keep the water cooler and reduces evaporation, meaning less frequent refills and fresher water for longer.
- Near Cover: Birds feel safer when there’s nearby shrubbery or trees they can quickly retreat to if a predator appears. However, ensure the feeder isn’t *too* close, as dense cover can also hide predators. A distance of 10-15 feet from dense bushes is often ideal.
- Visible but Safe: While you want to enjoy watching the birds, ensure the feeder isn’t in a high-traffic area where human or pet activity might scare them away.
- Avoid Direct Sunlight: As mentioned, direct sun will heat the water, promoting bacterial growth and rapid evaporation.
Essential Maintenance
- Regular Cleaning: Water can quickly become stagnant and a breeding ground for bacteria, algae, and mosquitoes. Clean your feeder at least once or twice a week, more often in hot weather. Empty the old water, scrub the container and bottle thoroughly with a brush, and rinse with a dilute bleach solution (1 part bleach to 9 parts water) or a mild, bird-safe soap. Rinse *very* thoroughly with clean water to remove all traces of cleaning agents.
- Fresh Water Daily: Even if the feeder isn’t empty, it’s best to change the water daily to ensure it’s fresh and clean.
- Check for Leaks: Periodically inspect the seals around the bolt and bottle cap. If you notice any leaks, you may need to reapply hot glue or super glue to reinforce the seal.
- Monitor Water Level: Ensure the bottle always has water. If the bottle runs dry, the dispenser won’t work, and birds will be disappointed!
Enhancing Your Feeder (Optional)
You can personalize your bird water feeder further. Consider decorating the wooden base with non-toxic paints or adding small, stable perches around the water dish to offer more comfortable landing spots for different bird species. Just ensure any additions are safe for birds and don’t introduce harmful chemicals.
Conclusion: A Small Effort with a Big Impact
Creating a recycled bird water feeder is more than just a craft project; it’s a meaningful step towards supporting local ecosystems and embracing sustainable living. In just a few simple steps, using readily available materials, you can provide a crucial water source for birds, especially vital during the warmer months when natural water can be scarce. This project exemplifies how small actions can lead to significant environmental benefits and foster a deeper connection with nature right in your backyard.
By following this guide, you’ve not only upcycled a plastic bottle, reducing waste, but also contributed to the health and happiness of your local bird population. Enjoy the rewarding experience of watching various bird species visit your feeder, bringing life and song to your garden. This DIY endeavor is a testament to the power of creativity and conservation working hand-in-hand, proving that making a difference can be both easy and incredibly satisfying.