
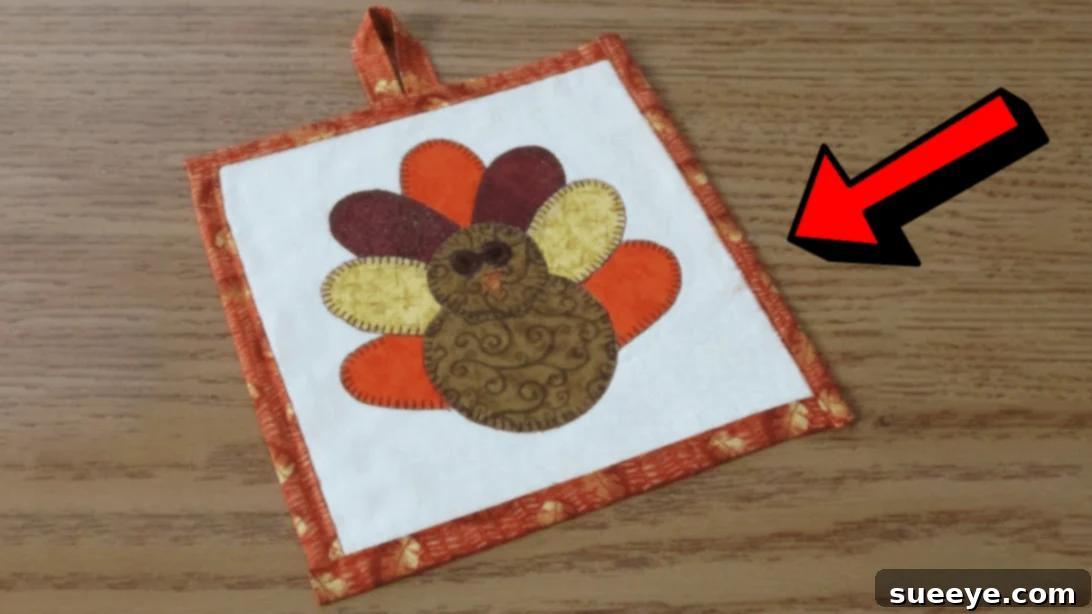
DIY Turkey Potholder Tutorial: Craft a Festive & Functional Thanksgiving Essential
As the vibrant hues of autumn paint the landscape and the comforting aroma of fall spices begins to drift through our homes, our thoughts naturally turn to the warmth and fellowship of Thanksgiving. This cherished holiday calls for festive decorations, heartwarming meals, and often, that special handmade touch that makes a house feel like a home. With an abundance of creative ideas available online, choosing just one project that’s both charming and practical can be a delightful challenge.
This comprehensive guide invites you to create a fantastic multi-purpose DIY turkey craft that will not only infuse your kitchen with autumnal cheer but also serve various practical roles. Imagine a single, adorable item that effortlessly functions as a reliable trivet, a protective hot pad, a handy pot holder, or simply a delightful Fall hanging ornament. It’s also an absolutely perfect, personalized gift for loved ones, showcasing your thoughtfulness and crafting prowess!
Ready to add some handmade charm to your holiday preparations? We’ll walk you through every step of crafting this delightful turkey potholder, inspired by the wonderful video tutorial by Debs Days on YouTube. Let’s gather our supplies and get ready to sew a touch of Thanksgiving magic!
RELATED READING: For more holiday crafting inspiration, don’t miss our Easy DIY Wreath for Thanksgiving Tutorial.
Why Craft a Turkey Potholder for Thanksgiving?
Beyond its undeniable cuteness and seasonal appeal, this DIY turkey potholder offers a wealth of benefits that make it an essential project for the holiday season. It’s more than just a decoration; it’s a versatile kitchen tool and a heartwarming gesture all rolled into one.
- Multi-Functional Marvel: Its primary purpose is to protect your precious tabletops and counters from hot dishes, making it an indispensable trivet or hot pad during your elaborate Thanksgiving feast. You can also use it as a conventional pot holder, offering a secure grip when handling hot pots and pans straight from the oven or stovetop. Its robust construction ensures reliable heat protection.
- Festive Home Decor: When not actively in use, its adorable turkey design makes it a charming decorative accent. Hang it prominently on a kitchen hook, display it artfully on your counter, or incorporate it as a whimsical element in your Thanksgiving centerpiece. It instantly infuses your kitchen and dining area with a cheerful, holiday-ready spirit.
- The Perfect Handmade Gift: There’s something truly special and deeply personal about receiving a gift made with love. A handmade turkey potholder is a thoughtful and practical present for Thanksgiving hosts, cherished friends, family members, or even as a small token of appreciation for teachers or neighbors. It speaks volumes about the effort and personalization you put in, offering a unique charm that store-bought items simply can’t match.
- Eco-Friendly & Sustainable Crafting: By choosing to craft your own items, you reduce your reliance on mass-produced goods, contributing to a more sustainable and mindful lifestyle. This project is also a fantastic way to utilize fabric scraps you might already have on hand, giving new life to materials and minimizing waste.
- Boost Your Sewing Skills: This project is wonderfully accessible for both eager beginners looking to practice fundamental sewing techniques and experienced crafters seeking a quick, satisfying seasonal project. It introduces and refines skills such as appliqué, layering, quilting, and binding, offering a comprehensive yet manageable learning experience.
The Joy of DIY Crafting for the Holidays
Engaging in DIY projects, particularly during the bustling holiday seasons, brings immense personal satisfaction and numerous benefits beyond just the finished product:
- Stress Relief and Mindfulness: Crafting offers a wonderful, therapeutic escape from the daily grind and holiday stressors. The rhythmic motions of sewing, the focused attention on detail, and the creative problem-solving involved can be incredibly meditative and calming, promoting a sense of well-being.
- Personalized Expression: When you craft, you infuse each item with your unique style, taste, and personality. From meticulously selecting fabric patterns and colors to choosing specific stitch types, every decision reflects your artistic flair, resulting in truly one-of-a-kind pieces that resonate with your individual aesthetic.
- Sense of Accomplishment: There’s an undeniable pride and joy that comes with creating something beautiful and functional with your own hands. Completing a project like this charming turkey potholder provides a tangible reminder of your skill, dedication, and creative effort, boosting your confidence.
- Budget-Friendly Decor & Gifts: While there’s an investment in materials, DIY projects often prove more economical than purchasing high-end decor or personalized gifts, especially when you can utilize existing fabric stashes or take advantage of sales. It allows for creative expression without breaking the bank.
- Family Bonding Activity: Crafting can be a fantastic way to spend quality time with family. Even younger members can participate safely by helping with fabric selection, tracing pattern pieces, or offering design suggestions (with careful adult guidance for sewing machine use and ironing). It creates cherished memories alongside beautiful items.
Materials for Your Adorable Turkey Potholder:
Before you embark on this fun and rewarding sewing journey, ensure you have all your supplies gathered. Having everything neatly at hand ensures a smooth, efficient, and enjoyable crafting experience without interruptions.
- Assorted Fabrics: You’ll need various fabric scraps or small cuts for the turkey’s body, its vibrant feathers, and the background of the potholder. Quilting cottons are generally ideal due to their durability, ease of handling, and wide array of prints. For a classic Thanksgiving look, choose warm autumnal colors such as rich browns, fiery oranges, deep reds, and sunny yellows. Consider incorporating patterned fabrics for the feathers to add delightful visual interest and texture.
- Cotton Batting or Insul-bright: This is a critical component for heat resistance and structure.
- Cotton Batting: Provides good general insulation, a soft, padded feel, and is excellent for quilting.
- Insul-bright: This is a specialized insulated batting featuring a metallic film that reflects heat, offering superior protection against high temperatures. For items intended for very hot dishes, Insul-bright is highly recommended. You’ll typically want to use two layers of batting (either two cotton or one Insul-bright and one cotton) for optimal protection.
- Paper-backed Fusible Web: This ingenious adhesive material (like HeatnBond Lite or Wonder Under) makes appliqué much easier by temporarily bonding fabric pieces together before they are stitched. It prevents shifting and ensures clean edges.
- Marking Pen, Pencil, or Chalk: Essential for accurately tracing your pattern pieces onto the fusible web and occasionally onto fabric. Choose a tool that is easily visible on your chosen fabrics and is designed to disappear or wash out without leaving permanent marks.
- Ruler: A clear quilting ruler or a standard measuring ruler is indispensable for accurate measurements, especially when cutting straight lines for backing fabric or binding strips. Precision here contributes to a professional finish.
- Scissors or Rotary Cutter and a Cutting Mat:
- Fabric Scissors: Keep a pair of sharp, dedicated fabric scissors solely for fabric. This ensures clean, precise cuts and prolongs their sharpness.
- Rotary Cutter and Cutting Mat: For experienced quilters or those aiming for maximum efficiency and accuracy, a rotary cutter paired with a self-healing cutting mat allows for incredibly fast and precise cutting of both straight lines and curves, which is particularly helpful for this project.
- Fabric Pins: Essential for holding multiple fabric layers securely in place before sewing. Clover Wonder Clips are also a fantastic alternative, especially useful for thicker layers that pins might struggle with.
- Hand Sewing Needle and Thread: While the majority of this project is efficiently machine-sewn, a sturdy hand sewing needle and matching thread can be useful for minor touch-ups, reinforcing corners, or for securely attaching a hanging loop if you opt to do so by hand.
- Iron, for Pressing: An iron is absolutely vital for this project. It’s used for fusing the web to fabric, pressing seams open or to one side, and generally ensuring a crisp, professional finish throughout the construction process. Have it ready and heated to the appropriate fabric settings.
- Sewing Machine: A reliable and well-maintained sewing machine is necessary for stitching the appliqué pieces, quilting the layers together, and finishing the edges. Ensure it’s threaded with a good quality polyester or cotton thread that matches or coordinates beautifully with your chosen fabrics.
- Printable Turkey Potholder Pattern: (Click here to download the pattern directly from Debs Days’ recommended link – this template is essential for creating the unique shape and features of your adorable turkey!)
Step-by-Step Guide: How to Make Your DIY Turkey Potholder
Let’s dive into the creative process! Follow these detailed steps meticulously to bring your charming turkey potholder to life. Remember, a little patience and precision will lead to the most delightful and durable results.
Step 1: Prepare Your Appliqué Pieces with Fusible Web
This crucial initial step involves meticulously preparing the individual components of your turkey design using paper-backed fusible web. This adhesive material will allow you to temporarily bond the fabric pieces to your main background fabric before final stitching, ensuring crisp, professional-looking appliqué.
- Trace the Pattern Elements: Begin by carefully taking your downloadable turkey pattern. Trace each individual part of the design – the turkey’s body, each feather, the beak, the wattle, and any other facial features – onto the *paper side* of your paper-backed fusible web. Ensure your tracing is as accurate as possible, as these lines will define the final shape and character of your appliqué pieces.
- Rough Cut the Fusible Web: Once all elements are traced, cut out each piece from the fusible web, leaving a generous margin of approximately ¼ inch all around the traced line. This small extra margin ensures that the adhesive extends slightly beyond your final cut line, guaranteeing a strong and reliable bond when fused to the fabric.
- Fuse to Fabric’s Wrong Side: Place the fusible web piece, with its paper side facing up, onto the *wrong side* (the back) of your chosen fabric for that specific turkey part. Using a warm iron (always follow the specific instructions provided with your fusible web for optimal temperature and pressing time), press firmly and evenly over the paper. Hold the iron steadily for the recommended duration to ensure the adhesive melts and creates a strong, lasting bond between the web and the fabric. This process prepares your fabric for a clean and crisp appliqué.
- Precision Cut Along Traced Lines: After fusing and allowing the fabric to cool slightly (to prevent stretching), carefully cut out each fabric piece *exactly* along the traced lines you initially made. This precision cut will give you the final, clean shape of your turkey’s body, individual feathers, and charming facial features.
- Remove Backing and Arrange: Gently peel off the paper backing from each fusible web-backed fabric piece. You’ll now have fabric pieces with a shiny, slightly tacky adhesive backing exposed. Carefully arrange these appliqué pieces onto the *front* main fabric that will serve as the background for your potholder. Refer closely to the Debs Days video tutorial for guidance on the optimal placement and spacing of each turkey component, ensuring your turkey looks cheerful, balanced, and ready for Thanksgiving!
Step 2: Secure Appliqué and Prepare Layers for Quilting
With your turkey design perfectly arranged, this next phase focuses on permanently securing the appliqué and preparing the layers for quilting. Quilting is essential as it adds durability, insulation, and a beautiful textured finish to your potholder.
- Fuse Appliqué Permanently: Once you are completely satisfied with the arrangement of all your appliqué pieces on the front fabric, use your warm iron again to fuse them permanently into place. Press firmly and evenly over each piece, ensuring the adhesive bonds well with the background fabric. Hold the iron for the recommended time to create a durable, lasting bond.
- Stitch the Appliqué Edges: To further secure the appliqué pieces and prevent any future fraying, machine stitch carefully around the raw edges of each fabric component. A decorative blanket stitch or a tight, narrow zigzag stitch on your sewing machine works wonderfully for this step, providing a neat, finished edge and adding lovely decorative detail. Choose a thread color that either closely matches your appliqué fabric for a subtle look or contrasts slightly for a more defined outline.
- Prepare the Backing Fabric: Lay your chosen backing fabric flat on your work surface, ensuring its *wrong side is facing up*. This will form the underside of your finished potholder. Make sure it’s smooth and free of wrinkles.
- Add Batting Layers: Center two pieces of cotton batting or Insul-bright directly on top of the backing fabric. If you are using Insul-bright, position it so the metallic, heat-reflective side faces towards the front fabric (or away from the heat source it will encounter, e.g., upwards towards a hot pot). Using two layers of batting provides excellent thermal protection, making your potholder highly functional.
- Place Front Appliqué Fabric: Finally, carefully place your front appliqué fabric (the piece with your beautifully finished turkey design) on top of these batting layers. Ensure it is perfectly centered and neatly aligned with both the backing fabric and the batting layers beneath it. Smooth out any wrinkles or puckers.
Step 3: Quilt, Trim, and Finish Your Potholder with Self-Binding
The final stage of this project involves quilting all the layers together, precisely trimming, and creating a clean, durable self-binding. This will bring your charming turkey potholder to a beautiful and functional completion.
- Baste the Layers Together: Before you begin quilting, it is crucial to secure all three layers together (backing fabric, batting, and front appliqué fabric) to prevent any shifting or puckering during the sewing process. You can achieve this by extensively pinning all layers together, using temporary fabric spray adhesive (following product instructions), or by hand-basting with a needle and thread in a large grid pattern.
- Quilt as Desired: Now, using your sewing machine, quilt through all the layers. You have creative freedom here! You can choose a simple grid pattern, stitch precisely around the outline of your turkey (often called “stitch-in-the-ditch”), or explore free-motion quilting designs to add intricate texture and further secure the layers. Quilting is vital for adding durability, preventing the batting from bunching up over time, and enhancing the overall aesthetic.
- Trim Batting to Match Front: Once your quilting is complete, carefully trim the batting layers so that they perfectly match the exact shape and size of your front appliqué fabric. *Crucially, at this stage, do not cut the backing fabric.* This step is essential for the unique self-binding technique described next.
- Trim Backing for Binding: Now, with the batting trimmed, trim the backing fabric so that it extends uniformly approximately one inch (or your desired binding width) beyond the edge of your front fabric and batting layers. This extra inch of backing fabric will be cleverly folded over to create a neat and integrated self-binding for your potholder, as beautifully demonstrated and explained in the Debs Days video tutorial.
- Create the Self-Binding: Fold the one-inch overhang of the backing fabric over to the front of the potholder. This action will completely encase the raw edges of the front fabric and batting layers. Press this fold down firmly with your iron to create a crisp, clean edge. Then, using your sewing machine, stitch this folded binding down securely. You can use a straight stitch close to the folded edge, or a decorative stitch for added flair, ensuring all raw edges are enclosed and the binding is durable.
- Add a Hanging Loop (Optional): If you wish to have a convenient way to hang your potholder, cut a small strip of coordinating fabric (e.g., about 1.5 inches wide by 4 inches long). Fold it in half lengthwise, press it, and then stitch along the raw long edge to create a finished loop. Form it into a loop shape and attach it securely to one corner of your potholder. This can be done either while you are stitching the final binding or by hand afterward for a discreet finish.
- Final Pressing: Give your completed turkey potholder a final, gentle press with a warm iron. This will smooth out any lingering wrinkles, flatten the binding, and ensure everything lies perfectly flat, giving your handmade creation a truly professional and polished look. And voilà, your festive and functional turkey potholder is ready to adorn your kitchen!
Customization Ideas for Your Turkey Potholder
One of the most rewarding aspects of any DIY project is the incredible freedom to personalize your creations. Here are some inspiring ideas to make your turkey potholder uniquely yours, reflecting your style or the personality of the recipient:
- Experiment with Fabric Choices: Don’t limit yourself to traditional cottons! Experiment with different fabric patterns and textures. Consider using a soft velvet or cozy flannel for a more luxurious or tactile feel, especially for purely decorative potholders. Incorporate bright, playful prints for a whimsical turkey, or mix and match subtle solids with coordinating patterns for the feathers to create depth and visual interest.
- Add Unique Embellishments: Elevate your design with small, thoughtful embellishments. Consider adding tiny embroidered details for the turkey’s eyes, or even attach small, contrasting fabric scraps to the feathers for a more textured, collage-like look. *Important safety note: If the potholder will be used as a functional hot pad, avoid plastic buttons or heat-sensitive embellishments, as they can melt or become damaged by high temperatures.*
- Creative Quilting Patterns: Move beyond simple straight lines! Explore different quilting patterns to add character. You could try free-motion quilting to create swirling patterns reminiscent of wind or leaves, stitch around the turkey’s outline to make it pop, or even experiment with more intricate turkey feather designs across the background fabric for a truly bespoke look.
- Vary the Size and Shape: The basic pattern can be easily adapted. Adjust the pattern size to create larger trivets perfect for big casserole dishes during your holiday meal, or scale it down to make smaller, charming coasters for individual mugs. You could even slightly alter the shape of the turkey’s feathers or body to give it a unique silhouette.
- Seasonal and Thematic Adaptations: While this pattern is perfect for Thanksgiving, the underlying concept can be easily adapted for other holidays or general seasonal decor. Change the appliqué design to a festive pumpkin, a cluster of acorns, or a stylized fall leaf for general autumn decor. For Christmas, imagine a cute snowman, a reindeer, or a gingerbread man potholder!
Caring for Your Handmade Potholder
To ensure your beautiful turkey potholder remains functional and vibrant for many Thanksgiving seasons to come, proper care and maintenance are essential. Following these simple guidelines will help preserve its beauty and integrity:
- Washing Instructions: Most cotton fabric potholders, especially those made with quilting cotton, can be safely machine washed. Use a gentle cycle with cold water to prevent colors from fading or bleeding. It’s best to avoid harsh detergents or bleach, as these can be detrimental to fabric integrity and color vibrancy. If you used Insul-bright batting, rest assured it is typically machine washable and dryable, maintaining its insulating properties.
- Drying Methods: To help maintain the potholder’s shape and prevent excessive shrinking, it’s ideal to air dry it flat on a clean surface. If machine drying is preferred for convenience, tumble dry on a low heat setting. Remove the potholder promptly from the dryer as soon as it’s dry to minimize wrinkles and prevent over-drying which can damage fabrics.
- Ironing for Crispness: If your potholder develops wrinkles after washing, a warm iron can be used to smooth them out. Always check your fabric types and iron on the appropriate setting to avoid scorching. A light misting of water before ironing can help achieve a perfectly crisp finish.
- Spot Treatment for Stains: For specific food stains or spills, gently pre-treat the affected area before washing. Use a mild stain remover suitable for fabric, following the product instructions carefully. Avoid aggressive scrubbing, which can damage fabric fibers or quilting stitches.
Gifting Your Handcrafted Turkey Potholder
A handmade turkey potholder makes a wonderfully thoughtful and incredibly practical gift, truly conveying a personal touch. Here are some creative ideas for presenting your handcrafted treasure:
- Pair with Kitchen Essentials: Elevate your gift by bundling the potholder with other charming kitchen essentials. Consider pairing it with a new set of spatulas, a festive dish towel featuring a complementary pattern, or a bag of gourmet coffee beans or a special tea blend for a delightful, kitchen-themed gift basket or set.
- Attach a Favorite Recipe Card: Make the gift even more personal by attaching a beautifully handwritten recipe card. Choose your favorite Thanksgiving dish that the recipient can prepare, or perhaps a family recipe that pairs perfectly with the spirit of the season. This adds a heartwarming and functional dimension to your present.
- Simple Ribbon & Personalized Tag: Sometimes, less is more. Tie a beautiful, rustic ribbon (perhaps in jute, burlap, or a festive plaid) around the folded potholder. Add a simple, elegant tag that says “Handmade with Love,” “Happy Thanksgiving,” or “From My Kitchen to Yours” for a charming and heartfelt presentation.
- The Perfect Hostess Gift: When attending Thanksgiving dinner or any fall gathering, present your handmade turkey potholder to your host as a unique and incredibly practical token of appreciation. It’s a gift they can use immediately, and it serves as a lovely reminder of your thoughtfulness and the festive occasion.
Conclusion: Your Charming Thanksgiving Craft Awaits!
Crafting this DIY turkey potholder is a delightful and deeply rewarding way to infuse your home with the true spirit of Thanksgiving. It seamlessly blends functional utility with decorative charm, creating an item that is both practical for your kitchen and beautiful to behold. Whether you are an experienced sewer looking for a quick seasonal project or a beginner eager to develop your skills, this tutorial provides a satisfying creative outlet that results in a beautiful, handmade item you can proudly display, use, or gift.
The versatility and heartwarming appeal of this turkey creation mean it will undoubtedly be a cherished addition to any kitchen. It serves as a gentle reminder of the warmth, bounty, and gratitude that define the holiday season. So, gather your chosen materials, follow these detailed steps, and immerse yourself in the joyful process of creating something truly special that will bring smiles and utility for years to come.
Don’t forget to visit Debs Days on YouTube for the original video tutorial, where you can see the process come to life, and to explore more of her inspiring and creative projects. We’d absolutely love to see your finished turkey potholders – share your creations and spread the crafting joy! Happy sewing, and from our creative corner to yours, we wish you a very Happy Thanksgiving!
*All images featured in this tutorial are credited to Debs Days via YouTube. Her channel is an incredible resource for crafters of all levels, so be sure to give her channel a visit and subscribe for more fantastic DIY ideas, tutorials, and inspiration!