
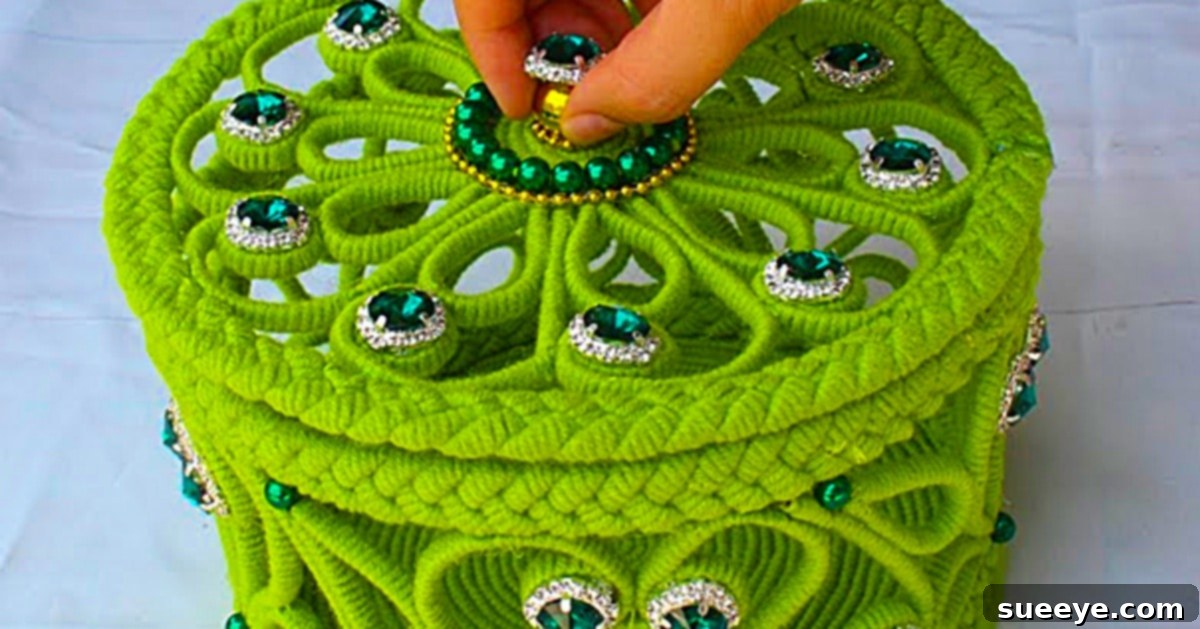
Create Your Own Vintage-Inspired DIY Jewelry Box from Recycled Materials
Are you looking for a creative escape on a quiet afternoon? This delightful DIY jewelry box project is the perfect antidote to boredom, requiring no specialized tools or expensive supplies. Everything you’ll need to construct this charming and functional storage solution can likely be found right in your craft cupboard or recycling bin. My own journey to this project began with a simple quest: to find a fun, accessible craft that utilized materials I already had on hand. That’s when I stumbled upon the ingenious idea of a jewelry box made from newspaper and yarn, brought together effortlessly with the help of a trusty hot glue gun. I’ve always been a firm believer in the power of a hot glue gun to bring any crafting vision to life, so I was incredibly eager to dive into this project.
What truly captivated me about this specific design was its distinctive aesthetic. It boasts a wonderfully retro “Seventies” look, complete with elegant, swirling decorative arches that give it a unique personality. This isn’t just a craft project; it’s an opportunity to create a beautiful, personalized piece of home decor while embracing the principles of upcycling and sustainability. Get ready to transform everyday materials into something truly special and stylish.
Why This DIY Jewelry Box Project is a Must-Try
In a world increasingly focused on sustainability and mindful consumption, upcycling projects like this DIY jewelry box offer a fantastic way to contribute positively to the environment while nurturing your creative spirit. This particular craft stands out for several compelling reasons. Firstly, its accessibility is unmatched. You won’t need to visit a specialty craft store; most of the components are likely already in your home. Newspaper, a common household item often discarded, finds a new purpose as the structural backbone of your box. Yarn, a versatile material often left over from knitting or crocheting projects, adds vibrant color and tactile texture.
Secondly, the project offers immense satisfaction. There’s a profound sense of accomplishment in taking humble, recycled materials and transforming them into a beautiful, functional object. This isn’t just a box; it’s a testament to your ingenuity and artistic flair. Moreover, the “Seventies” inspired design ensures your finished piece won’t just be functional but also a conversation starter, adding a touch of nostalgic charm to any dresser or vanity. It’s an ideal project for crafters of all skill levels, providing a gentle learning curve for beginners while still offering enough scope for experienced crafters to add their personal touch. Embrace the joy of creation and the pride of owning a one-of-a-kind, handmade treasure.
Materials You’ll Need for Your Upcycled Jewelry Box
One of the greatest joys of this DIY jewelry box project is the simplicity and accessibility of its material list. You likely won’t need to make a special trip to the store, as these are common items often found in craft stashes or around the house. Gather these essentials to begin your creative journey:
- Newspaper: The primary structural component. Old newspapers, magazines, or even advertising flyers can work. Choose pages that are relatively free of heavy ink or glossy coatings for easier manipulation.
- Yarn: This adds color, texture, and helps to strengthen the newspaper tubes. Any type of yarn (acrylic, cotton, wool blends) in your preferred color scheme will work beautifully. Consider different thicknesses for varied textures.
- A Hot Glue Gun: Your essential tool for rapid and strong adhesion. This will secure your newspaper tubes and yarn in place, ensuring a sturdy final product.
- Glue Sticks: Plenty of them! Hot glue is the workhorse of this project, so make sure you have enough to complete your entire box without interruptions.
- Jewels or Other Decorations: (Optional, for embellishment) Beads, sequins, small buttons, fabric scraps, or even paint can be used to add a personalized touch and enhance the vintage aesthetic.
- Scissors or a Craft Knife: For cutting newspaper strips and yarn precisely.
- Ruler (optional): Useful for ensuring consistent newspaper strip widths, leading to more uniform tubes.
These materials work in harmony to create a durable yet lightweight jewelry box. The newspaper provides form, the yarn adds character and reinforcement, and the hot glue gun binds it all together swiftly and securely. Let your imagination guide you in selecting colors and embellishments to truly make this box your own.
Step-by-Step Directions: Crafting Your Newspaper and Yarn Jewelry Box
Now that you have all your materials ready, let’s embark on the exciting journey of constructing your very own vintage-inspired jewelry box. Follow these detailed steps to bring your vision to life, paying close attention to the shaping that gives this box its unique Seventies charm.
Step 1: Preparing Your Newspaper Tubes – The Foundation of Your Box
The first and most fundamental step is to create the building blocks for your jewelry box: the newspaper tubes. Begin by taking sheets of newspaper and cutting them into long, rectangular strips. The width of your strips will determine the thickness of your tubes, so aim for consistency – a width of about 2-3 inches (5-7.5 cm) generally works well. Once you have your strips, take one and start rolling it tightly and diagonally from one corner to the opposite side. The goal is to create a firm, dense tube that holds its shape. A good tip is to start with a thin knitting needle or a skewer in the corner and roll the newspaper around it, then gently pull it out when the tube is mostly formed. Secure the end of each rolled tube with a small dab of hot glue to prevent it from unraveling. Repeat this process until you have a significant stack of newspaper tubes – the more intricate or larger your desired box, the more tubes you will need. Precision and tightness in rolling are key for a sturdy final structure.
Step 2: Wrapping with Yarn – Adding Color and Texture
With your newspaper tubes prepared, it’s time to add the vibrant color and soft texture that will define the look of your jewelry box. Take one of your newspaper tubes and begin wrapping yarn tightly around its entire length. Start by securing the end of your yarn to one end of the tube with a small dab of hot glue. Then, carefully and consistently wrap the yarn around the tube, ensuring each coil sits snugly next to the last, without any gaps showing the newspaper underneath. You can choose to wrap all your tubes in a single color for a monochromatic look, or mix and match colors to create stripes, patterns, or a multi-colored design. For the ultimate “Seventies” vibe, consider bright, earthy tones like lime green, orange, mustard yellow, or deep brown. Once you reach the other end of the tube, secure the yarn with another small dab of hot glue and trim any excess. This step is crucial for both aesthetics and adding an extra layer of durability to your building materials.
Step 3: Planning Your Design – Embracing the Seventies Swirl
Before you start gluing tubes together, take a moment to visualize or even sketch out your desired design. The original inspiration features distinctive swirling, decorative arches reminiscent of classic Seventies decor. Consider the overall shape and size of your jewelry box. Do you want multiple compartments? A lid? A simple open top? Lay out some of your yarn-wrapped tubes to experiment with curves and configurations. Think about how the arches will flow and connect. This planning stage is where you can truly personalize your box, deciding on the height of the walls, the number of internal dividers, and the prominence of those beautiful decorative swirls. A well-planned design will make the assembly process much smoother and ensure your finished product looks cohesive and intentional.
Step 4: Constructing the Base and Walls of Your Jewelry Box
Now, the real construction begins! Start by creating a sturdy base for your jewelry box. You can do this by forming a tight spiral of yarn-wrapped newspaper tubes and gluing them together flat on a surface, or by creating a rectangular or square frame from several tubes, gluing them side-by-side. Once your base is firm, begin building the walls of your box. Take more yarn-wrapped tubes and glue them vertically around the perimeter of your base. You can stack them horizontally, gluing them one on top of the other, or stand them upright, gluing their bases to the foundation and then joining them along their sides for a more open, columnar effect. Use generous amounts of hot glue, holding each piece firmly in place until the glue sets to ensure strong bonds. Pay attention to keeping your walls level and symmetrical as you build upwards. This stage sets the overall dimensions and stability of your jewelry box.
Step 5: Adding Decorative Arches and Details
This is where your jewelry box truly comes to life with its iconic Seventies flair! Once the main structure of your walls is complete, you can start shaping and attaching the decorative arches. Gently bend your yarn-wrapped newspaper tubes into graceful curves. You might need to apply a little pressure to create the desired arc without creasing the tube too sharply. Once you have the desired curve, apply hot glue along the edges or contact points of the curved tube and attach it to the existing walls of your box. You can create single sweeping arches, interlocking curves, or even layered designs to achieve that distinctive swirling effect. Don’t be afraid to experiment with different arrangements. Some tubes can be braided or twisted together before being glued to add even more intricate detail. This step allows for a great deal of artistic expression, transforming a simple box into a piece of art.
Step 6: Personalizing Your Creation with Embellishments
The final touch involves adding embellishments to truly make your jewelry box shine. Once all your newspaper and yarn structures are firmly in place, it’s time to strategically place your chosen decorations. Small jewels, beads, or even buttons can be glued onto the swirling arches or along the edges of the box to catch the light and add a touch of sparkle. If you’ve chosen to make yours in a vibrant lime green, as I plan to, adding complementary colored jewels or metallic accents can further enhance that super Seventies aesthetic. Consider painting small details, adding a layer of clear sealant for durability, or even gluing on fabric trim for extra texture. This step is about refining your creation and injecting your personal style into the finished piece, making it a unique holder for your cherished jewelry.
Tips for a Perfect DIY Craft Project
To ensure your DIY jewelry box project goes smoothly and yields the best results, keep these handy tips in mind:
- Patience is Key: While hot glue sets quickly, take your time with each step, especially when rolling tubes and shaping curves. Rushing can lead to uneven results.
- Safety First: Hot glue guns can cause burns. Always exercise caution and keep children supervised if they are helping with the project.
- Experiment with Colors and Textures: Don’t limit yourself to one type or color of yarn. Mixing different weights and hues can create a more dynamic and visually interesting box.
- Consider Compartments: For greater functionality, you can create internal dividers using smaller, straight yarn-wrapped tubes to form compartments for rings, earrings, or necklaces.
- Secure All Ends: Make sure all loose ends of newspaper and yarn are securely glued down to prevent unraveling over time.
- Recycle Smartly: If using newspapers, ensure they are clean and dry. Avoid heavily glossy pages as they can be harder to roll and glue.
Unleash Your Creativity: Variations and Customization Ideas
While the “Seventies swirling arches” provide a fantastic starting point, this DIY jewelry box project is incredibly versatile and open to endless customization. Instead of a vintage look, why not try a minimalist modern design using neutral-colored yarn and clean, straight lines? You could create a rustic-themed box by wrapping tubes with twine or jute instead of yarn, and embellishing with dried flowers or small wooden beads. For a child’s room, bright, primary colors and whimsical shapes could transform it into a treasure chest for small toys. Consider adding a hinged lid made from a piece of cardboard covered with fabric or even more newspaper tubes. You could also experiment with different base shapes – an oval, a hexagon, or even an irregular organic form. By simply changing the yarn color, the embellishments, or the overall structure, you can completely redefine the style of your jewelry box, ensuring it perfectly matches your personal aesthetic and decor.
The Joy of Upcycling and Handmade Gifts
Engaging in projects like this DIY jewelry box offers more than just a beautiful end product; it provides a deeply satisfying experience of upcycling and creative expression. In an age where mass-produced items are prevalent, creating something with your own hands carries a special significance. It’s an opportunity to reduce waste by giving new life to discarded materials, contributing to a more sustainable lifestyle. Beyond environmental benefits, the process of crafting itself is therapeutic and rewarding, fostering patience, problem-solving skills, and a sense of accomplishment. Furthermore, a handmade jewelry box makes for an incredibly thoughtful and personal gift. Imagine presenting a loved one with a unique, handcrafted item that not only holds their cherished possessions but also embodies the time, effort, and affection you poured into making it. It’s a gift with a story, far more meaningful than anything bought off a shelf.
Final Thoughts on Your Handmade Masterpiece
I am so thrilled to have discovered this brilliant newspaper and yarn DIY jewelry box project. It truly embodies the spirit of creative upcycling and showcases how readily available materials can be transformed into something both functional and aesthetically pleasing. The ease of assembly, combined with the charming vintage appeal, makes it an ideal craft for anyone looking to add a touch of handmade elegance to their space. As I mentioned, I’m planning to make my own in a vibrant lime green, certain it will perfectly capture that super Seventies essence. Whether you choose to follow the vintage aesthetic or put your own unique spin on the design, I encourage you to embark on this rewarding project. You’ll not only end up with a gorgeous, one-of-a-kind jewelry box, but also the immense satisfaction of having created something beautiful from scratch. Happy crafting!