
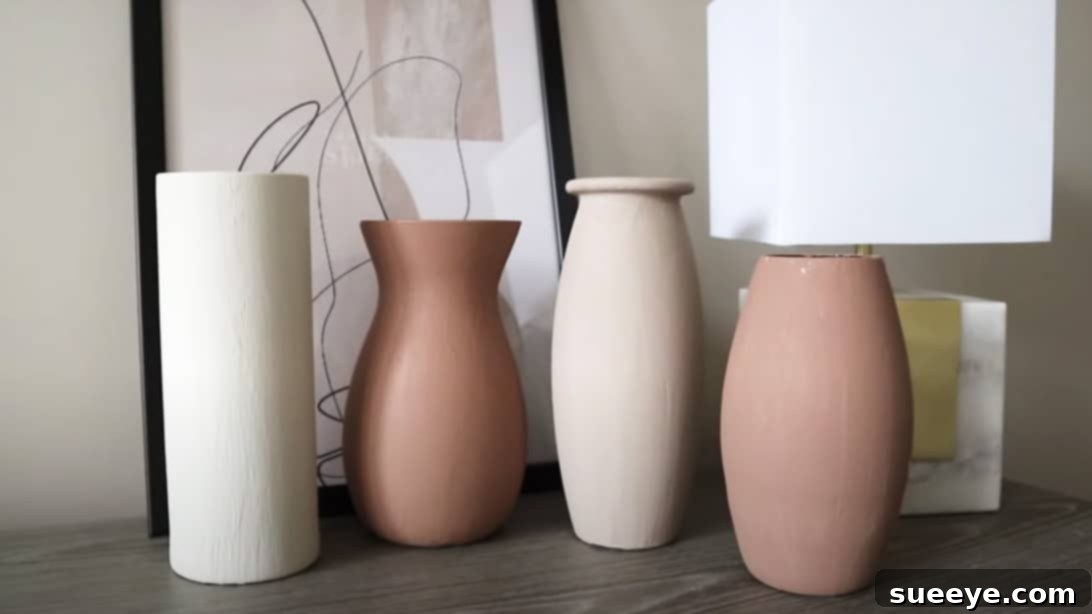
Are you captivated by the rustic charm and sophisticated elegance of ceramic vases, yet deterred by their often steep price tags? You’re not alone! Many homeowners dream of incorporating beautiful, earthy-toned pottery into their interior design, only to find authentic ceramic pieces can be a significant investment. While traditional pottery requires specialized skills, equipment, and often classes, there’s a fantastic, budget-friendly alternative that delivers the same coveted aesthetic: DIY faux ceramic vases. This ingenious crafting technique allows you to transform ordinary, inexpensive glass or plastic containers into stunning decorative accents that mimic the look and feel of high-end ceramics. Get ready to elevate your home decor without breaking the bank!
The secret lies in a simple yet incredibly effective paint mixture, a trick that has taken the DIY world by storm, championed by creators like Ayesha Masoodi on YouTube. By combining readily available paint samples with a common kitchen ingredient, you can create a unique, textured finish that perfectly replicates the matte, earthy appearance of unglazed pottery. Best of all, the base vases can be sourced from dollar stores for just a few dollars each, and paint samples from hardware stores like Home Depot typically cost around $5. This means you can craft a collection of exquisite, custom-colored ceramic-style vases in a single day, using minimal materials found right in your home or easily acquired on a budget-friendly shopping trip.
Embrace Affordable Elegance: Why DIY Faux Ceramic Vases Are a Must-Try
In a world where bespoke home decor can often command premium prices, the appeal of DIY projects like these faux ceramic vases is undeniable. This crafting trend isn’t just about saving money; it’s about unlocking a world of creative possibilities and personalizing your living space with unique touches. Here’s why diving into this project is such a rewarding endeavor:
- Unbeatable Affordability: High-quality ceramic vases can easily cost upwards of $30-$100 per piece. With this DIY method, you can create several beautiful, textured vases for less than the price of a single store-bought item. Repurposing old glass bottles or plastic containers further reduces costs and promotes sustainability.
- Complete Customization: Unlike buying mass-produced decor, this project puts you in complete control. You choose the vase shapes, sizes, and, most importantly, the exact colors to perfectly match your existing decor theme. Whether you prefer warm earthy tones, cool modern neutrals, or vibrant pops of color, the possibilities are endless.
- Accessible for All Skill Levels: You don’t need to be a seasoned artist or a pottery expert to achieve professional-looking results. The technique is remarkably simple, involving basic mixing and painting steps that anyone can master. It’s a perfect beginner-friendly craft that yields impressive outcomes.
- Sustainable and Eco-Friendly: Give new life to old glass jars, bottles, or inexpensive clear vases that might otherwise end up in landfills. This project champions repurposing and upcycling, turning forgotten items into cherished home accents.
- Personal Satisfaction: There’s immense joy and pride in displaying decor you’ve crafted with your own hands. These faux ceramic vases won’t just be beautiful; they’ll be conversation starters, imbued with your personal touch and creative effort.
Gather Your Essentials: Materials for Your Faux Ceramic Masterpiece
Before you embark on your creative journey, let’s assemble the simple yet powerful arsenal of materials needed to transform humble containers into captivating faux ceramic decor. The beauty of this project lies in its accessibility and the affordability of its components.
- Vases (4 or more): Opt for clear glass or plastic vases. Dollar stores, thrift shops, or even items like empty pasta sauce jars or wine bottles make excellent candidates. Look for interesting shapes and varying sizes to create a dynamic display. For example, a tall slender vase, a round squat one, and a couple of medium-sized options work well together. The clearer and smoother the surface, the better the paint will adhere and the texture will stand out. For this particular project, we recommend starting with four vases, which can typically be purchased for around $3 each from a dollar store, keeping your initial investment minimal.
- Paint Samples (Various Colors): These small, affordable pots of paint are your best friend for this DIY. They are perfect because you don’t need large quantities, and they come in an incredible array of colors. For a truly authentic earthy, ceramic look, consider shades like “Tribal Pottery,” “Aged Beige,” “Mesa Taupe,” and “Terracotta.” These colors evoke warmth, nature, and rustic charm, seamlessly integrating with various interior styles from modern farmhouse to bohemian and minimalist aesthetics. Each sample typically costs about $5 from hardware stores like Home Depot, making color experimentation both easy and economical.
- Baking Soda: This common pantry staple is the star ingredient! When mixed with paint, baking soda creates a gritty, textured consistency that perfectly mimics the porous, unglazed finish of ceramic or clay. It’s what gives your ordinary paint that unique, tactile dimension, elevating it from a flat color to a rich, sculptural surface. You’ll need a good amount, roughly a teaspoon per paint sample, but adjust based on your desired texture.
- A Small Plate or Mixing Container: Any disposable plate, an old plastic container, or even a sturdy paper plate will work. This is where you’ll mix your paint and baking soda, so choose something that allows for easy stirring and is disposable for quick cleanup.
- Paint Brush(es): A standard acrylic paintbrush is suitable for applying the textured paint. You might want a couple of different sizes – a wider brush for larger surfaces and a smaller one for detailing or reaching trickier spots. The type of brush can also influence the final texture; a stiffer bristle brush might create more pronounced strokes, while a softer one offers a smoother, yet still textured, finish.
Step-by-Step Guide: Crafting Your Textured Faux Ceramic Vases
Now that you have all your materials ready, let’s dive into the fun part: transforming your plain vases into beautiful, textured ceramic-look masterpieces. Follow these simple steps for a successful DIY project.
Preparation is Key: Cleaning Your Vases
Before any paint touches your vases, ensure they are spotlessly clean and completely dry. Any dust, grease, or residue can prevent the paint from adhering properly, leading to peeling or an uneven finish. Wash your glass or plastic vases thoroughly with soap and water, then rinse well. Allow them to air dry completely, or use a lint-free cloth to speed up the process. A clean surface provides the best canvas for your faux ceramic creation.
The Secret Sauce: Mixing Your Textured Paint
This is where the magic happens! Take one of your paint samples – let’s start with a beautiful “Tribal Pottery” shade. Pour a generous amount of paint onto your mixing plate. Now, gradually add baking soda. A good starting point is about one teaspoon of baking soda for every quarter cup of paint, but this can vary. Begin mixing with your paintbrush or a small stirring stick. As you stir, you’ll notice the consistency of the paint begin to thicken and become more clay-like and textured. This is exactly what you want! Continue adding small amounts of baking soda and mixing until you achieve a consistency that is thick enough to hold its shape slightly but still spreadable. The more baking soda you incorporate, the more pronounced and gritty the texture will be, giving a truly authentic ceramic feel. Experiment a little to find your preferred level of texture.
Applying the First Coat: Building the Base
With your perfectly mixed textured paint, it’s time to apply the first coat. Dip your paintbrush into the mixture and begin applying it generously to one of your clean, dry vases. Don’t be shy with the paint; a thick, even layer is crucial for achieving that desirable matte, unglazed ceramic look. Apply the paint using deliberate, even strokes, ensuring full coverage. You can experiment with different brush stroke directions – vertical, horizontal, or even dabbing motions – to create unique textural patterns. Make sure to cover the entire exterior surface of the vase, including the rim. Once the first vase is fully coated, set it aside in a well-ventilated area to dry completely. Drying times can vary depending on humidity and paint thickness, but it’s best to allow several hours, or even overnight, to ensure it’s fully cured before the next step.
Layering for Depth: The Second Coat and Beyond
After your first coat has dried completely, it’s time for the second layer. This coat is essential for building up opacity, deepening the color, and further enhancing the ceramic-like texture. Apply the second coat with the same generous hand, ensuring full and even coverage over the first layer. Pay close attention to any areas that might appear thin or translucent. For an even more robust and convincing ceramic appearance, or if you desire a particularly heavy texture, you can opt for a third coat after the second has dried. Remember, the goal is to build up a rich, opaque, and visibly textured surface. Once you are satisfied with the coverage and texture, set the vase aside again to dry thoroughly. Patience during drying stages is key to a durable and professional-looking finish.
Repeating the Magic: Working with Multiple Vases and Colors
Now that you’ve mastered the technique with your first vase, repeat the entire process for your remaining vases. For each new color, like “Aged Beige,” “Mesa Taupe,” or “Terracotta,” prepare a fresh batch of paint and baking soda mixture on a separate plate. This prevents color contamination and allows you to achieve distinct, vibrant hues. Apply the paint in two generous coats, allowing each coat to dry completely before applying the next. As you work through the different colors, you’ll notice how each shade, combined with the unique texture, contributes to the overall earthy and handmade aesthetic. Once all your vases have received their final coats and are completely dry, you’ll be amazed at the transformation. The key takeaway here is: The more baking soda you mix with the paint, the more pronounced and authentic that fake ceramic texture will be. Don’t be afraid to add extra baking soda if you’re aiming for a super gritty, robust finish.
Displaying Your Handmade Creations: Styling Tips for Faux Ceramic Vases
Once your beautifully transformed vases are fully dry and cured, it’s time to show them off! You’ll be genuinely surprised at how convincingly they mimic real ceramic pottery. These textured beauties are perfect for enhancing any room, adding a touch of sophisticated, earthy elegance. The choice of colors, particularly the “Terracotta” and “Mesa Taupe,” are excellent for creating a warm, inviting ambiance that complements minimalist, bohemian, or modern farmhouse interior designs. Place them as a focal point on your living room coffee table, a console table in your entryway, or even on a bookshelf. They also make exquisite centerpieces for dining tables or charming accents on bedroom nightstands. Consider pairing them with dried floral arrangements, pampas grass, or faux botanicals to complete the look. Their matte finish provides a striking contrast to glossy surfaces or metallic accents, adding visual interest and depth to your decor scheme. Encourage others to admire your handiwork and perhaps even inspire them to try this fantastic DIY!
Beyond Earth Tones: Unleashing Your Creativity
While earthy tones like “Tribal Pottery,” “Aged Beige,” “Mesa Taupe,” and “Terracotta” are highly recommended for achieving a classic ceramic aesthetic that seamlessly integrates with many home interiors, the beauty of this DIY project lies in its boundless potential for personalization. Don’t feel limited to these specific shades! Feel free to experiment with a spectrum of colors that resonate with your personal style and existing decor. Imagine vibrant blues for a coastal theme, muted pastels for a minimalist nursery, or bold blacks and whites for a striking modern statement. You can even try mixing different shades to create unique custom colors or applying multiple colors in a layered or ombre effect. Consider adding subtle distressing once the paint is dry for an aged, antique look, or use stencils for delicate patterns. Your imagination is the only limit to creating truly bespoke pieces that reflect your artistic vision.
Care and Maintenance for Your Faux Ceramic Vases
Maintaining your newly crafted faux ceramic vases is incredibly simple, ensuring they remain beautiful accents in your home for years to come. Because the paint creates a durable, textured finish, these vases are quite resilient. To clean them, simply wipe them gently with a soft, dry or slightly damp cloth. Avoid submerging them in water or scrubbing vigorously, as this could compromise the textured paint finish. They are generally best suited for decorative purposes or with dried floral arrangements, rather than holding fresh flowers with water directly, unless you’ve sealed the interior with a waterproof sealant (which is an optional extra step not covered in this basic tutorial). With proper care, your handmade ceramic-style vases will continue to add charm and character to your living spaces.
The Joy of DIY: A Fulfilling and Affordable Project
The journey of transforming simple dollar store finds into elegant faux ceramic vases is not just about creating beautiful home decor; it’s about embracing the joy of hands-on crafting, expressing your creativity, and achieving stunning results on a budget. This project is a testament to how simple materials and a clever technique can yield sophisticated and personalized accents for your home. You’ll not only save money but also gain immense satisfaction from showcasing pieces that are uniquely yours. So, gather your supplies, find an afternoon, and unleash your inner artist. These DIY faux ceramic vases are more than just decor; they are a celebration of resourceful creativity, bringing warmth, texture, and style into your home with ease.
DIY TikTok Faux Ceramic Vases: Trendsetting Decor Made Easy
This trending DIY project has exploded in popularity on platforms like TikTok, captivating millions with its simplicity and stunning results. Social media is filled with homeowners and crafters showcasing their incredible transformations, turning ordinary glass into extraordinary textured masterpieces. The “DIY TikTok Faux Ceramic Vases” trend highlights how accessible and impactful home decor crafting can be. By following this guide, you’re not just making vases; you’re joining a global community of DIY enthusiasts who prove that beautiful style doesn’t have to come with a hefty price tag. Get inspired by the viral sensation and create your own display-worthy pieces that are sure to earn you compliments and perhaps even go viral in your own social circles!