
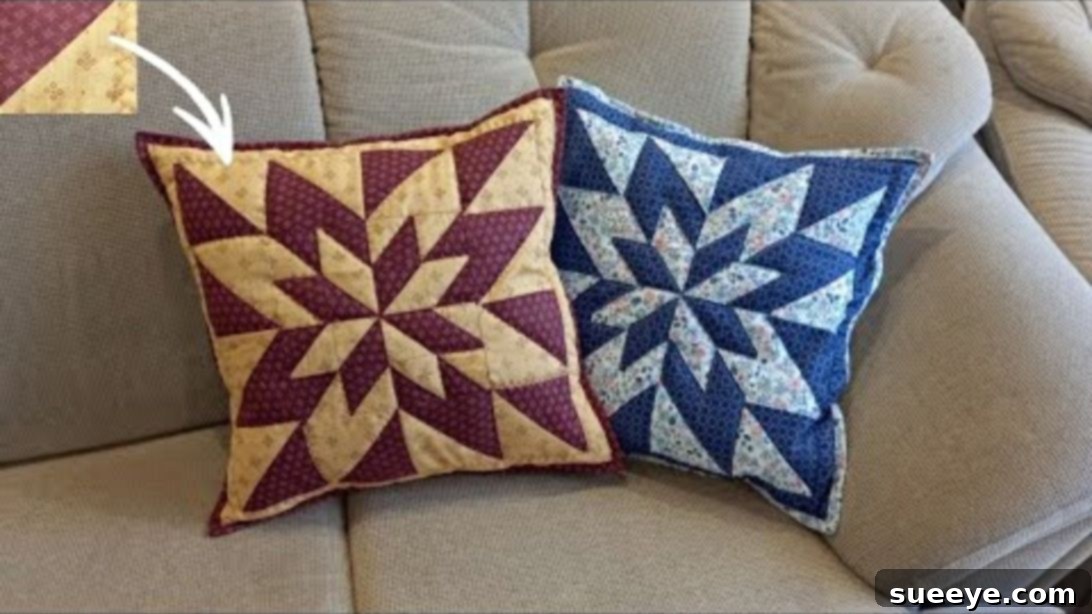
There’s a unique charm to handmade items, especially when they adorn your living space. A beautifully crafted pillowcase can instantly elevate the ambiance of any room, adding a personal touch that store-bought items simply can’t replicate. Among the myriad of sewing projects, the patchwork pillowcase stands out for its intricate beauty and the satisfying challenge it offers. This particular Star Patchwork Pillowcase design, with its captivating contrast between light and dark fabrics, is not only visually striking but also surprisingly achievable for sewers of varying skill levels.
When I first encountered this exquisite pattern, I knew it had to be my next creative endeavor. The way the vibrant, light-colored fabric dances against the deep, dark tones creates a mesmerizing visual effect that draws the eye. While it might appear complex at first glance, the truth is, this project is remarkably straightforward. With a clear step-by-step guide, you’ll be able to create your own stunning patchwork pillowcase with ease. We’ll be following the fantastic insights from the tutorial by Shveyniy ugolok s Ludmiloy Zardinovoy on YouTube, which provides comprehensive instructions. For a complete visual walkthrough, we highly recommend watching the video.
This detailed guide will walk you through every phase of constructing your very own Star Patchwork Pillowcase. From carefully selecting and preparing your fabrics to precisely cutting and stitching each piece, we’ll cover all the essential techniques. Whether you’re an experienced quilter or an enthusiastic beginner eager to expand your sewing repertoire, this project offers a rewarding experience, culminating in a beautiful, personalized piece of home decor. Get ready to transform ordinary fabric into an extraordinary work of art!
Why Sew a Star Patchwork Pillowcase?
Beyond the simple act of creation, sewing a Star Patchwork Pillowcase offers numerous benefits. Firstly, it allows for unparalleled customization. You can choose fabrics that perfectly match your existing decor, reflect your personality, or even celebrate a specific season or holiday. This level of personalization is impossible to achieve with mass-produced items. Secondly, it’s an excellent way to utilize fabric scraps from previous projects, turning them into something beautiful and functional, thereby reducing waste. Thirdly, the process itself is incredibly rewarding. There’s immense satisfaction in seeing individual fabric pieces come together to form a cohesive, intricate design. It hones your precision, patience, and attention to detail—skills that are valuable in all aspects of life. Finally, a handmade pillowcase makes a thoughtful and unique gift, showcasing the effort and love you’ve poured into its creation. It’s more than just a pillow covering; it’s a statement of style and craftsmanship.
Materials Needed for Your Star Patchwork Pillowcase Project
To embark on this exciting sewing journey, gathering all your materials beforehand is crucial. High-quality fabric and precise tools will make the entire process smoother and ensure a professional-looking finish. Here’s a detailed list of what you’ll need, along with some important considerations for each item:
- Fabric for the Main Star Design:
- 6 pieces of 6.9″ x 6.9″ squares (3 pieces dark-colored fabric, 3 pieces light-colored fabric). These will be used to create the half-square triangle (HST) blocks that form the points of your star. Choose quilting cottons for best results; they are easy to cut, sew, and press.
- 4 pieces of 5.9″ squares (2 light-colored, 2 dark-colored). These squares will be transformed into quarter-square triangle (QST) blocks, forming the central elements of your star design. Again, high-quality cotton is recommended for its stability and ease of handling.
- Fabric for the Borders:
- 2 pieces of 15.35″ x 1.97″ dark-colored strips. These strips will form the side borders of your finished patchwork panel, framing your beautiful star design.
- 2 pieces of 18.5″ x 1.97″ dark-colored strips. These longer strips will complete the top and bottom borders, adding a final touch of polish to your pillowcase front.
- General Sewing Supplies:
- Sewing Machine: A reliable machine is essential for consistent stitches.
- Matching Thread: Choose a good quality polyester or cotton thread that matches your dominant fabric color, or a neutral tone like white or grey that blends well.
- Rotary Cutter, Cutting Mat, and Acrylic Ruler: These tools are invaluable for achieving precise, straight cuts, which are paramount in patchwork.
- Fabric Scissors: For any smaller cuts or trimming threads.
- Iron and Ironing Board: Pressing seams accurately is critical for flat, professional-looking blocks.
- Pins or Fabric Clips: To hold fabric pieces together securely before sewing.
- Fabric Marker or Chalk: For drawing lines on your fabric, especially in Step 3.
- Seam Ripper: Every sewer needs one for those inevitable small corrections!
Pro Tip on Fabric Preparation: Always pre-wash and press your fabrics before cutting. This prevents potential shrinkage after your pillowcase is made and ensures that all fabrics behave consistently during sewing, avoiding distortion.
Step-by-Step Instructions for Sewing Your Star Patchwork Pillowcase
Follow these detailed instructions carefully to construct your beautiful Star Patchwork Pillowcase. Precision in cutting and sewing is key to achieving a stunning final product.
Step 1: Create the Half-Square Triangle (HST) Blocks
Begin by selecting one dark-colored 6.9″ x 6.9″ square and one light-colored 6.9″ x 6.9″ square. Place these two fabric squares right sides together, ensuring all edges are perfectly aligned. Using a sewing machine, sew all the way around the perimeter of the squares with a consistent 0.4-inch seam allowance. This precise seam allowance is vital for the block to come out to the correct size. Repeat this process for the remaining two pairs of 6.9″ squares, so you end up with three sewn pairs. Sewing around the entire square creates a stable foundation for the next step, ensuring that the fabric pieces don’t shift when cut.
Step 2: Transform Squares into Triangles
Once your three sewn square pairs from Step 1 are ready, it’s time to cut them. Lay one sewn square pair flat on your cutting mat. Using your rotary cutter and acrylic ruler, carefully cut the square diagonally from one corner to the opposite corner. Then, cut it again diagonally in the opposite direction, forming an “X” shape across the square. This will yield four individual triangles from each sewn square pair. Repeat this process for all three sewn pairs, resulting in a total of twelve triangles. After cutting, gently press the seams of each triangle open. Pressing seams open helps to reduce bulk and allows the blocks to lay flatter, which is essential for accurate patchwork piecing. Set these beautiful half-square triangles aside; they will form the dynamic points of your star.
Step 3: Craft the Quarter-Square Triangle (QST) Blocks for the Center Star
Now, let’s create the central components of your star. Take one light-colored 5.9″ square and one dark-colored 5.9″ square. Place them right sides together, aligning all edges carefully. Using a fabric marker or chalk, draw an “X” across the top fabric by drawing diagonal lines from one corner to the opposite corner. Next, draw a horizontal line and a vertical line directly through the middle of the square, creating a “cross” that intersects at the center. You will now have eight marked lines on your fabric. Secure the fabric layers with pins along each line to prevent shifting during sewing. Now, sew 0.4 inches away from both sides of each of the four marked lines (the two diagonal and two straight lines). This means you will be sewing a total of eight lines of stitching. Repeat this precise marking and sewing process for the remaining pair of 5.9″ squares. Once all sewing is complete, carefully cut along all the marked lines. This cutting will yield multiple quarter-square triangle blocks from each pair. Finally, press all seams open to reduce bulk and ensure your blocks are perfectly flat. Trim any odd excess fabrics to square up your blocks, ensuring they are uniform in size.
Step 4: Assemble the Star Block – The Core Design
This is where your star truly begins to take shape. Using the half-square triangle (HST) blocks from Step 2 and the quarter-square triangle (QST) blocks from Step 3, arrange them into the specific pattern shown in the image below. The QST blocks typically form the center and corners of the star, while the HST blocks form the points. Pay close attention to the orientation of each block to ensure the light and dark fabrics create the desired star effect. Once you are satisfied with your arrangement, begin sewing the blocks together. It’s often easiest to sew them into rows first, then sew the rows together to form the complete star block. Pinning carefully and pressing seams after each join will help maintain accuracy and keep your block flat and neat. This step requires patience and attention to detail to ensure all points align beautifully.
Step 5: Complete the Pillowcase Front and Add Borders
With your stunning star block completed, it’s time to frame it and prepare it for the pillowcase construction. Arrange the remaining larger squares or plain blocks (if you added any surrounding your star) around your central star block in the pattern indicated by the tutorial (refer to the second image). This creates the full front panel of your pillowcase. Carefully sew all these blocks together, ensuring seams are nested and pressed for a smooth finish. Once your complete front panel is assembled, measure and trim it into a precise 15.35″ square. This standardization ensures your borders will fit perfectly. Now, take the two 15.35″ x 1.97″ dark-colored strips and sew one to each side of your 15.35″ square panel. Press these seams open or towards the border. Finally, take the two 18.5″ x 1.97″ dark-colored strips and sew one to the top and one to the bottom of your bordered panel. This completes the intricate front piece of your Star Patchwork Pillowcase, ready for the backing and final assembly. The border strips not only frame the design but also add stability and a finished look to your patchwork.
Essential Sewing Tips for Patchwork Success
Achieving beautiful results in patchwork largely depends on precision and attention to detail. Here are some indispensable tips to help you succeed with your Star Patchwork Pillowcase and future quilting projects:
- Accurate Cutting: This is arguably the most critical step. Use a sharp rotary cutter, a non-slip ruler, and a self-healing mat. Double-check all measurements before making a cut. Even a tiny inaccuracy can lead to misaligned seams later on.
- Consistent Seam Allowance: The 0.4-inch seam allowance specified in this tutorial needs to be maintained rigorously. Use a seam guide on your machine or mark a guide line to ensure your stitches are always the same distance from the fabric edge.
- Pressing, Not Ironing: When joining patchwork pieces, it’s better to “press” your seams rather than “iron” them. Pressing involves lifting and placing the iron directly onto the seam, holding it for a few seconds, then lifting again. Ironing involves sliding the iron, which can distort your fabric pieces. Press seams open or to one side, as directed, to reduce bulk.
- Nesting Seams: When joining two blocks or rows, try to “nest” the seams (press one seam allowance to the left and the other to the right) where they meet. This allows the seams to interlock, creating a flatter, less bulky junction.
- Test Stitches: Before you start sewing your main project, test your stitch length and tension on a scrap piece of fabric. This ensures your machine is properly set up for strong, even seams.
- Use Quality Thread: A good quality polyester or cotton thread will be stronger and produce less lint, leading to a smoother sewing experience and a more durable finished product.
- Pin Generously: Don’t shy away from using plenty of pins, especially when joining longer seams or matching points. Pins prevent fabric layers from shifting, ensuring accuracy.
Customizing Your Star Patchwork Pillowcase
While the provided tutorial offers a specific design, feel free to unleash your creativity and personalize your Star Patchwork Pillowcase. Experiment with different color palettes – perhaps a vibrant rainbow star, or a more subtle, monochromatic design. Consider using novelty prints for the light or dark squares to add a whimsical touch. You could also vary the size of the overall pillowcase by adjusting the initial block measurements, though this would require careful recalculation of all dimensions. Adding decorative stitches to the borders or a unique backing fabric can further enhance its charm. This project is a fantastic canvas for expressing your unique style!
Conclusion: Your Handmade Star Patchwork Masterpiece
Congratulations on embarking on and completing this rewarding Star Patchwork Pillowcase project! From selecting your fabrics to meticulously piecing together each intricate block, you’ve witnessed the transformation of simple cloth into a stunning piece of textile art. The satisfaction of creating something beautiful and functional with your own hands is truly unparalleled. This pillowcase is more than just a decorative item; it’s a testament to your patience, skill, and creativity.
Whether this is your first venture into patchwork or another cherished addition to your growing collection of handmade treasures, this Star Patchwork Pillowcase is sure to brighten any room and spark conversations. We encourage you to share your finished creation with pride and inspire others to discover the joy of sewing. Don’t forget to revisit the video tutorial by Shveyniy ugolok s Ludmiloy Zardinovoy for any visual cues or to simply appreciate the artistry of the process. Happy sewing, and enjoy your beautiful, handcrafted star pillowcase!